Page is loading ...

INSTALLATION
NOTICE: Install this RO system on the cold water line only.
Completely read these instructions before starting installation.
Carefully read and follow all safety instructions in this manual
or on system.
This is the safety alert symbol. When you see this symbol on
your RO system or in this manual, look for one of the follow-
ing signal words and be alert to the potential for personal injury!
DANGER warns about hazards that will cause seri-
ous personal injury, death or major property damage if ignored.
WARNING warns about hazards that can cause seri-
ous personal injury, death or major property damage if ignored.
CAUTION warns about hazards that will or can
cause minor personal injury or property damage if ignored.
The word NOTICE indicates special instructions which are important
but not related to hazards.
The preservatives on the RO membrane can cause
severe digestive disturbance and diarrhea if ingested into the human
body. Flush the membrane housing twice and flush the membrane
itself twice before first using the RO water. See “Flushing the
System”, Page 4.
Tools Needed:
Drill
3/8” bit
1-1/8” bit (optional for hole for faucet)
Wrench
Phillips screwdriver
Pliers
Shallow pan
Bucket (for sanitizing the membrane housing)
9-Volt battery (not included). Purchase separately for
Model RO2000-TDS
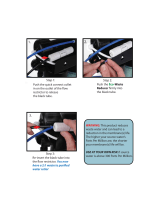
Faucet Installation. See Figure 1.
1. Turn off the cold water supply valve.
2. If necessary, drill (or punch) a 1-1/8” hole in the sink top.
3. Remove the nut and spacer from the RO faucet and feed the two
lengths of black tubing (attached to the faucet stem) down
through the hole in the sink top until the faucet is seated on the
sink top. The vertical ridge on the faucet handle should be facing
toward the user.
4. Reach below the sink top and slide the channel washer up the
faucet stem. Install the spacer tube (if needed) and tighten the
stem nut (cone shaped side up) on the channel washer. Tighten
the stem nut just enough to keep the faucet securely in place; do
not overtighten.
NOTICE: Be sure that the channel in the channel washer faces up
and that it completely bridges the hole in the sink top (that is, it
should be tightening against both sides of the hole).
NOTICE: For Model RO2000-TDS, make sure that the grey cable
coming from the faucet base is lying inside the channel washer,
and that the edges of the channel washer don’t pinch the cable.
Waste Drain Saddle Installation
1. Install the Waste Drain Saddle on the sink drain, above the trap
and below the bottom of the RO faucet.
®
2500 165th Street • Hammond, Indiana 46320
1-800-937-6664 • www.omnifilter.com
Reverse Osmosis System
INSTALLATION INSTRUCTIONS
Models RO2000 and RO2000-TDS
IN
OUT
IN
IN
OUT
OUT
IN
IN
OUT
OUT
3639 0100 ASB
©2001, Omnifilter Printed in U.S.A. OM539 (Rev. 7/20/01)
Channel Washer
Stem Nut
Cold Water Shut-off Valve
Cold Water Line
Threaded Stem
of Faucet
Existing Sink
Faucet Sprayer Hole
Vertical ridge of
faucet handle.
Figure 1
Waste
Saddle
1" Minimum
Figure 2:Waste Drain Saddle Installation

2. Assemble the Waste Drain Saddle around the drain pipe with the
port pointing toward the RO faucet. Do not install the compres-
sion nut yet. Tighten both clamp screws until they are snug.
3. Drill a 3/8” hole into the sink drain pipe, using the 3/8” port in
the Waste Drain Saddle as a guide for the drill.
4. Trim to length the 3/8” black tube coming from the RO faucet.
NOTICE: The cut tubing should slide into the port on the
Waste Drain Saddle until it seats on the bottom of the
port, without kinks (too short), and without a sag creating
a low spot (too long).
5. Slide the compression nut up the 3/8” black tube from the
faucet until the tube projects out of the nut about 1/2”. Insert
the tube end into the port on the Drain Saddle and tighten the
compression nut firmly until it captures the tube.
Cold Water Saddle Valve. See Figure 3.
1. Clamp the Cold Water Saddle Valve on the cold water supply line
with the screws supplied. Be sure the location will allow the white
supply tube to reach the RO unit (Step A).
2. Copper Pipe: Firmly tighten the screws on the Saddle Valve evenly
and firmly keeping the halves of the bracket parallel (Step B). Turn
the valve handle clockwise until it stops (Step C).
Galvanized and Plastic Pipe: Firmly tighten the screws on the
Saddle Valve evenly and firmly keeping the halves of the bracket
parallel. Turn the valve handle counterclockwise until needle
comes out of valve. Repeat with the packing nut. Now use the
port as a guide and drill a 1/8” hole in the coldwater pipe.
Reinstall the nut and needle and tighten the needle until it stops
(Step C).
NOTICE: The valve handle will be rather stiff to turn. It is driving
a needle through the wall of the supply line. Do not force it and
do not overtighten.
REVERSE OSMOSIS (RO) UNIT ASSEMBLY
AND INSTALLATION
1. Place the storage tank in a convenient location under the sink.
Make sure that the tank valve is OPEN (See Figure 4).
2. Place the RO unit in a shallow pan on the floor in front of the
sink.
3. Connect the free end of the 1/4” black tube out of the faucet to
the compression fitting coming straight out of the RO membrane
housing (see Figure 5).
For Model RO2000, Skip to Step 5.
For Model RO2000-TDS, go to Step 4, below.
4. Thread the white flow switch onto the end of the faucet (see
Figure 6).
2
A
Piercing
Needle
Cold
Water
Pipe
B
C
3631 0100
Secure the Saddle
Valve by
tightening the
nuts and bolts.
Turn handle
clockwise to
pierce the
supply line
with the
piercing needle.
Figure 3: Cold Water Saddle Valve Installation
Storage
Tank
Flow
Controller
Membrane
Housing
Pre-filter Tanks
RO Faucet
Post Filter
Product Water
(Blue)
Product Water
(White)
Product Water
(White)
Product Water
to Storage (Yellow)
Product Water
to Storage (Yellow)
Waste Water
(Black)
Waste Water
(Black)
Cold Water
Supply (White)
Cold Water
Supply (White)
Cold Water
Supply (White)
Cold Water
Saddle Valve
Waste
Saddle
3633 0100
TO1
CB1
1" Minimum
Figure 5:Tubing Layout w/o TDS Monitor
Storage
Tank
Flow
Controller
Membrane
Housing
Pre-filter Tanks
Post Filter
Product Water
(Blue)
Product Water
(White)
Product Water
(White)
Product Water
to Faucet (Yellow)
Product Water
to Storage (Yellow)
Waste Water
(Black)
Waste Water
(Black)
Cold Water
Supply (White)
Cold Water
Supply (White)
Cold Water
Supply (White)
Cold Water
Saddle Valve
Waste
Saddle
RO Faucet
Total Dissolved Solids (TDS)
Monitor
LED Shows
High TDS
Level
Flow
Switch
CB1TO1
3634 0100
1" Minimum
Yellow
Plug/Port
Figure 6:Tubing Layout w/TDS Monitor
Shut Open
3632 0100
Figure 4:Tank valve must be open for installation

5. Insert the blue product water tube into the quick connecting fit-
ting on the bottom of the RO faucet. The tube should slide into
the fitting about 5/8”. If you have a TDS monitor, slide the nut on
the bottom of the TDS monitor down onto the tube before
inserting the tube into the bottom of the white flow switch. Slide
the nut back up the tube onto the white flow switch and hand
tighten. DO NOT OVERTIGHTEN.
6. Remove the brass compression nut from the Cold Water Saddle
Valve. Slide the nut over the end of the white plastic tube coming
from the inlet to the Pre-filters. Discard the brass compression
sleeve. Slide the plastic compression sleeve provided (in the bag
with the Cold Water Saddle Valve) onto the tube and push the
brass insert provided into the end of the tube (see Figure 7).
7. Push the end of the white tube into the port on the Cold Water
Saddle Valve until it seats; tighten the compression nut firmly
with a wrench. Do not overtighten.
8. Insert the 1/4” yellow tube into the quick connecting fitting on
the storage tank valve. It should go in about 5/8”.
NOTICE: Make sure that the storage tank valve is still open.
TDS MONITOR WITH
MODEL RO2000-TDS INSTALLATION
NOTICE: Your RO unit will probably remove about 75% of your
water supply’s TDS. Your municipal water supply should be able to
test your supply water for TDS. If not, they can tell you where to get
it tested.
If you want to start using your RO water prior to having this test per-
formed, start with the Selector Switch No. 6 inside the monitor box set
to ON. This will warn you if the TDS level in your RO product water
approaches 1/2 the maximum allowable EPA level of 500 ppm TDS.
If you wish, you can also start with Switch No. 6 and, if the LED is
consistently green, change to No. 5 after a few days, then to No. 4.,
etc., until you reach a switch where the LED turns amber. Then go
back to the switch at the next highest set-point (For example, if the
LED is amber when Switch No. 3 is ON (90 ppm TDS), go back to
Switch No. 4 (120 ppm TDS), and leave the unit on that set-point.
When the LED changes to amber, it is time to service the unit.
While the system above will work, having your supply water tested
will assure you that your RO unit is in fact performing as designed.
1. Mount the TDS monitor in a convenient location on the wall by
the self-adhesive hook-and-loop pad on the back of the monitor.
Be sure that the connection ports on the electronics enclosure
face down.
2. Run the grey telephone-style cable with the yellow plug from the
RO faucet to the right-hand (yellow) port on the TDS Monitor.
3. Run the grey telephone-style cable from the white flow switch to
the left-hand port on the TDS Monitor.
4. Remove the lid from the monitor and install a 9-volt battery (pur-
chase separately). Use a pointed object (such as a bent paper clip)
to set one of the six selector switches as shown in Table 1.
FLUSHING THE SYSTEM PREFILTERS
NOTICE: Please flush the prefilters before installing the RO
membrane into its housing.
1. Make sure that both of the prefilter cartridges are installed
correctly in the blue tanks and that the tanks have been hand
tightened.
2. Hook up the system as illustrated in Figures 5 and 6 and as indi-
cated in the instructions. See the owner’s manual.
3. Connect the white tubing from the inlet side of the TO1 car-
tridge housing to the Cold Water Saddle Valve.
4. Make sure that all of the tubing connections have been made on
the system and that the RO membrane tank cap has been
installed hand tight.
5. Close the valve on the top of the storage tank and open the RO
faucet on the sink.
6. Turn on the water on the cold water supply valve and then turn
on the Cold Water Saddle Valve. Check the system for leaks.
7. Flush the system for a minimum of 30 minutes or until you
notice that no more dark carbon fines or particles are coming
out of the RO faucet.
8. After you have completed the flushing process turn off the water
on the Cold Water Saddle Valve.
9. Close the RO faucet on the sink after the water has stopped run-
ning and open the valve on the storage tank.
10. Open the RO membrane housing and drain the water out of the
housing.
11. Install the RO membrane per the instructions in the following
section.
MEMBRANE INSTALLATION
1. The RO Membrane has two O-Rings at one end. Cut the mem-
brane bag at that end (see Figure 8). Be very careful not to
damage the membrane.
3
Switch ON Amber Light ON
Is No. if TDS Above
1 30 PPM
260
390
4 120
5 150
6 250
Ta b le 1:TDS Monitor Switch settings and TDS Levels
Discard Brass
Compression
Sleeve
Use Plastic
Compression
Sleeve from
Kit
Install Brass
Insert from
Kit
Slide Compression Nut
up Tube
1
2
3
3635 0100
Figure 7: Replace compression sleeve and install insert in
tube.
3636 0100
Figure 8: Cut the membrane bag at the end of the membrane
with the 2 O-Rings. Do not damage or touch the membrane!
CAUTION: Do not touch the membrane with your hands.
Always use the bag to lift the membrane.

2. Peel back the bag from the cut end and use it as a holder to
insert the RO Membrane, O-Rings first, into the Membrane
Housing (see Figure 9).
3. Push the RO membrane into the housing until it seats. The end of
the membrane should be about 3/8” into the housing.
4. Check the O-Ring on the membrane housing shoulder to make
sure it is seated in place.
5. Screw the membrane housing cap back onto the membrane
housing. Firmly hand tighten the cap on the housing, but do not
overtighten it and do not use a wrench.
Flushing the System
1. Open the cold water supply valve and the Cold Water Saddle
Valve, allowing the water to enter your system.
2. Open the RO faucet and let it run for one hour.
3. Close the RO faucet and open the storage tank valve. Check the
system for leaks.
4. Put the RO unit under the sink.
5. Let the RO unit charge for at least 6 hours. Periodically check for
leaks. Then open the RO faucet and let the water run until the air
and carbon fines are out of the system. Close the faucet.
6. Let the system charge for approximately another 6 hours.
7. Open the RO faucet and let the water run until the water comes
out at a slow drip or stops. Close the faucet and allow the system
to fill.
Your system is now ready for use.
TDS MONITOR OPERATION
Once the drinking water system installation is complete, run water
from the RO faucet and watch the LED in the base of the faucet.
•A green light will appear if the product water TDS is below the
set point. No action is required.
• An amber light will appear if the product water TDS is above the
set point. Proceed with Steps 1 and 2 below.
1. Run a few cups of water through the faucet and see if the LED
changes to green.
2. If the color of the LED does not change, run the water until the
storage tank is empty.
Allow the tank to refill and recheck it. If the LED is still amber, the
drinking water system may require service.
• If the LED is blank, replace the battery.
PRE-FILTER CARTRIDGE CHANGE
(TO1 AND CB1)
NOTICE: Do not disconnect any tubing for this operation!
1. Turn off the water supply either at the Cold Water Saddle Valve
or the cold water supply valve.
2. Close the valve on the storage tank.
3. Open the RO faucet until the water stops running; close the
faucet.
4. Pull the RO unit out from under the sink (don’t bring the storage
tank out) and put it in a shallow pan on the floor in front of the
sink.
NOTICE: Do not disconnect any tubing!
5. Using the plastic tank wrench supplied, remove Pre-Filter Tanks
TO1 and CB1. Be careful – the tanks will be full of water.
6. Remove the used cartridges and dispose of them.
7. Check the tank O-Rings to be sure that they are seated properly.
Apply vegetable oil to the O-Rings.
8. Rinse the tanks with clear water (no soap) and wipe them out
with a clean rag or paper towel.
9. Put the replacement filter cartridges into the tanks and reinstall
the tanks.
NOTICE: The carbon filter cartridge (dark grey) goes onto the
tank head marked TO1 (toward the prefilter inlet). The CB filter
cartridge (white) goes onto the tank head marked CB1 (toward
the unit outlet).
10. Screw the filter tanks onto the tank heads firmly hand tight.
NOTICE: Do not use the wrench to tighten the filter tanks – you
could crack the tanks or the tank heads. Tighten them hand-
tight only.
POST FILTER REMOVAL AND
INSTALLATION
1. Note that the large end of the R200 Post Filter is on the same
end of the unit as the membrane housing cap. The new Post
Filter must be installed with the same orientation.
2. Disconnect the tubing from the old Post Filter (see Figures 5 and
6) and pull it out of the brackets holding it to the RO membrane
housing.
3. Insert the yellow tubing into the input end of the new Post Filter.
Push it in firmly until it stops (about 5/8” of tubing should go
into the connector).
NOTICE: Before reconnecting the filter note the flow direction
arrow on the filter. Be sure it is installed correctly.
4. Insert the blue tubing into the output end of the new Post Filter.
Push it in firmly until it stops (about 5/8” of tubing should go
into the connector).
5. Snap the new Post Filter into its brackets on the RO membrane
housing (inlet end toward the Membrane Housing Cap).
6. Open the RO faucet, the valve on the storage tank, and the
water supply valve. Flush the system until the water stops run-
ning or slows down to a slow drip. This will flush the ‘carbon
fines’ (very small particles of carbon that are present in a new
cartridge) out of the system.
7. Turn off the faucet and check for leaks. Carefully tighten any-
thing that is leaking. Do not overtighten fittings.
8. Put the RO unit back under the sink and let it charge for at least
6 hours. After 6 hours, check for leaks. Open the RO faucet and
let the water run until the air and carbon fines are out of the
system. Close the faucet.
9. Let the system charge for approximately another 6 hours.
Your system is now ready for use.
4
3637 0100
Do not touch the membrane
with your bare hands!
Figure 9: Peel the bag back from the membrane before
inserting in housing

1- 2 YEAR RO MEMBRANE CHANGE/
CARTRIDGE CHANGE/SYSTEM DISINFECTION
NOTICE: The quality of the supply water feeding the RO system will
directly affect RO membrane life and Pre-filter Cartridge life.
A. Remove Pre-filter Cartridges and RO Membrane.
1. Follow Steps 1 through 6, under “Pre-filter Cartridge
Change”, Page 4.
2. Unscrew the RO membrane housing cap and pull the RO
membrane out with pliers. Be sure you don’t touch the mem-
brane with your bare hands. Be careful – the membrane
housing is full of water. Leave the post filter in place for now.
3. Clean the Pre-filter tanks and O-Rings in warm (no soap)
water. Rinse them thoroughly.
4. Re-lubricate the O-Rings with vegetable oil and seat them in
the tanks.
B. Fill RO Membrane Housing and Pre-filter Tanks.
1. Run water into pre-filter Tank 1 until it is half-full. Add 1/2
teaspoon of standard chlorine bleach (unscented). Depress
blue air-bleed buttons on top of tanks to allow air to escape
and tanks to fill.
2. Re-install (without cartridges) both pre-filter tanks. Firmly
hand-tighten them.
3. Screw the RO membrane housing cap back on (without
installing the membrane) to the RO membrane housing.
Make sure you still have the RO membrane outside of the
housing before going on to the next step.
C. Soak and Flush the System.
NOTICE: The RO membrane is chlorine sensitive and will deteri-
orate if exposed to chlorine. Make sure that all chlorine has been
flushed out of the membrane housing and pre-filter tanks before
reinstalling the RO membrane.
1. Turn the cold water supply on.
2. Open the storage tank valve to disinfect the tank.
3. Bleed the air from the system by opening the RO faucet until
water comes out of it. Immediately shut off the RO faucet.
4. Let the system stand for 10 minutes.
5. Open the RO faucet and flush the system for 10 minutes.
6. Turn off the water supply and open the RO faucet until the
system pressure has been released. Close the RO faucet.
D. Replace the Filters.
1. Remove both Pre-filter tanks and empty the water out of
them.
2. Follow Steps 7 through 9 under “Pre-Filter Cartridge Change
(TO1 and CB1)”, Page 4.
3. Follow Steps 1 through 4 under “Post Filter Removal and
Installation”, Page 4.
4. Carefully pull the RO membrane housing out of its
brackets.
5. Place a bucket under the membrane housing. Unscrew the
membrane housing cap and dump all the water into the
bucket.
E. Re-install the RO Membrane.
1. Follow Steps 1 through 5 under “RO Membrane Installation”,
Pages 3 and 4. Before replacing the membrane housing Cap,
re-lubricate the O-Ring with vegetable oil.
2. Unscrew the compression nut holding the black tube onto
the membrane housing.
3. Gently remove the tube from the membrane housing port;
keep the nut on the tube.
4. Remove and discard the flow restrictor from the end of the
black tube (see Figure 10).
5. Install the new flow restrictor in the end of the tubing as
shown in Figure 10. Make sure that the collar on the flow
restrictor seats against the end of the tube.
NOTICE: Do not cut the flow restrictor.
6. Insert the black tube approximately 3/8” into the port on the
membrane housing and screw on the compression nut until it
is firmly hand tight.
7. Snap the new Post filter into its brackets on the RO mem-
brane housing (large end toward the membrane housing
cap).
F. Flush the System Before Using.
1. Put the RO unit back under the sink. Open the faucet and the
saddle valve. Flush the system to waste for one hour. Fill and
dump the storage tank to waste twice.
2. Charge the system for at least 6 hours. Periodically check for
leaks.
3. Open the RO faucet and let the water run until the air and
carbon fines are out of the system. Close the faucet.
4. Charge the system for a minimum of another 6 hours.
Your system is now ready for use.
NOTICE: For units equipped with Total Dissolved Solids (TDS) moni-
tor: The TDS monitor is designed to detect the presence of TDS
only. Do not rely on the TDS monitor to warn of the presence of
bacterial or other organic substances in the system.
The TDS monitor checks the conductivity of filtered drinking water
each time the RO faucet is used. It displays a green light on the LED
in the faucet if the TDS level of the water is below the set point,
and an amber light if the TDS level is above the set point.
This RO unit must be used only on the cold water line.
RO units work best at a neutral pH (7.0).
Pressure limits: Minimum 40 psi, Maximum 100 psi.
Temperature limits: Minimum 40° F (4° C), Maximum 100° F (38° C).
Sanitize the system at every membrane change (when replacing all
filter cartridges). This should be done every 2 years or whenever
daily water production is greatly reduced. The condition of the sup-
ply water to your unit will directly affect membrane life.
Most newer sinks have a 1-3/8” or 1-1/2” hole through the sink
top. If your sink does not have such a hole, or if it is already in use,
the installer must drill (or punch) a 1-1/8” hole in the sink top
before installing the RO unit.
5
3638 0100
Flow
Restrictor
Waste Water
Tube
Figure 10: Flow Restrictor
IN
OUT
From Membrane
(Product Water)
From Pre-Filter
(Supply Water)
To Tee/Post Filter
(Product Water)
To Membrane
(Supply Water)
3640 0100
Figure 11: Flow Controller Tubing Connections. Please See
Exploded View, Page 6.

6
I
N
IN
I
N
I
N
O
UT
OUT
ININ
ININ
O
UT
OUT
IN
OUT
3639 0100
1
2
4
7
6
9
10
8
12
11
13
14
15
17
16
18
3
19
20
5
Key No. Part Description Qty. RO2000-R RO2000-TDS
1 Flow Controller (4-way shutoff valve) 1 SOV1 SOV1
2 Post Filter Bracket 2 15745 15745
3 Post Filter 1 R200 R200
4 Check Valve 1 CV1 CV1
5 Flow Restrictor 1 † †
6 Membrane Housing Bracket 2 15740 15740
7Waste Saddle Kit 1 DVK1 DVK1
8Pre-Filter Housing 2
9Pre-Filter Housing O-Ring* 1 K4 K4
10 Cartridge CB1 1 CB1 CB1
11 Cold Water Saddle Valve Kit 1 SVK1 SVK1
12 Cartridge TO1 (Carbon) 1 TO1SS TO1SS
13 Wall Bracket 1 12355 12355
14 RO Membrane (includes Key No. 5) 1 OM1 OM1
15 Membrane Housing O-Ring 1 13500
16 Filter Wrench 1 OW1 OW1
17 Storage Tank with Base 1 15755 15755
18 RO Membrane Housing (includes Key No. 15) 1 MHO1 MHO1
19 RO Faucet 1 † †
20 TDS Monitor 1 – †
REPAIR PARTS LIST
EXPLODED VIEW
† Not available separately.
* Comes prepackaged. Two O-Rings per package.
System tested and certified by NSF
International against ANSI/NSF Standard 42 for
the reduction of Taste and Odor, Chlorine
Reduction, Class I and ANSI/NSF Standard 58
for the reduction of Fluoride, Cysts, Lead, TDS,
Nitrate and Nitrite.
For further operating, installation, or
maintenance assistance:
Call Omnifilter
®
Customer Service
at 800-937-6664
The Chlorine claim was tested off of the R200 post filter.
NOTICES
Daily production rate is 13 gpd.
The reverse osmosis system contains a replaceable treatment
component, critical for the effective reduction of total dis-
solved solids, and that product water should be tested peri-
odically to verify that the system is performing properly.
This system is acceptable for treatment of influent concen-
tration of no more than 27 mg/L nitrate and 3 mg/L nitrite
in combination measures as N and is certified for
nitrate/nitrite reduction only for water supplies with a pres-
sure of 40 psig or greater, but not to exceed 100 psig.
Do not use with water that is microbiologically unsafe or of
unknown quality without adequate disinfection before or
after the system. Systems certified for cyst reduction may be
used on disinfected water that may contain filterable cysts.
This system and installation must comply with all state and
local laws and regulations.
For proper operation, this system requires that 52 gallons
per day be routed to drain to produce 13 gallons of product
water per day.
/