Carel heaterSteam User manual

Type
User manual
High Efficiency Solutions
heaterSteam - UR
NO POWER
& SIGNAL
CABLES
TOGETHER
READ CAREFULLY IN THE TEXT!
Electric resistance humidifi er
User manual
3
ENG
“heaterSteam +0300080EN - rel. 1.0 - 27.04.2016
IMPORTANT WARNINGS:
This product is compliant with the European directives and other standards
specifi ed on the EC declaration of conformity. The customer is responsible
for suitably verifying any use of the product that implies application of
standards relating to any special environments and/or processes (e.g.
heavy industry, medical environments, maritime environments, railway
environments, etc.) other than those specifi ed by Carel.
The humidifi ers manufactured by CAREL are advanced products, whose
operation is specifi ed in the technical documentation supplied with the product
that can be downloaded, even prior to purchase, from the website www.carel.
com. Every product made by CAREL Industried, in relation to its advanced level of
technology, requires a qualifi cation/ confi guration / setup phse in order to best
fulfi l your specifi c application. The lack of such phase of study, as indicated in the
manual, can cause the fi nal product to malfunction, of which CAREL cannot be
held responsible. The client (builder, developer or installer of the fi nal equipment)
assumes all responsibility and risk relating to the confi guration of the product in
order to achieve the expected results in relation to the specifi c fi nal installation
and/or equipping. In this case, subject to specifi c agreements, CAREL acts as a
consultant for the success of the installation / start-up / use of the machine, but
in no case does it accept liability for proper operation of the humidifi er and of
the fi nal plant, should the warnings and recommendations in this manual or in
any other technical documentation of the product not be followed. In particular,
in addition to the obligation to observe the above mentioned warnings and
recommendations for proper use of the product, we recommend paying
attention to the following warnings:
DANGER ELECTRIC SHOCK: The humidifi er includes live electrical parts.
Disconnect the power supply before accessing internal parts, in case of
maintenance and during installation.
DANGER WATER LEAKS: The humidifi er automatically and constantly sucks
in/drains quantities of water. Malfunctions in the connections or humidifi er
may cause leaks.
DANGER OF BURNS: The humidifi er contains hot parts and delivers steam
at 100 °C / 212 °F.
The product is designed exclusively to humidify rooms either directly or
through distribution systems (ducts).
Installation, operation and maintenance must be performed by qualifi ed
personnel, aware of the necessary precautions and able to perform the
required operations correctly.
All operations on the product must be carried out according to the
instructions given in this manual and on the labels applied to the
product. Any uses or modifi cations unauthorized by the manufacturer are
considered improper. CAREL denies all responsibility for such unauthorized
uses.
Do not attempt to open the humidifi er in any way other than the ones
described in the manual.
Follow the regulations in force in the place where the humidifi er is installed.
Keep the humidifi er out of the reach of children and pets.
Do not install and use the product near objects that can be damaged by
contact with water (or condensate). CAREL denies all responsibility for direct
or indirect damage as a result of loss of water from the humidifi er.
Do not use corrosive chemicals, aggressive solvents or detergents to clean
the internal or external parts of the humidifi er, unless specifi cally indicated
in the users manual.
CAREL adopts a continuous development policy. Therefore, CAREL reserves the
right to carry out modifi cations and improvements to any product described
in this document without prior notice. The technical data in the manual
can undergo modifi cations without forewarning. The liability of CAREL in
relation to its own product is governed by CAREL general contract conditions
published on the website www.carel.com and/or by specifi c agreements with
clients; in particular, within the limits set by the applicable law, in no way will
CAREL, its employees or its branch offi ces/affi liates be responsible for any lack
of earnings or sales, loss of data and information, cost of replacement goods
or services, damage to objects or persons, work interruptions, or any direct,
indirect, accidental, patrimonial, coverage, punitive, special or consequential
damage in any way caused, be they contractual, out-of-contract, or due to
negligence or other responsibility originating from the installation, use or
inability of use of the product, even if CAREL or its branch offi ces/affi liates
have been warned of the possible damage.
ATTENTION
NO POWER
& SIGNAL
CABLES
TOGETHER
READ CAREFULLY IN THE TEXT!
Separate the probe cables and the digital input cables as much as possible
from the inductive load and power cables to prevent possible electro-
magnetic interference.
Never introduce power cables and signal cables (including those of electric
control board) into the same cable troughs.
The installation of the product must absolutely include the grounding
connection, using the special yellow-green terminal on the terminal block.
Do not use the neutral as grounding connection.
DISPOSAL
The humidifi er consists of metal parts and plastic parts. With reference to the
European Parliament and Council Directive 2002/96/EC issued on 27 January
2003 and the related national implementation legislation, please note that:
1. WEEE cannot be disposed of as municipal waste, said waste must be
collected separately;
2. the public or private waste collection systems defi ned by local legislation
must be used. Moreover, the equipment can be returned to the distributor
at the end of its working life when buying new equipment;
3. the equipment may contain hazardous substances: the improper use or
incorrect disposal of such may have negative eff ects on human health
and on the environment;
4. the symbol (crossed-out wheeley bin) shown on the product or on the
packaging and on the instruction sheet indicates that the equipment has
been introduced onto the market after 13 August 2005 and that it must
be disposed of separately;
5. in the event of illegal disposal of electrical and electronic waste, the
penalties are specifi ed by local waste disposal legislation.
Warranty for materials: 2 years (from the manufacture date, excluding
consumables).
Certifi cation: the quality and safety of CAREL products are guaranteed by
CARELs ISO 9001 certifi ed design and production system, as well as
marking.
5
ENG
“heaterSteam +0300080EN - rel. 1.0 - 27.04.2016
Content
1. INTRODUCTION AND INSTALLATION 7
1.1 HeaterSteam (UR*)......................................................................................................7
1.2 Dimensions and weights ........................................................................................7
1.3 When opening the packaging ............................................................................7
1.4 Positioning .......................................................................................................................7
1.5 Wall mounting ..............................................................................................................7
1.6 Removing the front panel......................................................................................8
1.7 Mounting the front panel ......................................................................................8
1.8 Material supplied with the appliance .............................................................9
1.9 Technical data plate ...................................................................................................9
1.10 Water circuit ....................................................................................................................9
1.11 Layout of models UR002 – UR0013 ..............................................................10
1.12 Layout of models UR020 – UR0080 ..............................................................11
2. HYDRAULIC CONNECTIONS 12
2.1 Supply water ..............................................................................................................14
2.2 Drain water ...................................................................................................................14
3. STEAM DISTRIBUTION 15
3.1 CAREL steam nozzles (SDPOEM00**) ..........................................................15
3.2 CAREL linear distributors for air ducts or AHUs (DP***DR0) .........15
3.3 CAREL blowers for room installation (VSDU0A*, VRDXL*) .............16
3.4 Steam transport pipe .............................................................................................16
3.5 Condensate drain pipe .........................................................................................16
3.6 Outlet pressure limits .............................................................................................17
4. ELECTRICAL CONNECTIONS 18
4.1 Wiring provisions ......................................................................................................18
4.2 Power cable connection ......................................................................................18
4.3 Control board .............................................................................................................19
4.4 Operating and control principles ..................................................................20
4.5 Steam production control signals ...............................................................21
4.6 Control with humidity probes ..........................................................................22
4.7 Control with temperature probes..................................................................23
4.8 Alarm contact .............................................................................................................24
4.9 Unit status contact / maintenance pre-alert ..........................................25
4.10 Production request analogue output .........................................................25
4.11 Final checks ..................................................................................................................25
5. PREPARING FOR OPERATION 25
5.1 Preliminary checks ...................................................................................................25
6. STARTUP AND USER INTERFACE 26
6.1 Start-up ...........................................................................................................................26
6.2 Activation sequence ............................................................................................26
6.3 Shutdown .....................................................................................................................26
6.4 Graphic terminal .......................................................................................................26
6.5 Keypad ............................................................................................................................27
6.6 Display .............................................................................................................................27
6.7 Display graphic area 2 – Probes/Request ..................................................27
6.8 Display graphic area 3 - Notifi cation center ............................................27
6.9 Display graphic area 4 - Unit status ..............................................................28
6.10 Display graphic area 5 - Quick access ..........................................................28
6.11 Display graphic area 6 - Unit status icons .................................................28
6.12 Main menu ...................................................................................................................29
6.13 Complete programming menu tree ............................................................30
6.14 Alarms..............................................................................................................................32
7. USER MENU AND UNIT CONFIGURATION 33
7.1 Main menu ...................................................................................................................33
7.2 Menu E. Settings - a. Control ..........................................................................33
7.3 Menu E. Settings - b. Functions ......................................................................35
7.4 Menu E. Settings - c. Confi guration ............................................................37
7.5 E.Settings – d.Master/Slave ...............................................................................41
7.6 E.Settings – e.Backup ............................................................................................41
7.7 E.Settings – f.Manual mode ...............................................................................41
7.8 E.Settings – g.Initialisation .................................................................................42
7.9 E. Settings - h. Supervision ................................................................................43
7.10 E. Settings - i. Logout ...........................................................................................43
8. MASTER/SLAVE SYSTEM 44
8.1 Description of the Master/Slave system ....................................................44
8.2 Network switch for Master/Slave connection ........................................44
8.3 Type of Master/Slave system installation ..................................................44
8.4 Master/Slave system confi guration ..............................................................45
9. WEB SERVER 47
9.1 Integrated web server ...........................................................................................47
9.2 Connecting to the integrated web server ................................................47
9.3 Description of the web server function .....................................................47
10. HARDWARE BACKUP 48
11. SUPERVISOR NETWORK 49
11.1 Supervisor network protocols and confi guration ...............................49
11.2 Table of supervisor variables ............................................................................49
12. WIRELESS PROBES, INSTALLATION AND CONFIGU
RATION 57
12.1 Type of installation and wireless probe electrical connections 57
12.2 Wireless probe installation .................................................................................57
13. ALARM TABLE 58
14. SPARE PAR TS AND MAINTENANCE 60
14.1 Maintenance ...............................................................................................................63
14.2 Maintenance operations .....................................................................................63
14.3 Maintenance frequency .......................................................................................63
14.4 Maintenance of the cylinder-boiler ..............................................................64
14.5 Feed/drain tempering solenoid valve .........................................................65
14.6 Fill tank ............................................................................................................................66
14.7 Replacing the parts .................................................................................................66
14.8 Mechanical discharge of water in the cylinder .....................................67
15. WIRING DIAGRAMS 68
15.1 Wiring diagram UR002-UR004 single-phase 208 V / 230 V .................
- version U ....................................................................................................................68
15.2 Wiring diagram UR002-UR004 single-phase 230 V - version 0 ....69
15.3 Wiring diagram UR006 single-phase 208 V / 230 V - version U ...70
15.4 Wiring diagram UR006 single-phase 230 V - version 0 .....................71
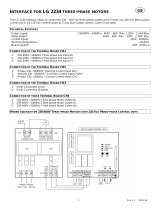
15.5 Wiring diagram UR006-UR010-UR013 three-phase (208-230-400-
460-575 V) - version U ...........................................................................................72
15.6 Wiring diagram UR006-UR010-UR013 three-phase ...............................
(230-400-460 V) - version 0 ................................................................................73
15.7 Wiring diagram UR020 three-phase (208-230-400-460-575 V) - ....
version U
Wiring diagram UR027 three-phase (400-460-575 V) - ........................
version U .......................................................................................................................74
15.8 Wiring diagram UR020-UR027 three-phase (230-400-460 V) - ........
version 0 .......................................................................................................................75
15.9 Wiring diagram UR027 three-phase (230 V) - version U ..................76
15.10 Wiring diagram UR040 three-phase (400-460-575 V) - version U
Wiring diagram UR053 three-phase (575 V) - version U ..................77
15.11 Wiring diagram UR040-UR053 three-phase (400-460 V) - ..................
version 0 .........................................................................................................................78
15.12 Wiring diagram UR053 three-phase (400-460 V) - version U ........79
15.13 Wiring diagram UR060 three-phase (575 V) - version U ..................80
15.14 Wiring diagram UR060 (400-460 V) - version U .....................................81
15.15 Wiring diagram UR060-UR080 three-phase (400-460 V) - ..................
version 0 .......................................................................................................................82
15.16 Wiring diagram UR080 three-phase (400-460-575 V) - ........................
version U ........................................................................................................................83
16. GENERAL FEATURES AND MODELS 84
16.1 heaterSteam models and electrical features ..........................................84
16.2 Electrical connection of boiler heaters .......................................................85
16.3 Technical features ....................................................................................................86
16.4 Steam transport pipe models...........................................................................86
16.5 Steam nozzle models.............................................................................................86
16.6 Linear nozzle models and typical installations ......................................87
7
ENG
“heaterSteam +0300080EN - rel. 1.0 - 27.04.2016
1. INTRODUCTION AND INSTALLATION
1.1 HeaterSteam (UR*)
Range of isothermal electric heater humidifi ers for steam production
control and distribution, fi tted with graphic display.
Available models (identifi ed by means of the code on the label, packaging
and on the technical data plate):
UR002, UR004, UR006, UR010, UR013 with steam production capacity
up to 13 kg/h (28,66 lb/h), water connections under the base of the
humidifi er;
UR020, UR027, UR040, UR053, UR060, UR080 with steam production
capacity from 20 to 80 kg/h (from 44.09 to 176.37 lb/h), water
connections next to the humidifi er.
1.2 Dimensions and weights
Models UR002..UR013 Models UR020...UR080
B
A
C
B
A
C
Fig. 1.a
UR002…13 UR020…40 UR053…80
Size
mm (in)
A 365 (14.37) 690 (27.16) 876 (34.48)
B 275 (10.82) 445 (17.51) 445 (17.51)
C 712 (20.03) 888 (34.96) 888 (34.96)
Tab. 1.a
UR002…13 UR020…40 UR053…80
Weights
kg (lb)
packaged 31(68.3) 73(160.9) 98(216.0)
empty 26(57.3) 63(138.8) 87(191.8)
installed* 35(77.1) 97(213.8) 155(341.7)
Tab. 1.b
* in operating conditions, fi lled with water.
1.3 When opening the packaging
check the integrity of the humidifi er upon delivery and notify to the
carrier immediately, in writing, any damage that can be attributed to
improper or careless transport;
move the humidifi er to the installation site before removing it from the
packaging, grasping the neck from beneath;
open the cardboard box, remove the protective material and remove
the humidifi er, keeping it upright at all times.
1.4 Positioning
the unit is designed for wall mounting, suitable to support the weight
under operating conditions (see par. Wall mounting”). The models
UR020*... UR080 * can be fl oor installed;
to ensure proper distribution of steam, place the humidifi er next to the
steam distribution point;
position the humidifi er vertically, use a spirit level to ensure the base is
perpendicular; observe the minimum clearances (see Fig. 1.b) to allow
space for maintenance.
Caution: during operation, the external metal panels heat up, and
the back leaning against the wall can reach temperatures above 60 °C
(140 °F).
Models UR002..UR013 Models UR020...UR080
≥200
(7.9”)
≥200 (7.9”)
≥200
(7.9”)
≥400 (15.7”)
≥700
(27.6”)
<0,5$
≥500
(19.7”)
≥200 (7.9”)
≥300
(11.8”)
≥700
(27.6”)
Fig. 1.b
1.5 Wall mounting
Mount the humidifi er on the wall using the support bracket pre-attached
to the humidifi er, using the screws kit supplied (for mounting dimensions
see draws below).
Instructions for fastening:
1. unscrew the wall bracket from the one attached to the humidifi er;
2. secure the bracket to the wall (see Fig. 1.c), checking with a spirit level
the horizontal position; if the unit is mounted on a masonry wall, you
can use the plastic anchor plugs (Ø 8 mm, Ø 0.31in) and the screws
(Ø 5 mm x L= 50 mm, Ø 0.19 in x L= 1.97 in) supplied;
3. hang the humidifi er on the bracket using the profi le on the upper
edge of the unit’s rear (Fig. 1.d).
4. lock the humidifi er to the wall by means of the hole / holes found /
on the lower part of the rear panel of the machine (Fig. 1.d).
61
(2.39)
201
(7.92)
235,5
(9.27)
285,5
(11.24)
93
(3.67)
230
(9.06)
416
(16.38)
230
(9.06)
30
(1.18)
731
(28.80)
127
(4.99)
169
(6.67)
32
(1.25)
137
(5.39)
445
(17.52)
122,5
(4.82)
122,5
(4.82)
130
(5.13)
728
(28.66)
30
(1.18)
400
(15.75)
145
(5.71)
145
(5.71)
22,5
(0.89)
22,5
(0.89)
588 (23.15)
365 (14.37)
75 (2.96)
9 (0.36)
41 (1.59)
162
(6.38)
106
(4.17)
49 (1.91) 49 (1.91)
67
(2.64)
67
(2.64)
67
(2.64)
67
(2.64)
UR053...080
UR020...040
UR002...013
Fig. 1.c
Fig. 1.d
8
ENG
“heaterSteam +0300080EN - rel. 1.0 - 27.04.2016
1.6 Removing the front panel
Models UR002…UR013:
1
2
3
4
5
Fig. 1.e
1. turn the oval plate with the CAREL logo until the ground screw head
can be seen;
2. loosen the screw with a screwdriver;
3. grab the sides of the panel, lift it about 20 mm (0.79 in), and detach it
from the protruding edges of the humidifi er;
4. remove the panel by pulling it forward;
5. remove the protective fi lm.
Models UR020...UR080:
1
3
2
4
5
Fig. 1.f
1. remove the screws on the top of the humidifi er using a screwdriver;
2. grab the panel by lifting it from the top about 20 mm (0.79 in);
3. remove the panel by pulling it forward;
4. remove the protective fi lm (on all external surfaces of the humidifi er).
1.7 Mounting the front panel
Models UR002…UR013:
1
3
4
2
Fig. 1.g
1. turn the red oval plate with the CAREL logo so that the fastening hole
below is visible;
2. slide the panel on the frame (keeping it slightly raised and tilted) until
it stops on the rear edges;
3. fasten the ground screw using a screwdriver, ensuring its tightening;
4. turn the red oval plate with the CAREL logo so that the fastening hole
below is no longer visible;
Models UR020...UR080:
1
2
Fig. 1.h
1. slide the panel on the base, keeping it slightly tilted;
2. put it in vertical position and tighten the screws on the top cover
with a screwdriver.
Caution: in models UR020...UR080 open the electrical
compartment of the humidifi er using the slotted lock.
Fig. 1.i
9
ENG
“heaterSteam +0300080EN - rel. 1.0 - 27.04.2016
1.8 Material supplied with the appliance
Once the packaging opened and the front panel removed, check
if there is a:
screws and anchor
kit for wall mounting
only for models UR020...UR080: Code
FWHDCV0003 non-return valve with
connection tube
1.9 Technical data plate
Humidifi ers can be identifi ed by means of the technical plate placed on
the partition wall of the electrical cabinet.
MOD.
A
Vac
Hz
PH
kW
kg/h
IP
Date
Part No.
IP
Date
Part No.
Serial No.
Rev.
MADE IN ....
CAREL INDUSTRIES
Via dell'Industria, 11, 35020 Brugine
(Padova) Italy
Fig. 1.j
Note: tampering, removal, lack of the identifi cation plate or other
does not allow the safe identifi cation of the product and will
make any installation or maintenance operation to be performed diffi cult.
1.10 Water circuit
Models UR002 – UR013
31 2
5
4
7
8
6
9
10
16
17
12
11
19
18
15
14
Fig. 1.k
Models UR020 – UR080
16
1
5
7
12
19
17
14
13
9
18
6
Fig. 1.l
1 Anti-foaming sensor 11 Drain tube tempering (*)
2 Over ll diaphragm 12 Drain valve tempering (*)
3 Fill diaphragm 13 Inlet valve
4 Feed tank 14 Drain pump
5
Electrodes for conductivity meas-
urement
15 Anti-adhesive fi lm (**)
6 Equaliser pipe 16 Overtemperature sensors (PTC)
7 Feed pipe 17 Heaters
8 Fill-up pipe 18
Water temperature sensor (NTC)
(**)
9 Level sensor 19 Thermal insulation
10 Over ow pipe/drain
(*) for the units equipped with it
(**) for full option modules only
10
!
ENG
“heaterSteam +0300080EN - rel. 1.0 - 27.04.2016
1.11 Layout of models UR002 – UR0013
Fig. 1.m
Key:
1 Solid state relay (SSR) 20
Level sensor
A Green LED: normal operation
B Yellow LED: fi ll
C Red LED: minimum level
2 Motor protector (THP)
3 Fuse carrier (F1, F2)
4 Contactor
5 Transformer
6 Electronic controller 21 Fastening strap
7 Power cable terminal block 22 Heater
8 Pump fuse (F3) 23 Drain pump
9 RF interference suppressor (where envisaged) 24 Fill valve
10 Power cable gland 25 Drain tempering valve (where envisaged)
11 Fan control board 26 Feedwater tank
12 Auxiliary cable glands 27 SSR thermal protector (Klixon)
13 Cooling fan 28 X1-X2 (prepared for ventilated steam distributors connections)
14 ON/OFF switch 29 X3-X4 (prepared for external drain tempering valve) - where envisaged
15 Drain 30 Drain pump relay
16 Display
17 NTC probe socket
18 Boiler
19 Warning label
11
1
10
11
ENG
“heaterSteam +0300080EN - rel. 1.0 - 27.04.2016
1.12 Layout of models UR020 – UR0080
Fig. 1.n
Key:
1 Display 20 Drain tempering valve (where envisaged)
2 SSR thermal protector (Klixon) 21 Drain tempering inlet (where envisaged)
3 Cooling fan 22 Level sensor
4 Solid state relay (SSR) 23 Boiler
5 Heater fuses (where envisaged) 24 Drain pipe
6 Contactor 25 Heater
7 Motor protector (THP) 26 Boiler thermal protector (Klixon)
8 NTC probe socket 27 Foam detection sensor
9 Transformer 28 Water fi ll
10 Control board 29 Drain pump relay
11 Fuse carrier (F1, F2, F3) 30 X3-X4 (prepared for external drain tempering valve) - where envisaged
12 Power cable terminal block
13 RF interference suppressor (where envisaged)
14 Power cable inlet
15 ON/OFF switch
16 Drain pump
17 Drain collection tank ( 19 mm)
18 Drain
19 Fill valve
12
ENG
“heaterSteam +0300080EN - rel. 1.0 - 27.04.2016
2. HYDRAULIC CONNECTIONS
Important: before making the water connections disconnect the
humidifi er from the power supply.
Models UR002..UR013 Models UR020...UR080
1
1
3
3
4
4 7
5
6
6
2
2
4
5
Fig. 2.a
WATER CONNECTIONS:
1. install a manual valve upstream (to cut off the water supply);
2. connect the humidifi er to the water supply. For UR002...UR013 models,
use a fl exible pipe 3/4’’G connection. For UR020...UR080 models
connect the fl exible pipe with the non-return valve (supplied - code
FWHDCV0003), to avoid the water inside the humidifi er making
contact with the one in the mains;
3. install a mechanical fi lter to retain any solid impurities (connect
downstream with respect to the tap.
4. connect a section of pipe for draining (resistant to temperatures of
100 ° C (212 ° F)) and with a minimum internal diameter of 40 mm
(1.6 in) for models UR002-UR013 and 50 mm (2 in), for models UR020
UR080;
5. provide a funnel to ensure continuity interruption in the drain piping;
6. connect a P-trap to prevent the return of odours;
7. for models UR020...UR080: connect a drain pipe from the tank to
the bottom of the humidifi er (this can run into the funnel used for
draining).
8. for drain tempering versions, water temperature will be 60°C (140°F)
with temperature is max 25°C (77°F) guaranteed.
Caution:
once the installation is complete, fl ush the supply pipe for about
30 minutes by carrying water directly in the drain and without
introducing it into the humidifi er. This will eliminate any waste or
processing residues that could clog the inlet valve and/or cause foam
when boiling water;
the drain pipe must run vertically downwards at least 30 cm (fi gure 2.a)
to prevent the return of steam.
Set up for water connections:
Models UR002..UR013 Models UR020...UR080
B
A
A
D
B
C
Fig. 2.b Fig. 2.c
Key:
A Supply water inlet
B Drain water outlet
C bottom tank drain water outlet (only for models UR020-UR080)
D Drain tempering inlet
13
ENG
“heaterSteam +0300080EN - rel. 1.0 - 27.04.2016
Water connection heights:
Drain / Fill
Models UR002…UR013 (view from below):
Fig. 2.d
mm (in)
D 75 (2.95) E 62 (2.44)
D’ 126 (4,96) E' 116 (4.57)
Water fi ll Water fi ll Water drain Water drain
Models UR020…UR080 (left side view):
L’
K
L
L”
I’
I
I”
J
Fig. 2.e
mm (in)
l 50 (1.96) L' 230 (9.0)
l' 120 (4.72) L” 54 (2.1)
l" 20 (0.78) J 132(5.2)
L 122 (4.8) K 571(22.5)
Water fi ll Water fi ll Water drain Water drain
Steam exhaust and condensate drain
Models UR002…UR013 (top view):
A1
A2
A3
Fig. 2.f
size mm (in) Models UR002-UR013
F 126.7 (5)
F' 224 (8.8)
G 137.9 (5.4)
G' 21.7 (0.85)
A1 Steam outlet
A2 Juncture for the steam distributor condensate drain pipe
A3 Fan head power cable passageway (ancillary)
Models UR020…UR080 (top view):
B1
B2
PP
Fig. 2.g
size mm (in) Models UR020...UR040 Models UR053-UR080
M 172 (2.0) 172 (6.8)
M' 31 (1.2) 52 (2.0)
N 273 (10.7) 260 (10.2)
N' --- 190 (7.4)
N" 46 (1.8) 52 (2.0)
P 60 (2.4) 60 (2.4)
B1 Set up for steam distributor condensate drain pipe
B2 Steam outlet
14
ENG
“heaterSteam +0300080EN - rel. 1.0 - 27.04.2016
2.1 Supply water
The supply water for the electric heater humidifi er must not be corrosive,
must not emit bad odours, and must not contain too much lime to
avoid excessive deposits. The water, supplied from mains of drinking
water or demineralised water, must have the following characteristics:
LIMIT VALUES FOR THE HEATER HUMIDIFIER WATER
Min Max
Specifi c conductivity at 20°C /68°fH σ20 - μS/cm 0 1500
Total dissolved solids TDS – mg/l (1) (1)
Fixed residual at 180°C/ 356°fH TDS – mg/l (1) (1)
Hydrogen ion activity pH 6 8.5
Total hardness TH– mg/l CaCO3 0 (2) 400
Temporary hardness mg/l CaCO3 0 (3) 300
Chlorides ppm Cl = 50(4)
Iron + Manganese mg/l Fe+Mn = 0.2
Silica mg/l SIO2 = 20
Residual Chlorine mg/l Cl- = 0.2
Calcium sulphate mg/l CaSO4 = 100
Metallic impurities mg/l 0 0
Solvents, diluents, detergents, lubricants mg/l 0 0
Tab. 2.a
1. Values depending on the specifi c conductivity; in general: TDS ≈0,93 * σR, 20
°C; R180 ≈0,65 * σR , 20 °C;
2. Not lower than 200% the content of chloride in mg/l Cl- ;
3. Not lower than 300% the content of chloride in mg/l Cl- ;
4. It could be necessary to intervene on the drain rate to avoid a concentration
in the boiling water higher than 300 mg/l Cl-;
For particularly aggressive water (conductivity <1 μS/cm), use titanium heaters
(heaterSteam titanium model).
Important: treating the water with water softeners or
polyphosphates dispensers is not allowed; it allows for reduced
maintenance but favors the concentration of dissolved salts in the
water in the cylinder, and possible operation irregularities due to the
formation of foam. Should this be impossible to avoid, it requires
dilution with ordinary mains water in such a quantity as to guarantee at
least 60% of its initial hardness value, and not less than 5°f. Water
treatment with reverse osmosis demineralisers is allowed.
Not recommended:
1. the use of well water, industrial water or water from cooling circuits
and, in general, water which may be chemically or bacteriologically
contaminated;
2. the addition to the water of disinfectants or anticorrosion
compounds, as these may cause irritation.
Note: no relationship can be proven between water hardness
and conductivity; nonetheless, as an indication only, water with a
hardness of 40°f should have a conductivity of approximately 900-1000
mS/cm a 20 °C.
2.2 Drain water
contains the same substances dissolved in the supply water, but in
larger amounts;
it can reach a temperature of 100 °C (212° F);
it is not toxic and can be drained in the white waters collection
system.
3. for drain tempering versions, water temperature will be 60°C (140°F),
with temperature is max 25 °C guaranteed.
Important: completely demineralised water is aggressive. For
connection to a water system with fully demineralized water use
only installation items made of plastic resistant to chemicals (eg.
Polypropylene) or stainless steel.
15
ENG
“heaterSteam +0300080EN - rel. 1.0 - 27.04.2016
3. STEAM DISTRIBUTION
3.1 CAREL steam nozzles (SDPOEM00**)
Compact steam distributors for small ducts or applications such as steam
baths. They can be mounted either horizontally or vertically (steam
exhaust facing upwords).
Mounting instructions (see fi gure):
1. drill a series of holes in the wall of the pipe, using the drilling jig of
the distributor;
2. insert the distributor;
3. fasten the fl ange of the distributor using 4 screws.
31,5
50 50
31,5
50
31,531,5
57,5
100
C
C
B
AA
B
D
Fig. 3.a
Key:
A. steam inlet
B. condensate drain
C.
steam outlet
The hole dimensions vary depending on the distributor model:
model SDPOEM0000: hole to be drilled manually,
up to 30 mm (1.2 in) diameter;
model SDPOEM0012: hole diameter 12 mm (0.5 in);
model SDPOEM0022: hole diameter 22 mm (0.9 in);
D. drilling jig
Note: if using steam hoses with an inside diameter of 30 mm (1.2 in),
remove the 22 mm (0.9 in) inlet section from the steam nozzle.
3.2 CAREL linear distributors for air ducts or
AHUs (DP***DR0)
The steam distributors for AHU or duct applications deliver steam along
their entire length in order to ensure the shortest not-wetting distance.
The distributor should be chosen based on the maximum required
capacity, the dimensions of the AHU/duct and the outlet diameter of
the humidifi er it is connected to. Install far from any obstacle (curves,
ramifi cation, section changes, grilles, fi lters, fans).
Minimum distance between distributor and obstacle: 1…1.5 m (3.3…4.9 ft).
Increase distance in case of:
1. increase in speed of the air in the duct;
2. turbulence decrease.
Mounting instructions (see fi gure):
drill a series of holes in the wall of the pipe, using the drilling jig of the
distributor (found in the packaging of the distributor);
insert the distributor with the steam outlet holes facing upwards;
fasten the fl ange of the distributor using 4 screws.
B
Y
X
A
X
°2
L
5
4
3
2
1
9
6
8
Fig. 3.b
Key:
1. L-shaped mounting bracket (where applicable)
2. ange gasket
3. steam inlet (ØA)
4. condensate drain (ØB)
5. ange screw (see instructions sheet that comes with the distributor)
6. L = length (depending on the model of distributor, see paragraph
“Linear distributors” )
7. tilt angle (about 2 °) for condensate drain
8. diameter of the hole in the wall (ØY)
Size in mm (in)
linear distributors from CAREL
DP***D22R0 DP***D30R0 DP***D40R0
ØA 22 (0.9) 30 (1.2) 40 (1.6)
ØB 10 (0.4) 10 (0.4) 10 (0.4)
ØY 58 (2.3) 68 (2.7) 89 (3.5)
Ø 35 (1.4) 45 (1.8) 60 (2.4)
X 68 (2.7) 77 (3.0) 99 (3.9)
Tab. 3.a
Caution:
1. mount the distributor slightly tilted (at least 2°, to facilitate the
condensate discharge);
2. the L-shaped supports (see element 1 Fig. 3. b) is supplied with steam
distributors models from DP085* to DP205*. For shorter lengths the
bracket can be supplied as optional (code 18C478A088).
16
ENG
“heaterSteam +0300080EN - rel. 1.0 - 27.04.2016
3.3 CAREL blowers for room installation
(VSDU0A*, VRDXL*)
Steam distributors for installation in rooms. These come with a fan
to assist steam absorption. The VSDU0A* blowers can be used on
humidifi ers with fl ow-rates up to 18 kg/h (39.7 lb/h), i.e. models UR002…
UR013. They can be connected to the top of the humidifi er, or separately
in a remote position using the fastening support VSDBAS0001 (see Fig.
3.c). These distributors have a power supply inside the electrical panel
(24 Vac, Terminals X1, X2).
A
B
C
D
E
F
G
Fig. 3.c
A > 0,5 m (>19.6”) E > 0,5 m (>19.6”)
B > 5 m (>196.8”) F > 5 m (>196.8”)
C > 2,1 m (>82.6”) G > 1 m (>39.4”)
D > 1 m (>39.4”)
Caution: in order to achieve proper steam distribution observe
the distances indicated in the fi g. above.
For the humidifi ers larger than 18 kg/h, the are ventilated steam
distributors code VRDXL00000 with 230 Vac power supply, external
power supply (maximum capacity 45 kg/h). The distributors are designed
for installation in a remote position, and require two steam hoses with a
30 mm diameter, c
connected to a “Y adapter (available as accessories, contact Carel for
details on the product code).
C > 1,8 m (>70.8”) E > 0,9 m (>35.4”)
D > 1,2 m (>47.2”) F > 3 m (>118.9”)
G > 1,2 m (>47.2”)
In this case, terminal J19.1 on the control board is used as a voltage-free
contact (normally open when there is no production - SSR OFF). This
contact has a maximum rating of 2 A.
3.4 Steam transport pipe
use CAREL fl exible hoses (max 4 m long, see section “Models of steam
conducting pipes”);
avoid the formation of pockets or traps (cause of condensate
accumulation)
avoid choking the pipe with sharp bends or twists.
Use metal clamps to fasten the ends of the pipe to the connections
on the humidifi er and the steam distributor, so that they do not come
loose as a result of the temperature.
avoid strains which include mechanical stress on the cylinder steam
outlet tailpiece
3.5 Condensate drain pipe
During the operation of the humidifi er part of the steam can condense,
causing effi ciency loss and noise (gurgling).
To drain the condensate connect to the base of the distributor a discharge
pipe with a water trap and a minimum slope of 5° (see fi g.3.d).
CAREL condensate drain pipes: code 1312368AXX (ø 10mm) -
(CHOSE00516 (5/16”) for North American market) for DP* series linear
steam distributors; code 1312353APG (ø 7mm) - (CHOSE0038 (3/8”) for
North American market) for steam blowers and nozzles.
Caution: the condensate drain pipe trap must be fi lled with water
prior to turning on the humidifi er.
Below are show some installation examples of the steam transport and
condensate drain pipes:
All the UR models
>5°
D> 200mm (8”)
>5°
R> 300mm (12”)
H ≤ 2 m (7.8”)
Fig. 3.d
Models UR002...UR013 (1), condensate drain connection with return
to fi ll tank:
>20°
>5°
1
D> 200mm (8”)
R> 300mm (12”)
Fig. 3.e
Models UE020...UR080 (1) extend the pipe inside the humidifi er up to
the base tank.
>20°
>5°
1
D> 200mm (8”)
R> 300mm (12”)
Fig. 3.f
17
ENG
“heaterSteam +0300080EN - rel. 1.0 - 27.04.2016
All the UR models
NO
Fig. 3.g
SI
R>300mm (12”)
D> 200mm (8”)
R>300mm (12”)
NO
NO
D> 200mm (8”)
Fig. 3.h
3.6 Outlet pressure limits
The backpressure at the boiler outlet, either positive or negative, depends
both on the relative pressure in the duct/AHU and the pressure drop in
the steam pipe, due to bends or adapters, and the steam distributor.
Carel steam transport pipes have a pressure drop of around 150 Pa/m
(0.021psi) (respecting the maximum fl ow-rate recommended by Carel).
Carel DP* series linear distributors have a pressure drop of around 25 Pa
(0.003psi) (respecting the maximum fl ow-rate recommended by Carel).
Considering these values, the boiler outlet pressure must be:
boiler outlet pressure > 150 [Pa/m] * steam pipe length [metres] + 25 [Pa]
DP + pressure in duct/AHU [Pa]
Boiler outlet pressure values for heaterSteam:
UR002…R013 UR020…UR080
pressure limits at boiler outlet
Pa (PSI)
0 to 1500 (0 to
0.218)
0 to 2000 (0 to
0.290)
Note: a pressure of around -200 Pa (-0.029 psi) at the boiler outlet
corresponds to around 20 mm (0.78”) of water inside the boiler (for all
sizes).
18
ENG
“heaterSteam +0300080EN - rel. 1.0 - 27.04.2016
4. ELECTRICAL CONNECTIONS
4.1 Wiring provisions
Models UR002-UR013
Outside, bottom view Inside, top view
3
1
1
3
Fig. 4.a Fig. 4.b
Models UR20-UR80
Outside, side view
1
3
2
Fig. 4.c
Key:
1. power supply cable inlet;
2. inlet (after removing the knock-out) for other uses;
3. probe cables inlet (after removing the knock-outs).
4.2 Power cable connection
Before making the connections, make that the unit is disconnected from
the mains power supply: move the main system switch and humidifi er
switch to OFF).
Important: the humidifi er ON/OFF switch disconnects power
only to the electronic controller, and not the other devices, which
therefore remain powered.
Check that the unit’s power supply voltage corresponds to the rated value
shown inside the electrical panel. Remove the front panel as explained in
chap. 1.
To enter the power and probe cables, see the follow the procedures
described below:
Models UR002-UR013
1. unscrew the screws and remove the cover (A);
2. if necessary, cut the top part of the conical cable gland (B) and insert
the power cable;
3. connect the electrical wires to the terminal block, reposition the
cover and fasten it using the screws;
To attach the probe cable:
4. remove the knock-out (C) and unscrew the screws;
5. insert the probe cable through the opening created: then fasten the
cable using the screws.
A
B
1
2
GND
L
N
3
Fig. 4.d Fig. 4.e
GND
L
N
C
4
GND
L
N
5
Fig. 4.f Fig. 4.g
Models UR020-UR080
1. identify the rubber cable gland (A) on the right side of the unit and
insert the power cable;
2. inside the electrical panel: unscrew the cable gland (B), connect the
wires to the terminal block and tighten the screws again to fasten
the cable.
GND
L1
L2
L3
B
A
Fig. 4.h
The humidifi er power line must be fi tted by the installer with a disconnect
switch and fuses to protect against short circuits. The table shows the
recommended sizes of the cable and fuses; nonetheless, these data are
purely indicative and, if diff erent from local standards in force, the latter
must prevail.
Note: to avoid unwanted interference, the power cables should
be kept separate from the probe signal cables.
Important: connect the yellow-green wire to the earth terminal
(GND).
19
ENG
“heaterSteam +0300080EN - rel. 1.0 - 27.04.2016
4.3 Control board
The control board (S) is inside of the electrical panel in the wall dividing.
The auxiliary connections (probes, remote terminal, alarm) are made by
inserting the cables form the outside into the electrical panel.
To do this, use cables gland located on the base of the unit to the plug-in
screw terminals on the control board.
UR002-UR013 UR020-UR080
6
6
Fig. 4.i Fig. 4.j
M2M9
12 1 123 123452121122123456
J17C
2 1
J17L J23 J24 J19J20J3 J16 M3 J18
2 1
J21
M8 M1 M5 M6M12
1 1234567821132 31221212
main probe
ext. regulator
GND
GND
Remote
ON/OFF
limit probe
12Vdc
Control signal
Ethernet
GND
RS485 Serial
L+
L-
Alarm
relay
NO
NC
C
NO
C
Unit
status
relay
Fig. 4.k
Key:
Terminal Function Electrical specifi cations
M1 M1.1 GND (G0)
M1.2 Controller power supply 24Vac +10%/-15% 50/60Hz
M2 M2.1 Main room probe signal
input or signal from external
controller
0/1V, 0/10V, 2/10V, 0/20mA,
4/20mA, NTC 10 kΩ a 25 °C
M2.2 GND
M2.3
Probe power supply (+G)
+12 Vdc, maximum current that
can be delivered 50 mA; Protec-
tion against short-circuits
M2.4
Digital input for backup/
rotation function
Maximum current output: 5 mA;
Maximum voltage with contact
open: 13 Vdc
M2.5 Limit humidity probe signal
input
0/1V, 0/10V, 2/10V, 0/20mA,
4/20mA, NTC
M2.6 GND
M2.7 GND
M2.8
Remote on/off contact
digital input
Maximum current output: 5 mA;
Maximum voltage with contact
open: 13 Vdc
M3 M3.1
Fieldbus
Tx/Rx-
M3.2 Tx/Rx+
M3.3 GND
M5 M5.1 Unit status contact (NO)
250 Vac; 2 A with resistive load;
2 A with inductive load
M5.2 Unit status contact
common
M6 M6.1 Alarm common
250 Vac; 2 A with resistive load;
2 A with inductive load
M6.2 NC alarm contact
M6.3 NO alarm contact
Terminal Function Electrical specifi cations
M8 M8.1 Production request analo-
gue output
Output voltage range: 0-10 V
max 10 mA
M8.2 GND
M9 M9.1 Backup and rotation contact
common
250 Vac; 2 A with resistive load;
2 A with inductive load
M9.2 Backup and rotation NO
contact
M11 Ethernet port
M12 M12.1
BMS 485
Tx/Rx-
M12.2 Tx/Rx+
M12.3 GND
Earth connection
J18 pLAN/display terminal
J19 J19.1 Auxiliary/blower contact
(NO)
250 Vac; 2 A with resistive load;
2 A with inductive load
J19.2 Auxiliary/blower contact
common
USB Port (type A)
Ethernet RJ45 Port
Tab. 4.b
20
ENG
“heaterSteam +0300080EN - rel. 1.0 - 27.04.2016
4.4 Operating and control principles
Before describing each electrical connection on heaterSteam, below are
some fundamental aspects regarding the control of steam humidifi ers.
4.4.1 Operating principle of a heater humidi er
HeaterSteam is an isothermal steam humidifi er whose technology uses
heaters immersed in a cylinder or boiler fi lled with water. This may be
mains water or demineralised water. The heat generated by the heaters
increases the water temperature up to around 100°C (212°F). The use
of demineralised water ensures long cylinder and heater life, as virtually
no scale builds up. On the other hand, if using mains water, some of the
minerals dissolved in the water accumulate in the cylinder as solids with
diff erent compositions. To prevent this from occurring, when the water
conductivity in the cylinder exceeds a certain value, some of the water is
periodically drained and replenished, thus diluting the water. In models
where featured, the drain water is mixed with mains water so as to not
exceed the maximum temperature allowed by national and local standards
in force (drain tempering function). The steam generated has a temperature
of around 100°C (212°F) and minimal positive pressure (unpressurised
steam). It is virtually free of minerals and germs. Steam production is
controlled with ON/OFF logic or with continuous modulation from 0% to
100% of rated output, using solid state relays (SSR); the control logic in this
case is PWM (i.e. pulse width modulation) with a programmable time base.
4.4.2 Control principles
The appliance is fi tted with solid state relays (SSR), meaning steam
production is continuously adjustable based on demand, in one of the
following modes.
4.4.3 ON/OFF control
Operation is all or nothing, and is activated by an external contact; the
maximum percentage of unit production can be set.
4.4.4 Proportional to an external signal (modulating
control)
Steam production is proportional to the value of an external signal Y,
(selectable by programming one of the following standards: 0 to 1 Vdc; 0
to 10 Vdc; 2 to 10 Vdc; 0 to 20 mA; 4 to 20 mA). The maximum production
Pmax corresponds to the maximum value of the external signal Y and
will be the humidifi ers rated production. The activation hysteresis hy is
settable by the user and refers to the external signal Y.
Pmax
Steam_Pr
Pmin
OFF ON
0%
hy 2xhy 100%
Y
Y= 0…1Vdc
0…10Vdc
2…10Vdc
0…20mA
4…20mA
Fig. 4.l
Key:
Steam_pr Steam production Y External signal
P0 Max production hy Activation hysteresis
Pm Min production
Note: the graph shown above applies when the pre-heating
function is disabled.
4.4.5 Autonomous control with humidity probes
Steam production is related to the % rH reading made by the relative
humidity probe and increases as the value read deviates from the set
point St. Maximum production Pmax corresponds to the case where the
humidity value, read by the probe, is BP away (proportional band) from
the set point. The activation hysteresis hy is settable by the user.
Pmax
Steam_Pr
Pmin
OFF
ON
St
hy
BP
%rH
Fig. 4.m
Key:
Steam_pr Steam production Y External signal
P0 Max production hy Activation hysteresis
Pm Min production
To check that the relative humidity measured by the transducer is within
certain preset values, two alarm thresholds can be set in autonomous
control:
high relative humidity alarm threshold;
low relative humidity alarm threshold.
When these thresholds are exceeded, an alarm is activated by closing the
corresponding relay contact on the main control board.
4.4.6 Autonomous control with relative humidity
transducer and outlet limit probe
In this case too, the controller modulates steam production based on the
% rH measured by the main relative humidity transducer, while limiting
production if the humidity measured by a second limit transducer,
located in the air duct downstream of the steam distributor, approaches
the maximum desired value. Consequently, to prevent the relative
humidity of the outlet air from exceeding a value that is considered
excessive, the control module with autonomous control and limit
transducer can be set with a high relative humidity alarm threshold.
When this threshold is exceeded, the alarm is activated by closing the
corresponding relay contact on the main control board. The limit probe
allows steam production to be modulated depending on the specifi c set
limit diff erential.
4.4.7 Application for steam baths
In applications for steam baths, in which the control probe measures
temperature rather than humidity, the same rules apply as for
autonomous control with probe.
By setting control to temperature, the humidifi er will continue to produce
steam until reaching the desired set point temperature inside the steam
bath, and consequently the desired saturation of the air (fog eff ect).
Recommended CAREL transducer: ASET030001 or ASET030000, or NTC
probes UEKNTC0*.
  • Page 1 1
  • Page 2 2
  • Page 3 3
  • Page 4 4
  • Page 5 5
  • Page 6 6
  • Page 7 7
  • Page 8 8
  • Page 9 9
  • Page 10 10
  • Page 11 11
  • Page 12 12
  • Page 13 13
  • Page 14 14
  • Page 15 15
  • Page 16 16
  • Page 17 17
  • Page 18 18
  • Page 19 19
  • Page 20 20
  • Page 21 21
  • Page 22 22
  • Page 23 23
  • Page 24 24
  • Page 25 25
  • Page 26 26
  • Page 27 27
  • Page 28 28
  • Page 29 29
  • Page 30 30
  • Page 31 31
  • Page 32 32
  • Page 33 33
  • Page 34 34
  • Page 35 35
  • Page 36 36
  • Page 37 37
  • Page 38 38
  • Page 39 39
  • Page 40 40
  • Page 41 41
  • Page 42 42
  • Page 43 43
  • Page 44 44
  • Page 45 45
  • Page 46 46
  • Page 47 47
  • Page 48 48
  • Page 49 49
  • Page 50 50
  • Page 51 51
  • Page 52 52
  • Page 53 53
  • Page 54 54
  • Page 55 55
  • Page 56 56
  • Page 57 57
  • Page 58 58
  • Page 59 59
  • Page 60 60
  • Page 61 61
  • Page 62 62
  • Page 63 63
  • Page 64 64
  • Page 65 65
  • Page 66 66
  • Page 67 67
  • Page 68 68
  • Page 69 69
  • Page 70 70
  • Page 71 71
  • Page 72 72
  • Page 73 73
  • Page 74 74
  • Page 75 75
  • Page 76 76
  • Page 77 77
  • Page 78 78
  • Page 79 79
  • Page 80 80
  • Page 81 81
  • Page 82 82
  • Page 83 83
  • Page 84 84
  • Page 85 85
  • Page 86 86
  • Page 87 87
  • Page 88 88

Carel heaterSteam User manual

Type
User manual

Ask a question and I''ll find the answer in the document

Finding information in a document is now easier with AI