Page is loading ...

freeView Pro C80H
8-port 1U Rack Mount HD KVM with 15” LCD
Screen
USER’S MANUAL
P/N: KDW-08HA
Rev 1.1

Copyright and Trademark Information
This document contains proprietary information that is protected by copyright. All rights
reserved. No part of this document may be photocopied, reproduced, or translated into another
language without express prior to written consent of freedom9 inc.
© Copyright 2005, freeView Pro and the freedom9 company logo are trademarks or registered
trademarks of freedom9 inc. All rights reserved. Windows is a trademark or registered
trademark of Microsoft Corporation. Macintosh is a trademark or registered trademark of Apple
Computer, Inc. Other trademarks or registered trademarks are the property of their respective
holders.

freeView Pro C80H User’s Manual
TABLE OF CONTENTS
1 GENERAL INFORMATION..................................................................................................................3
1.1 OVERVIEW.....................................................................................................................................3
1.2 SAFETY INSTRUCTIONS...................................................................................................................3
1.3 PACKAGE CONTENTS......................................................................................................................3
1.4 PRODUCT SPECIFICATION...............................................................................................................4
1.5 HARDWARE REQUIREMENTS...........................................................................................................4
1.6 MOUNTING THE UNIT.......................................................................................................................5
2 SPECIFICATIONS................................................................................................................................9
2.1 LCD SPECIFICATIONS.....................................................................................................................9
2.2 FACTORY PRESET TIMING...............................................................................................................9
2.3 PANEL CONTROLS AND MENU OPTIONS...........................................................................................9
3 INSTALLATION..................................................................................................................................13
3.1 INSTALLING THE VIDEO CARD AND VIDEO DRIVER ..........................................................................13
3.2 CONFIGURING THE DISPLAY SETTINGS ..........................................................................................13
3.3 CONNECTING THE DRAWER ..........................................................................................................13
3.4 DAISY CHAIN YOUR SWITCH .........................................................................................................14
3.5 TURNING ON THE DRAWER...........................................................................................................15
3.6 INCREASING THE RANGE OF THE MONITOR ....................................................................................15
3.7 TESTING THE DRAWER .................................................................................................................16
4 OPERATION ......................................................................................................................................17
4.1 LOGGING INTO THE CONSOLE .......................................................................................................17
4.2 HOT KEYS ...................................................................................................................................17
4.3 OSD OPERATION.........................................................................................................................18
5 TROUBLESHOOTING.......................................................................................................................20
6 CERTIFICATIONS..............................................................................................................................22
1

2
LIST OF FIGURES
Figure 1-1: Unit Diagrams.............................................................................................................................5
Figure 1-2: Mounting Kit................................................................................................................................6
Figure 1-3: L-bracket Placement...................................................................................................................6
Figure 1-4: Metal Brace Placement ..............................................................................................................7
Figure 1-5: Washer Installation.....................................................................................................................7
Figure 1-6: Screwing Down Metal Brace ......................................................................................................8
Figure 1-7: Front Mounting Bracket..............................................................................................................8
Figure 2-1: Panel Controls Located to the Left of the LCD Screen ..............................................................9
Figure 3-1: freeView Pro C80H Rear Panel................................................................................................13
Figure 3-2: Daisy-chaining KVMs ...............................................................................................................15
Figure 4-1: Hot Key Command List.............................................................................................................17
Figure 4-2: OSD Screen – Bank Number and Active Computer.................................................................18
Figure 4-3: OSD Screen – Settings and Commands..................................................................................18

freeView Pro C80H User’s Manual
1 General Information
1.1 Overview
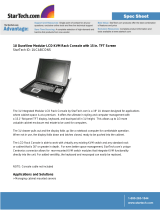
The freeView Pro C80H is an ideal solution for network administrators with multiple servers and
platforms. The 15-inch TFT LCD color display and ultra-low-profile compact industrial keyboard
and touchpad provide a user-friendly and reliable console for network administrators. All these
functions are integrated in a slim 19-inch compact 1U space.
The built-in KVM switch of the freeView Pro C80H enables easy accessibility to 8
servers/platforms and supports PS/2 keyboard, PS/2 mouse, and DB15 VGA with 8 DB15
connectors. By cascading multiple switches, you can connect up to 512 computers or servers.
The KVM Console drawers provide superior picture quality and state-of-the-art features
mounted in an industrial grade, rack mount drawer. The drawer forms a rugged enclosure that
protects the monitor from industrial hazards and permits easy access to monitor controls.
The KVM Console Active Matrix TFT LCD screen provides flicker-free color images at optimal
resolutions. The KVM Console is intelligent, microprocessor-based, and has an ergonomically
designed display.
The KVM Console screen employs the latest in active matrix thin film transistor (TFT)
technology, providing crisp screen images and wide viewing angles. Unlike CRT monitors, LCD
monitors are inherently immune to the magnetic fields commonly found on the factory floor or
communications centers. LCDs are also typically brighter than conventional CRT technology,
making them ideal for the high ambient lighting conditions found in many of today's factory
environments. In addition, on-screen menus allow for display adjustments. Also, the monitors'
Plug-n-Play features support Windows 95/98, NT and XP, while a universal power supply
ensures global compatibility.
1.2 Safety Instructions
To prevent the equipment from overheating, DO NOT COVER THE OPENING IN THE REAR
OF THE DEVICE.
If one of the following situations arises, the equipment should be checked by service personnel.
• The power cord or plug is damaged.
• Liquid has leaked into the equipment.
• The equipment has been exposed to excessive moisture.
• The equipment has not worked well or you can not get it work according to the User’s
Manual.
• The equipment has been dropped and damaged.
• If the equipment has obvious signs of breakage.
1.3 Package Contents
The complete freeView Pro C80H package consists of:
Equipment Qty
1U 19” rack mount console 1
Rear mounting kit (2 x L-brackets, 2 x Metal Brace, 6 x Washer, 6 x Screw) 1
3

4
1.8m PS/2 HD KVM cable (PS/2 mouse and keyboard, DB15 VGA) 2
1m PS/2 KVM cascading cable (PS/2 mouse and keyboard, DB15 VGA) 1
Power cord 1
User manual CD 1
Check to make sure the unit was not damaged in shipping. If you encounter a problem, please
contact your dealer.
Read this manual thoroughly, and follow the installation and operation procedures carefully to
prevent any damage to the product and/or any of the devices connected to it.
1.4 Product Specification
Standard Meets EIA RS-310C 1U 19” rack mount standard.
(H x W x D) 44 x 440 x 492 (mm)
LCD Panel 15” /17” Active-Matrix TFT LCD
Hardness Glass for LCD 2 x 249 x 333 (mm)
Maximum Resolution 1024 x 768
Pixel Pitch 0.297 mm
Input Signal Format RGB Analog Video
Display Control Auto Tune, Brightness, Contrast, Color, Quality, Position, Language,
Recall
Keyboard PS/2, 83 keys (US version) or 84 keys (International version)
Pointing Device Touchpad
Gross Weight 17 kg
Certification CE, FCC
1.5 Hardware Requirements
Computers
Your PC must have a VGA, SVGA, or Multisync video card and video driver already installed for
the monitor. If you need to install a video card or a video driver, refer to your computer
documentation for instructions.
• Your Macintosh will require a “Mac adapter” for video.
• Your computer must have a standard 6-pin mini-DIN (PS/2 style), mouse port
• Your computer must have a standard 6-pin mini-DIN (PS/2 style) keyboard port
For optimum signal integrity and to reduce cable clutter, the device uses high density cables.
High density cables have a DB15 connector on one end to connect to the KVM switch, and
keyboard, mouse, and monitor connectors on the other end to connect to the server. Ask your
dealer for a list of available cables or visit us online at http://www.freedom9.com.

freeView Pro C80H User’s Manual
Figure 1-1: Unit Diagrams
1.6 Mounting the unit
The unit is designed for standard 750mm cabinets. You can find the mounting kit in the carton.
Familiarize yourself with all of the pieces before installation.
5

6
Figure 1-2: Mounting Kit
Mounting the KVM Console
1. Place the L-bracket on the side of the unit surrounding the three screw sockets with the
bracket facing outwards. The groove down the center of the L-bracket should face outwards.
Figure 1-3: L-bracket Placement

freeView Pro C80H User’s Manual
2. Place the metal brace over the three screw sockets next to the L-bracket.
Figure 1-4: Metal Brace Placement
3. Place the washers around the screw sockets and in the metal brace.
Figure 1-5: Washer Installation
7

8
4. Screw the screws into the screw sockets. Note: Ensure the screws are not completely
tightened. You should be able to slide the L-bracket freely. If necessary, loosen the screws
until the L-bracket slides easily.
Figure 1-6: Screwing Down Metal Brace
5. When mounting the unit into the rack, unscrew the locks at the front of the unit and slide the
mounting ears backwards. Attach the mounting bracket to the rack, leaving the screw lock
free. Once mounted, slide the unit back into place and lock the screw locks by turning them
clockwise. If more space is needed after the keyboard and monitor have been pulled out,
you can unlock the screw locks and pull the entire unit out further. See Section 3.6 for
further details.
Screw Lock
Mounting Bracket
Figure 1-7: Front Mounting Bracket

freeView Pro C80H User’s Manual
2 Specifications
2.1 LCD Specifications
Screen Type TFT
Display Area 304 mm (H) x 228 mm (V)
Contrast Ratio 350:1
Viewing Angle Vertical: 100 degrees, Horizontal: 120 degrees
Maximum Resolution 1024 x 768
Pixel Pitch 0.297 mm
Response Time 45 ms
Brightness 250 cd/m
2
Panel Color 16.7 million
Back Light 2 lamps
Power Management VESA DPMS
Plug & Play DDC1 & DDC2B
Power Consumption 24 Watts
Power Saving VESA DPMS Standard, EPA/Energy Star Compliant
Regulations CE, FCC
2.2 Factory Preset Timing
Preset mode VGA 640x350 @ 70Hz
VGA 720x400 @ 70Hz
VGA 640x480 @ 60/72/75Hz
SVGA 800x600 @ 60/72/75Hz
XGA 1024x768 @ 60/70/75Hz
2.3 Panel Controls and Menu Options
Figure 2-1: Panel Controls Located to the Left of the LCD Screen
9

10
Controls Description
(Power)
Powers on or off the device (device must be plugged in and power switch on
front panel must be turned on in order for the unit to turn on)
Auto Auto-synchronize and scale display to any valid factory preset timings
Up Move the cursor up in the menu screen
Down Move the cursor down in the menu screen
Menu Open the menu screen and activate menu options
Menu Options (Opened by pressing the “Menu” button)
Brightness
Contrast
Color
Quality
Position
Language
Recall
Exit
Auto Tune
1. Press the “Auto” button to adjust the display size automatically and also tune the panel to
the best conditions.
Brightness
1. Press the “Menu” button.
2. Use the “Up” and “Down” buttons to scroll to “Brightness”.
3. Press the “Menu” button to select the option.
4. Use the “Up” and “Down” buttons to adjust the brightness.
5. Press the “Menu” button to exit the option.
Contrast
1. Press the “Menu” button.
2. Use the “Up” and “Down” buttons to scroll to “Contrast”.
3. Press the “Menu” button to select the option.
4. Use the “Up” and “Down” buttons to adjust the contrast.
5. Press the “Menu” button to exit the option.
Color
1. Press the “Menu” button.
2. Use the “Up” and “Down” buttons to scroll to “Color”.

freeView Pro C80H User’s Manual
3. Press the “Menu” button to select the option. The following options will be displayed:
Icon Description
9300 Set CIE coordinates at 9300K color
7500 Set CIE coordinates at 7500K color
6550 Set CIE coordinates at 6500K color
User Exit and return to the previous page
Auto Set user defined CIE
Color Auto adjust color
4. Use the “Up” and “Down” buttons to select the desired option.
5. Press the “Menu” button to select the option.
Position
1. Press the “Menu” button.
2. Use the “Up” and “Down” buttons to scroll to “Position”.
3. Press the “Menu” button to select the option. The following options will be displayed:
Image Pos Description
Image Adjust the position of the image
OSD Pos Adjust the position of the OSD
Return Exit and return to the previous page
4. Use the “Up” and “Down” buttons to select the desired option.
5. Press the “Menu” button to select the option.
6. Use the “Up” and “Down” buttons to adjust the position.
7. Press the “Menu” button to exit the option.
Language
1. Press the “Menu” button.
2. Use the “Up” and “Down” buttons to scroll to “Language”.
3. Press the “Menu” button to select the option. The following options will be displayed:
English
German
French
Italian
Spanish
4. Use the “Up” and “Down” buttons to select the desired language.
5. Press the “Menu” button to select the option.
Recall
1. Press the “Menu” button.
2. Use the “Up” and “Down” buttons to scroll to “Recall”.
11

12
3. Press the “Menu” button to select the option. You will be prompted Yes or No.
4. Use the “Up” and “Down” buttons to select the desired option: “Yes” to reset the device to
factory defaults, “No” to return to the previous page.
5. Press the “Menu” button to activate the selected option.

freeView Pro C80H User’s Manual
3 Installation
3.1 Installing the Video Card and Video Driver
Before connecting the freeView Pro C80H, make sure your computer has a video card already
installed that is compatible with the monitor. Ensure both the KVM switch and the computer are
powered off. Connect the end of the HD KVM cable with only one DB15 connector to the KVM
switch, and the other end to the computer, see section 3.3 for details. After the drawer is
connected to the computer, power on the computer and install the video card driver. The video
card driver is supplied by the video card manufacturer and may be found on the CD-ROM that
came with the video card or your computer. If you need information on installing a video card or
video driver, refer to the manual that came with your video card.
3.2 Configuring the Display Settings
After connecting the drawer and turning on your computer, you may need to configure one or
more of the following display settings of the video card:
• Display mode (also called desktop area or video resolution)
• Refresh rate (also called vertical scan rate or vertical sync)
• Color depth (also called color palette or number of colors)
Each video card has several controls that let you adjust the display settings. However, the
software and driver for each video card is unique. In most cases, you can adjust these settings
by using a program or utility provided by the manufacturer of the video card. If you are using
Micrsofot Windows, most video cards use the Windows Display Properties control panel to
configure the display. To open the Windows Display Properties window, click the right mouse
button in a blank area of the Windows desktop and then select Properties. The Settings tab
usually lets you change the color depth and the resolution.
Whenever you change the resolution, color, or refresh rate, the image size, position, or shape
may change. This behavior is normal. You can readjust the image using the on-screen controls
on the KVM switch. For more information on the monitor on-screen controls, refer to Section 2.
For more information on configuring the display settings, refer to the manual that came with your
video card.
3.3 Connecting the Drawer
To connect the freeView Pro C80H to a computer, perform the following steps:
Figure 3-1: freeView Pro C80H Rear Panel
1. Turn off your computer (You should always turn off your computer before connecting or
disconnecting a device).
2. Connect the KVM cable to the "Port 1" connector on the KVM switch.
3. Connect the video (VGA) connector of the KVM cable to the video card connector on the
rear panel of your computer.
13

14
4. Identify and connect the PS/2 mouse and PS/2 keyboard connector to the correct PS/2 ports
on the rear panel of your computer.
5. Connect the AC power cord to the power socket on the drawer and then to a power outlet.
Note: The VGA Port and 2 PS/2 Ports on the left side of the rear of the unit are used for
cascading with other KVM switches. It is not a console port for connecting an external monitor
and peripherals.
3.4 Daisy Chain Your Switch
The freeView Pro C80H can be cascaded with up to 7 freeView Pro 80P’s for a total of 64
servers.
1. It is recommended to power off all KVMs.
2. Use the 3 ft PS/2 KVM cable included with the unit.
3. Connect one end of the KVM cable to the VGA port and two PS/2 ports on the back of the
freeView Pro C80H next to the power socket.
4. Connect the other end of the KVM cable to the Console Port on the freeView Pro 80P.
5. Power on the freeView Pro 80P.
6. Power on the freeView Pro C80H.
7. The Bank LED on the freeView Pro 80P should read “2”.
8. Cascade other freeView Pro 80P units in the same manner.
9. You can now use the OSD on the freeView Pro C80H to control all of the KVMs in the stack
at the same time.

freeView Pro C80H User’s Manual
Figure 3-2: Daisy-chaining KVMs
3.5 Turning On the Drawer
1. Make sure all cables and the power cord are connected properly.
2. Be sure to tighten all connector screws on the back of the unit.
3. Flip the power switch on the front of the unit to the “on” position.
4. Ensure that the unit is not locked (the keyhole should be vertical if unlocked).
5. Grasp the handle on the front of the device, pull out slowly and smoothly, and then flip the
device upwards once it has been pulled out completely.
6. This will disengage the soft on/off switch and the unit should power on.
7. If the unit does not power on, press the power button to the left of the LCD screen.
8. The Status LED on the left of the monitor panel should turn from orange to green, verifying
that the unit is operational.
3.6 Increasing the Range of the Monitor
If you would prefer to pull the monitor out further from the rack, you can unlock the unit from the
home position by unscrewing the two screws on either side of the device by turning counter-
15

16
clockwise. Once the unit has been unlocked, it can be pulled out further to allow the monitor to
lean back further. Be sure to return the unit to its original state and lock the unit by screwing the
two screws after use to prevent damage.
3.7 Testing the Drawer
To test that the drawer is working properly, perform the following steps:
1. Power up the monitor/keyboard drawer, and then turn on your computer.
2. Make sure the video image is centered within the screen area. Use the OSD controls to
adjust the image (see note below) or press the Auto button on the right hand side of the
monitor.
NOTE: If the unit does not power up when the panel is pulled up, try pushing the soft power
on/off button on the left side of the monitor panel to power up the unit. You can adjust the
horizontal and vertical position, contrast, and brightness to better suit your video card and your
personal preference. Refer to Section 2 for more information on using the on-screen menu to
adjust the video display. Before you begin, make sure that power to all the devices you will be
connecting up have been turned off. To prevent damage to your installation due to ground
potential difference, make sure that all the devices on the installation are properly grounded.
Consult your supplier for any technical issues if necessary.

freeView Pro C80H User’s Manual
4 Operation
4.1 Logging Into the Console
Once the freeView Pro C80H is powered on, it will prompt you for a password to access the
console. The default password is “00000000”. Remember to change the password using the on-
screen display (OSD) immediately to prevent unauthorized access to the unit.
4.2 Hot Keys
You can control the operation of the KVM using hot keys. Hot key commands are initiated by
pressing the “Scroll Lock” key twice in succession followed by the desired command. Refer to
the table below for a list of available commands.
Figure 4-1: Hot Key Command List
Notes:
• If you enable scan mode, the KVM switch will cycle through all active ports one at a time.
The scan interval can be set through the On-Screen Display (OSD) (see next section for
details). If Beeper is turned on, the KVM will beep each time it skips to the next computer.
17

18
• To get out of Auto Scan Mode, press the Space Bar.
• Bank number and Port number selections must be made using the numeric keys on the
keyboard. Numeric keys on the numeric keypad are not available for hot key commands.
• To restore the unit to factory default settings, press “Scroll Lock + Scroll Lock + R”. The
Display LEDs on the front panel will flashed during the refresh process. Once the unit has
been reset, the LEDs will stop flashing.
4.3 OSD Operation
You can access the On-Screen Display (OSD) menu by using the hot keys (Scroll Lock + Scroll
Lock + Space Bar). The following window will be displayed on the monitor:
Figure 4-2: OSD Screen – Bank Number and Active Computer
Usage:
• The first line shows the Bank Number (the default is 1).
• The next section shows the systems connected to the KVM along with the computer
names. The computer names can be edited by highlighting it and pressing the “Insert” key.
Any port with an active system connected to it will have a sun symbol
beside it.
• Use the arrow keys to select a computer and press “Enter” to activate it.
• Use the “PgUp” or “PgDn” keys to select the previous or next Bank Number.
• Press “Tab” key to toggle through the different sections of the menu.
Figure 4-3: OSD Screen – Settings and Commands
/