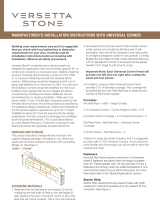
Bard IST4-X User manual

Type
User manual

Bard IST4-X side trim extension kit is designed for use with IH Series heat pumps. It enables you to fill gaps between the back of the heat pump and the mounting wall surface in rooms with a maximum ceiling height of 12 feet. The kit includes four 72-inch side trim pieces with adhesive tape, two 144-inch black rubber edge guards with wipers, and two 1-1/2 x 3-3/8-inch connector plates with adhesive tape.

Bard IST4-X side trim extension kit is designed for use with IH Series heat pumps. It enables you to fill gaps between the back of the heat pump and the mounting wall surface in rooms with a maximum ceiling height of 12 feet. The kit includes four 72-inch side trim pieces with adhesive tape, two 144-inch black rubber edge guards with wipers, and two 1-1/2 x 3-3/8-inch connector plates with adhesive tape.

MIS-3181
MIS-3181
FIGURE 2
(4) S
ide Trim Pcs.
(2) Edge Guard Pcs.
(2) Connector Pcs.
1
3
2
FIGURE 1
TOTAL
TRIM
HEIGHT
Figure 1
Two Edge Guard Pieces
Two Connector
Plates
Four Side Trim Pieces
Page 1 of 3
SUPPLEMENTAL INSTRUCTIONS
Bard Manufacturing Company, Inc.
Bryan, Ohio 43506
www.bardhvac.com
Manual: 7960-678G
Supersedes: 7960-678F
Date: 6-6-22
Model Features
IST4, IST6, IST8, IST10 and IST14 Side Trim Extension
Kits are designed for use with IH Series heat pumps.
By using this kit, it enables the installer to ll gaps
between the back of the IH heat pump to the front of the
mounting wall surface in a room with a maximum ceiling
height of 12'. It will ll spaces for the nominal dimension
plus up to 3/8". Wider kits can be trimmed down.
Description
The following 4" side trim kit models are available:
IST4-X (Beige)
IST4-1 (White)
IST4-4 (Buckeye Gray)
The following 6" side trim kit models are available:
IST6-X (Beige)
IST6-1 (White)
IST6-4 (Buckeye Gray)
The following 8" side trim kit models are available:
IST8-X (Beige)
IST8-1 (White)
IST8-4 (Buckeye Gray)
The following 10" side trim kit models are available:
IST10-X (Beige)
IST10-1 (White)
IST10-4 (Buckeye Gray)
The following 14" side trim kit models are available:
IST14-X (Beige)
IST14-1 (White)
IST14-4 (Buckeye Gray)
Tools Needed
The following tools will be required for installation of
the trim kit:
Sheet metal cutting tool such as tin snips,
aviation snips, metal nibbler or electric shears
(recommended)
Tape measure
Alcohol pad or non-residue cleaner and cleaning
cloth
Contents of Kit
Before starting, unwrap packaging and verify the
following contents (see Figure 1):
Four (4) 72" side trim pieces with adhesive tape
Two (2) 144" black rubber edge guard with wiper
Two (2) 1-1/2" x 3-3/8" connector plate with
adhesive tape
I-TEC® Side Trim Extension Kit:
IST4-X, -1, -4
IST6-X, -1, -4
IST8-X, -1, -4
IST10-X, -1, -4
IST14-X, -1, -4
Figure 2
MIS-3181
FIGURE 2
(4) Side Trim Pcs.
(2) Edge Guard Pcs.
(2) Connector Pcs.
1
3
2
FIGURE 1
TOTAL
TRIM
HEIGHT
Manual 7960-678G
Page 2 of 3
Installation
1. First measure the distance between the back of
unit side and the wall. If this distance is less than
3-3/4", the width of the side trim pieces will need
adjusted appropriately. The minimum gap distance
the trim kit can be used for is 5/8".
2. Measure height of area requiring trim piece (see
Figure 2). If this measurement is a distance from
oor to ceiling, reduce total height by 1/8" for
clearance installation purposes when installing trim
piece. Record total trim height measurement for
future use in process.
3. Place two (2) 72" side trim pieces paint textured
side down on large at work area and clean primer
metal surface with rubbing alcohol pad or non-
residue cleaner. This will help adhesive tape bond
to metal surface.
4. Align trim pieces together so ends are ush with
both sides parallel (see Figure 3). Remove adhesive
tape from back of connector plate. Apply connector
plate to cleaned, primered surface while ensuring
trim piece ends are ush. Apply adequate pressure
to area to form bond.
5. Measure and mark total trim height measurement
on primer side of piece. Using sheet metal cutting
tool, remove excess metal trim from one end.
6. Cut black rubber edge guard piece to total trim
height measurement. Apply edge guard to trim
assembly on “non-offset” side of part with rubber
wiper facing down while trim piece is resting on
the work surface painted textured side down.
7. Prepare I-TEC® Series unit back corner by cleaning
surface with alcohol pad or non-residue cleaner
and cleaning cloth.
8. Take completed side trim assembly to unit
installation and remove adhesive backing. Attach
trim assembly ush with unit back corner using
edge of offset as a guide (see Figure 4). Apply
adequate pressure to form bond between trim
assembly and unit side.
9. Repeat process for side trim assembly and
installation on opposite rear corner of I-TEC® Series
unit.
DOWN
WIPER POINTED
OFFSET DOWN
NOMINAL DIMENSION
PLUS UP TO 3/8"
SIDE OUT
WIPER POINTED OUT
PAINTED
TEXTURED
OFFSET BEND OUT
PAINTED/TEXTURE
SIDE DOWN
MIS-3182 A
FIGURE 3
FIGURE 4
CONNECTOR PLATE
GOES ON PRIMED SIDE
OF PARTS (OFFSET DOWN)
TOTAL TRIM HEIGHT
(CANNOT EXCEED 144")
CUT
EXCESS
DOWN
WIPER POINTED
OFFSET DOWN
NOMINAL DIMENSION
PLUS UP TO 3/8"
SIDE OUT
WIPER POINTED OUT
PAINTED
TEXTURED
OFFSETBEND OUT
PAINTED/TEXTURE
SIDE DOWN
MIS-3182 A
FIGURE 3
FIGURE 4
CONNECTOR PLATE
GOES ON PRIMED SIDE
OF PARTS (OFFSET DOWN)
TOTAL TRIM HEIGHT
(CANNOT EXCEED 144")
CUT
EXCESS
Figure 3
Figure 4
MIS-3182A
MIS-3182A
Manual 7960-678G
Page 3 of 3
  • Page 1 1
  • Page 2 2
  • Page 3 3

Bard IST4-X User manual

Type
User manual

Bard IST4-X side trim extension kit is designed for use with IH Series heat pumps. It enables you to fill gaps between the back of the heat pump and the mounting wall surface in rooms with a maximum ceiling height of 12 feet. The kit includes four 72-inch side trim pieces with adhesive tape, two 144-inch black rubber edge guards with wipers, and two 1-1/2 x 3-3/8-inch connector plates with adhesive tape.

Ask a question and I''ll find the answer in the document

Finding information in a document is now easier with AI