Page is loading ...

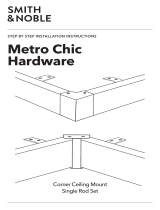
BRACKET INSTALLATION
STEP 1.
Place brackets against wall or ceiling at desired locations
and mark screw holes. Use tape measure and level to make
sure marked screw holes are horizontal to each other.
Pre-drill two pilot holes for each bracket (1/4” drill bit) and
insert anchors into wall/ceiling and insert screws into wall
anchors.
STEP 2B.
If mounting directly into wood or studs, pre-drill two pilot
holes for each bracket (1/4” drill bit) and install bracket on
the wall with screws provided.
STEP 3.
Determine projection of brackets. Loosen projection screw,
slide bracket to desired position and tighten projection
screw. Repeat for each bracket.
STEP 2A.
(FOR MOUNTING TO DRYWALL OR PANELING)
(FOR MOUNTING TO WOOD OR STUDS)
projection
screw
WOOD
or
STUDS
DRY WALLCEILING MOUNT
Package Contents:
2 Extendable Single Rod Brackets
4 Philips Pan Head Screw
4 Wall Anchors
Tape Measure, Pencil, Drill & Bit Set, Philipshead
Screwdriver, Level
Tools needed:
Tape Measure
Philipshead
Screwdriver
Drill & Bit SetPencil Level
USER CARE & INSTALLATION GUIDE
ROD INSTALLATION
STEP 4.
Place curtains on the rod and slide the rod onto the brackets.
Note that panels, rods, and finials are rold separetely.
STEP 6.
Secure each rod by tightening screws provided.
STEP 5.
Add finials to the ends of the rod.
Care Instruction:
Wipe gently with cloth to clean any sand, dirt, or dust on product. Do
not use abrasive cleaners as they may damage the surface finish.
/