Extron electronics MDA 4V EQ User manual

Type
User manual
1
MDA 4V EQ • USER GUIDE
Introduction
About this Manual
This manual provides information on the Extron MDA 4V EQ video distribution amplifier and discusses how to install and
operate them.
About the MDA 4V EQ Mini Distribution Amplifier
The Extron MDA 4V EQ are compact composite video mini distribution amplifier with individual output gain and
equalization controls that compensate for different cable lengths for each output. The MDA 4V EQ is also a line driver,
able to handle 1000 feet of Extron Mini HR cable.
MDA 4V EQ — One input, four outputs, composite video with equalization and gain controls for each output
Features
Input: One female BNC connector
Output: Four female BNC connectors and a passive loop-through
150 MHz (-3 dB) video bandwidth, fully loaded
Variable gain and EQ adjustments
Independent gain and EQ control per output
Video loop-through
1U, quarter rack width metal enclosure
External Extron Everlast™ power supply included — Provides worldwide power compatibility with high-demonstrated
reliability and low power consumption
Installation and Operation
Mounting the MDA 4V EQ
The MDA 4V EQ mini distribution amplifier can be set on a table or mounted on a rack shelf, see the accessory options at
www.extron.com
Tabletop Use
Four self-adhesive rubber feet are included with the MDA EQ. For tabletop use, attach one foot at each corner of the
bottom side of the unit and place the unit in the desired location.
2
MDA 4V EQ • USER GUIDE (Continued)
Rack Mounting
For optional rack mounting, mount the MDA EQ on one of the rack shelves or projector mounting brackets listed above.
On the standard 9.5 inches deep rack shelves, the unit can be mounted in one of four locations to the rear of the rack or
in one of four locations to the front of the rack.
1. If rubber feet are installed on the bottom of the MDA, remove them.
2. Mount the MDA EQ on the rack shelf, using two 4-40 x 3/16” screws in opposite (diagonal) corners to secure the unit
to the shelf.
3. Install blank panels or other units on the rack shelf.
Use 2 mounting holes on
opposite corners.
(2) 4-40 x 3/16"
Screws
1U Universal Rack Shelf
Both front false faceplates
use 2 screws.
QuarterRackStandardShelf
1/4 Rack Width Front False
Faceplate
1/2 Rack Width Front False
Faceplate
6" Deep Rack Shelf
Front false
faceplate
uses 2
screws.
1/2 Rack Width Front False
Faceplate
Use 2 mounting holes on
opposite corners.
(2) 4-40 x 3/16"
Screws
Figure 1. Mounting an MDA 4V EQ on a
Standard Rack Shelf
Figure 2. Mounting an MDA 4V EQ on a
6-inch Rack Shelf
Furniture Mounting
To furniture-mount the MDA 4V EQ, use the optional mini under-desk mounting kit, as follows.
QuarterRackUnderdeskMounting
Figure 3. Preparing the MDA 4V EQ for Under-desk Mounting
1. If rubber feet were previously attached to the bottom of the unit, remove them.
2. Attach the mounting brackets to the MDA EQ with the provided machine screws as shown in the previous figure.
3. Hold the unit with the attached brackets against the underside of the table or other furniture. On the mounting
surface, mark the location of the bracket’s screw holes.
4. Drill 3/32” (2 mm) diameter pilot holes, ¼” (6.3 mm) deep in the mounting surface at the marked screw locations.
5. Insert #8 wood screws into the four pilot holes. Tighten each screw into the mounting surface until slightly less than
¼” of the screw head protrudes.
6. Align the mounting screws with the slots in the brackets and place the unit against the surface, with the screws
through the bracket slots.
7. Slide the unit slightly forward or back, then tighten all four screws to secure it in place.
3
Rear Panel Features and Cabling
The following figures shows the back panel configurations of the MDA 4V EQ model.
MDA 4V EQ
POWER
12V
0.2A MAX
INPUT
LOOP-THRU
OUTPUTS
HIGH Z
IN
1
2
75 Ohm
3
4
331122
5
5
4
4
1
Power supply connector
2
Passive Loop-Thru connector
3
Toggle switch
4
Output connectors, composite video
5
Input connector, composite video
Figure 4. MDA 4V EQ Rear Panel
1
Power supply connector — Plug the external 12 VDC power supply into this 2-pin, 3.5 mm captive screw
connector. The power supply is included with the unit.
NOTE: The power connector on the rear panel is orange; however, the plug for the power cord may be either
orange or blue. Either color plug can be connected to the rear panel receptacle.
2
Passive Loop-Thru connector — Connect a monitor (optional) to this female BNC connector.
3
Toggle switch — Set this switch to HIGH Z if a monitor is plugged into the Passive Loop Thru connector. Setting
this switch to 75 OHM simulates a monitor when none is attached to the Loop Thru connector.
4
Output connectors, composite video — Connect up to four MDA 4V EQ composite video monitors to these BNC
connectors.
5
Input connector, composite video — Connect a composite video input source to this BNC connector.
Wiring the Connector
WARNING: The two power cord wires must be kept separate while the power supply is plugged in. Remove power
before wiring.
AVERTISSEMENT : Les deux cordons d’alimentation doivent être tenus à l’écart l’un de l’autre quand
l’alimentation est branchée. Couper l’alimentation avant de faire l’installation électrique.
1. Cut the DC output cord to the length needed.
2. Strip the jacket to expose 0.2 inch (5 mm) of the conductors for the blue captive screw plug, or 0.3 inch (7 mm) for
the orange plug.
ATTENTION: The length of the exposed wires in the stripping process is critical. The ideal length is 3/16 inches
(5 mm). Any longer and the exposed wires may touch, causing a short circuit between them. Any shorter and
the wires can be easily pulled out even if tightly fastened by the captive screws.
ATTENTION : La longueur des câbles exposés est primordiale lorsque l’on entreprend de les dénuder. La
longueur idéale est de 5 mm (3/16 inches). S’ils sont un peu plus longs, les câbles exposés pourraient se
toucher et provoquer un court circuit. S’ils sont un peu plus courts, ils pourraient sortir, même s’ils sont
attachés par les vis captives.
NOTE: Stripping the wires to expose less than the recommended amount causes them to slide out of the
connector too easily, even if they are tightly pinched by the captive screws.
3. Slide the leads into the supplied captive screw plug and lock them, using an Extron Tweeker (small screwdriver).
4. Use the supplied tie-wrap to strap the power cord to the extended tail of the connector.
5. To verify the power cord’s polarity before connecting it, plug in the power supply with no load and check the output
with a voltmeter.
4
MDA 4V EQ • USER GUIDE (Continued)
ATTENTION:
The installation must always be in accordance with the applicable provisions of National Electrical Code ANSI/
NFPA 70, article 725 and the Canadian Electrical Code part 1,section 16.
Cette installation doit toujours être conforme aux dispositions applicables du Code américain de l’électricité
(National Electrical Code) ANSI/NFPA 70, article 725, et du Code canadien de l’électricité, partie 1, section 16.
The power supply shall not be permanently fixed to building structure or similar structure.
La source d’alimentation ne devra pas être fixée de façon permanente à une structure de bâtiment ou à d’autres
structures similaires.
Power over Ethernet (PoE) is intended for indoor use only. It is to be connected only to networks or circuits that
are not routed to the outside plant or building.
L’alimentation via Ethernet (PoE) est destinée à une utilisation en intérieur uniquement. Elle doit être connectée
seulement à des réseaux ou des circuits qui ne sont pas routésau réseau ou au bâtiment extérieur.
Unless otherwise stated, the AC/DC adapters are not suitable for use in air handling spaces or in wall cavities.
The power supply is to be located within the same vicinity as the Extron AV processing equipment in an ordinary
location, Pollution Degree 2, secured to the equipment rack within the dedicated closet, podium, or desk.
Sauf mention contraire, les adaptateurs AC/DC ne sont pas appropriés pour une utilisation dans les espaces
d’aération ou dans les cavités murales. La sourced’alimentation doit être située à proximité de l’équipement de
traitement audiovisueldans un endroit ordinaire, avec un degré 2 de pollution, fixé à un équipement de rack à
l’intérieur d’un placard, d’une estrade, ou d’un bureau.
Always use a power supply provided by or specified by Extron. Use of an unauthorized power supply voids all
regulatory compliance certification and may cause damage to the supply and the end product.
Utilisez toujours une source d’alimentation fournie ou recommandée par Extron. L’utilisation d’une source
d’alimentation non autorisée annule toute conformité réglementaire et peut endommager la source
d’alimentation ainsi que le produit final.
Do not tin the wire leads before installing into the connector. Tinned wires are not as secure in the connector and
could be pulled out. They may also break after being bent several times.
Ne pas étamer les conducteurs avant de les insérer dans le connecteur. Les câbles étamés ne sont pas aussi
bien fixés dans le connecteur et pourraient être retirés. Ils peuvent aussi se casser après avoir été pliés plusieurs
fois.
Extron power supplies are certified to UL/CSA 60950-1 and are classified as LPS (Limited Power Source). Use
of a non-LPS or unlisted power supply will void all regulatory compliance certification.
Les sources d’alimentation Extron sont qualifiées UL/CSA 60950-1 et sont classées LPS (Limited Power
Source). L’utilisation d’une source d’alimentation non-listéeou non-listée LPS annulera toute certification de
conformité réglementaire.
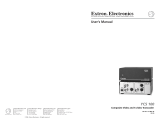
The figure below shows how to wire the connector.
Power Supply
Output Cable
Orange Captive Screw
Connector
0.3” (7 mm) MAX
+
-
Black Wire
White Wire
Power Supply
Output Cord
Orange Captive Screw
Connector
0.3” (7 mm) MA
X
SECTION A–A
Ridges
Smooth
AA
Tie Wrap
Tie Wrap
Figure 5. Power Connector Wiring
NOTE: Your MDA may have shipped with a blue captive screw plug. The blue connector does not have the extended
tail or the included tie-wrap.
5
Front Panel Features and Operation
The following shows the front panel configurations of the MDA 4V EQ.
VIDEO DISTRIBUTION CONTROLLER
GAIN EQ
1
GAIN EQ
2
GAIN EQ
3
GAIN EQ
4
1111222222 22
Figure 6. MDA 4V EQ Front Panel
1
Power indicator LED — This LED, when lit, indicates that the MDA EQ is receiving power.
2
Gain and Equalization (EQ) potentiometers — One set for each output. Use a small screwdriver to rotate these
potentiometers to adjust the gain and equalization for optimization of the image over the output cable.
6
68-978-50 Rev. C
09 18
© 2004-2018 Extron Electronics — All rights reserved. www.extron.com
All trademarks mentioned are the property of their respective owners.
For information on safety guidelines, regulatory compliances, EMI/EMF compatibility, accessibility, and related topics,
see the Extron Safety and Regulatory Compliance Guide on the Extron website.
  • Page 1 1
  • Page 2 2
  • Page 3 3
  • Page 4 4
  • Page 5 5
  • Page 6 6

Extron electronics MDA 4V EQ User manual

Type
User manual

Ask a question and I''ll find the answer in the document

Finding information in a document is now easier with AI

in other languages