Page is loading ...

ABB solar monitoring
Product manual
VSN700 Data Logger

VSN700 Data Logger Product Manual
Operators are required to read this manual and scrupulously follow the indications reported
in it, since ABB cannot be held responsible for damages caused to people and/or things, or
the equipment, if the warranty conditions are not observed.
IMPORTANT SAFETY INSTRUCTIONS
This manual contains important safety instructions that must be followed during
installation and maintenance of the equipment.
SAVE THESE INSTRUCTIONS!
This manual must be considered as an integral part of the equipment, and must
be available at all times to everyone who interacts with the equipment.
Symbols and signs
In the manual, the danger or hazard zones are indicated with signs, labels,
symbols, or icons.
Generic hazard -
Important safety information. This points out operations or
situations in which staff must be very careful.
Hazardous voltage - This points out operations or situations in which staff must be
very careful due to hazardous voltage.
This points out that it is mandatory to carry out the described operations using the
clothing and/or personal protective equipment provided by the employer.
Positive pole and negative pole of the input voltage (DC)
This points out that the examined area must not be entered or that the described
operation must not be carried out.

VSN700 Data Logger Product Manual
- 3 -
Not included in the supply
ABB accepts no liability for failure to comply with the instructions for correct installation and will not
be held responsible for systems upstream or downstream the equipment it has supplied. It is
absolutely forbidden to modify the equipment. Any modification, manipulation, or alteration not
expressly agreed with the manufacturer, concerning either hardware or software, shall result in the
immediate cancellation of the warranty.
The Customer is fully liable for any modifications made to the system.
Given the countless array of system configurations and installation environments possible,
it is essential to check the following: sufficient space suitable for housing the equipment;
airborne noise produced depending on the environment; potential flammability hazards.
ABB will NOT be held liable for defects or malfunctions arising from: improper use of the
equipment; deterioration resulting from transportation or particular environmental
conditions; performing maintenance incorrectly or not at all; tampering or unsafe repairs;
use or installation by unqualified persons.
ABB will NOT be held responsible for the disposal of: displays, cables, batteries,
accumulators etc. The Customer shall therefore arrange for the disposal of substances
potentially harmful to the environment in accordance with the legislation in force in the
country of installation.
Field of use, general conditions
ABB shall not be liable for any damages whatsoever that may result from incorrect or careless
operations.
You may not use the equipment for a use that does not conform to that provided
for in the field of use. The equipment MUST NOT be used by inexperienced
staff, or even experienced staff if carrying out operations on the equipment that
fail to comply with the indications in this manual and enclosed documentation.
Intended or allowed use
This device is monitoring equipment designed for data collection and low-voltage connection to
inverters, weather stations, string combiners, and other photovoltaic equipment.

VSN700 Data Logger Product Manual
- 4 -
Contents
System overview ...................................................................................................................... 5
VSN700 Data Logger models ............................................................................................................... 6
Installation ................................................................................................................................ 7
Preparation ............................................................................................................................................ 7
VSN700 installation ............................................................................................................................... 8
Inverter address configuration .......................................................................................................... 11
Commissioning ...................................................................................................................... 12
Connect to the Internet ....................................................................................................................... 12
Configure the data logger................................................................................................................... 13
Configure for devices ......................................................................................................................... 14
Set a static IP address ............................................................................................................. 14
Verify Internet connectivity to Aurora Vision servers ...................................................................... 14
Asset registration ................................................................................................................................ 15
End-to-end data check ........................................................................................................................ 15
Plant Viewer access for end users .................................................................................................... 15
Adding an ABB weather station ............................................................................................ 18
Configuration for a weather station device ....................................................................................... 19
Interfacing VSN700-05 with SCADA systems ....................................................................... 21
Power-One SunSpec Adapter ............................................................................................................ 21
Modbus TCP server ............................................................................................................................ 21
Data logger configuration for SCADA or other monitoring systems .............................................. 22
Set a Static IP Address for the data logger .............................................................................. 22
Configure the serial interfaces ................................................................................................. 22
Communication with devices by SCADA or monitoring system ................................................ 23
Adding 3rd party devices ................................................................................................................... 24
Modbus TCP client .............................................................................................................................. 25
Troubleshooting ..................................................................................................................... 26
Troubleshooting guide ....................................................................................................................... 26
Troubleshooting/Resetting a data logger ................................................................................. 27
How to contact ABB technical support ............................................................................................. 28
Data logger specifications ..................................................................................................... 29

VSN700 Data Logger Product Manual
System overview
The VSN700 series data loggers are a lightweight solution for remote data acquisition, which
enables PV system owners to benefit from advanced energy reports. The data logger collects and
analyzes energy generation data from all connected ABB (and legacy Power-One) solar inverters
and other supported devices. System performance and energy information are logged into a
database on the Aurora Vision® Plant Management Platform where it can be retrieved and used
for analysis via any standard web-browser on an Internet connected device.
The installer logs on to the Aurora Vision website to register the VSN700 series data logger and
ensures that the logger is correctly passing information to the servers. The installer provides a URL
to the end user for access to Aurora Vision Plant Viewer. The installer can also monitor all of their
sites through a web-browser using Aurora Vision Plant Portfolio Manager.
The VSN700 in conjunction with the Aurora Vision solution brings the following benefits:
• Safeguard Your Investment and Maximize Your Return
• Improved Solar Energy System Efficiency
• Lower Life Cycle Costs
• Real-time and Historic Data Presented Using Web-based Devices
• Alarm Functions and Device Communication Failure
• Remote Access to all Data Using Internet Technology

VSN700 Data Logger Product Manual
- 6 -
Commercial and Utility Application with VSN700-05
The information in this document applies to all VSN700 Data Logger models. This guide provides
instructions for installing the data logger hardware
to
work
directly with
ABB
(or legacy Power-One)
solar inverters and for setting up the Aurora Vision management system for remote data access.
The VSN700 consists of a data logger/gateway and a universal AC/DC power supply adaptor and
optionally comes with a DIN rail mounting kit. The data logger connects to a Local Area Network
(LAN) with an Ethernet RJ45 connection. Typically it connects to a Digital Subscriber Line (DSL) or
Cable modem through a router to get access to the Internet. In summary, any kind of Internet
connection will work.
VSN700 Data Logger models
The data logger comes in three models. The feature differences are provided in the table below.
Model
Supported Devices and Features
Residential
(VSN700-01-XX)
Monitor up to 5 ABB (or legacy Power-One) single-phase and/or small three-
phase (Trio 5.8/7.5/8.5) string inverters.
Commercial
(VSN700-03-XX)
Monitor up to 10 ABB (or legacy Power-One) string inverters and one ABB
weather station. String inverters can be single-phase or three-phase.
Max
(VSN700-05-XX)
Monitor any ABB (or legacy Power-One) solar inverters. Monitor other supported
ABB and 3
rd
party devices; including, meters, combiners, and weather stations.
Includes a Modbus TCP server and converts proprietary Power-One inverter
data maps into SunSpec compliant maps for easier SCADA system interface.

VSN700 Data Logger Product Manual
- 7 -
Installation
Qualified personnel with appropriate training and experience must perform installation of the
VSN700. Follow standard safety precautions during all procedures. Appropriate personal protection
equipment (PPE), such as safety gloves and safety glasses is recommended.
During normal operation, dangerous voltages flow through many parts of the
system, including: terminals, all I/O Modules (Inputs and Outputs) and their
circuits. All Primary and Secondary circuits can, at times, produce lethal voltages
and currents. Avoid contact with any current-carrying surfaces. Installation may
also require close proximity to high-voltage high-current wires, so proper caution
should be exercised when installing these devices.
Make sure all power is switched off before performing installation. These servicing
instructions are for use by qualified personnel only. To reduce the risk of electric
shock, do not perform any servicing other than that specified in the operating
instructions unless you are qualified to do so.
Preparation
Make sure you have the following tools and materials prior to starting installation.
Tools
• Standard Electrician’s Toolkit
• Personal Protective Equipment (Gloves, Goggles, Clothing)
Materials and Test Equipment
• Twisted-Pair RS-485 Wire (Belden#3106A or equivalent).
DO NOT USE CAT5/6 CABLE FOR THE RS-485 DATA WIRE.
• Ethernet Cable to make Network Connection
• Laptop Computer with Internet Browser
• Second Ethernet Cable for Logger configuration
• Mounting Screws and/or Brackets
It is also useful to know if you need to perform Asset Registration or final End-to-End Data Checks
after physical installation is complete. If so, you will need a User ID/password to log in to Aurora
Vision, and additionally you will need Administrator privileges to access the Administration tool in
Aurora Vision. See the Commissioning section for details.

VSN700 Data Logger Product Manual
- 8 -
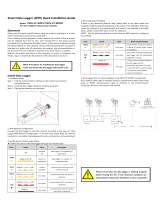
VSN700 installation
1. Check packaging for all components:
• Data Logger
• Power Supply Adapter (not included
with VSN700-05-00 model)
• DIN rail mounting kit for 35mm DIN
rails (VSN700-05-00 model only)
2. Determine the indoor location of the VSN700. For reliable operation, it is required that the
data logger be located within 100m (330 ft.) of an Ethernet connection and within 1200m
(4000 ft.) of the inverter(s).
3. Mount the data logger. The logger comes with flanges with pre-drilled holes for easy
mounting. A DIN rail mounting kit comes with the VSN700-05-00 model and can be
optionally ordered with other models. All data logger versions require a weather protected
site. The included power supply requires an ambient temperature between 0
o
C and 40
o
C
but the logger can operate between -40
o
C and 85
o
C.
4. Connect shielded twisted-pair wire to the RS-485 terminals on the inverter(s). If there are
multiple inverters, wire the inverters in a daisy chain configuration. Refer to your inverter
manual for information on terminal locations and daisy chaining inverters. Use RS-485
data wire with one twisted pair, one ground conductor, and a shield with drain wire
(Belden#3106A or equivalent). DO NOT USE CAT5/6 CABLE FOR THE RS-485 DATA
WIRE.
5. For systems with multiple inverters, the RS-485 network must be terminated at the final
inverter by a switch near the RS-485 terminal block. The farthest inverter in the daisy
chain must be terminated by setting the inverter termination switch to ON. For all other
inverters in the daisy chain, turn OFF the termination switch. Below are pictures of RS-485
terminals in various inverters, as well as locations of the termination switch.
1
If you need
more information, consult your inverter’s manual for locating the RS-485 terminals and the
termination resistor switch.
1
In some environments you may experience poor RS-485 signal quality due to noise. If signal quality is a
problem, double-check that the last inverter in the chain is terminated and other inverters are not terminated. If
problems persist, it may prove helpful to attach a 120 Ohm 0.5 Watt resistor across screw terminals 1 and 2 on
the data logger.

VSN700 Data Logger Product Manual
- 9 -
6. Connect the other end of the shielded twisted-pair wire to Secondary RS-485 terminals on
the data logger. Use the table below and the figure on page the next page to make the
proper connections. See the section on Adding an ABB Weather Station for information on
connections for an attached weather station.
RS-485
Connection
Data Logger RS-485
Screw Terminal
Connector
Example Inverter RS-485
Pin Label
RS-485 Negative (-)
1
-TR (Port 5)
RS-485 Positive (+)
2
+TR
(Port 4)
RS-485 Negative (-)
3
-----
RS-485 Positive (+)
4
----
Ground
5
RTN (Port 3)
VDC Power Only
6
----
PVI-xxxx Indoor Series
PVI-x.x Outdoor Series
PVI-x.x Outdoor Series
(U.S.)
Termination Switch
Eth0 -- For Internet Connection
RS-485
Screw Terminal
Eth1 -- For Device Configuration

VSN700 Data Logger Product Manual
- 10 -
7. Most VSN700 models come packaged with an AC/DC power adapter. The DC output
wires are pre-stripped and tinned for connecting to the screw terminal of the data logger.
Attach the conductor with the white label, which is positive 12 volts DC, to Port 6 of the
data logger’s screw terminal. Attach the other solid black DC ground conductor to Port 5 of
the data logger’s screw terminal. See the figure below.
VSN700-05-00 models come with a DIN Rail kit for mounting directly on a DIN rail within
an inverter. After DIN Rail mounting, connect the data logger directly to a 9V-24V (±10%)
DC voltage source capable of supplying greater than 7.2VA. The logger will typically only
consume about 3VA during normal operation.
8. For models with an AC/DC adapter, connect the adapter to a standard power outlet. The
power supply accepts a Universal AC input for use worldwide and will come with a plug
adapter that is specific for your region. An appropriate travel adapter can be used if
connecting to a different socket type.
9. Check the data logger’s power. There is a pair of light emitting diodes (LEDs) on the side
of the logger, opposite the RS-485/DC power terminal block. The LEDs flash during
system boot and then LED2 turns solid green when power is supplied and the system is
ready.
To Network via
Switch or Router
Screw Terminal Block
on Data Logger
Example Inverter
Terminal Block
Positive (+)
Negative (-)
100-240VAC/12VDC
Converter/Adapter
Data Logger
+12VDC Power
Use Twisted Pair Wire
Adapter
+12VDC Power
DC Ground

VSN700 Data Logger Product Manual
- 11 -
Inverter address configuration
ABB’s legacy Power-One inverters (PVI, UNO, TRIO) may only use, or are configured to use, a
proprietary communication protocol called Aurora Protocol. To monitor these inverters with a
Residential or Commercial model VSN700, they must be attached to the Secondary RS-485 port
on the data logger. ABB inverters (PVS, PRO, TRIO) may only use, or are configured to use,
Modbus RTU protocol and must be attached to the Primary RS-485 port on Commercial data
loggers. Modbus devices are not supported by the Residential data logger. The RS-485 ports on
the Max version data logger are configurable for either protocol. In any case, all inverters
connected in a daisy chain must use, or be configured to use, the same communication protocol
and protocol settings. For systems with multiple inverters, each inverter in a daisy chain must be
manually assigned a different RS-485 address. Refer to the inverter manual(s) for instructions on
how to set inverter addresses and exact inverter connection points. Write down the serial number
and RS-485 address for each inverter so you can determine which inverter is which on the
monitoring system.

VSN700 Data Logger Product Manual
- 12 -
Commissioning
The following are the major steps required to make sure the system is operational and data is
being passed to Aurora Vision servers:
1. Connect the data logger to your Ethernet network.
2. Configure the data logger through its web-based user interface.
3. Verify that you have a working Internet connection from the data logger to Aurora Vision’s
servers.
4. Perform Asset Registration through the Administration page on Aurora Vision.
5. Verify end-to-end data transfer using the Plant Portfolio Manager web portal.
Commissioning is not complete until you have performed the final two steps above over the
Internet. However, these two steps do not necessarily need to be performed as part of the
hardware installation.
Connect to the Internet
Connect the data logger to the Internet through a local area network. Use standard Ethernet cable
and connect it to the Ethernet RJ-45 port marked Eth0 on the front of the data logger. The data
logger can connect through any switch or router in your network.
2
Verify that the data logger has an Ethernet connection. The Eth0 LED can be used for detecting
network link and network traffic:
• Eth0 LED = GREEN = Link
• Eth0 LED = GREEN BLINK = Traffic
• Eth0 LED= OFF = No network link
If no activity is seen on the LEDs, double-check all connections.
ABB recommends a wired Internet connection because it is more reliable and requires less setup.
If it is necessary to connect to a wireless network, a wireless network bridge with an Ethernet port
is required. Purchase and configure the wireless network bridge that is compatible with the host
wireless network. Ensure that the wireless connection is operational with a laptop before
connecting it to the Eth0 port of the data logger.
ABB does not provide Internet service or the cables required to connect the data logger to the
Internet.
2
The data logger is by default set to DHCP and will try to acquire its IP-address from the DHCP server on your local network
(LAN). The data logger is designed for use on an Ethernet network and must be assigned an IP address (DHCP or static) to
make it accessible. If it is required to set a static IP for the data logger, your connection will not work until this address is set. If
required, refer to the section below on setting a Static IP address. Normally no ports should need to be opened in the network
firewall. The data logger will use port 443 outbound to transmit the data.

VSN700 Data Logger Product Manual
- 13 -
Configure the data logger
The installer must use a laptop with an Ethernet cable to communicate directly to the data logger’s
web-based user interface for configuration. The data logger’s web server has many options and
capabilities, but here we only describe those necessary to get your system up and running.
1. Configure the laptop’s Ethernet port to obtain a Dynamic IP address automatically through
DHCP; typically, laptops are already configured this way.
2. Connect the Ethernet cable between the secondary Ethernet port marked Eth1 on the data
logger and the laptop computer.
3. Wait for the laptop to obtain an IP address from the data logger and then open an Internet
browser window on the computer. Type in the following URL in the address bar.
http://172.17.17.1
4. The following Home page (or similar
3
) will appear:
Select the tabs across the top to perform configuration operations and select one of the ports in the
Devices list to set up devices.
Verify all the icons for the data logger in the status area to the right are green. It may take some
time for all the icons to turn green.
The MAC address (Logger ID) for the data logger is displayed at the top of the page. Be sure to
write down the MAC address of the data logger. The MAC address is needed later for Asset
Registration.
3
Due to the constantly evolving nature of software, the images shown in this manual may be out of sync with the
current user interface. The options mentioned should still be accessible, but may be renamed or accessed in a
different way than is described in this manual.

VSN700 Data Logger Product Manual
- 14 -
Configure for devices
The Devices list on the Home page shows all the different devices connected through all the ports
on the data logger. It is essential that the devices you set up here match how devices are
physically connected to your data logger.
By default, only the two RS-485 ports are set up. The primary RS-485 port is set to Modbus RTU
and the secondary RS-485 is set to Power-One Aurora Protocol. The default settings support
hardware connections where all legacy Power-One inverters are attached as an RS-485 daisy
chain to the Secondary RS-485 port. Optional weather stations used with the Commercial version
VSN700 are connected to the Primary RS-485 port. See Section 4 if you are adding a weather
station. See Section 5 for configuration options if you are using a Max version VSN700.
For the Secondary RS-485 connection, once legacy Power-One inverters and ABB inverters using
the Aurora Protocol are properly addressed and wired in the RS-485 daisy chain, inverters will
automatically be discovered and displayed.
Set a static IP address
Setting a Static IP is only necessary if required by your network. In almost all cases you can skip
this section.
1. Obtain Static IP address information for the site.
2. Select the Network tab. Set the Type (Network Connection Type) field to Static. The page
allows you to type in the following information:
•
IP address
•
Subnet Mask
•
Gateway
•
DNS (separate primary and secondary DNS servers with a single space)
3. Press Update at the bottom of the page.
The data logger needs to be restarted before the network changes take affect. In the Home tab
use the Reboot Logger button to reboot the logger.
Verify Internet connectivity to Aurora Vision servers
1. Verify that the Ethernet cable is connected between the data logger’s Eth0 and your network.

VSN700 Data Logger Product Manual
- 15 -
2. The data logger acts as a router. From your laptop connected to Eth1, verify internet
connectivity by opening up an Internet browser window and connecting to
www.auroravision.net.
3. The remaining steps for commissioning are performed via the Internet to check end-to-end
communications. Proceed with one of the following steps:
• If you are not responsible for these remaining steps, be sure to pass on the MAC address
(Logger ID) information to the responsible party. Remove the cable from Eth1. Installation
is complete.
• If asset registration is already complete, proceed to the section on End-to-End Data
Check.
• If asset registration is not complete, proceed to the next section on Asset Registration.
Asset registration
Asset registration is performed via the Administration tool in Aurora Vision. Asset registration
assigns the MAC address of your logger to a specific plant in Aurora Vision. Asset Registration can
be performed before or after the on-site installation is complete. When you register the data logger,
all the assets (inverters and other devices) reporting to the data logger are also registered. A Plant
must be created on Aurora Vision using the Administration tool before the data logger can be
assigned and registered to it. Note that access to Administration tool requires an Aurora Vision
User ID and password with Administrator privileges.
From the data logger’s user interface, click the Logger Registration button to go to the Asset
Registration on the Administration page of Portfolio Plant Manager. If you are not using the data
logger’s web-based user interface, go to https://admin.auroravision.net/customeradmin
. Select
Administration > Register Logger and type in the MAC address of the data logger. Follow the
steps on the Asset Registration page to select the plant that the data logger will be associated with.
See the Plant Portfolio Manager Users Guide for help in using the Administration tool for asset
registration. Go to https://docs.auroravision.net for all the latest product documentation.
End-to-end data check
The last check is to make sure that data is actually being reported and is visible on the Aurora
Vision portal. Wait 15 minutes and log on to www.auroravision.net using a web browser on an
Internet connected device. Within Aurora Vision, go to the Plant > Dashboard page for the plant
and open the Device Status panel. Verify that the energy readings agree with the inverter(s) and
that all of the monitored devices are communicating, as indicated by the Last Reported time.
Plant Viewer access for end users
The installer must supply the user with their unique Plant Viewer URL so they can monitor their
system. To find the URL for a specific user’s plant within Aurora Vision, follow these steps:
1. Log on to Plant Portfolio Manager at www.auroravision.net and go to Plant > Management.

VSN700 Data Logger Product Manual
- 16 -
2. Select the Plant from the asset list in the screen area to the left.
3. Once the correct Plant is displayed, select Share from the Actions menu.

VSN700 Data Logger Product Manual
- 17 -
4. A page is displayed to configure the user’s Plant Viewer options. Scroll down to the Published
View section. The URL to provide to the customer is in the Share URL field.
For detailed information about plant sharing options see the Plant Portfolio Manager User Guide.
Go to https://docs.auroravision.net for all the latest product documentation.

VSN700 Data Logger Product Manual
- 18 -
Adding an ABB weather station
ABB’s weather stations must be wired to the Primary RS-485 port on the Commercial version
VSN700. Weather stations are not supported by the Residential version VSN700. Weather stations
can be attached to any port configured for Modbus RTU on the Max version VSN700.
1. Connect shielded twisted-pair wire to the RS-485 terminals on the weather/environmental
station. Use RS-485 data wire with one twisted pair, one ground conductor, and a shield with
drain wire (Belden#3106A or equivalent). DO NOT USE CAT5/6 CABLE FOR THE RS-485
DATA WIRE.
2. Connect the other end of the shielded twisted-pair wire to the Primary RS-485 terminals on the
data logger. Use the table below and the figure on the next page to make the proper
connections.
RS-485 Screw Terminal
RS-485
Connection
Data Logger RS-485
Screw Terminal
Connector
Example Inverter RS-485
Pin Label
Example VSN800-XX
RS-485 Pin Label
RS-485 Negative (-)
1
-TR (Terminal 5)
----
RS-485 Positive (+)
2
+TR
(Terminal 4)
----
RS-485 Negative (-)
3
-----
RS-485 A(-)
RS-485 Positive (+)
4
----
RS-485 B(+)
Ground
5
RTN (Terminal 3)
RS-485 GND and GND
VDC Power Only
6
N/A
24VDC
3. The VSN800 weather stations can tap the power terminals on the data logger for its power
source. Tapping off the data logger’s power source is optional; any appropriate DC power
source that meets the specifications of the weather station may be used. To use the data
logger’s power source for the weather station, connect shielded twisted-pair wire to the power
terminals on the weather/environmental station. For distances less than 400 feet between the
data logger and the weather station we recommend using #22 AWG stranded copper wire. For
longer distances use a heavier gauge wire. Consult the VSN800 weather station’s datasheet
+12VDC Power, Terminal 6
DC Ground, Terminal 5
Primary RS-485 Connectors, Terminal
3 (D-) and
Terminal 4 (D+)

VSN700 Data Logger Product Manual
- 19 -
for the minimum required voltage and maximum allowed wire gauge. If unable to meet these
specs because of voltage drop then a separate power supply closer to the weather station
must be used. DO NOT USE CAT5/6 CABLE FOR THE POWER WIRES.
4. Connect the other end of the shielded twisted-pair wire to the +9-24VDC and GND terminals
(terminals 6 and 5) on the data logger. It may be necessary to use a wire nut to attach the
multiple wires to the GND terminal on the data logger.
Wire the weather station to the data logger as shown in the figure below.
Configuration for a weather station device
The Devices list on the data logger’s Home page will show all the different devices connected
through all the ports on the data logger. It is essential that the devices you set up here match how
devices are physically connected to your data logger.
To Network via
Switch or Router
Screw Terminal Block
on Data Logger
Example Inverter
Terminal Block
Positive (+)
Negative (-)
100-240VAC/12VDC
Converter/Adapter
Data Logger
+12VDC Power
Use Twisted Pair Wire
Example Weather Station Terminal Block
Use Twisted Pair Wire
Power for
Weather Station
Adapter
+12VDC Power
DC Ground

VSN700 Data Logger Product Manual
- 20 -
The port configuration for the Primary RS-485 port on the VSN700 Commercial must remain set to
Modbus RTU (default value). Configuration of the Primary RS-485 port only needs to be
completed when using an optional weather station.
Configure the Primary RS-485 port using the following procedure. Bring up the data logger’s web
interface in the same manner as for configuring inverters (connect an Ethernet cable from the data
logger’s Eth1 port to a laptop and go to http://172.17.17.1).
To add the VSN800 weather station go to the Home tab and push the Find button for the Primary
RS-485 port. Click on Start in the window that pops up to begin the device discovery process. The
default Modbus address for the VSN800 weather stations is 60. It is not necessary to let the scan
finish, once it has discovered the device the scan can be stopped and closed.
/