Page is loading ...

INSTALLATION INSTRUCTIONS
For Model # P477-077 (02/27/2019)
WARNI N G ! S H U T P O W E R O F F AT F U S E O R C I RCUI T B R E A K E R .
WARNING
Risk of shock, do not plug in the unit before assembly.
Do not exceed the maximum wattage rating (100W MAX).
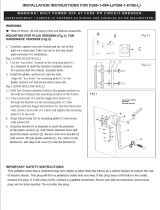
MOUNTING THE LUMINAIRE, PLUG VERSION (Fig.1 & Fig. 2)
For hardware version see Fig. 3 & Fig. 4
1. Carefully unpack your new fixture and lay out all the parts on
a clear area. Take care not to lose any small parts necessary
for installation.
2. Drill two (6mm) diameter holes in the proper position on the wall
according to the mounting location of the fixture,insert the plastic
anchors (D).
3. Secure the mounting plate (A)
to wall using th
e screws (B).
4. Secure the fixture body (K) to mounting plate (A) and using
the screws (C) .Place the socket through the shade (F), then
screw the glass bowl (E) to the socket until tight.
5. Using the bracket (G) as template to mark the positions of the
plastic anchors (L), drill (6mm) diameter holes and insert the p
lastic anchors (L). Install the bracket (G) using screws (H).
Align the cord (I) into the bracket (G), then snap the cord cover
(J) into the bracket (G) tightly.
6. Install (1) one medium base bulb up to 100 watts or CFL or LED
equivalent (not included) in accordance with the fixtures
specifications. (DO NOT EXCEED THE MAXIMUM WATTAGE
RATING!) (NE PAS DEPASSER LA PUISSANCE NOMINALE
MAXIMALE!)
IMPORTANT SAFETY INSTRUCTIONS
Fig.1
Fig.1(FOR SOLID WALL)
Fig.1-1
Fig.1-1(FOR HOLLOW WALL)
Fig.2
IN AN ONGOING EFFORT TO BE ENVIRONMENTALLY FRIENDLY AND IN COMPLAINCE WITH
CALIFORNIA TITLE 20 AN ENERGY SAVING COMPACT LED BULB(S) IS INCLUDED.
AVERTISSEMENT! COUPER LE COURANT AU NIVEAU DES FUSIBLES OU DO DISJONCTEUR
2-1. Drill two (16mm) diameter holes in the proper position on
the wall according to the mounting location of the fixture.
3-1. Pass crown bolt (O) and the toggle bolt anchor (Q) through the
keyhole on the mounting plate (A), then carefully push the
toggle bolt anchor (Q) into the hole in the wall. Screw crown
bolt (O) which will tighten the mounting plate (A) to the wall.
40
Q
A
O
Ø16
Ø16
1. This portable lamp has a polarized plug (one blade is wider than the other) as a safety feature to reduce the risk of
electric shock. This plug will fit in a polarized outlet only one way. If the plug does not fit fully in the outlet, reverse
the plug. If it still does not fit, contact a qualified electrician. Never use with an extension cord unless plug can be
fully inserted. Do not alter the plug.
2. The lamp also uses 1-3W LED and the on/off switch is on the face plate. Do not look directly at LED with lit.

Fig. 5
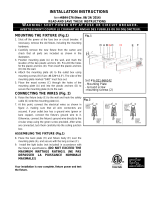
MOUNTING THE FIXTURE, HARDWARE VERSION
(Fig. 3 & Fig. 4)
1. Shut off power at the circuit breaker and remove old
fixture from wall, including the crossbar.
2. Remove the cord and plug by disconnecting the wire
nuts to the cord. (CAUTION: CAN NOT GO BACK TO
PLUG VERSION ONCE THE CORD AND PLUG ARE
CUT OFF)
3. Remove screws (C) from the fixture body(K) to separate
mounting plate.
4. Secure the mounting bracket (A) to the outlet box using
the screws (B). The side of the mounting bracket
marked “GND” must face out (Fig.3).
CONNECTING THE WIRES (Fig. 5)
Connect the electrical wires as shown in
Fig.5, making
sure that all wire connectors are secured. If your outlet
hasaground wire (green or bare copper), connect the
fixture’s ground wire to it. Otherwise, connect the
fixture’s ground wire directly to the mounting bracket by
using the green screw provided.
FINISHING THE INSTALLATION (Fig. 4)
5. Place fixture body (K) over the mounting bracket (A)
then secure them tightly with two screws (C).
6. Insert the filler plug (M) into the hole on the bottom of
the fixture body (K).
7. Install (1) one medium base bulb(100W MAX) into socket
in accordance with the fixtures specifications.(DO NOT
EXCEED THE MAXIMUM WATTAGE RATING!)
(NE PAS DEPASSER LA PUISSANCE NOMINALE
MAXIMALE!)
Your installation is now complete. Return power to the
outlet box and test the fixture.
FIXTURE
WIRES
Black or
Smooth
HOUSE
WIRES
Black
(Hot)
FIXTURE
WIRES
White or
Ribbed
HOUSE
WIRES
White
(Neutral)
FIXTURE
WIRES
Bare
Copper
(Ground)
HOUSE
WIRES
Green
(Ground)
Fig.3
Fig.4
/