GoPro CHDHZ-103 User manual
- Category
- Action sports cameras
- Type
- User manual
This manual is also suitable for

1
USER MANUAL


Your Fusion 6
Getting Started 8
Navigating Your GoPro 17
Map of Modes and Settings 20
Tips for Capturing with Fusion 22
QuikCapture 24
Capturing Video and Photos 26
Controlling Your GoPro with Your Voice 28
Playing Back Your Content 32
Connecting to Other Devices 33
Ooading Your Content 35
Video Mode: Capture Mode 36
Video Mode: Settings 37
Photo Mode: Capture Modes 41
Photo Mode: Settings 42
Time Lapse Mode: Capture Modes 44
Time Lapse Mode: Settings 46
Protune 50
Customizing Your GoPro 53
TABLE OF CONTENTS
Important Messages 56
Resetting Your GoPro 57
Mounting 59
Removing the Side Door 64
Maintenance 66
Battery Information 68
Troubleshooting 71
Customer Support 73
Trademarks 73
Regulatory Information 73
TABLE OF CONTENTS

6 7
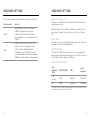
8
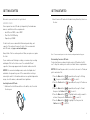
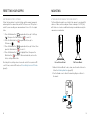
1. Speaker
2. Camera Lens (Back)
3. Status Light
4. Mode Button [ ]
5. Microphones
6. USB-C Port
7. Side Door
8. Latch Release Button
YOUR FUSION
9. Camera Lens (Front)
10. Status Screen
11. Slot for microSD Card 1
12. Shutter Button [
]
13. Battery Door
14. Slot for microSD Card 2
15. Battery
16. Mounting Fingers
YOUR FUSION
3
2
10
9
13
7
14
4
7
6
12
15
16
11
1
5

8 9
Welcome to your new Fusion! Let’s get started.
MICROSD CARDS
Fusion requires two microSD cards (sold separately). Use brand name
memory cards that meet these requirements:
• microSD, microSDHC, or microSDXC
• Class 10 or UHS-II/III rating
• Capacity up to 128GB
For best results, we recommend that the brand, speed rating, and
capacity of the cards are the same. For a list of the recommended
microSD cards, visit gopro.com/workswithgopro.
Always think of the two cards as partners. When you replace one, replace
the other.
If your cards become full during recording, your camera stops recording
and displays FULL on the status screen. For cards with dierent
capacities, this message appears when the smaller card becomes full.
NOTICE: Use care when handling memory cards. Avoid liquids, dust
and debris. As a precaution, power o the camera before inserting or
removing the cards. For information about use in acceptable temperature
ranges, check the memory card manufacturer’s guidelines.
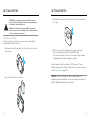
Inserting the microSD Cards
1. Hold down the Latch Release button on the battery door, then slide
the door open.
GETTING STARTED
2. Insert two microSD cards with the labels facing the battery, then close
the door.
Note: To remove a card, press it into the slot with your ngernail and it will pop out.
Reformatting Your microSD Cards
For best performance, always reformat your microSD cards before rst
use. To keep the cards in good condition, reformat them on a regular basis.
NOTICE: Reformatting erases all of your content, so be sure to ooad your
photos and videos rst.
1. Press the Mode button [
] repeatedly until you get to Settings
[ ], then press the Shutter button [
] to select it.
2. Press the Shutter button [
] repeatedly until you get to Preferences
[ ].
3. Press the Mode button [ ] repeatedly until you get to Format,
then press the Shutter button [
] to select it.
4. Press the Mode button [ ] to highlight which card(s) you want to
reformat, then press the Shutter button [
] to select it.
5. Press the Mode button [ ] to highlight Yes, then press the
Shutter button [
] to select it.
GETTING STARTED

10 11
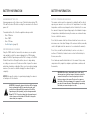
WARNING: Use caution when using your GoPro as part of
your active lifestyle. Always be aware of your surroundings to
avoid injury to yourself and others.
Abide by all local laws when using your GoPro and related
mounts and accessories, including all privacy laws, which may
restrict recording in certain areas.
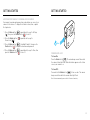
CHARGING THE BATTERY
For the best experience with your new camera, we recommend fully
charging the battery before rst use.
1. Hold down the Latch Release button on the battery door, then slide
the door open.
2. Insert the battery, then close the door.
GETTING STARTED
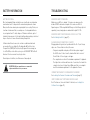
3. Hold down the Latch Release button on the side door, then slide the
door open.
4. Connect the camera to Supercharger or another wall charger
(both sold separately) using the included USB-C cable.
The camera status light on the front of the camera turns on during
charging and turns o when charging is complete.
For wall chargers, the battery charges to 100% in about 3.5 hours.
Supercharger charges the battery in about 2 hours. For more information,
see Battery Information (page 68).
PRO TIP: For fastest charging, use GoPro’s Supercharger (sold
separately) and its included cable. You can also charge your camera with
a USB-compatible wall charger or auto charger.
GETTING STARTED

12 13
GETTING STARTED GETTING STARTED
UPDATING YOUR CAMERA SOFTWARE
To get the latest features and best performance from your GoPro,
make sure your camera is always using the most current software.
Updating with the GoPro App
When you connect your camera to the GoPro app, you are automatically
notied if an update is available.
1. Download the app from the Apple
©
App Store
©
or Google Play.
™
2. Be sure that the camera contains both microSD cards.
3. Follow the on-screen instructions in the app to connect your camera.
If an update is available, the app provides instructions for installing it.
Updating Manually (with an SD Card Reader/Adapter)
1. Visit gopro.com/update.
2. Select your camera, then click the option to update the camera
manually.
3. Be sure that the camera contains both microSD cards.
4. Follow the on-screen instructions.
LOCATING YOUR SOFTWARE VERSION
1. Press the Mode button [
] repeatedly until you get to Settings
[ ], then press the Shutter button [
] to select it.
2. Press the Shutter button [
] repeatedly until you get to
Preferences [ ].
3. Press the Mode button [ ] to highlight About, then press the
Shutter button [
] to select it. The software version appears on
the rst screen.
4. Press the Shutter button [
] to select Done.
5. Press the Mode button [ ] repeatedly until you get to Done,
then press the Shutter button [
] to select it.

14 15
LOCATING YOUR CAMERA’S USERNAME AND PASSWORD
Your camera’s username and password are needed when you connect your
camera to other devices. To display this information at any time, complete
the steps below.
1. Press the Mode button [
] repeatedly until you get to Settings
[ ], then press the Shutter button [
] to select it.
2. Press the Shutter button [
] repeatedly until you get to
Connections [ ].
3. Press the Mode button [
] to highlight Cam Info, then press the
Shutter button [
] to display the username and password.
4. Press the Mode button [
] repeatedly until you get to Done, then
press the Shutter button [
] to select it.
GETTING STARTED GETTING STARTED
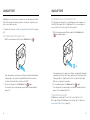
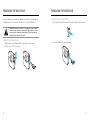
POWERING ON + OFF
To Power On:
Press the Mode button [ ]. The camera beeps several times while
the camera status lights ash. When information appears on the status
screen, your camera is on.
To Power O:
Press and hold the Mode button [
] for two seconds. The camera
beeps several times while the camera status lights ash.
Note: Fusion automatically powers o after 7 minutes of inactivity.
2 sec

16 17
GETTING STARTED
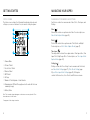
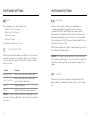
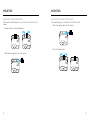
STATUS SCREEN
The status screen contains the following information about modes and
settings so you can see the basics for your current setting at a glance:
1. Camera Mode
2. Protune
™
Status
*
3. Voice Control Status
*
4. Wireless Status
*
5. GPS Status
*
6. Settings
7. Number of Files Captured or Video Duration
8. Remaining microSD Card Storage (based on the card with the lower
remaining storage)
9. Battery Status
Note: The icons and settings that appear on the status screen vary by mode. Those
shown above are for Video mode.
*
Icon appears if this setting is turned on
1
6
7
8 9
2 3
4
5
CHANGING CAPTURE MODES AND SETTINGS
Your Fusion contains four camera modes: Video, Photo, Time Lapse, and
Settings.
Video [
]
Video mode contains one capture modes: Video. For a description, see
Video Mode: Capture Mode (page 36).
Photo [
]
Photo mode contains three capture modes: Photo, Burst, and Night.
For descriptions, see Photo Mode: Capture Modes (page 41).
Time Lapse [
]
Time Lapse mode contains three capture modes: Time Lapse Video, Time
Lapse Photo, Night Lapse Photo. For descriptions, see Time Lapse Mode:
Capture Modes (page 44).
Settings [
]
Settings contains all of the settings for each camera mode. For details,
see Video Mode: Settings (page 37), Photo Mode: Settings (page
42), and Time Lapse Mode: Settings (page 46). Settings also
contains the Connections, Voice Control, and Preferences menus.
NAVIGATING YOUR GOPRO

18 19
NAVIGATING YOUR GOPRO
1. To change modes, press the Mode button [ ] repeatedly until you
get to the mode that you want.
2. If needed, select a new capture mode and settings:
a. Press the Mode button [ ] repeatedly until you get to
Settings [ ], then press the Shutter button [
] to select it.
b. Press the Shutter button [
] repeatedly until you get to the
camera mode that you want.
c. Press the Mode button [ ], then press the Shutter button
[
] repeatedly until you get to the capture mode that you
want.
d. Press the Mode button [ ] until you get to the setting that
you want to change.
e. Press the Shutter button [
] repeatedly until you get to the
option that you want.
f. Press the Mode button [ ] repeatedly until you get to Done,
then press the Shutter button [
] to select it.
PRO TIP: To exit Settings and begin recording immediately, press and hold
the Shutter button [
].
NAVIGATING YOUR GOPRO

20 21
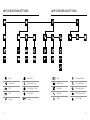
MAP OF MODES AND SETTINGS
Burst
Connections
FOV
FPS
Interval
Night Photo
Night Lapse Photo
Photo Mode / Photo
Preferences
Protune
MAP OF MODES AND SETTINGS
Rate
RAW Format
Resolution
Settings
Shutter
Time Lapse Mode
Time Lapse Photo
Time Lapse Video
Video Mode / Video
Voice Control

22 23
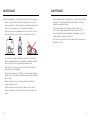
TIPS FOR CAPTURING WITH FUSION TIPS FOR CAPTURING WITH FUSION
If you are new to capturing spherical content, below are some tips to help
you get the best results from Fusion.
• Fusion captures everything around you, regardless of where the
camera is pointed. However, for best results, aim one of the lenses
directly at the main subject.
• OverCapture lets you capture content in all directions from a single
point of view. So, you do not need as many cameras to ensure that
you get the shot. And you can select the content that is important to
you after you capture.
• For the best results, attach Fusion to the mounts that came with the
camera. Using the mounts moves the camera away from your hand
and helps reduce the chances that your hand appears in the shot.
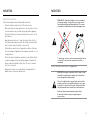
• When using Fusion as a handheld camera without a mount, group
most of your ngers underneath the camera near the mounting
ngers. This placement reduces the chance that your hand appears
in the shot:
• For more control during editing, capture with Protune turned on.
• To prevent additional work during editing, do not rest Fusion on its
side when capturing.
• Keep editing in mind when you are capturing with Fusion. For
example, remember to hide yourself and your supporting mounts and
equipment somewhere that is easily blended during editing.
WARNING: The dual lenses of Fusion are unprotected and
are susceptible to scratches, if not cared for properly. Always
store Fusion with the provided lens protection and avoid
resting the lens on any surface. Scratches to the lens are not
covered by the warranty.

24 25
QuikCapture is the fastest way to capture video or time lapse photos with
Fusion. Because the camera is powered on only when it is capturing, you
also conserve battery power.
To capture other types of content, see Capturing Video and Photos (page
26).
CAPTURING VIDEO WITH QUIKCAPTURE
1. With the camera powered o, press the Shutter button [
].
Your camera powers on, beeps several times, and automatically begins
capturing video. The camera status lights blink while the camera is
recording. The default video resolution is 5.2K30.
2. To stop recording, press the Shutter button [
] again.
The camera stops recording, beeps several times, and automatically
powers o.
QUIKCAPTURE
CAPTURING TIME LAPSE WITH QUIKCAPTURE
The Time Lapse mode is perfect for showing how a scene changes over
time. With Time Lapse Photo or Night Lapse Photo, you can capture a
series of photos to be sure you get the shot you want.
1. With the camera powered o, press and hold the Shutter button
[
] until capture begins.
3 sec
Your camera powers on, beeps several times, and automatically begins
capturing in the current Time Lapse capture mode (Time Lapse Video,
Time Lapse Photo, or Night Lapse Photo). The camera status lights
blink once for each photo captured.
2. To stop capturing, press the Shutter button [
] again.
The camera stops recording, beeps several times, and automatically
powers o to maximize battery life.
TURNING QUIKCAPTURE OFF
QuikCapture is on by default. To turn it o, connect Fusion to the
GoPro app and turn o QuikCapture in the settings list. For details, see
Connecting to Other Devices (page 33).
QUIKCAPTURE

26 27
CAPTURING VIDEO AND PHOTOS
You can also use a more traditional method to capture video and photos
in which you leave the camera powered on and capture, as needed. Unlike
QuikCapture, the camera remains on when you are not capturing, so
you must manually power it o to save battery life. (Fusion automatically
powers o after 7 minutes of inactivity.)
1. Press the Mode button [
] to power on the camera.
2. Select a mode and settings. For details, see Changing Modes and
Settings (page 17).
3. Press the Shutter button [
]. The camera beeps and the camera
status lights ash while the camera is capturing.
4. To stop capturing video or time lapse, press the Shutter button [
].
The camera beeps and the camera status lights ash quickly.
CAPTURING VIDEO AND PHOTOS
ADDING HILIGHT TAGS
You can mark specic moments in your video during recording or playback
with HiLight Tags. HiLight Tags make it easy to nd the best highlights
to share.
To add a HiLight Tag, press the Mode button [
] or tap [ ] in the
GoPro app.
CAPTURING VIDEO AND PHOTOS

28 29
You can control Fusion with your voice using a set of specic commands
(see list below).
Note: Voice Control performance may be impacted by distance, wind, and noisy
conditions. Keep the product clean and clear of debris.
USING VOICE CONTROL
Voice Control works best when you and your GoPro are in close proximity.
1. Press the Mode button [
] repeatedly until you get to Settings
[
], then press the Shutter button [
] to select it.
2. Press the Shutter button [
] repeatedly until you get to Voice
Control [ ].
3. Press the Mode button [ ], then press the Shutter button [
]
to turn on Voice Control.
Note: To conserve battery life, turn o Voice Control when you’re not using it.
4. Press the Mode button [ ] repeatedly until you get to Done, then
press the Shutter button [
] to select it.
5. Say a command from List of Voice Commands (page 29).
LIST OF VOICE COMMANDS
Two types of commands are available with Voice Control:
• Action commands let you immediately capture video or photos.
For example, if you just stopped recording video, you can say the
command to take a photo or begin capturing time lapse—without
having to rst change the mode.
• Mode commands are useful if you want to select a mode and then use
the Shutter button [
] to capture.
CONTROLLING YOUR GOPRO WITH
YOUR VOICE
Your camera does not need to be in a specic mode to capture video or
photos. You can use the action commands from any mode. Your camera
captures video or photos based on the settings you previously selected.
Action Command Description
GoPro start recording Starts capturing video
GoPro HiLight Adds a HiLight Tag to video
during recording
That was sick Adds a HiLight Tag to video
during recording
GoPro stop recording Stops capturing video
GoPro take a photo Captures a single photo
GoPro shoot burst Captures burst photos
GoPro start time lapse Starts capturing time lapse
GoPro stop time lapse Stops capturing time lapse
GoPro turn o Powers o the camera
CONTROLLING YOUR GOPRO WITH
YOUR VOICE

30 31
Mode Command Description
GoPro Video mode Changes the camera mode to Video
(does not capture video)
GoPro Photo mode Changes the camera mode to Photo
mode (does not capture photos)
GoPro Burst mode Changes the camera mode to Burst
mode (does not capture burst photos)
GoPro Time Lapse mode Changes the camera mode to
Time Lapse (does not capture time
lapse photos)
For the most updated list of commands, visit gopro.com/help.
PRO TIP: If you are recording video or time lapse, you must stop
recording before issuing a new command.
CONTROLLING YOUR GOPRO WITH
YOUR VOICE
CHANGING YOUR VOICE CONTROL LANGUAGE
1. Press the Mode button [ ] repeatedly until you get to Settings
[ ], then press the Shutter button [
] to select it.
2. Press the Shutter button [
] repeatedly until you get to Voice
Control [ ].
3. Press the Mode button [ ] repeatedly until you get to Voice
Control Language [ ], then press the Shutter button [
] to
select a new language.
4. Press the Mode button [ ] to highlight Done, then press the
Shutter button [
] to select it.
TURNING OFF VOICE CONTROL
1. Press the Mode button [
] repeatedly until you get to Settings
[ ], then press the Shutter button [
] to select it.
2. Press the Shutter button [
] repeatedly until you get to Voice
Control [ ].
3. Press the Mode button [ ], then press the Shutter button [
]
to turn o Voice Control.
4. Press the Mode button [ ] repeatedly until you get to Done, then
press the Shutter button [
] to select it.
CONTROLLING YOUR GOPRO WITH
YOUR VOICE

32 33
You can play back your content on a computer or mobile device.
VIEWING VIDEOS AND PHOTOS ON A COMPUTER
To play back your video and photos on a computer, you must rst
transfer these les to a computer. For details, see Ooading Your
Content (page 35).
You can also insert the microSD cards directly into a computer.
VIEWING VIDEOS AND PHOTOS ON A MOBILE DEVICE
1. Connect your camera to GoPro app. For details, see Connecting to
Other Devices (page 33).
2. Use the controls on the app to play back your footage on your
smartphone/tablet. You can move the device itself or navigate with
the touch screen to explore the full 360 image.
PRO TIP: While playing back your video with the GoPro app, you can
mark the best moments by tapping [ ] to add a HiLight Tag.
PLAYING BACK YOUR CONTENT
CONNECTING TO THE GOPRO APP
The GoPro app lets you control your camera remotely using a smartphone
or tablet. Features include full camera control, live preview, playback and
sharing of content, and camera software updates.
Connecting to the GoPro App for the First Time
1. Download the GoPro app to your mobile device from the Apple
©
App
Store
©
or Google Play
™
.
2. Follow the app's on-screen instructions to connect your camera.
Reconnecting to the GoPro App
After connecting to the GoPro app for the rst time, you can connect in
the future through the Connections menu [
] on the camera.
1. Turn on your camera’s wireless:
a. Press the Mode button [
] repeatedly until you get to
Settings [ ], then press the Shutter button [
] to select it.
b. Press the Shutter button [
] repeatedly until you get to
Connections [ ].
c. Press the Mode button [ ] to highlight Turn On, then press
the Shutter button [
] to select it.
d. Press the Mode button [ ] to highlight Yes, then press the
Shutter button [
] to turn on wireless.
e. Press the Mode button [ ] repeatedly until you get to Done,
then press the Shutter button [
] to select it.
2. In the GoPro app, follow the on-screen instructions to connect
your camera.
CONNECTING TO OTHER DEVICES

34 35
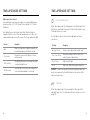
CONNECTING TO THE SMART REMOTE OR REMO
For details about connecting Fusion to the Smart Remote or Remo
(Waterproof Voice Activated Remote), see the user manual for the device
at gopro.com/help.
CONNECTING TO BLUETOOTH DEVICES
You can connect your GoPro to Bluetooth devices that track statistics
about your activity. That data is then automatically added to your video to
create a more engaging record of your activity.
1. Connect your camera to the GoPro app. For details, see Connecting
to the GoPro App (page 33).
2. In the app, open the camera’s settings, then tap Bluetooth Devices.
3. Follow the on-screen instructions.
SELECTING A DIFFERENT CONNECTION SPEED
By default, your GoPro uses the 5GHz Wi-Fi band to connect to other
devices. This band provides faster transfer speed than the 2.4GHz band.
The transfer speed aects how long it takes for your video and photos to
be copied to your phone.
To use the 5GHz band, your phone and region must also work with that
band. Otherwise, you can change the Wi-Fi band on your GoPro to
2.4GHz.
1. Press the Mode button [
] repeatedly until you get to Settings
[ ], then press the Shutter button [
] to select it.
2. Press the Shutter button [
] repeatedly until you get to
Connections [ ].
3. Press the Mode button [ ] to highlight Band.
4. Press the Shutter button [
] to select 2.4GHz.
5. Press the Mode button [ ] to highlight Done, then press the
Shutter button [
] to select it.
CONNECTING TO OTHER DEVICES
Fusion Studio is free GoPro software that lets you import, stitch, trim,
and share your spherical content. Although Fusion video is captured with
a Spherical FOV, the Overcapture feature lets you extract a high-quality
1080p30 video that is optimized for at screens.
OFFLOADING YOUR CONTENT TO A COMPUTER
To play back your video and photos on a computer or mass storage
device, you must rst transfer these les to a computer. Transferring
also frees up space on your microSD cards for new content.
1. Download and install Fusion Studio from gopro.com/apps.
2. Connect the camera to your computer using the included
USB-C cable.
3. Power on the camera and follow the on-screen instructions in the
software to view and stitch your content.
OFFLOADING YOUR CONTENT USING A CARD READER
You must use a card reader to ooad RAW photos.
1. Download and install Fusion Studio from gopro.com/apps.
2. For each microSD card, complete these steps:
a. Insert a microSD card into a card reader, then connect the card
reader to the computer.
b. Use your computer’s le explorer to manually transfer the les
from the card to your computer.
3. Open Fusion Studio and follow the on-screen instructions to view and
stitch your content.
OFFLOADING YOUR CONTENT

36 37
Video mode contains one capture mode: Video (default). For details about
how to change settings, see Changing Modes and Settings (page 17).
VIDEO
This capture mode records video. The default resolution is 5.2K30. For
more information, see these topics:
Fusion Video Resolutions (page 39)
Protune (page 50)
VIDEO MODE: CAPTURE MODE
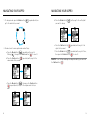
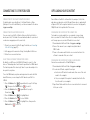
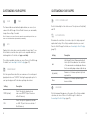
VIDEO RESOLUTION
Video resolution (RES) refers to the number of horizontal lines in the
video. For example, 3K means that the video has 3000 horizontal lines,
each with a width of 1504 pixels. Higher numbers of lines and pixels
result in greater detail and clarity. So, a video with resolution of 5.2K is
considered higher quality than 3K because it consists of 4992 lines, each
with a width of 2496 pixels.
VIDEO MODE: SETTINGS
5.2K
3K
1080p

38 39
Use this table to help you determine the best resolution for your activity.
Video Resolution Best Use
5.2K30
Beautiful high-resolution content. Enables
1080p30 OverCapture videos with the
traditional GoPro look and feel. Results in a
large viewing area, so is recommended for most
situations.
3K60
High frame rate yields the smoothest, most
immersive results for capturing fast-action
activities. Enables 720p60 xed-frame
OverCapture videos. This FPS gives you the
most natural playback in head-mounted displays
(HMDs) and enables slow motion during editing.
VIDEO MODE: SETTINGS
FRAMES PER SECOND FPS
Frames per second (FPS) refers to the number of video frames that are
captured in each second.
When selecting a resolution and FPS combination, consider the activity
that you want to capture. For more details, see Video Resolution (page
37).
ASPECT RATIO
Fusion video resolutions are captured with a 16:9 aspect ratio, which is the
standard for televisions and editing programs.
FIELD OF VIEW FOV
The eld of view (FOV) refers to how much of the scene (measured in
degrees) can be captured through the camera lens. The FOV for all Fusion
video is Spherical, which captures a full 360 view.
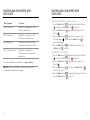
FUSION VIDEO RESOLUTIONS
Video
Resolution
(RES)
FPS (NTSC/PAL)
*
FOV
Screen
Resolution
5.2K
(default)
30/25 Spherical 4992X2496
3K 60/50 Spherical 3000X1504
*
NTSC and PAL refer to the video format, which depends on the region that you are in.
For more information, see Video Format (page 54).
VIDEO MODE: SETTINGS
Page is loading ...
Page is loading ...
Page is loading ...
Page is loading ...
Page is loading ...
Page is loading ...
Page is loading ...
Page is loading ...
Page is loading ...
Page is loading ...
Page is loading ...
Page is loading ...
Page is loading ...
Page is loading ...
Page is loading ...
Page is loading ...
Page is loading ...
-
 1
1
-
 2
2
-
 3
3
-
 4
4
-
 5
5
-
 6
6
-
 7
7
-
 8
8
-
 9
9
-
 10
10
-
 11
11
-
 12
12
-
 13
13
-
 14
14
-
 15
15
-
 16
16
-
 17
17
-
 18
18
-
 19
19
-
 20
20
-
 21
21
-
 22
22
-
 23
23
-
 24
24
-
 25
25
-
 26
26
-
 27
27
-
 28
28
-
 29
29
-
 30
30
-
 31
31
-
 32
32
-
 33
33
-
 34
34
-
 35
35
-
 36
36
-
 37
37


GoPro CHDHZ-103 User manual
- Category
- Action sports cameras
- Type
- User manual
- This manual is also suitable for
Ask a question and I''ll find the answer in the document
Finding information in a document is now easier with AI
Related papers
-
GoPro Hero 5 Black Troubleshooting guide
-
-
-
-
GoPro Hero 5 Session User manual
-
-
-
-
-
