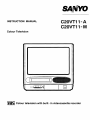
Sanyo C20VT11-A User manual
- Category
- Cassette players
- Type
- User manual
This manual is also suitable for

INSTRUCTION MANUAL
Colour Television
C20VTI 1-A
C20VTI 1- M
WI
~[ Colout’television vuithbuilt-in videocassette recorder

Warnings and Precautions
.....................................
3
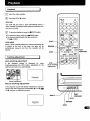
Remote Control Transmitter
[ Model C20VTI I-A ]
...................................
4
Front Controls
5
A.C. 220-240 Volts, 50/60 Hz.
,..,,.,,,..,. ...........................................
Watching the TV
[ Model C20VTI 1-M ]
Power ON/OFF/Auto Shut Off
..............,.........0. 6
A.C. 110-240 Volts, 50/60 Hz.
Programme Selection
......................................
7
Volume Control/Sound Mute/Recall ................. 8
Alternate/Off Timer .......................................... 9
Picture Adjustments
...............................................
10
Memory and Normalization
...............................
10
Setting of the Colour System
.............,,,,,,..............
11
Setting of the TV System
.......................................
12
Tuning of the Channels
Automatic Tuning
...............................................
13
Channel Copy
....................................................
13
Search Tuning and Manual Tuning .................... 14
Clock Setting
........................................................0.
15
VCR Precautions
....................................................
16
Playback and Recording Possibilities
Playback possibilities
........................................
17
TV broadcasts recording possibilities ................ 17
Tape dubbing possibilities ................................. 17
Cassette Loading and Unloading
Cassette loading/Cassette unloading ................ 18
Recording/playback duration
.............................
18
Playback
................................................................ 19
Tracking adjustment
...........................................
19
Special Playback
Forward search/Reverse search/Still picture ....... 20
Frame advance/Repeat playback ........................2O
Counter Memory and Index Search
.........................21
Recording Television Broadcasts ............................ 22
One Touch Timer Recording
...................................
23
on-screen Timer Recording Programming .............. 24
Notes on timer recording setting .........................25
To watch another video until recording starts ......25
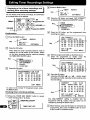
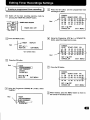
Editing Timer Recordings Settings
Displaying a list of timer recordings and revising
timer recording settings
......................................26
Erasing a programmed timer recording, ............. 27
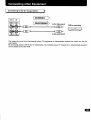
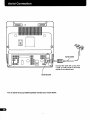
Connecting other Equipment
Connecting tothe AV input jacks..., .................... 28
Connecting tothe AVoutput jacks ......................29
Aerial Connection
....................................................
30
Specifications
..........................................................31

H
A
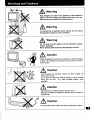
Warning
QX :
High voltages are used in the operation of this television
receiver. Do not remove the cabhet back from your set.
Refer servicing to qualified service personnel.
A
Warning
To prevent fire or electrical shock hazard, do not expose
the television receiver to rain or moisture.
~
Warning
Do not drop or push objects into the television cabinet
slots or openings.
Never spill any kind of liquid on the television receiver.
A
1 Caution
●
..”
J
......
.-----
8..
R
‘.
& 4_$
#
‘, .-
‘; ;
,.
~ Whenthetelevisionreceiveris notused for an extended period
of time, it is advisable to disconnect the AC power cord from
the AC outlet.
A
f Caution
●
Avoid exposing the television receiver to direct sunlight and
other source of heat.
Do not stand the television receiver directly on other products
which give off heat.
E.g. video cassette players, audio
amplifiers.
A
! Caution
●
Do not block the ventilation holes in the back cover.
Adequate ventilation is essential to prevent failure of electrical
components.
A
I Caution
●
Do not squash power supply cord under the television receiver.

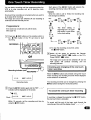
TVIAV Selector
‘igit ~
r
Programme Selector
1
FUNCTION
SOUND MUTE
OK
REWIND
RECORD
SPILP
INDEX
ATR
(Auto-Tracking Adjustment+
OFF TIMER
—
\
\
.
.
.
.
\
Power ON/OFF
RECALL / COLOUR SYSTEM
~ VOLUME
P
Programme
PLAY
— FAST FORWARD
STOP
TIMER REC ON/OFF
~ COUNTER MENORY
~ ALTERNATE
\
COUNTER RESET
r-
renormalization
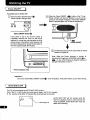
Battery installation of the Remote Control Transmitter
❑ Remove the battery cover by sliding.
❑ Install two “AA 1.5 volt batteries so that the “+” and”-”
marks on the batteries match the
“+” and ”-” marks inside the unit.
❑ Close the battery cover.
Note: Replace the batteries when the TV set is showing the following symptoms:
Operation is unsteady or erratic, sometimes the TV set does not work with transmitter.
Discharged batteries may leak and damage the unit.
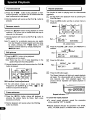
The normal life of batteries should be from nine to ten months.

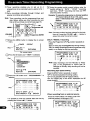
Recording (red) and
\
Timer Recording (green)
Indicator
/-
Cassette Loading Slot
I
Repeat Indicator
Power Indicator (
Remote Control
Detector
‘Ew’ND~///
puy~
FAST FORWARD
1/
RECORDING
II
l!
( J
MAINS SW.
ON m OFFm
ISYSIEM~ Q F@ -A +
VPA
Mians ON/OFF
I II
~FUNCTION
I
!L
LpR’S’T
Headphone Jack
For personal listeningb~
TV SYSTEM
headphone can
connected to the head
phone jack.
COLOUR SYSTEM

L
Power ON/OFF
To switch on or off the ~
c1
1 Press the Main ON/OFF Switch O .
c1
2 Press the Power ON/OFF ~ button of the TV set.
Power Indicator will light dimly.
Power Indicator will become brightly lit, sound will be
produced, and image will appear. If the Power ON/OFF
1
MAINS SW.1
button is pressed again, the TV will be switched off.
Mains ON/OFF Switch ~
If this switch is set to off, the TV’s power is
completely switched off. If the TV will not be
watched for a long time, set this switch to off to
reduce power consumption (note however that
the clock setting will be erased if this switch is
left off for approximately 60 minutes).
I
I
Power Indicator (re&
c1
3 The RemoteControlcan be used while the Power
Indicator is brightly lit.
Note: While the Power Indicator is brightly lit,
pressing the Programme UP/DOWN buttons@ or
~ , or any of the Programme Selector buttons O
through 9 will switch on the TV.
Important !
Be sure to set the Mains ON/OFF switch ~ to the off position, if the power failure occurs while viewing.
This TV set incorporates the AUTO SHUT OFF function.
Even if the TV is left on after you have gone to sleep, the TV set changes
to the standby mode within 10 minutes after all broadcasts have ended.
m,e”’anngtme affectvcRrecOrding
AUTO SHUT OFF will not operate while the
VCR is in playback mode or while external AV
mode ISselected. AUTO SHUT OFF does not

(Direct Selection)
To select a programme directly
Exampie;
To seiect a programme 8
&l=
Press” 8” button of the Programme Selector
Y
To seiect a programme 59
~g~ ~;
Press” 5” button
Press the Digit button
J
9
Jr
59
gy~o
Press” 9” button
J
‘igit7
Programme-
seiector
L
Programme Selection
(Programme UP and Down)
Press the Programme UP/DOWN button ~ or @ .
Uuuull
bdaa
MENU
F~
8
UREW
n
■ STOP
l--m
or
I Programme
J UP/DOWN
[
MAINS SW.
ON m OFFm
ISYSTEMI O FGI -d+ VPA
Wm!immil
-1-
6
Programme UP/DOWN

I
Volume Control
1
Press the VOLUME(- + or 4 – )button ~ or Q .
UME
T
T
VOLUME
SOUND
11[11111111111111’’’’”
EmEl
Should you wish to mute the sound (e.g. While talking on
the telephone), press the SOUND MUTE ~ button.
SOUND MUTE
or
1 J
ISYSTEMII O FQ -A+ V P A
[
RECALL
SOUNDMUTE
11111111111111111’’’’”
To display the on screen indications, press the
RECALIJCOLOUR SYSTEM button.
Programme
Position
\
I-VIB-
(!)
0 0
.
To switch the sound back on,
press the SOUND MUTE button
again.
~ Off Timer
Colour Syste
<
–120
A:TO
7
--i’
s-1
TV System
Clock
_ RECALL/
COLOUR
SYSTEM
Screen display disappears after
about 5 seconds.

~
Press the ALTERNATE button, and the programme position will
alternately select the previous position and the present position.
Uuuull
- ALTERNATE
1
I I
I
For example, now you are watching programme position
“4” but you watched programme position”2 previously. If
you press the ALTERNATE button, programme position
“2 immediately appears.
~
Press the OFF TIMER button.
The TV set will be turned off after about 30, 60, 90 or 120 minutes.
When VCR is set to playback mode, playback mode will be cancelled and power will be switched off after the set time has
elapsed.
The OFF TIMER does not affect VCR recording.
Uuuu
SP/LP ATR RESET MEMORY
0000
0
— OFF TIMER
Each time the OFF TIMER button is pressed, the set time changes as follows
-—
No off timer
A
– 30
30 minutes
– 60
+ “0
60 minutes
–120
90 minutes
120 minutes
I
To cancel the OFF TIMER
Press the OFF TIMER button until” – –” appears,
or turn off the TV set.
T
Just one minute before switching off the TV, ” – 01”
will be displayed on the screen.
1
–
01
&

(
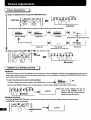
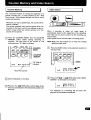
Picture Adjustments
)
c1
1 Select a adjustment item using the FUNCTiON button.
FUNCTiON
or
FUNCTiON
I
Each time the FUNCTION button is pressed, function choice will change as follows
U’k”k”u
Colour intensity
Brightness
Contrast
Tint
m
(Operative for NTSC signal
1
‘+ ]-l <> ~ Wii%
Display off
Fine tuning
Sharpness
(OperativeforTV modeonly)
c1
2 Adjust using the VOMJME ~ or ~ ( ~ + and A– ) key.
L
J
7 -
ISYSTEMII O F~ -~+ VPA
VOLUME
[ MEMORY and NORMALIZATION )
only)
MEMORY
This function lets you store the settings (for sound volume, colour, brightness, contrast, tint and sharpness )in memory for
both picture and the sound volume, and these setting levels can be recalled by pressing the NORMALIZATION button of
the remote control transmitter.
To store the picture and sound voiume settings
(1) Set the picture and sound volume to the desired level.
~ ‘tc”
(2) Press the PRESET button of the lV set while the control function display is still visible on the screen.
\
#
ISYSIEMn o F~ -A+
VPA
NOTE: The control settings will not be
+1 ‘EMORy I
saved if the PRESET button is
pressed after the control function
display has left the screen.
NORMALIZATION
Press the NORMALIZATION button, and the sound volume and the picture settings which you stored using
the MEMORY button are recalled.
al== I
&
NORMALIZATION
II
“3

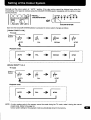
Normally, set the colour system to “ AUTO “ position, if the clear picture cannot be obtained even when the
broadcasting or AV signal is received, press the COLOUR SYSTEM selector repeatedly until the optimum image
can be produced.
Iuuuull
“RECALL/
COLOUR SYSTEM
or
\
J
[SYSTEMEo FQ .-A+
VPA
@@@@@@@
COLOUR SYSTEM
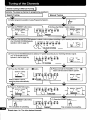
Each time the COLOUR SYSTEM selector is pressed, the colour system changes as follows
[ Model C20VTI I-M ]
I
s-1
AUTO
+
P;L
+
S:CAM + N:SC
s-1
s-1
s-1
PAL
SECAM
NTSC
I
Playback mode
_. —.—.—.
------- .—.—.—------ .-. -.—.—---- ------ .—.—.------- .—.—.—.—.—.-.-. -.—.—.—.—.—---- ._ .. ...
~
~+F+F+~~
~
\
;
.—.—.—._.-.—.—.—.—.-.—.—.-.-.—.—--------._._._._
--------
._._._._._._._._._._._._._._
._.
_._
_.
.
[
Model C20VT1 I-A]
TV mode
r
Colour
System
A6T0
s-1
I
AUTO
+
P:L
s-1
+
m
PAL
N&C
s-1
NTSC
Playback mode
-. —.- .-. —.—.—.—.- ------ .—._. _------ .—._. _------ ._ ._. _.—.-.— ------ ._ ._. _ .,.
i
~ y+=y ‘
~
i
I
(
i
.—.-.— .—.—.-.-. —.—.—---- .-. —.—.—.—.-._ ._. _._ ._. _ ------ ._ ._. _._ ._. _ ______./
:
NOTE: A colour system entry to the memory cannot be made during the TV mode, make it during the manual
preset mode. (Refer to the page 14)
Colour system setting for the playback mode is automatically stored in the memory.

TV SYSTEM selector functions only in TV mode.
Normally, set the TV system to” S –
1 “ (AUTO) position, if the sound is not clear or no sound is produced on a
programme number position, press the TV SYSTEM selector repeatedly until the optimum sound is obtained.
\
J
ISYSIEM~ o F~ -A +
VPA
fi SYSTEM
Each time the TV SYSTEM selector is pressed, the TV system changes as follows
[ Model C20VT1 1-M ]
J-” r=++= F
r
S-1 (AUTO) s-2 (5.5MHZ) s-3 (6.OMHZ) S-4 (6.5MHz) s-5 (4.5MHZ)
Tv
System
[ Model C20VT1 1-A ]
}-+-F-F
‘stem‘~”5MHz)
NOTE: A TV system entry to the memory cannot be made during the TV mode, make it during the manual preset
mode. (Refer to the page 14)

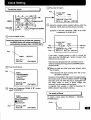
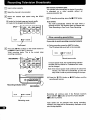
There are three ways of tuning as follows;
Automatic Tuning (the basic way)
All receivable channels are automatically tuned in and memorized in consecutive programme position.
Search Tuning
Use to preset a receivable channel in any desired programme position, e.g. the position with the same
channel.
Manual Tuning
Manuallytune a channel if it cannot be automatically tuned, such as when the signal is poor.
number as the
•1
I Pressthe PRESETbutton.
\
J
ISYSTEM~o FQ -~ +
VPA
Programme
,Channel band
@@@@
position
AUTOTUNING
AS
13 VL
s-1
AUTO
TV system~ -
11111’’’’’’’’’’’’’’’’’’”
PRESET
‘Colour system
‘ Normally, set the colour system to “AUTO position (for COLOUR SYSTEM Selector operation, refer to pagel 1).
4-
Normally, set the TV system to” S- 1 “ (AUTO) position (for TV SYSTEM Selector operation, refer to page 12).
7
\
)
c1
2 Press the VOLUME( + ) @ button.
~ VOLUME(+)
The channels are preset in consecutive positionsbegining
fromthe programmeposition”1”.
After all available channels have been preset, the unit
returns to the position”1”.
Note: To cancel automatic tuning midway, press the
PRESET button or turn off the TV set.
-
AUTOTUNING
1 VL
‘O TUNING
s-1 AUTO
2 VL
1
1111111llllllllltlltlll
‘O TUNING
AUTO
3 VL
11111’’’’’’’’’’’’’’’’’”
AUTO
I
I
11111111’’’’’’’’’’’’’”
1’
:l~o
●
●
●
●
●
+
●OOO.O
[
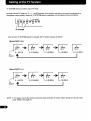
Channel Copy
J
Example: To copy the TV channel in the programme position 2 into the programme position 6
(1) Select programme position 2
(2) Press the PRESET button
(3) Select programme position 6 using
using Programme selector.
3 times.
Programme UP/DOWN o button@
~ - ~el+the”-~
s-1 AUTO
(5) Press the PRESET button.
(4) Press the FUNCTION button.
9
r
MANUALTUNING
~ :/
~
Q
6
6 VL
s-1
o ~- - ‘-1 ‘uTO
11[[1,,,,,,,,,,,,,,,,,,,
#

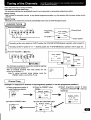
Search tuning & Manual Tuning
Example: To preset a channel in programme position 6
I
Search Tuning
I
1~1
Manual Tuning
>
(1) Select programme position 6 using Programme Selector.
~r
A8T0
s-1
J
f
(2) Press the PRESET button twice.
●
(2) Press the PRESET button 3 times.
m
‘p’ , m
L
L
I
B
1
1
J
f(3) Pr=ss the COLOUR SYSTEM selector to select a colour system according to your receiving television signal.
(For COLOUR SYSTEM Selector
&
ISYSTEMI o F@ -~ +
operation, refer to page 11)
‘p’ w
@@@@@@@
PM
AS
COLOUR SYSTEM _
(4) Press the TV SYSTEM Selector to select a TV syste~ according to your receiving television signal.
(For TV SYSTEM selector
operation, refer to page 12)
b
n 0
FG) --+ v“
i
@f@@@@@
TEp M
AS
UiK2-1
TV
SYSTEM _
\
t
\
(5) Press the VOLUME(+) or ( – )Q button.
(5) Press and hold the VOLUME(+) or ( - )@
button until the desired station appears.
I il:~ I ~~~m
,,,:,,;fl,
MANUALTUNING
When a station is found,
searching stops automatically.
I
1
1.
(6) Press the FUNCTION button.
% SEARCHTUNING
3
(7) Press the PRESET button twice.
(7) Press the PRESET button.
r
ISYSIEMn o F@ -A +
VP’
P:L
T
P~L
s-2
s-2
Thiscompletesthe presetting.
m’
Thiscompletesthe presetting.
J
Repeat steps 1to
7 for other desired channeis.

c1
4 Press the OK button.
Red
\ I CLOCK SET
.J--l-B&%i2k-:.p
VOLUME
(-)
c1
1 Pressthe MENUbutton.
I
.ote:lf the clock has not yet been set, pressing
the MENU button wiii cause the dispiay to
automatically change to item
4 (CLOCKSET)
L
Red _
\
TiMER REPEAT
SET~-/+
NE~OK EXiTMENU
c1
2 Press the OK button.
TiMER
\ PROGRAMMiNG
LiST CORRECT
CANCEL
CLOCK SET
S= PA/PV
NE~OK
EXiTMENU
c1
3 Using the Programme DOWN (P ~ ) button,
select “CLOCK SET”.
TIMER
PROGRAMMING
$
LiST CORRECT
ANCEL
CLOCK SET
Red ~
S~.PA/P7
NEXT:OK
EXITMENU
•1
5
TiME
-- $--
TiME
SHimPA/ PV
SET:O-9
DEL:~- END:OK
P
DATE
--- ---
r
..
Using the remote control numeric buttons, enter the
date (day, month, year) and time (hours, minutes).
Example: To set 10th, December, 1995, 16:15, enter
in sequence, 10-12-95-16-15.
Year
SETO- 9 DEL:-- END:OK
if you enter a wrong number or wish to correct the
clock, press the VOLUME( A - ) button to erase it, then
enter the correct number.
if the clock has already been set, corrections can be
made by pressing the Programme UP/DOWN buttons
(PAand PT).
n
6 When the date and time have been entered, press
the OK button.
Note: Seconds will start counting from “00 as the
OK button is pressed.
if power is not supplied to the product for approximately
60 minutes (such as when the Mains ON/OFF Switch ~
has been set to off, when the piug is unplugged from
the mains outlet, or when a power outage has
occurred), the ciock setting will be erased.
A calendar from January 1, 1994 to December 31,
2039 is stored in the product’s memory.
I
To recall a Clock
I
To recall a clock, press the RECALL / COLOUR
SYSTEM button.
Clock
1
16:15

•l This VCR is based on a VHS system. Only video
cassettes bearing the ml symbol can be used.
I
VCR operating precautions
)
•l The unauthorizedrecordingof televisionprogrammed,
video tapes, films and other such material may infringe
upon copyright or the rights of third parties.
❑ Be sure to use this VCR only in a temperature range of
5 C to 40 C and at less than 80%humidity.
❑ DO not place anything, except VHS video cassette
tapes, in the unit.
❑ DO not allow rain, steam, dew, salt water, sand, oily
smoke, metal objects, etc. entering the unit.
El Place the unit on a flat, stable, level surface. Never
subject it to violent shaking or any other shock or
impact.
•l DO not expose the unit to high temperatures.
Excessive heat (heat sources such as heaters, ovens,
closed car on hot days, etc.) may damage the unit.
•l DOnot use the unit under the following conditions:
● in locations with high humidity
● in presence of excessive dirt or dust
● in areas subject to strong vibrations
● near strong magnetic fields (e.g. transmitting
antennas, motors, fluorescent lights, etc. )
(
Caution concerning condensation
Be careful of condensation
Condensation is the moisture that forms on the outside of
a glass when you fill.it with cold water. Condensation can
also form inside a VCR when it is suddenly moved from a
cold place to a warm, humid one, or when a heater has
been turned onto quickly heat the room.
Particular care must be taken with your VCR because
water particles that form on the video head drum, which is
the main VCR mechanism, can cause the video tape to
stick to the drum. This prevents proper tape travel and
may damage both tape and mechanism.
Follow the procedures below the first time you use
the VCR, and whenever you use it in places which are
subject to condensation:
o
1 Connect the aerial cable and make all other
necessary connections.
o
2 Plug the power cord into a wall socket.
o
3 Turn on the TV set power to warm it up and speed
up the drying of any water particles that may have
formed on the video head drum.
o
4 Do not insert a video cassette.
It takes about 1-1/2 to 2 hours to completely
eliminate condensation. Wait at least this long
before using the VCR.

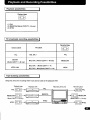
Playback possibilities
Playback tape
m
(1) PAL
(2) MESECAM (ModelC20VT11 -M only)
(3) NTSC
TV broadcasts recording possibilities
Recordedtape
Colour system
TV system
o
anD
PAL
B/G, D/K, I
PAL
SECAM
B/G, D/K, I (ModelC20VT11 - M only)
MESECAM
(Model C20VT11 - M only)
B/G, D/K, 1 (ModelC20VT11 -A)
NTSC 3.58
B/G, D/K, 1,M/M (ModelC20VT11 -M)
NTSC
Tape dubbing possibilities
Using this unit as the recording VCR. It can also be used as the playback VCR.
Playbacktape
PlaybackVCR
o
PAL (lnD ~
n
PAL
1
n
MESECA
MESECAM dnD ~
(Model C20VT11 - M only)
E!EI--EU
NTSC
Recording (This unit)
b
-amq
Iu
.
Recording tape
--’’ElpAL
U
+ (jOl) MESECAM
(Model C20VT11 - M only)

I
Cassette Loading
1
[
Recording / Playback duration
)
When a video cassette is inserted, it will be loaded
automatically.
Erasure-prevention ~
tab
Erasure-prevention tab
If the erasure-prevention tab on the back of the video
cassette is removed,the cassette cannot be recordedon.
This tab is designed to prevent the accidental erasure of
recordedmaterial.
Note- The tab should be snapped off at its base, and
removedcompletely.
To recordontothe same cassette again, place two layers
of adhesive tape over the space where the tab was, so as
to cover the space completely.
(
Cassette Unloading
Power off eject
The video cassette will be ejected when the EJECT
button is pressed, even when the TV set is in the standby
condition.
CAUTION: Do not put your hand or other objects in
the cassette loading slot because of the risk of injury
or an accident.
Be sure to keep small children away from the TV set.
The recording tape speed can be selected by pressing
the SP/LP button.
At playback, the tape speed cannot be selected, the
playback speed will always match the speed selected for
recording.
PAIJMESECAM
~
Standard Play mode (SP) Long Play mode (LP)
Cassette tYPe Best qualltyof sound
I E-30 I
30 minutes
I 60 minutes I
E-60
60 minutes 120 minutes
E-90
90 minutes
180 minutes
E-120
120 minutes
240 minutes
I E-150 I 15o minutes I 300 minutes I
I E-180 I 180 minutes I 360 minutes I
I E-195 I 195 minutes I 390 minutes I
I E-21O I 210 minutes I 420 minutes I
I E-240 I 240 minutes I 480 minutes I
I
E-300
300 minutes
600 minutes
I
NTSC
I
Standard play Long play mode
mode (SP)
Cassette
LP (Playback only)
EP
1
I
type
Bestwality
Twice the SP mode
Triple the SP mode
of sound and
duration
picture
duration
I T-30 I 30 minutes] 60 minutes I 90 minutes I
T-60 60 minutes
120minutes
180minutes
T-90 90 minutes
180minutes 270minutes
I T.120 1120minutesl 240 minutes I 360 minutes I
] T-160 ]160minutesl 320minutes I 480 minutes I
Notes:
● For PAUMESECAM, pressing the SP/LP button will
change the recording speed between SP mode and LP
mode.
● For NTSC, pressing the SP/LP button will change the
recording speed between SP mode and EP mode.

1
Playback
1
•1
1 Insert thevideo cassette.
c1
2 Press the PLAY ➤ button.
Auto play
The VCR will play back a tape automatically when a
video cassette is inserted whose erasure-prevention tab
has been removed.
c1
3 To stop the playback, press the ■ STOP button.
● To rewind the tape, press the 4 REW button.
● To advance (fast-forward) the tape, press the
FF ~ button.
Auto eject
When a video cassette without an erasure-prevention tab
is played to the end of the tape, the tape will be
automatically rewound and then the cassette will be
ejected.
I
Tracking adjustment
I
Auto-tracking adjustment
If the playback picture is disturbed by noise
interference, press the ATR button, adjustment to the
-- A! —.. — --:-L . ...11 ------ -..& -—-. $:-- lI. .
tlULUIIICUIGtW)’.
El
TRACKING
_____
Noise interf&rence
Manual tracking adjustment
If the playback picture still shows interference, manually
adjust it with the Programme UP/DOWN(P
A or PT )=
or ~ buttons, to minimize the noise.
TRACKING
-I:--
PLAY-
REWIN[
STOP
ATR –
(Auto-Tn
Adjustmc
FAST-
FORWARD
● K.
EJECT
I
PiAY
REWIND
STOP

[
Forward search
)
❑ Press the FFW button during playback or fast-
forward operation. The picture can be viewed while the
tape is advanced at a fast speed.
•l Normal playback will resume as the PLAY ➤ button is
pressed.
(
Reverse search
)
❑ Press the < REW button during playback or rewind
operation. The picture can be viewed while the tape is
rewound at a fast speed.
•l Normal playback will resume as the PLAY ➤ button is
pressed.
Note: To search for a particular scene you can switch
from fast forward to forward search and vice versa
by simply pressing the FF ~ button, or from
rewind to reverse search by simply pressing the
< REW button.
I
Still picture
1
❑ PresstheIISTILL buttonduringplayback.
A stillpicturecan beviewed.
Note:There
may be a lot of noise depending on the
grade of tape and recording system.
❑ Normal playback picture will resume when the PLAY>
button is pressed.
A
~ TIMER
d“b “ST’LL5
SPILP
RESET MEMORY
o 0
INDEX
+.+ P*P
nnnn
-STILL
Still vertical lock adjustment
•l If the still picture moves up or down, press the
Programme UP/ DOWN(P
A or P Y ) ~ or ~
buttons to adjust the still picture.
I
Frame advance
1
•l Press the II STILL button during still playback to
advance the picture frame by frame. Each press
advancesoneframe.
•l Normal playback will resume when the PLAY ➤
button is pressed.
I
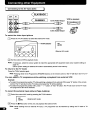
Repeat playback
I
This function is used for playing back the videocassette
repeatedly.
•1
1
•1
2
•1
3
•1
4
•1
5
Set the VCR to the playback mode by pressing the
PIAY ➤button.
Press the MENU button and the on-screen menu is
displayed.
“N”B&]
-%
TIMER REPEAT
Red
sm. A-/+
NEXT:OK
EXITMENU
On -screen menu
Press the VOLUME (~+) button, and “REPEAT’ is
selected.
T,M=EPEAT
Red
i--
sET:A-/+
NEXT:OK
EXITMENU
Press the OK button.
Red
SET:~-/ +
END:OK
Press the OK button again.
The Repeat Indicator will light and repeat playback
will begin. The videocassette will be played to the
end, rewound, and then playback again. This
process will be repeated until repeat playback is
cancelled.
~1 -
.
9,,,n
=
Repeat Indicat
To cancel the repeat playback
● To cancel repeat playback, repeat the procedure
above, selecting“OFF”instep
❑ .
. Repeat playback will also be cancelled if the STOP,
STILL, FF, REW, EJECT, or INDEX buttonis pressed.
Page is loading ...
Page is loading ...
Page is loading ...
Page is loading ...
Page is loading ...
Page is loading ...
Page is loading ...
Page is loading ...
Page is loading ...
Page is loading ...
Page is loading ...
Page is loading ...
-
 1
1
-
 2
2
-
 3
3
-
 4
4
-
 5
5
-
 6
6
-
 7
7
-
 8
8
-
 9
9
-
 10
10
-
 11
11
-
 12
12
-
 13
13
-
 14
14
-
 15
15
-
 16
16
-
 17
17
-
 18
18
-
 19
19
-
 20
20
-
 21
21
-
 22
22
-
 23
23
-
 24
24
-
 25
25
-
 26
26
-
 27
27
-
 28
28
-
 29
29
-
 30
30
-
 31
31
-
 32
32


Sanyo C20VT11-A User manual
- Category
- Cassette players
- Type
- User manual
- This manual is also suitable for
Ask a question and I''ll find the answer in the document
Finding information in a document is now easier with AI