Page is loading ...

CPA-360
PA CASSETTE PLAYER
OPERATION MANUAL
OPERATION MANUAL
28W RMS / 35W Max.
Please read this manual thoroughly before making connections and turning on the power. Following the instructions in
this manual will enable you to obtain optimum performance from your new AHUJA PA Cassette Player.
Please retain this manual for future reference.
®
SPECIFICATIONS
GENERAL
PLAYER SECTION
Power Supply : AC: 22 0 -240V 50 / 60Hz*
Track System : 2 Track Monaural
: DC: 1 2 -14 V Car Battery
Tape Speed : 4.75 cm / sec.
Power Consumption : AC: 48 VA at rated output
FF Time : 190 sec. approx. (C-60)
: DC: 2.7 A / 12V
Wow & Flutter : 0.35% Nominal
Semiconductors : 13 Transistors
Tape Speed Accuracy : Within +2% -1%
: 13 Diodes
: 2 Zener Diodes
AMPLIFIER SECTION
: 2 LEDs
Power Output : 35 Watts RMS (max.)
Dimensions : L280 × H100 × D295 mm
: 28 Watts RMS at 10% THD
Weight : 5.0kg approx.
Input Channels : 2 × Mic 0.5mV (Lo-Z) / 2.5k
: 1 × Aux 50mV / 250k
Frequency Response : 100Hz - 12,000Hz ±3dB
S / N Ratio : >55dB
Tone Control: : Bass: -6dB at 100Hz
: Treble: -10dB at 10kHz
* This unit is connected to 240V tap when leaving the factory.
Output Taps for speaker : 4, 8, 16 & 100V
Matching
Specifications claimed are subject to permissible production
Line Output : 250mV / 3.5 k
tolerances.
FEATURES
Imported Tape Deck Mechanism with Auto Stop used.
Provision for automatic changeover from AC to Battery Operation ensuring continuity of program.
100V line for long distance speaker connections.
Separate BASS and TREBLE controls for shaping tonal quality of music & speech as desired.
LINE OUT for connecting additional booster amplifier.
Two low impedance Microphone inputs and one Aux. Input. The Aux input is for connecting Mixer, CD Player,
etc.
n
n
n
n
n
n
2
4
6
8
0
10
MIC-1
2
4
6
8
0
10
MIC-2/AUX
PLAY
LOW IMPEDANCE MIC INPUTS
MON
POWER
PWR
FF
EJECT
2
4
6
8
0
10
BASS
2
4
6
8
0
10
TREBLE
CPA-360
AC/12V DC
2
4
6
8
0
10
TAPE
TAPE
LO
HI
AUTO STOP CASSETTE

15 16 17 18
COM
CPA-360
⇓ ⇓ ⇓ 100V LINE OUT AUX
LIVE
12V DC
14
240V~50Hz
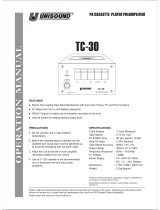
• Front & Rear Panel Controls & Features
• Speaker Connections
1. MIC-1 Volume Control 11. TAPE-LO/TAPE-HI Selector Switch
2. MIC-2 / AUX Volume Control 12. MIC-2 Input Jack Socket
For Connecting a low impedance microphone.
3. TAPE Volume Control
13. MIC-1Input Jack Socket
4. BASS Control
For connecting a low impedance microphone.
For controlling the low frequency signals.
14. AC Mains Cable with plug
5. TREBLE Control
For controlling the high frequency signals. 15. BATTERY Terminal Strip
For connecting a 12V car battery.
6. MONITOR LED
This LED flickers to indicate the set is delivering 16. SPEAKER Terminal Strip
power to the load. For connecting speakers or driver units.
7. POWER LED 17. LINE Output Jack Socket
This LED glows to indicate that the set is ON. For connecting additional higher wattage amplifier for
obtaining more power output.
8. POWER switch
18. AUX Input
9. CASSETTE SLOT
For connecting an auxiliary source like a CD player,
The cassette is loaded into the set through this slot.
Tuner, Echo or Audio Mixer etc.
10. FF / EJECT Lever
For fast winding the tape, this lever is pushed in
partially. For ejecting the cassette, it is pushed in fully.
Total Impedance:
32 × 32
32 + 32
= 16
Total Impedance:
16 × 16
16 + 16
= 8
4
8 16 100V
COM
⇓
L1
L2
⇓
L1
L2
+ Low Impedance
Speaker impedance taps of 4, 8 and 16 ohms have been provided for direct connection of speakers to the amplifier when the
distance between the amplifier and speakers is less than 50 meters. Use 23/36 or thicker cable for connections. Be sure that
total impedance of speakers is equal to or above the impedance specified on the terminal strip.
4
8 16 100V
COM
⇓
L1
L2
⇓
L1
L2
⇓
L1
L2
⇓
L1
L2
2
4
6
8
0
10
MIC-1
2
4
6
8
0
10
MIC-2/AUX
PLAY
LOW IMPEDANCE MIC INPUTS
MON
POWER
PWR
FF
EJECT
2
4
6
8
0
10
BASS
2
4
6
8
0
10
TREBLE
CPA-360
AC/12V DC
2
4
6
8
0
10
TAPE
TAPE
LO
HI
AUTO STOP CASSETTE
1 2 3 4 5 6 7 8
9101213 11

+ 100V Line
When it is desired to connect speakers or driver units at a
distance over 50 meters, it is recommended that the 100V
line output be used together with line matching transformer
for each speaker. This prevents excessive power loss in the
speaker cables.
4
8 16 100V
COM
30W
20W
10W
5W
40W
COM
1
L1
L2
30W
20W
10W
5W
40W
COM
2
L1
L2
30W
20W
10W
5W
40W
COM
5
L1
L2
• Operating Procedure
CASSETTE INSERTION
+
+
+
+
+
+
+
+
+
Hold the cassette tape in such a manner that the
exposed tape area is facing towards your right and the
full reel of tape is towards you.
Now insert the cassette into the cassette loading slot
firmly and push it in until it snaps into position.
To retrieve the cassette, push in the FF / EJECT lever
fully and the cassette will eject out.
CASSETTE OPERATION
Set all volume controls to '0' position and the TAPE-
LO/TAPE-HI selector switch to TAPE-LO position.
Connect the required number of speakers to the proper
impedance on the terminal strip.
Connect the AC cable to a suitable AC socket. For DC
operation, connect a 12V car battery to the battery
terminal strip.
Switch on the set with the POWER switch, so that the PWR
LED starts glowing.
Load the player with a recorded cassette and the tape
starts moving.
Adjust the tape volume and tone controls to the desired
level. As the output levels of pre-recorded tapes differ from
make to make, tapes which do not give enough output on
TAPE-LO position can be played with switch on TAPE-HI
position and vice versa.
+
+
+
+
+
The tape can be advanced rapidly by pushing in the FF /
EJECT lever partially.
To stop the tape, push in the FF / EJECT lever fully so that
the cassette is ejected out.
Due to the Auto Stop system, the cassette is automatically
stopped when the tape comes to an end.
USING THE TONE CONTROLS
A TREBLE control has been provided for controlling
the high frequency signals e.g. violin, sitar and to some
extent female voice. When this control is rotated from
maximum to minimum position, the high frequencies
are gradually cut down by about 10 dB.
A BASS control has been provided for controlling the
low frequency signals e.g. tabla, drums and to some
extent male voice. When this control is rotated from
maximum to minimum position, the low frequencies
are gradually cut down by about 6 dB.
PRECAUTIONS
1. Do not use this unit in high ambient temperature.
2. Before the cassette tape is inserted into the cassette slot,
loose tape must be tightened up to avoid its entangling
with the pinch roller.
3. Speaker impedance mismatch may cause insufficient
output or overheating of the components, which may lead
to failure of the components. Check and make sure that
the impedance of the speakers is equal to or greater than
the selected impedance on the output terminal strip.
4. Use of C-120 cassette is not recommended as it is
extremely thin and may cause problems.
PWR
M
ON
OWEP
R
C-1
2V DCA
B
LET
RE
BA
S
S
EJECT
F
F
LP AY
•
6
•
8
•
10
4
•
6
•
8
•
10
4
FULL REEL
EXPOSED TAPE

TROUBLE CHECKS
The following trouble checks will help to correct the most
common problems encountered with a cassette player.
The auto stop mechanism activates and the tape
stops just after it is inserted.
The tape is completely wound on the reel away from
you (refer instructions in “Cassette Insertion”).
Cassette spools jammed due to deformed cassette
shell.
Tape moving but no output
The tape volume control is at minimum.
Speakers are not connected.
Hum in Mic and Aux. inputs
Shielding of the pickup wire not proper. Use good
quality shielded cable for input connections.
Try reversing the AC mains plug of the set.
Set gets very hot during operation
Proper ventilation not provided. Keep the set away
from walls in a well ventilated area.
Speaker mismatch causing overloading. Check the
total speaker impedance and connect to the proper
tap on the output terminal strip.
Loss of power at the speakers
Speaker cables very long. Under such conditions,
make use of the 100V line output connection.
Speaker cables thin. Use thicker type 23/36 cables.
+
+
+
+
+
+
+
+
+
+
MAINTENANCE
To get a long trouble free service, maintenance is
essential. After some use the Head, Capstan, Pinch
Roller etc. that come in contact with the tape, become
dirty due to dust or magnetic material on the tape. Dirty
heads cause loss of high frequencies and the output
falls. Dirty capstan and pinch roller will cause unstable
tape speed, leading to increased Wow and Flutter.
To clean these, follow the under mentioned procedure:
+
+
+
+
Remove the plastic cover on the top by unscrewing
the screws provided. The head and pinch roller
become accessible through the cutout provided.
Clean the head and pinch roller with a cotton bud
dipped in methylated spirit.
Keep magnets and metallic objects away from the
head. If the head gets magnetized, it will lead to more
noise and loss of high frequencies. The head and all
metallic parts should be got demagnetized after
about 50 hours of use.
Consult your dealer about demagnetizing the head.
• Maintenance & Trouble Checks
TRUSOUND PVT. LTD. C-89, Sector IV, Noida, Gautam Budh Nagar-201 301 (UP)
Regd. Office : 125E, Okhla Industrial Estate, New Delhi-110 020
Tel.: +91-120-2551452/53 Fax : +91-120-2553677
E-mail: [email protected], [email protected] Website: www.ahujaradios.com
1K/02/06
Design and Specifications are subject to change without notice. • is a registered trademark of Ahuja Radios in India and other countries.
© Copyright Ahuja Radios, 2005. All rights reserved. Any unauthorized reproduction or use of logos, images or design elements is strictly prohibited by law.
No part of the compilation may be reproduced in any manner or translated without written permission.
/