Page is loading ...

THANK YOU
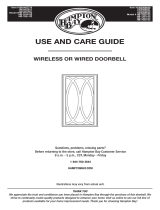
We appreciate the trust and condence you have placed in Hampton Bay through the purchase of this wireless
fashion doorbell. We strive to continually create quality products designed to enhance your home. Visit us online to
see our full line of products available for your home improvement needs. Thank you for choosing Hampton Bay!
USE AND CARE GUIDE
WIRELESS FASHION DOORBELL
Questions, problems, missing parts?
Before returning to the store, call Hampton Bay Customer Service
8 a.m. - 5 p.m., CST, Monday - Friday
1-844-760-3644
HAMPTONBAY.COM
Illustrations may vary from actual unit.
Item #1001411387
Model #HB-7951-02

2
Table of Contents
Table of Contents ......................................2
Safety Information ....................................2
Warranty ...................................................2
3-Year Limited Warranty ........................2
Pre-Installation .........................................3
Planning Installation ..............................3
Specications ........................................3
Package Contents ..................................3
Installation ................................................4
Operation...................................................6
Care and Cleaning ....................................6
Troubleshooting ........................................7
Safety Information
PRECAUTIONS
Please read and understand this entire manual
before attempting to assemble, install, or operate
this doorbell.
WARNING: To prevent possible SERIOUS INJURY or
DEATH never allow small children near batteries. If battery
is swallowed, immediately notify a doctor.
WARNING: DO NOT mix old and new batteries. DO
NOT mix battery types - such as alkaline, heavy duty, and
rechargeable - in a single device. Battery leakage may occur.
WARNING: DO NOT DISPOSE OF BATTERIES IN FIRE.
BATTERIES MAY EXPLODE OR LEAK.
NOTE: The range of the wireless doorbell can vary with
location, temperature, and battery condition.
This device complies with Part 15 of the FCC Rules and
RSS-210 of Industry Canada. Operation is subject to the
following two conditions: (1) this device may not cause
harmful interference, and (2) this device must accept any
interference received, including interference that may
cause undesired operation.
The user is cautioned that changes or modications
not expressly approved by the party responsible for
regulatory compliance could void the user’s authority to
operate the equipment.
Warranty
3-YEAR LIMITED WARRANTY
WHAT IS COVERED
This product is guaranteed to be free of factory defective parts and workmanship for a period of 3 years from date
of purchase. Purchase receipt is required for all warranty claims.
WHAT IS NOT COVERED
This warranty does not include expendable items (such as light bulbs, batteries, etc.), repair service, adjustment
and calibration due to misuse, abuse or negligence. Unauthorized service or modication of the product or of any
furnished component will void this warranty in its entirety. This warranty does not include reimbursement for
inconvenience, installation, setup time, loss of use, unauthorized service, or return shipping charges. This warranty
is not extended to other equipment and components that a customer uses in conjunction with this product.
Contact the Customer Service Team at 1-844-760-3644 or visit www.hamptonbay.com.

3 HAMPTONBAY.com
Please contact 1-844-760-3644 for further assistance.
Pre-Installation
PLANNING INSTALLATION
Before installing the wireless fashion doorbell, ensure that all parts are present. Compare parts with the Hardware
Included and Package Contents sections. If any part is missing or damaged, do not attempt to assemble, install, or
operate this wireless fashion doorbell.
Estimated installation time: 15 minutes
SPECIFICATIONS
Doorbell
Power requirements
6 “AA” alkaline batteries (not included)
PACKAGE CONTENTS
Part Description Quantity
A Doorbell 1

4
Installation
1
Removing the control cover
Twist the bottom of the doorbell (A)
counterclockwise to remove the control
cover(1).
2
Removing the battery cover
Push the battery cover tab toward the battery
cover (2) and pull to remove.
TUNE – HOLD
1 SECOND.
SYNC – HOLD
3 SECONDS.
RESET – HOLD
10 SECONDS.
C
H
I
M
E
V
O
L
U
M
E
3
Installing the batteries
Install six alkaline “AA” batteries (not included)
into the doorbell (A). Ensure batteries are
oriented correctly.
Replace the battery cover (2) onto the
doorbell(A).
NOTE: In typical use, alkaline batteries will last up to
one year.
TUNE – HOLD
1 SECOND.
SYNC – HOLD
3 SECONDS.
RESET – HOLD
10 SECONDS.
C
H
I
M
E
V
O
L
U
M
E
“AA” 1.5V
“AA” 1.5V
“AA” 1.5V
4
Syncing the doorbell and push
button
Press and hold the “SYNC” button on the bottom
of the doorbell (A) until the doorbell (A) sounds
a “Beep-Beep”.
Press the push button (not included) within
30 seconds. The doorbell (A) will sound a
“Beep-Beep” tone to indicate the push button
is synced.
Press the push button to ensure operation.
TUNE – HOLD
1 SECOND.
SYNC – HOLD
3 SECONDS.
RESET – HOLD
10 SECONDS.
C
H
I
M
E
V
O
L
U
M
E
TUNE – HOLD
1 SECOND.
SYNC – HOLD
3 SECONDS.
RESET – HOLD
10 SECONDS.
30
A
1
A
2
A
A

5 HAMPTONBAY.com
Please contact 1-844-760-3644 for further assistance.
Installation (continued)
5
Installing the control cover
Twist the bottom of the doorbell (A) clockwise to
install control cover (1).
6
Testing the doorbell and push
button placement
Temporarily position the doorbell (A) and push
button (not included) where they will be placed.
Press the push button and listen for the
doorbell(A) to ring.
If the doorbell (A) does not sound, move the
doorbell (A) closer to the push button and test
again.
NOTE: Do not permanently mount the push button (not
included) until the push button and doorbell are working
properly.
A
A
1

6
Operation
1
Adjusting the doorbell volume
The doorbell (A) has an adjustable volume control.
Rotate the volume control to adjust the volume.
TUNE – HOLD
1 SECOND.
SYNC – HOLD
3 SECONDS.
RESET – HOLD
10 SECONDS.
C
H
I
M
E
V
O
L
U
M
E
C
H
I
M
E
V
O
L
U
M
E
2
Setting wireless push buttons
Wireless push buttons (not included) have two options
for tune selection: Play the selected “FRONT” door
musical tune or play the “REAR” door designated tune
(Ding).
Remove the single jumper inside the push
button to play the selected musical tune.
Add the single jumper inside the push button
to play only the Ding tune.
ON
1 2
1
ON
1 2
1
Remove jumper to Add jumper to set
set as the “FRONT” door as the “REAR” door
3
Selecting a musical tune
The doorbell has different selectable tunes. The push
button (not included) set as the “REAR” push button
will only play Ding (one note tune). The push button set
as the “FRONT” push button will play either Ding-Dong
(two note tune) or Westminster (eight note tune).
Press and release the “TUNE” button on the
doorbell (A) until desired tune is heard.
NOTE: All doorbell models are designed to work with up
to 10 wireless push buttons (sold separately).
NOTE: All doorbells are designed to play only two
different tunes no matter how many push buttons are used.
TUNE – HOLD
1 SECOND.
SYNC – HOLD
3 SECONDS.
RESET – HOLD
10 SECONDS.
C
H
I
M
E
V
O
L
U
M
E
TUNE – HOLD
1 SECOND.
SYNC – HOLD
3 SECONDS.
RESET – HOLD
10 SECONDS.
Care and Cleaning
Use a dry cloth to clean the doorbell.
Do not use cleaners or polishes.
Do not use any uids on the doorbell.
A
A

7 HAMPTONBAY.com
Please contact 1-844-760-3644 for further assistance.
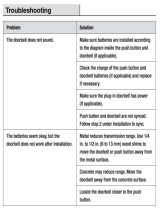
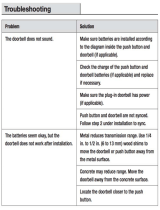
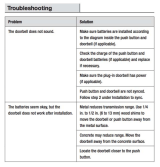
Troubleshooting
Problem Possible Cause Solution
The doorbell does
not sound.
The push button (not
included) and doorbell
are not synced.
Follow step 4 under Installation to sync.
The batteries are not
installed correctly.
Make sure the batteries are installed according to the
diagram inside the push button and doorbell.
The batteries are dead. Check the charge of the push button and doorbell batter-
ies and replace if necessary.
The batteries
seem okay, but
the doorbell does
not work after
installation.
The push button (not
included) is mounted
on metal or near metal
studs.
Metal reduces transmission range. Use 1/4 in. to 1/2 in.
(6 to 13 mm) wood shims to move the push button away
from the metal surface.
The doorbell and push
button are installed too
far apart.
Locate the doorbell closer to the push button.
Doorbell sounds
when not intended
(false triggers).
Doorbell is receiving in-
terference from another
wireless device.
Reset the doorbell and push button (not included).
Remove the push button batteries. Wait 30 seconds.
Press and hold the push button for 10 to 15 seconds
within 60 seconds after installing the battery into
the push button.
Press and hold the button on the doorbell until the
doorbell sounds a “Beep-Beep-Beep-Beep”.
To re-sync the push button and doorbell, follow step
4 under Installation.

Questions, problems, missing parts?
Before returning to the store, call Hampton Bay Customer Service
8 a.m. - 5 p.m., CST, Monday - Friday
1-844-760-3644
HAMPTONBAY.COM
Retain this manual for future use.
208197-02A

GRACIAS
Agradecemos la conanza que han depositado en Hampton Bay al comprar este timbre inalámbrico de moda.
Procuramos crear continuamente productos de calidad diseñados para mejorar su hogar. Visítenos en internet para
ver nuestra línea completa de productos disponibles que necesita para el mejoramiento de su hogar.
¡Gracias por escoger Hampton Bay!
GUÍA PARA EL USO Y CUIDADO
TIMBRE INALÁMBRICO DE MODA
¿Tiene preguntas, problemas o piezas faltantes?
Antes de la devolución al almacén llame al Servicio al Cliente de Hampton Bay de
8 a.m.-5 p.m., Hora del Central, de lunes a viernes.
1-844-760-3644
HAMPTONBAY.COM
Las ilustraciones pueden ser diferentes de la unidad comprada.
Articulo #1001411387
Modelo #HB-7951-02

10
Contenido
Contenido ................................................10
Información de seguridad ......................10
Garantía...................................................10
3 años de garantía limitada .................10
Antes de la instalación ...........................11
Planicación de la Instalación .............11
Especicaciones ..................................11
Contenido del Paquete .........................11
Instalación ..............................................12
Operación ................................................14
Cuidado y limpieza .................................14
Análisis de averías .................................15
Información de seguridad
PRECAUCIONES
Por favor lea y entienda todo este manual antes de
tratar de ensamblar, instalar u operar este timbre.
ADVERTENCIA: Para evitar posibles LESIONES GRAVES
o LA MUERTE nunca deje que los niños pequeños estén
cerca de las pilas. Si alguien ingiere una pila, notique
inmediatamente al médico.
ADVERTENCIA: NO mezcle las pilas viejas con las
nuevas. NO mezcle diferentes tipos de pilas - tales como
alcalinas, muy resistentes y recargables - en un solo
dispositivo. Pueden causar goteo de las pilas.
ADVERTENCIA: NO TIRE LAS PILAS AL FUEGO. LAS
PILAS PUEDEN EXPLOTAR O GOTEAR.
NOTA: El alcance del timbre inalámbrico puede variar de
cuerdo a la ubicación, temperatura, y condición de la pila.
Este dispositivo cumple con la sección 15 de las
normas de la FCC e RSS-210 de la industria de Canadá.
El funcionamiento está sujeto a las siguientes dos
condiciones: (1) este dispositivo no debe causar
interferencia perjudicial y (2) debe aceptar cualquier
interferencia recibida, incluida la interferencia que
pudiese causar un funcionamiento no deseado.
Se le advierte al usuario que los cambios o
modicaciones a esta unidad que no estén expresamente
aprobadas por la parte responsable del cumplimiento
regulatorio podrían anular la autorización del usuario
para utilizar el equipo.
Garantía
3 AÑOS DE GARANTÍA LIMITADA
LO QUE SE CUBRE
Se garantiza que este producto no tiene partes defectuosas de fábrica o de mano de obra por un período de 3 años
desde la fecha de compra. Se necesita el recibo de compra para todos los reclamos de garantía.
LO QUE NO SE CUBRE
Esta garantía no incluye los artículos reemplazables (como bombillas, pilas etc.), servicio de reparación, ajuste y
calibración debido al mal uso, abuso o negligencia. Los servicios no autorizados o las modicaciones hechas al
producto o a cualquier componente invalidarán esta garantía en su totalidad. Esta garantía no incluye reembolso
por inconveniencia, instalación, tiempo de instalación, perdida de uso, servicio no autorizado, o gastos de envío.
Esta garantía no se extiende a otros equipos o componentes que el consumidor usa junto con este producto.
Póngase en contacto con el personal de servicio al cliente al 1-844-760-3644 o visite el sitio www.hamptonbay.com.

11 HAMPTONBAY.com
Por favor, póngase en contacto al 1-844-760-3644 para obtener más ayuda.
Antes de la instalación
PLANIFICACIÓN DE LA INSTALACIÓN
Antes de instalar el timbre inalámbrico de moda, asegúrese de tener todas las piezas. Compare las piezas con las
indicadas en las secciones ferretería incluida y contenidos del paquete. Si alguna pieza falta o está dañada, no trate
de ensamblar, instalar u operar este timbre inalámbrico de moda.
Tiempo estimado para la instalación: 15 minutos
ESPECIFICACIONES
Timbre
Requisitos de la energía eléctrica
6 baterías alcalinas “AA” (no incluido)
CONTENIDO DEL PAQUETE
Pieza Descripción Cantidad
A Timbre 1

12
Instalación
1
Retiro de la tapa del control
Gire la parte inferior del timbre (A) en sentido
antihorario para retirar la tapa del control (1).
2
Retiro de la tapa de la pila
Empuje la lengüeta de la tapa de la pila hacia
esta tapa (2) y hálela para retirarla.
TUNE – HOLD
1 SECOND.
SYNC – HOLD
3 SECONDS.
RESET – HOLD
10 SECONDS.
C
H
I
M
E
V
O
L
U
M
E
3
Instalación de las pilas
Instale seis pilas alcalinas “AA” (no incluidas)
en el timbre (A). Asegúrese que las pilas estén
orientadas correctamente.
Vuelva a colocar la tapa de la batería (2) en el
timbre (A).
NOTA: Con uso normal, las pilas alcalinas durarán hasta
un año.
TUNE – HOLD
1 SECOND.
SYNC – HOLD
3 SECONDS.
RESET – HOLD
10 SECONDS.
C
H
I
M
E
V
O
L
U
M
E
“AA” 1.5V
“AA” 1.5V
“AA” 1.5V
4
Sincronización del timbre y el
pulsador
Presione y mantenga presionado el botón
“SYNC” de la parte inferior del timbre (A) hasta
que el timbre (A) suene un “bip-bip”.
Presione el botón pulsador (no incluido)
durante 30 segundos. El timbre (A) sonará
con un tono de “bip-bip” para indicar que el
pulsador está sincronizado.
Presione el botón pulsador para asegurar el
funcionamiento.
TUNE – HOLD
1 SECOND.
SYNC – HOLD
3 SECONDS.
RESET – HOLD
10 SECONDS.
C
H
I
M
E
V
O
L
U
M
E
TUNE – HOLD
1 SECOND.
SYNC – HOLD
3 SECONDS.
RESET – HOLD
10 SECONDS.
30
A
1
A
2
A
A

13 HAMPTONBAY.com
Por favor, póngase en contacto al 1-844-760-3644 para obtener más ayuda.
Instalación (continuación)
5
Instalación de la tapa del
control
Gire la parte inferior del timbre (A) en sentido
horario para instalar la tapa (1) del control.
6
Prueba de la colocación del
timbre y del pulsador
Coloque temporalmente el timbre y el pulsador
(no incluido) donde serán montados.
Presione el pulsador y escuche al timbre (A)
sonar.
Si el timbre (A) no suena, acerque más el
timbre al pulsador y pruebe de nuevo.
NOTA: No instale de forma permanente el pulsador
(no incluido) hasta que el pulsador y el timbre funcionen
correctamente.
A
A
1

14
Operación
1
Regulación del volumen del
timbre
El timbre (A) tiene un control regulable del volumen.
Gire el control de volumen para regular el volumen.
TUNE – HOLD
1 SECOND.
SYNC – HOLD
3 SECONDS.
RESET – HOLD
10 SECONDS.
C
H
I
M
E
V
O
L
U
M
E
C
H
I
M
E
V
O
L
U
M
E
2
Configuración de los
pulsadores inalámbricos
El pulsador inalámbrico (no incluido) tiene dos
opciones para la selección de tonos: Reproduzca el
tono musical seleccionado de la puerta “PRINCIPAL” o
el tono designado para la puerta “DE ATRÁS” (Ding).
Retire el puente simple del interior del
pulsador para reproducir el tono musical
seleccionado.
Añada el puente simple al interior del pulsador
para reproducir solo el tono ding.
ON
1 2
1
ON
1 2
1
Retire el puente para Añada el puente para
congurar como puerta congurar como puerta
“PRINCIPAL” “DE ATRÁS”
3
Selección de un tono
El timbre tiene diferentes tonos seleccionables. El
pulsador (no incluido) congurado como pulsador “DE
ATRÁS” reproducirá solo un din (tono de una nota).
El pulsador congurado como pulsador “PRINCIPAL”
reproducirá sea din-don (tono de dos notas) o
Westminster (tono de ocho notas).
Presione el botón “TUNE” (TONO) en el
timbre(A) hasta escuchar el tono deseado.
NOTA: Todos los modelos de timbres están diseñados
para funcionar hasta con 10 pulsadores inalámbricos
(vendidos por separado)
NOTA: Todos los timbres están diseñados para reproducir
solo dos tonos diferentes no importa cuantos pulsadores
se utilicen.
TUNE – HOLD
1 SECOND.
SYNC – HOLD
3 SECONDS.
RESET – HOLD
10 SECONDS.
C
H
I
M
E
V
O
L
U
M
E
TUNE – HOLD
1 SECOND.
SYNC – HOLD
3 SECONDS.
RESET – HOLD
10 SECONDS.
Cuidado y limpieza
Use un paño seco para limpiar el timbre.
No use limpiadores ni pulidores.
No use ningún líquido en el timbre.
A
A

15 HAMPTONBAY.com
Por favor, póngase en contacto al 1-844-760-3644 para obtener más ayuda.
Análisis de averías
Problema Possible Cause Solución
El timbre no
suena.
El pulsador (no incluido)
y el timbre no están
sincronizados.
Para sincronizar, siga el paso 4 en la sección instalación.
Las baterías no están
bien instaladas.
Asegúrese que las pilas estén instaladas según el
diagrama del interior del pulsador y del timbre.
Las baterías se aca-
baron.
Revise la carga de las pilas del pulsador y del timbre y
reemplácelas si es necesario.
Las pilas parecen
estar bien, pero
el timbre no
funciona luego de
la instalación.
El pulsador (no incluido)
está montado sobre
metal o cerca de espá-
rragos metálicos.
El metal reduce el alcance de transmisión. Utilice cuñas
de madera de 1/4 pulg. a 1/2 pulg. (de 6 a 13 mm) para
mover el timbre o el pulsadort lejos de la supercie de
metal.
El timbre y el pulsador
están instalados muy
separados entre sí.
Coloque el timbre más cerca del pulsador.
El timbre suena
cuando no se
lo requiere
(activaciones
falsas).
El timbre está recibien-
do interferencia de otro
dispositivo inalámbrico.
Reposicione el timbre y el pulsador (no incluido).
Retire las baterías del botón pulsador. Espere 30
segundos.
Mantenga presionado el botón pulsador entre 10 y
15 segundos por un periodo de 60 segundos luego
de instalar la batería en el botón pulsador.
Presione y mantenga presionado el botón en el tim-
bre hasta que el timbre suene un “bip-bip- bip-bip”.
Para volver a sincronizar el pulsador y el timbre,
siga el paso 4 de la sección Instalación.

¿Tiene preguntas, problemas o piezas faltantes?
Antes de la devolución al almacén llame al Servicio al Cliente de Hampton Bay de
8 a.m.-5 p.m., Hora del Central, de lunes a viernes.
1-844-760-3644
HAMPTONBAY.COM
Guarde este manual para uso futuro.
208197-02A
/