Page is loading ...

CAUTION
READ ALL PRECAUTIONS AND
INSTRUCTIONS IN THIS MANUAL
BEFORE USING THIS EQUIPMENT.
KEEP THIS MANUAL FOR
FUTURE REFERENCE.
Visit facebook.com/trojanhealth
www.trojanhealth.co.za
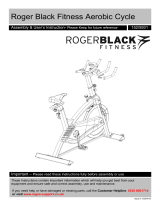
ECLIPSE 400
EXERCISE BIKE
USER MANUAL

2
10385
INDEX
• ImportantSafetyInstructions______________________________________ 3
• PreAssemblyCheckList__________________________________________ 5
• Hardware&ToolsList____________________________________________ 6
• AssemblySteps_________________________________________________ 7
• ExplodedDrawing______________________________________________ 12
• PartsList______________________________________________________ 13
• ConsoleFunctions_______________________________________________ 15
• Maintenance___________________________________________________ 19
• FitnessTips&Techniques__________________________________________ 20
• ConditioningGuidelines __________________________________________ 21
• WarmUp&CoolDown _________________________________________ 22
• 1YearLimitedWarranty__________________________________________ 23
• RepairsProcedure_______________________________________________ 24

3
10385
IMPORTANTSAFETY
INSTRUCTIONS
It is the sole responsibility of the purchaser of Trojan products to read the owner’s manual, warning labels and
instruct all individuals, on proper usage of the equipment. Understanding each and every warning in its entirety
is important. If any of these instructions or warnings are unclear please contact Trojan Customer Services
on 0861 TROJAN (0861 876526), within the Republic of South Africa. Customers outside South Africa can
contact the store where the product was purchased.
The equipment is only intended for home use and is not intended for commercial, institutional and/or studio
facilities use.
Contact Trojan with any questions regarding this classication. It is recommended that all users of Trojan be
informed of the following information prior to use.
HEALTH WARNING
• Before starting any exercise or conditioning program you should consult with your personal physician to
see if you require a complete physical exam. This is especially important if you are inactive, pregnant or
suffer from any illness.
• If at any time during exercise you feel faint, dizzy or experience pain, stop exercising immediately and
consult your physician.
• To avoid muscular pain and strain, begin each workout by stretching and warming up and end each
session by cooling down and stretching.
ACCESS CONTROL
• Trojan recommends that all tness equipment be used in a supervised area. It is recommended that
the equipment be located in an access controlled area. Control is the responsibility of the owner. Keep
children away from all equipment.
• Parents or other supervising adults must provide close supervision of children if the equipment is used in
the presence of children.
INSTALLATION
Trojan recommends that all equipment:
• be secured to or set up on a solid, level surface to stabilise and eliminate rocking or tipping over
during training.
• be set up inside your home away from moisture and dust (the equipment is not designed for
outdoor use).
• be set up with sufcient ventilation to ensure proper operation.
• be set up with sufcient space around the equipment so that all exercises can be completed safely.
It is recommended that there should be at least 1 m of space around the equipment where access is
required to exercise.

4
10385
IMPORTANTSAFETY
INSTRUCTIONS
Front Stabiliser
Pedal
PROPER USAGE
• Do not use the equipment in any way other than as designed or intended by the manufacturer. It is
imperative that Trojan equipment is used properly to avoid injury.
• Injuries may result from exercising improperly or excessively.
• Your Trojan equipment should only be used by one person at a time.
• Be careful to maintain your balance while using, mounting, dismounting or assembling your Trojan
equipment to avoid injury.
• Do not attempt to adjust the seat or handlebars while you are on your Trojan equipment.
• Servicing other than the procedures in this manual should be performed by an authorised service
representative only.
INSPECTION
• Do not use or permit use of any equipment that is damaged or has worn or broken parts. For all Trojan
equipment use only replacement parts supplied by Trojan.
• Always make sure that all nuts and bolts are tightened prior to each use.
• Maintain labels and nameplates – do not remove labels for any reason. They contain important
information.
• Equipment maintenance – preventative maintenance is the key to smooth operating equipment. Please
ensure that you follow our maintenance tips to ensure the continued correct function of your
Trojan equipment.
• Before any use, examine all accessories approved for use with the Trojan equipment for damage or wear.
• Should your Trojan equipment appear damaged or worn, do not attempt to use or repair the equipment
yourself.
• Please contact our service department on 0861 TROJAN (0861 876526) to arrange a repair.
OPERATING WARNINGS
• It is the purchaser’s responsibility to instruct all users as to the proper operating procedures of all Trojan
equipment.
• Keep children away from all moving parts. Parents must provide close supervision of children if the
equipment is used in the presence of children.
• Do not wear loose tting clothing or jewellery when using the equipment. It is also recommended that
users tie up long hair to avoid contact with moving parts.
• Ensure that anyone not using the equipment stays clear of the user, accessories and moving parts while
the machine is in operation.
USER WEIGHT LIMITATIONS
• This Trojan Eclipse 400 Exercise Bike may not be used by persons weighing more than 130 kg.
SAVE THIS INSTRUCTION MANUAL FOR FUTURE USE AND REFERENCE
If any of these instructions or warnings are unclear please contact Trojan Customer Services on
0861 TROJAN (0861 876526) within the Republic of South Africa or visit www.trojanhealth.co.za.
Customers outside South Africa can contact the store where the product was purchased.

5
10385
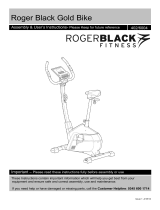
PREASSEMBLYCHECKLIST
Thank you for choosing the Trojan Eclipse 400 Exercise Bike. We took great pride in producing this product
and hope it will provide many hours of quality exercise to make you feel better, look better and enjoy life to
the full. Yes, it’s a proven fact that a regular exercise program can improve your physical and mental health.
Too often, our busy lifestyles limit our time and opportunity to exercise. The Trojan Eclipse 400 Exercise Bike
provides a convenient and simple method to begin your assault on getting your body in shape and achieving
a healthier lifestyle. Before reading further, please review the drawing below and familiarise yourself with the
parts that are labelled.
Read this manual carefully before using the Trojan Eclipse 400 Exercise Bike.
Functions:
Time / Distance / Calories / Speed / Age / Watt / 13 Pre-programmes /
Body Fat / Heart Rate Sensor / Recover
Tension Control: Auto Tension Control
Weight of Flywheel: 4 kg
Saddle: Seat Adjusts Vertically and Horizontally
Set-up Size (mm): 1050 mm (l) x 480 mm (w) x 1250 mm (h)
Front Stabiliser
Pedal
Hand Pulse
Handlebar
Adjustment
Knob
Adjustment
Knob
Seat
Main Cover
Rear
Stabiliser
Computer

6
10385
HARDWARE&TOOLSLIST
INSTRUCTIONS FOR ASSEMBLY
• Before you start to assemble, please check the hardware packaging to make sure all parts are included.
• Basic tools, such as spanners will be provided for assembly.
• The following is included:
(17) Bolt M8 x 70
Wrench/Screwdriver Allen Wrench 6 mm
(18) Bolt M10 x 50 (11) Washer Ø20 x Ø10
(15) Big Curve Washer Ø25 x Ø8 (30) Cap Nut M8
4 PCS 4 PCS 4 PCS
1 PC
1 PC 1 PC
1 PC

7
10385
ASSEMBLYSTEPS
1. PREPARATION
• Before assembly, make sure you have enough space to assemble.
• Use the provided tools for the assembly.
• Before assembling, check whether all the parts needed have been supplied.
STEP 1
STEP 1: INSTALL THE FRONT / REAR STABILISERS
• Attach the Front Stabiliser (2) onto the front curve plate of the Main Frame (1) with two M8 Cap
Nuts (30), M8 x 70 Bolts (17), and Big Curve Washer Ø25 x Ø8 (15).
• Attach the Rear Stabiliser (3) onto the rear curve plate of the Main Frame (1), with two M8 Cap Nuts
(30), M8 x 70 Bolts (17), and Big Curve Washer Ø25 x Ø8 (15).

8
10385
ASSEMBLYSTEPS
STEP 2
STEP 2: INSTALL THE SEAT POST, SEAT CUSHION
AND SEAT SLIDING TUBE
• Release the Locking Knob (48) by turning it in a counterclockwise direction until it can be pulled out.
• Pull out the Locking Knob (48) and slide the Seat Post (5) into the Bushing (53) and Seat Post Cover (59)
on the tube of the Main Frame (1).
• Lock the Seat Post (5) in place by releasing the Locking Knob (48) and sliding the Seat Post (5) up or
down slightly until the Locking Knob (48) “pops” down into the locked position.
• For added safety, tighten the Locking Knob (48) in a clockwise direction.
Note: When adjusting the height of seat post, the maximum insert depth mark line cannot
be higher than the edge of bushing.
• Remove three Locknut M8 (27) and Big Flat Washer Ø16 x Ø8 x 1.5 (10) from underneath of the Seat
Cushion (65) and then attach the Seat Cushion (65) onto the triangle plate of Seat Sliding Tube (6) with
three Locknut M8 (27) and Big Flat Washer Ø16 x Ø8 x 1.5 (10) that were removed.
• Attach the Seat Sliding Tube (6) onto the Seat Post (5) with a Big Flat Washer Ø20 x Ø10 (11), Round
Knob M10 (61) and Bolt M10 x 50 (18).
53

9
10385
STEP 3: INSTALL THE COMPUTER POST
• Remove four M8 x 15 Bolts (19) Big Curve Washer Ø20 x Ø8 (14) from the tube of the
Main Frame (1).
• Slide the Computer Post Cover (58) up to the Computer Post (7).
• Connect the Extension Sensor Wire (42) from the Main Frame (1) to the Extension Sensor
Wire I (68) from the Computer Post (7).
• Insert the Computer Post (7) onto the tube of the Main Frame (1) and secure with four
M8 x 15 Bolts (19), Big Curve Washer Ø20 x Ø8 (14) that were removed.
• Tighten bolts with the S6 Allen Wrench provided.
• Slide the Computer Post Cover (58) down to the Computer Post (7).
ASSEMBLYSTEPS
68
68
42
STEP 3

10
10385
STEP 4: INSTALL
THE HANDLEBAR
• Install the Handlebar (8) to the groove of the
Computer Post (7).
• Insert the Hand Pulse Sensor Wires (68) into the
hole on the Computer Post (7) and then
pull them out from the top end of the
Computer Post (7).
• Attach the Decorate Cover (63) onto the
Handlebar (8) with a Spacer (41)
and T-Knob (62).
• Tighten the T-Knob (62) after adjustment.
STEP 5: INSTALL THE COMPUTER
AND THE FOOT PEDALS
• Remove four Bolt M5 x 10 (67) from the
Computer (66).
• Connect the Hand Pulse Sensor Wires (49)
and Sensor Wire I (68) to the wires that come
from the Computer (66) and then attach
the Computer (66) onto the top end of the
Computer Post (7) with four Bolt M5 x 10 (67)
that were removed.
• Attach the Right and Left Foot Pedals (45, 44) to
the Right and Left Cranks . The Right Foot Pedal
(45) should be threaded in a clockwise direction.
The Left Foot Pedal (44) should be threaded in a
counterclockwise direction.
Note: The Right and Left Foot Pedals (45, 44) and
Right and Left Cranks are marked with “R” & “L”.
ASSEMBLYSTEPS
58
68
8
STEP 4
STEP 5

11
10385
STEP 6: AC ADAPTER INSTALLATION
• Plug one end of the AC Adapter (70) into the power jack of the Power Supply Wire (54)
on the Front of the Left Chain Cover.
• Before plugging in, make sure to check carefully the specications on the Adapter.
• Plug the other end of the AC Adapter (70) into the electrical wall outlet.
ASSEMBLYSTEPS
CAUTION:
Ensure that cables are not damaged
during assembly or when
tightening screws.
Recheck
All bolts and nuts are
tightened securely
before using the machine
STEP 6

12
10385
EXPLODEDDRAWING

13
10385
PARTSLIST
No. Description Qty
1 MainFrame 1
2 FrontStabilizeØ60 1
3 RearStabilizeØ60 1
4 IdleWheelBracket 1
5 SeatPost 1
6 SeatSlidingTube 1
7 ComputerPost 1
8 HandlebarØ25 1
9 UBracket 2
10 WasherØ16xØ8 4
11 WasherØ20xØ10 1
12 IdleWheelØ10xØ35 1
13 WasherØ12xØ6 1
14 BigCurveWasherØ20xØ8 4
15 BigCurveWasherØ25xØ8 4
16 SpringWasherØ6 2
17 BoltM8x70 4
18 BoltM10x50 1
19 BoltM8x15 4
20 BoltM8x18 1
21 AdjustableBoltM6x36 2
22 BoltM6x10 1
23 ScrewST2.9x12 2
24 ScrewST4.2x20 4
25 ScrewST4.2x25 8
26 PhillipsSelfTappingScrewST4.2x20 8
27 NutM8 4
28 NutM6 2
29 NutM10 2
No. Description Qty
30 CapNutM8 4
31 Flywheel 1
32 AxleBush 2
33 BallBearing 2
34 AxleSleeve15/16” 1
35 AxleSleeve7/8” 1
36 WasherI 1
37 WasherII 1
38 Nut7/8” 2
39 BeltPulleywithCrank 1
40 Spring 1
41 SpacerØ12x1.5x20 1
42 ExtensionSensorWireL=500mm 1
43 HandlebarFoamGripØ24xØ30x550 2
44 LeftPedal 1
45 RightPedal 1
46 HandlebarEndCapØ25 2
47
CoverCap 2
48 LockingKnob 1
49 HandPulseSensorwithWireL=750mm 2
50 SensorWireL=300mm 1
51
LeftChainCover 1
52 RightChainCover 1
53 Bushing 1
54 PowerSupplyWireL=400mm 1
55 HexagonNutM12x3 1
56 FrontStabilizeEndCap 2
57 RearStabilizeEndCap 2
58 ComputerPostCover 1

14
10385
PARTSLIST
No. Description Qty
59 SeatPostCover 1
60 EndCap 2
61 NutM10 1
62 T-KnobM8x55 1
63 DecorateCover 1
64 Belt 1
65 Seat 1
66 Computer 1
67 BOLTM5x10 4
68 MiddleSensorWireL=1100mm 1
69 MotorL=400mm 1
70 ACAdapterL=2000mm 1

15
10385
CONSOLEFUNCTIONS
FUNCTION BUTTON
START/STOP: 1. Starts & pauses workouts.
2. Starts body fat measurement and quit the body fat program.
3. Operates only when in stop mode. Holding key 3 seconds
will reset all function value to zero.
DOWN: Decreases value of selected workout parameter:
TIME, DISTANCE, etc. During the workout, it will decrease the
resistance load.
UP: Increases value of selected workout parameter.
During the workout, it will increase the resistance load.
ENTER: To input desired value or work out mode.
TEST (RECOVERY): Press to enter into Recovery function when computer has the heart rate value. Recovery is
Fitness Level 1 - 6 after 1 minute. F1 is best and F6 is the worst.
MODE: Press to switch display form RPM to SPEED > ODOMETER
> DISTANCE > WATT > CALORIES during workout.
WORKOUT SELECTION
After power-up using UP or DOWN keys to select then pressing ENTER to enter
the desired mode.
SETTING WORKOUT PARAMETERS
After selecting your desired program, you may pre-set several workout parameters
for desired results.
WORKOUT PARAMETERS
TIME/DISTANCE/CALORIES/AGE
Note: Some parameters are not adjustable in certain programs.
Once a program has been selected, pressing ENTER, will make “Time” parameter ash.
Using UP or DOWN KEY you may select desired time value. Press ENTER KEY to input value.
Flashing prompt will move to the next parameter. Continue use of UP or DOWN KEY.
Press START / STOP to start workout.

16
10385
Field
Setting
Range
Default
value
Increment/
Decrement
Description
Time
0:00~99:00 00:00 ±1:00
1. When display is 0:00,
Time will count up.
2. When Time is 1:00~99:00,
it will count down to 0.
Distance
0.00~999.0 0.00 ±1.0
1. When display is 0.0,
Distance will count up.
2. When distance is 1.0~999.0,
it will count down to 0.
Calories
0~9950 0.0 ±50
1. When display is 0,
Calories will count up.
2. When Calories are 50~9950,
it will count down to 0.
Age
10~99 30 ±1
Target H.R. will be based on age.
When Heart Rate exceeds target
H.R.; the number of Heart Rate will
ash in programs.
CONSOLEFUNCTIONS
MORE ABOUT WORKOUT PARAMETERS

17
10385
CONSOLEFUNCTIONS
PROGRAM OPERATION
MANUAL (P1)
Select “Manual” using UP or DOWN button then pressing ENTER button. First parameter “Time” will ash so value can be
adjusted using UP or DOWN button. Press ENTER button to save value & move to next parameter to be adjusted.
Continue through all desired parameters, pressing START / STOP to start workout.
Note: Once the workout parameters counts down to zero; it will give two beeps and stop the workout automatically.
Press START / STOP button to continue the workout to nish the workout parameter.
PRE-PROGRAMS (P2 - P7)
There are 6 program proles ready for use. All program proles have 16 levels of resistance.
SETTING PARAMETERS FOR PRE-PROGRAMS
Select one of the pre-programs using UP or DOWN button then pressing ENTER button. First parameter “Time” will ash
so value can be adjusted using UP or DOWN button. Press ENTER button to save value & move to next parameter to be
adjusted.
Continue through all the desired parameters, pressing START / STOP to start workout.
Note: Once the workout parameters counts down to zero; it will give two beeps and stop the workout automatically.
Press START / STOP button to continue the workout to nish the workout parameter.
BODY FAT PROGRAM (P8)
SETTING DATA FOR BODY FAT
• Select “Body Fat Program” using UP or DOWN button then pressing ENTER.
• “Male” will ash so Gender can be adjusted using UP or DOWN button, press ENTER to
save gender & move to next data.
• “175” of the Height will ash, so Height can be adjusted to use UP or DOWN button,
press the ENTER button to save value & move to next data.
• “75” of the Weight will ash so Weight can be by using the to use UP or DOWN button,
press ENTER button to save value & move to next data.
• “30” age will ash so Age can be adjusted using UP or DOWN button, press ENTER to save value.
• Press START / STOP to start measurement, please also grasp hand pulse grips.
• After 15 seconds the display will show Body Fat %, BMR, BMI & BODY TYPE.
Note: Body Types: There are 5 body types divided according to the FAT % calculated.
BMR: Basal Metabolism Ratio.
BMI: Body Mass Index.
• Press the START / STOP button to return to the main display.

18
10385
TARGET HEART RATE PROGRAM (P9)
SETTING PARAMETER FOR TARGET H.R.
Select the “TARGET H.R.” using UP or DOWN button and press the ENTER button. First parameter “Time” will ash so value
can be adjusted using UP or DOWN button. Press ENTER button to save value & move to next parameter to be adjusted.
Continue through all desired parameters, pressing START / STOP to start the workout.
Note: If Pulse ±5 is above or below the set TARGET H.R., computer will adjust the resistance load
automatically. It will check every 20 seconds approx. I resistance load will increase or decrease.
(Note: Each resistance load represents 2 level of loading)
One of the workout parameters counts down to zero; it will give the beeps and stops the workout
automatically. Press START / STOP button to continue the workout to nish the workout parameter.
HEART RATE CONTROL PROGRAM (P10 - P12)
There are 3 selections for target pulse:
P10 - 60 % TARGET H.R. = 60 % of (220 - AGE)
P11 - 75 % TARGET H.R. = 75 % of (220 - AGE)
P12 - 85 % TARGET H.R. = 85 % of (220 - AGE)
SETTING PARAMETERS FOR HEART RATE CONTROL
Select “a Heart Rate Control Program” using the UP or DOWN button and press the ENTER button. First parameter “Time”
will ash so value can be adjusted using UP or DOWN button. Press ENTER button to save value & move to next parameter
to be adjusted.
Continue through all the desired parameters, by pressing START / STOP to start the workout.
Note: If Pulse ±5 is above or below the set TARGET H.R., the computer will adjust the resistance load
automatically. It will check Every 20 seconds approx. I resistance load will increase or decrease
(Note: each resistance load represents 2 level of loading)
One of workout parameters counts down to zero, it will give two beeps and stop the workout
automatically. Press START / STOP button to continue the workout to nish the workout parameter.
USER PROGRAM (P13)
User program allows user to set their own program that can be used immediately.
SETTING PARAMETERS FOR USER PROGRAM
Select user, using UP or DOWN button, then press the ENTER button. First parameter “Time” will ash so value can be
adjusted using UP or DOWN button. Press ENTER button to save value & move to next parameter to be adjusted.
Continue through all desired parameters.
After completing parameter setup level it will ash. Use the UP or DOWN button to adjust then press ENTER
until complete. (There are a total of 10) Press START / STOP to start the workout.
Note: One of workout parameters counts down to zero, it will give two beeps and stop the workout automatically.
Press START / STOP button to continue the workout to nish the workout parameter.
CONSOLEFUNCTIONS

19
10385
MAINTENANCE
CLEANING
The Trojan Eclipse 400 Exercise Bike can be cleaned with a soft cloth and mild detergent. Do not use abrasives or solvents on
plastic parts. Please wipe your perspiration off the Trojan Eclipse 400 Exercise Bike after each use. Be careful not to get excessive
moisture on the computer display panel as this might cause an electrical hazard or electronics to fail.
Please keep the Trojan Eclipse 400 Exercise Bike, especially the computer console, out of direct sunlight to prevent screen damage.
Please inspect all assembly bolts and pedals on the machine for proper tightness before use.
STORAGE
Store the Trojan Eclipse 400 Exercise Bike in a clean and dry environment away from children.
TROUBLESHOOTING
PROBLEM SOLUTION
Thereisnodisplayonthe
computerconsole.
1. Removethecomputerconsoleandverifythewirethatcomesfromthecomputer
consoleisproperlyconnectedtothewirethatcomesfromthemainframe.
2. Checkifthebatteriesarecorrectlypositionedandthatthebatteryspringsarein
propercontactwithbatteries.
3. Thebatteriesinthecomputerconsolemaybeexpired.Replacewithnewbatteries.
Squeakingnoisewheninuse. Theremaybealoosebolt.Pleaseinspecttheboltsandtightenifnecessary.

20
10385
FITNESSTIPS&TECHNIQUES
Trojan and the Heart and Stroke Foundation have joined forces to KEEP SOUTH AFRICA MOVING.
The Heart and Stroke Foundation South Africa encourages all South Africans to make heart-healthy choices
that include daily physical activity, exercise and a balanced diet. Use Trojan, SA’s No. 1 selling Home Fitness
brand to give you the ability to boost your tness level and lower your risk of cardiovascular disease.
Visit www.trojanhealth.co.za for equipment choices and exercise programs, and
www.heartfoundation.co.za for information on how to adopt a healthy lifestyle.
AEROBIC EXERCISE
Aerobic exercise is any sustained activity that sends oxygen to your muscles via your heart and lungs. Aerobic
exercise improves the tness of your lungs and heart − your body’s most important muscle. Aerobic exercise
tness is promoted by any activity that uses your large muscles (arms, legs, or buttock, for example). Your heart
beats quickly and you breathe deeply. An aerobic exercise should form part of your entire exercise routine.
WEIGHT TRAINING
Along with aerobic exercising which helps get rid of and keep off the excess fat that our bodies can store,
weight training is an essential part of the exercise routine process. Weight training helps tone, build and
strengthen muscle. If you are working above your target zone, you may want to do a lesser amount of reps.
Always consult your physician before beginning any exercise program.
MUSCLE CHART
TROJAN ECLIPSE 400 EXERCISE BIKE
The exercise routine that is performed on the Trojan Eclipse 400 Exercise Bike will develop the lower body
muscle group as well as condition the circulatory system and provide a good aerobic workout. These muscle
groups are highlighted on the muscle chart below.
Tr apezius
Posterior
Tricep
Latissimus Dorsi
Gluteals
Hamstrings
Gastrocnemius
Tr apezius
Anterior
Pectoralis Major
Serratus Anterior
Biceps
Abdominal
Sartorius
Quadriceps
Tibialis
/