Page is loading ...

1
MODELS: Fuego Manual / Remote Option
Fuego LE Timer fires
Installation and User Instructions
UK
PLEASE READ THESE INSTRUCTIONS CAREFULLY
AND RETAIN FOR FUTURE REFERENCE
This electric fire has been made with great care. Here are some instructions including cleaning and
maintenance, which will help you keep your fire in good condition for many years. If you experience
any parts or service problems contact your retailer.
This appliance is not intended for use by persons (including children) with reduced physical,
sensory or mental capabilities, or lack of experience and knowledge, unless they have been given
supervision or instruction concerning use of the appliance by a person responsible for their safety.
Children should be supervised to ensure that they do not play with the appliance.
This is an amendment to the standard and now applies to all EN60335 or later approved products.
WARNING - DO NOT BLOCK ANY AIR VENTS.
DO NOT TURN THE FIRE ON UNTIL YOU HAVE READ ALL OF THE INSTRUCTIONS.
Created in the UK by
WIDNEY LEISURE LTD
St Marys Road, Nuneaton, Warwickshire, CV11 5AU
Telephone: +44(0) 2476 377550
Email: sales@widney-leisure.co.uk | Web: www.widney-leisure.co.uk
The product complies with the European Safety Standards EN 60335 -1, EN60335-2-30 and the essential requirements of EEC Directives 73/23 and 89/336

2
YOUR FIRE
UNPACKING, ELECTRICAL INSTALLATION
& GENERAL SAFETY
GENERAL:
Unpack the fire carefully and retain the packaging for possible future use, for
example in the event of moving or returning the fire to your supplier. Remove any
plastic protection film and transit tape.
The fire incorporates a flame effect that may be enjoyed at any time of the year;
using the flame effect on its own only requires minimal electricity.
THIS APPLIANCE MUST BE EARTHED
Check that the voltage shown on the rating label of your fire is the same as your
dwelling electricity supply which must be AC (alternating current).
The mains cord of the fire has a UK type plug fitted with a 13amp fuse; when
replacing a fuse use a 13amp fuse approved to BS 1362. The fuse cover of a
moulded on plug must be refitted after changing the fuse. Should the fuse cover
become lost, the plug must not be used until the correct replacement fuse cover
is obtained from your service agent.
The wires in the mains supply cord are coloured in accordance with the following
code: Green and Yellow = Earth, Blue = Neutral, Brown = Live.
If your fire is fitted with a moulded on mains plug which is not suitable for the
socket outlets in your dwelling, the plug must be cut off and an appropriate one
fitted.
Note: A plug cut off from a flexible cord presents a shock hazard if inserted in a
13 amp socket elsewhere in the dwelling, to avoid this remove the fuse and
dispose of immediately.
If you are fitting an alternative type of plug then the colours of the wires in the
mains cord may not correspond with the identifying markings on the plug
terminals. In this case proceed as follows:
The wire which is coloured Green/Yellow must be connected to the terminal in
the plug which is marked by the letter E or by the earth symbol or coloured
Green or Green/Yellow. The wire which is coloured Blue must be connected to
the terminal in the plug which is marked by the letter N or coloured Black. The
wire which is coloured Brown must be connected to the terminal in the plug
which is marked by the letter L or coloured Red.

3
ALWAYS INSTALL THE FIRE SO THAT THE PLUG IS ACCESSIBLE.
DO NOT COVER OR HANG CLOTHES, TOWELS ETC. OVER OR NEAR
THE HEATER AS THIS COULD CAUSE OVERHEATING AND POSSIBLE
DAMAGE. THE HEATER SHOULD NOT BE USED IMMEDIATELY
BELOW A SOCKET OUTLET.
DO NOT USE IN THE IMMEDIATE SURROUNDINGS OF A BATH,
SHOWER OR NEAR ANY SOURCE OF WATER.
ENSURE THAT SUFFICIENT CABLE LENGTH IS FITTED TO ENABLE
THE MAINS PLUG TO BE CONNECTED TO THE APPLIANCE WITHOUT
STRETCHING.
DO NOT USE THIS HEATER WITH AN EXTERNAL PROGRAMME
CONTROLLER, THERMAL CONTROL, TIMER OR ANY OTHER DEVICE
WHICH SWITCHES THE HEATER ON AUTOMATICALLY AS A FIRE
RISK MAY OCCUR IF THE HEATER HAS BEEN ACCIDENTALLY
COVERED OR MOVED.
HARD WIRING THE FIRE:
IF DESIRED THE FIRE CAN BE HARD WIRED TO A SWITCHED FUSED
ISOLATOR.
IF A SWITCH FUSED ISOLATOR IS USED ENSURE THAT THE FUSE IN THE
ISOLATOR IS RATED AT 13AMP TO BS1362.
It is recommended that this work be undertaken by a competent engineer.
Note: If the fire is hard wired ensure that the mains lead can be unplugged from
the appliance to assist removal.

4
SECTION 1: ELECTRIC FIRE FITTING INSTRUCTIONS
The appliance can either be fixed to a flat vertical wall or inset – please refer
to the instructions below.
WARNING
DO NOT BLOCK ANY OF THE AIR VENTS LOCATED IN THE BACK, SIDES
OR THE FRONT OF THE FIRE
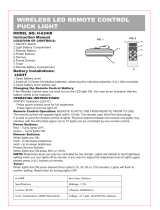
FLAT WALL FIXING:
The appliance should be securely fixed to the wall using suitable
wall fixings.
1. Position the hanger bar at the desired height: note that the
minimum height to the top of the fixing bracket from the floor
must be at least 565mm to ensure there is a minimum of 60mm
air gap between the floor and the fire.
2. Mark the position of the hanging bar on the wall - ensure that it
is parallel to the floor.
3. Mark fixing holes through hanger bar and drill holes to suit wall
fixings and screws.
4. Fix hanger bar to wall using suitable fixings.
5. The main chassis of the fire is now ready to be fitted.
7. Connect the mains cord to the fire
8. At the top of the fire is a hanging lip that is designed to fit over
the lip on the hanger bar; hang the fire onto this lip.
9. To fix the fire permanently to the wall there is a tab at the rear
of the fire on the bottom right hand side (viewed from the front)
shown in the diagram (right) that should be used. The tab
should be unfolded out as shown in the diagram and then used
to insert the fixing the same as those used for the wall hanger
bar.
10. The Fascia may now be fixed to the fire chassis – see
Fully inset instructions ‘Fitting the facia’.
.
Pull tab outward and fold at 180 degrees
Flat Wall Fixing
Minimum Dimensions
>60mm
>565m
m

5
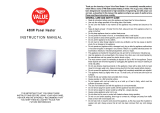
FULLY INSET FITTING:
The fire can be inset up to the fixing flange as indicated in the diagram.
IMPORTANT:
IT IS IMPORTANT TO PROVIDE SUFFICIENT AIR TO THE CAVITY BEHIND THE APPLIANCE. THE
RECOMMENDED MINIMUM IS 12,600MM
2
.
THE FIRE MUST BE FITTED WITH A MINIMUM OF 50MM CLEARANCE BETWEEN THE REAR OF THE FIRE
AND ANY SOLID WALL.
Fitting the fire into a wall or aperture:
The fire should be fitted in an aperture cut to the size shown in the diagram; the cavity depth
should also be as shown – if the depth is less than shown the fire may not function correctly.
Installation of the fire:
Provision for a mains connection should be made at the rear of the aperture – If the appliance is to
be hard wired allow sufficient length of mains cable to enable removal of the appliance from the
aperture with the cable attached.
11. Fix the mains cable to the underside of the appliance
12. Slide the fire into the aperture
13. Check to ensure that the appliance is level.
14. Mark through the fixing holes in the outer flange and then remove the fire from the wall
aperture.
15. Drill the wall with a suitable sized drill and where necessary insert suitable fixings.
16. Connect the appliance to the mains socket.
17. Slide the complete fire into the aperture.
18. Fix the fire to the pre drilled holes with suitable fixings.
440
5
3
5
185
Floor
> 60
Cavity Minimum Dimensions
This Flange must
be on the outside
of the aperture

6
19. Pebble effect setup:
Remove the pebbles carefully from the packaging
and place the pebbles evenly on the effect tray. The
fire is supplied with a pebble effect light box that is
positioned on top of the flame effect panel as shown
in the diagram (right).
20. Moulded Log effect setup:
Fit as shown in the diagram (right).
In this case the pebble effect light
box is not used.
21. Fit the Facia see below:
FITTING THE FASCIA:
The fire front may now be fitted to the fire chassis as follows.
At the rear of the facia frame there is a large v shaped hook. Hook this over
the fixing lip located on the fire back.
Carefully lower the bottom edge of the facia frame towards the fire chassis
until the magnets connect the facia frame to the fire chassis.
Place pebbles onto the bed
Bed
HOOK OVER
CLIP TO
MAGNET
FIRE FRONT FITTING
Fit the Log fuel
bed moulding as
shown by
arrows, making
sure that it
covers the
bottom of the
effect screen
and rests on the
illumination box.

7
SECTION 2: OPERATING YOUR FIRE
OPERATING THE FIRE IN MANUAL MODE (Not applicable to LE Timer fires)
MANUAL MODE IS USED IF THE OPTIONAL REMOTE HANDSET HAS NOT BEEN PURCHASED,
HAS BEEN MISLAID OR THE BATTERIES ARE FLAT.
To operate the fire in manual mode follow the steps below:
NOTE: BY PRESSING ‘FLAME’ MORE THAN ONCE
THERE ARE THREE INTENSITY SETTINGS AVAILABLE
NOTE:
THE DISPLAY INDICATES THE TEMPERATURE OF THE
SENSOR WHICH IS LOCATED INSIDE THE FIRE, AS A
RESULT THE ACTUAL ROOM TEMPERATURE WILL BE
LOWER THAN INDICATED, WE SUGGEST THAT THE
TEMPERATURE IS GRADUALLY RAISED UNTIL A
COMFORT LEVEL IS ACHIEVED.

8
OPERATING YOUR FIRE—REMOTE OPTION FIRE
REMOTE OPERATION:
(Not applicable to LE Timer fires or if the remote option has not been purchased)
On first use insert the batteries into the remote control handset—see battery
replacement section below. With the mains supply connected to the fire and
switched on the fire can be operated.
CARE
DO NOT drop - DO NOT immerse in liquids - DO NOT leave flat batteries in
the unit -Clean only with a dry cloth.
As this product operates using infra-red, ensure there is a clear line of sight
between the handset and the appliance for it to operate effectively.
REMOTE HANDSET BATTERY REPLACEMENT:
To replace the batteries in the remote handset remove the battery compartment cover and remove
the batteries. Replace the batteries with either rechargeable or non-rechargeable batteries of type:
AAA, MN2400, LR23, or UM4.
DO NOT MIX Rechargeable and Non rechargeable batteries.
To operate your fire in Remote mode follow the steps below:
1) When the Mains supply has been turned on the Fire can be activated to
Standby mode by pressing
the switch on the Fire as shown.
2) To switch the Fire on press on the remote handset; Now the Flame
effect and Fuel bed will be on.
3) Press ‘Flame intensity -‘; Flame effect and Fuel bed become dimmer
(there are 4 steps).
4) Press ’Flame intensity +’; Flame effect and Fuel bed become brighter
(there are 4 steps).
5) Press ‘DISPLAY ON/OFF’ Control, the Flame effect and Fuel bed switch
on/off.
6) Press ’HEATER ON/OFF’; The Heater will come on if the set tempera-
ture is greater than the temperature of the environment.
7) Press ‘Temp +’; the set temperature will raise 1ºC per press (after 28 the
Fire will be permanently on, a further press will reset to the minimum
temperature).
8) Press ‘Temp -’; the set temperature will lower 1ºC per press.
9) Press ’HEATER ON/
OFF’ again; the Heater will switch off.
10) At any stage if you press the Fire will go off.
11) The Fire can be operated with Flame effect and Fuel bed with or without
the Heater on.
+ -
- +
+ -
- +
PRESS
DISPLAY ON/OFF
FLAME
INTENSITY
HEATER ON/OFF
-
+
-
+
TEMP

9
OPERATING YOUR FIRE—LE TIMER FIRE
(Not applicable to Manual / remote fires)
To operate the fire follow the steps below:
NOTE: BY PRESSING ‘FLAME’ MORE THAN ONCE
THERE ARE THREE INTENSITY SETTINGS AVAILABLE

10
SECTION 3: MAINTENANCE AND CLEANING
DISCONNECT THE FIRE FROM THE SUPPLY BEFORE CLEANING OR
CARRYING OUT ANY MAINTENANCE CLEANING
Warning: If the air inlet becomes covered with dust the fire may cut out. This is a
safety feature. Refer to Safety Cut-out information for further action.
IMPORTANT NOTICE
Your electric fire operates using a rotary fan. Due to the working nature of this fan it is inevitable
that a build-up of LINT, or general house dust (i.e.) carpet fibres or animal fur etc. will from time to
time accumulate around the inlet and outlet grills. Therefore it is recommended that regular clean-
ing of this area is undertaken using a standard vacuum cleaner attachment.
For safety reasons please ensure that the fire is switched off and has had time to cool down before
cleaning.
GENERAL CLEANING:
The fire should be cleaned with an antistatic cloth to prevent dust being attracted to the high gloss
surfaces of the fire - do not use polish! For difficult to remove marks such as finger marks it is rec-
ommended that a chamois leather slightly damp is used.
Care should be taken when cleaning around metal parts; non-painted metal parts may have sharp
edges.
DO NOT USE ABRASIVE MATERIALS
Decorative parts:
Under no circumstances use an abrasive cleaner on bright surfaces. Such use will cause
permanent damage to the appearance of your fire.
It is important to use care in cleaning. Dusting or wiping with a damp cloth is recommended in
order to preserve the finish.
Fuel Bed:
Clean with a vacuum cleaner attachment or a soft brush.
Light and Flame Effects:
No maintenance should be necessary on the light / flame effect, illumination is by LED’s which
should not require any attention for the life of the fire except for damage to the LED’s or failure of
the LED power supply — in which case the fire must be returned to Imperial fires for replacement
of the damaged / faulty part(s).

11
SECTION 4: IMPORTANT INFORMATION
SAFETY CUT-OUT:
The heating element is fitted with a cut-out which will switch off the fire in the event the fire over-
heats, should this occur follow the points below.
Switch the fire off at the wall outlet, the fire must be isolated from the mains power supply.
Ensure that there are no obstructions in or around the air inlet or air outlets.
After approximately 5 minutes the fire can be switched back on.
WARNING
Do not switch the fire on until the above checks have been completed.
If the fault is persistent contact your retailer or Imperial Fires Customer Service on the telephone
numbers provided at the beginning of these instructions.
FEATURES—MANUAL / REMOTE FIRE
KEY Standard Option Not available
Heat output 1.5kW
Timer operation
Living flame effect
Thermostat
Digital display
Remote control
Manual control
TECHNICAL SPECIFICATION
Voltage 220 ~240v A.C.
Power Input 1532w
MAINS CORD:
Mains Cord UK Plug
If the mains supply cord is damaged it must be replaced by a
competent electrician or similarly qualified person
FEATURES—LE TIMER FIRE
KEY Standard Option Not available
Heat output 1.5kW
Timer operation
15mins—30mins—1Hr—2Hr
Living flame effect
Thermostat
Digital display
Remote control
Manual control

12
SECTION 4: IMPORTANT INFORMATION Continued
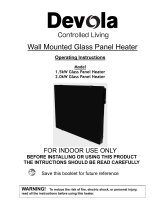
Dimensional Specifications (GL Wide / GL Standard)
Height 590mm / 575mm
Width 720mm / 580mm
Depth 165mm / 165mm
Minimum mounting height from floor or
surface
60mm
Minimum aperture size 535mm High x 440mm Wide
GL standard
GL Wide
720 165
590
542
580
165
575
527

13
NOTES

14
NOTES

15
GUARANTEE
This product is guaranteed against faulty parts or workmanship for 12 months from the date of
purchase.
To validate the guarantee the product must be returned to the retailer or supplier for repair or
replacement with this sheet completed with the detail requested. (Please do not send a
photocopy).
Imperial Fires Limited are not responsible for any cost incurred by the customer in returning the
product to the seller.
When making a claim under warranty you must provide the details requested below
otherwise your warranty might be invalid.
Return this form to your dealer or contact Imperial Fires Limited.
Imperial Fires Limited reserves the right to refuse warranty for any product returned that
does not have valid proof of date of purchase:
Please return your original sales invoice with any returned product.
This guarantee does not affect your statutory rights.
Affix Data Label
Insert Your Full Name
Insert Your Full Address
Post Code
Daytime Contact Telephone Number
Return this form to
Widney Leisure Ltd
St Marys Road
Nuneaton
Warwickshire
CV11 5AU
Telephone +44(0) 2476 377550
Email: sales@widney-leisure.co.uk

16
I01427 - Fuego Issue C
/