Dell C8621QT User guide

Type
User guide
Model: C8621QT
Regulatory model: C8621QTt
Dell C8621QT
User’s Guide
NOTE: A NOTE indicates important information that helps you make better use of your
display.
CAUTION: A CAUTION indicates potential damage to hardware or loss of data if
instructions are not followed.
WARNING: A WARNING indicates a potential for property damage, personal injury,
or death.
Copyright © 2020 Dell Inc. or its subsidiaries. All rights reserved. Dell, EMC, and other trademarks are
trademarks of Dell Inc. or its subsidiaries. Other trademarks may be trademarks of their respective owners.
2020 – 03
Rev. A00
Contents
About Your Display ..................................5
Package Contents . . . . . . . . . . . . . . . . . . . . . . . . . . . . . . . . .5
Product Features . . . . . . . . . . . . . . . . . . . . . . . . . . . . . . . . .7
Identifying Parts and Controls . . . . . . . . . . . . . . . . . . . . . . . . . . .8
Display Specifications . . . . . . . . . . . . . . . . . . . . . . . . . . . . . . 12
Plug-and-Play . . . . . . . . . . . . . . . . . . . . . . . . . . . . . . . . . . 24
LCD Display Quality and Pixel Policy. . . . . . . . . . . . . . . . . . . . . . .24
Setting Up the Display ..............................25
Connecting Your Display . . . . . . . . . . . . . . . . . . . . . . . . . . . . . 25
Wall Mounting . . . . . . . . . . . . . . . . . . . . . . . . . . . . . . . . . . 29
Remote Control. . . . . . . . . . . . . . . . . . . . . . . . . . . . . . . . . .30
Magnet Warning Statement . . . . . . . . . . . . . . . . . . . . . . . . . . . 33
Using the stylus . . . . . . . . . . . . . . . . . . . . . . . . . . . . . . . . . 33
Operating the Display...............................35
Turning on the Display . . . . . . . . . . . . . . . . . . . . . . . . . . . . . . 35
Touch OSD Launcher. . . . . . . . . . . . . . . . . . . . . . . . . . . . . . .35
Using the Touch Control Launcher. . . . . . . . . . . . . . . . . . . . . . . .36
Using the OSD lock function. . . . . . . . . . . . . . . . . . . . . . . . . . . 37
Using the On-Screen Display (OSD) Menu . . . . . . . . . . . . . . . . . . . 38
Dell Web Management for Displays . . . . . . . . . . . . . . . . . . . . . . . 51
Contents | 3
4 | Contents
Troubleshooting ...................................56
Self-Test . . . . . . . . . . . . . . . . . . . . . . . . . . . . . . . . . . . . . 56
Built-in Diagnostics. . . . . . . . . . . . . . . . . . . . . . . . . . . . . . . .58
Common Problems . . . . . . . . . . . . . . . . . . . . . . . . . . . . . . . .59
Product Specific Problems. . . . . . . . . . . . . . . . . . . . . . . . . . . .60
Touchscreen Problems . . . . . . . . . . . . . . . . . . . . . . . . . . . . . .62
Universal Serial Bus (USB) Specific Problems . . . . . . . . . . . . . . . . . 62
Ethernet Problems . . . . . . . . . . . . . . . . . . . . . . . . . . . . . . . . 63
Appendix.........................................64
Safety Instructions . . . . . . . . . . . . . . . . . . . . . . . . . . . . . . . .64
FCC Notices (U.S. only) and Other Regulatory Information . . . . . . . . . . 64
Contacting Dell . . . . . . . . . . . . . . . . . . . . . . . . . . . . . . . . . .64
Setting Up Your Display . . . . . . . . . . . . . . . . . . . . . . . . . . . . . 65
Maintenance Guidelines . . . . . . . . . . . . . . . . . . . . . . . . . . . . . 67
About Your Display | 5
About Your Display
Package Contents
Your display ships with the components shown below. Make sure that you have received all the
components and contact Dell if something is missing.
NOTE: Some items may be optional and may not ship with your display. Somefeatures
may not be available in certain countries.
Display
Remote Control & Batteries
(AAA x 2)
Stylus x 2
6 | About Your Display
Remote control holder
Wire Saddle x 3
Stylus nib x 2
Power cable (varies by country)
Power cable for connecting
Optiplex system to display
(see Optiplex (Optional))
USB 3.1 upstream cable (enables
the USB ports on the display)
DP cable (DP to DP)
USB Type-C cable
HDMI cable
About Your Display | 7
• Flatfrog Board Software
download instruction
• Safety, Environmental and
Regulatory Information
• Quick Setup Guide
Product Features
The Dell C8621QT display has an active matrix, thin film transistor (TFT), liquid crystal display
(LCD), and LED backlight. The display features include:
• 217.427 cm (85.60 in.) active area display (Measured diagonally) 3840 x 2160 (16:9 aspect
ratio) resolution, plus full-screen support for lower resolutions.
• Video Electronics Standards Association (VESA™) 600 x 400 mm mounting holes.
• Build-in speakers (2 x 20 W) by New Sunlink.
• Plug and play capability if supported by your system.
• On-Screen Display (OSD) adjustments for ease of set-up and screen optimization.
• Security lock slot.
• Supports Asset Management Capability.
• Arsenic-Free glass and Mercury-Free for Panel only.
• 0.3 W standby power when in the sleep mode.
• Easily setup with Dell Optiplex Mirco PC (Mirco Form Factor).
• Up to 20 points and 4 pens InGlass
TM
Touch technology.
• Optimize eye comfort with a flicker-free screen.
• The possible long-term effects of blue light emission from the display may cause damage
to the eyes, including eye fatigue or digital eye strain. ComfortView feature is designed to
reduce the amount of blue light emitted from the display to optimize eye comfort.
8 | About Your Display
Identifying Parts and Controls
Front view
25 3
1
1
4
Label Description
1 Screen drop down touch key
2
IR Lens
3 Power on/off button
4 Power LED indicator
5 OSD Launcher touch key (For more information, see Operating the Display)
About Your Display | 9
Back View
1
2
4
3
9 10876
5
1
1
1
Label Description Use
1 Handle x 4 Use to move the display.
2 VESA mounting holes (600 x 400
mm)
To mount the display.
3
USB Type-C cable clip
Use to route USB Type-C cable.
4 Security lock slot Secures Optiplex with security cable lock (sold
separately).
5
Optiplex holder
Use to hold a Micro Form Factor Optiplex PC.
6 Serial number, Service Tag label,
and Website
Refer to this label if you need to contact Dell for
technical support.
7 Barcode, serial number, and Service
Tag label
8 Regulatory label List of approved regulatory labels.
9 AC to optiplex AC power to optiplex power adapter (optional).
10 AC power connector To connect the display power cable.
10 | About Your Display
Side View
1b
1c
1d
2
4
3
8
9
7
5
6
1a
Label Description Use
1a HDMI 1 connector
Connect your computer with HDMI cable.
1b HDMI 2 connector
1c HDMI 3 connector
1d HDMI 4 connector
2 DP connector Connect your computer with DP cable.
3 USB Type-C/DisplayPort Connect to your computer using the USB Type-C cable.
The USB 3.1 Type-C port offer the fastest transfer rate
and the alternate mode with DP 1.2 support the maximum
resolution of 3840 x 2160 at 60 Hz, PD 20 V/4.5 A, 15 V/3 A,
9 V/3 A, 5 V/3 A.
NOTE: USB Type-C is not supported on Windows versions
that are prior to Windows 10.
4 Audio line-out port Connect to external audio peripherals.
Only supports 2-channel audio.
NOTE: The audio line-out port does not support
headphones.
About Your Display | 11
5 USB 3.1 upstream ports
(3)
Connect the USB cable that comes with your display to the
computer. Once this cable is connected, you can use the
USB downstream connectors on the display and the touch
screen function on the display.
NOTE: Refer to section on Input sources and USB pairing.
6 USB 3.1 downstream
ports (3)
Connect your USB device.
You can only use this connector after you have connected
the USB cable to the computer and USB upstream
connector on the display.
7
USB charging port
USB 3.1 with 10 W with BC 1.2 charging capability at 2 A
(max).
8 RS232 connector Remote management and control of display via RS232.
9 RJ-45 connector Remote Network Management and control of display via
RJ-45.
Input sources and USB pairing
Input sources USB upstream
HDMI 1 USB 1
HDMI 2 USB 2
HDMI 3
USB 3HDMI 4
DP
Bottom View
2 31
Label Description
1, 2 Speakers
3 Power on/off button
12 | About Your Display
Display Specifications
Screen type Active matrix - TFT LCD
Panel Type In-plane switching Technology
Aspect ratio 16:9
Viewable image dimensions
Diagonal 217.427 cm (85.60 in.)
Active Area
Horizontal
1895.04 mm (74.60 in.)
Vertical 1065.96 mm (41.97 in.)
Area
2020036.84 mm
2
(3130.96 in.
2
)
Pixel pitch 0.4935 mm x 0.4935 mm
Pixel per inch (PPI) 25
Viewing angle
Horizontal 178° (typical)
Vertical 178° (typical)
Panel brightness 350 cd/m² (typical)
Contrast ratio 1200 to 1 (typical)
Display screen coating 9H, Anti-Smudge, Anti-Glare
Response Time 8 ms typical (G to G), 12 ms max. (G to G )
Color depth 1.07 Billon colors
Color gamut NTSC ( 72%)
Connectivity •1 x DP 1.2
•1 x USB Type-C (Alternate mode with DisplayPort 1.2,
Power Delivery PD up to 90 W)
•4 x HDMI 2.0
•4 x USB 3.1 downstream port
(
1 x USB BC1.2 charging capability at 2 A (max)
)
•3 x USB 3.1 upstream port
•1 x Analog 2.0 audio line out (3.5 mm jack)
•1 x RJ-45
•1 x RS232
Border width (edge of display to
active area)
43.72 mm (1.72 in.) (Top)
43.80 mm (1.72 in.) (Left/Right)
46.96 mm (1.85 in.) (Bottom)
About Your Display | 13
Touch
Type InGlass Touch Technology
TM
Input Method Bare finger and stylus
Interface USB HID Compliant
Touch point
Up to 20 points touch
Up to 4 pens
NOTE: Touch Pen and Eraser differentiation ready (functionality subject to application).
Support OS
OS Version Touch Pen Eraser
Windows 7 Pro and Ultimate 20 4 1
8, 8.1 20 4 1
10 20 4 1
Chorme OS Linux kernel version 3.15 (3.10) or later
1
20 4 (0) 1 (0)
Android 4.4 (KitKat) with Linux kernel 3.15 (3.10) or later
1
20 4 (0) 1 (0)
Other Linux
based OS
Linux kernel 3.15 or later 20 4 1
macOS 10.10, 10.11 1 (mouse
2
) No
1
Functionality of Linux kernel has been verified on Ubuntu 14.04 and Debian 8. Functionality of
Chrome OS and Android with Linux kernel 3.15 needs comfirmation.
2
Mouse emulation in landscape mode. Full multi-touch requires additional drivers on the host
system.
Touch sensor input accuracy
Ty p
1
Max
2
Unit
Touch sensor input accuracy
Center area
3
1.0 1.5 mm
Edge area
4
1.2 2.0 mm
1
Average accuracy at the specified input area.
2
95-percentile accuracy of specified input area.
3
>20 mm from active touch area edge
4
>20 mm from active touch area edge
Note that touch sensor input accuracy is defined relative to the active touch area as defined in
the reference drawing (listed in 8.1). The overall system accuracy, of touch co-ordinates relative
to display co-ordinates, is directly affected by integration assembly tolerances.
14 | About Your Display
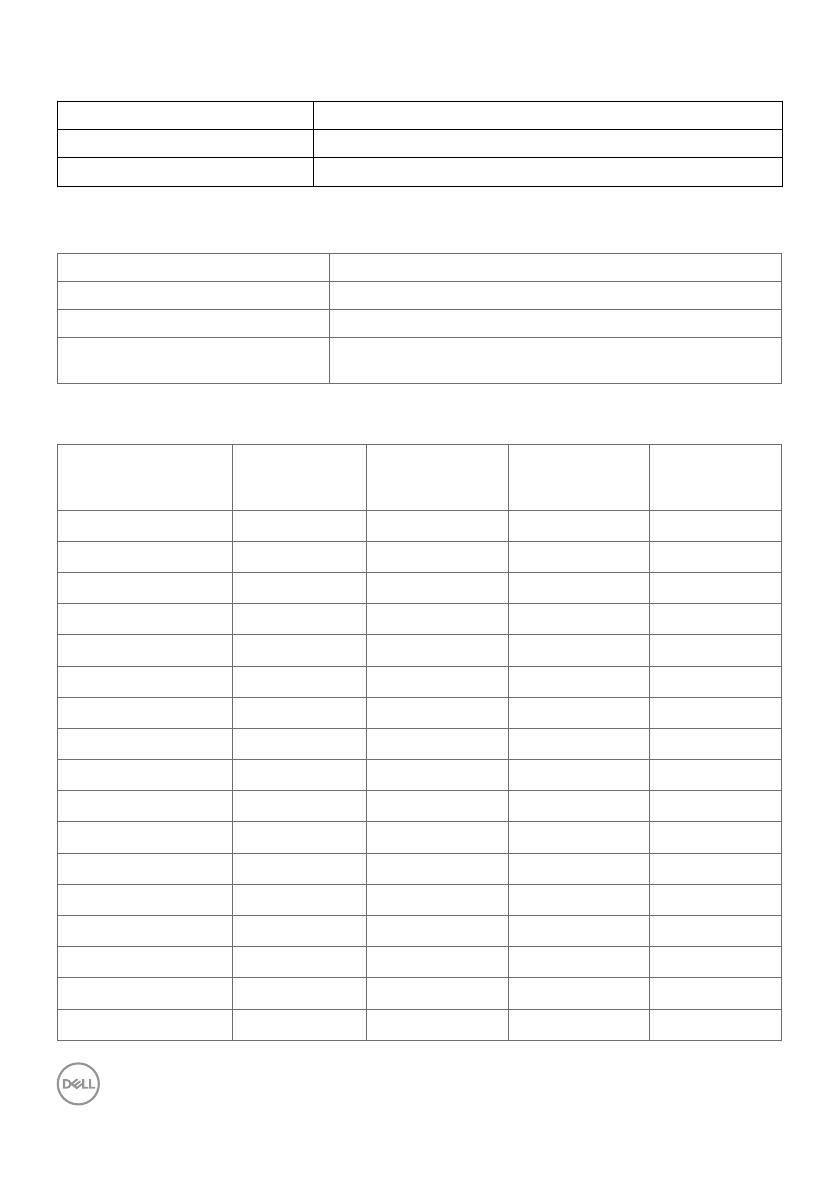
Speaker Specifications
Speaker rated power 2 x 20 W
Frequency Response 120 Hz - 20 kHz
Impedance
8 ohm
Resolution Specifications
Horizontal scan range
30 kHz to 140 kHz (DP/HDMI)
Vertical scan range 24 Hz to 75 Hz (DP/HDMI)
Maximum preset resolution 3840 x 2160 at 60 Hz
Video display capabilities
(DP & HDMI playback)
480p, 576p, 720p, 1080i, 1080p, 2160p
Preset Display Modes
Display Mode Horizontal
Frequency
(kHz)
Vertical
Frequency
(Hz)
Pixel Clock
(MHz)
Sync Polarity
(Horizontal/
Vertical)
720 x 400 31.5 70.0 28.3 -/+
640 x 480 31.5 60.0 25.2 -/-
640 x 480 37.5 75.0 31.5 -/-
800 x 600 37.9 60.0 40.0 +/+
800 x 600 46.9 75.0 49.5 +/+
1024 x 768 48.4 60.0 65.0 -/-
1024 x 768 60.0 75.0 78.8 +/+
1152 x 864 67.5 75.0 108.0 +/+
1280 x 800 49.3 60.0 71.0 +/+
1280 x 1024 64.0 60.0 108.0 +/+
1280 x 1024 80.0 75.0 135.0 +/+
1600 x 1200 75.0 60.0 162.0 -/+
1920 x 1080 67.5 60.0 193.5 +/+
2048 x 1152 71.6 60.0 197.0 +/-
2560 x 1440 88.8 60.0 241.5 +/-
3840 x 2160 65.68 30.0 262.75 +/+
3840 x 2160 133.313 60.0 533.25 +/+
About Your Display | 15
Electrical Specifications
Video input signals •Digital video signal for each dierential line
Per dierential line at 100 ohm impedance
•DP/HDMI/USB Type-C signal input support
Input voltage/ frequency/current 100-240 VAC / 50 or 60 Hz ± 3 Hz / 7.0 A (maximum)
Output voltage/ frequency/current 100-240 VAC / 50 or 60 Hz ± 3 Hz / 2.0 A (maximum)
Inrush current 120 V: 42 A (Max.) at 0°C (cold start)
240 V: 80 A (Max.) at 0°C (cold start)
Physical Characteristics
Connector type •DP connector
•USB Type-C connector
•HDMI connector
•Audio line-out
•USB 3.1 connector
•USB charging port- supplying power of up to 5 V (max
2 A) for connected devices
•RJ-45 connector
•RS232 connector
Signal cable type (in-box) DP, 3 m cable
HDMI, 3 m cable
USB 3.1, 3 m cable
USB Type-C, 1.8 m cable
Optiplex power cable, 1 m
Dimensions
Height 1156.63 mm (45.54 in.)
Width 1982.64 mm (78.06 in.)
Depth 82.8 mm (3.26 in.)
Weight
Weight with packaging 114.5 kg (252.43 lb)
Weight without packaging 86.5 kg (190.70 lb)
16 | About Your Display
Environmental Characteristics
Compliant Standards
•ENERGY STAR certified Monitor
•RoHS Compliant
Temperature
Operating 0°C to 40°C (32°F to 104°F)
Non-operating
20°C to 60°C (–4°F to 140°F)
Humidity
Operating 10% to 80% (non-condensing)
Non-operating 5% to 90% (non-condensing)
Altitude
Operating 5,000 m (16,404 ft) (maximum)
Non-operating 12,192 m (40,000 ft) (maximum)
Thermal dissipation 1467.22 BTU/hour (maximum)
597.12 BTU/hour (typical)
Power Management Modes
If you have VESA’s DPM-compliant video card or software installed in your PC, the display can
automatically reduce its power consumption when not in use. This is referred to as power save
mode*. If the computer detects input from the keyboard, mouse, or other input devices, the
display automatically resumes functioning. The following table shows the power consumption
and signaling of this automatic power saving feature.
VESA
Modes
Horizontal
Sync
Vertical
Sync
Video Power Indicator Power Consumption
Normal
operation
Active Active Active White 430 W (maximum)**
175 W (typical)
Active-off
mode
Inactive Inactive Off White
(Glowing)
Less than 0.3 W
Switch off - - - Off Less than 0.3 W
Power Consumption P
on
142.60 W
Total Energy Consumption (TEC)
Not Applicable
About Your Display | 17
The OSD operates only in the normal operation mode. If you press any button in the active-off
mode, the following message is displayed:
Dell 86 Monitor
No HDMI 1 signal from your device.
Press any key on the keyboard or move the mouse or wake it up.
If there is no display, press the monitor button again to select the correct
input source.
C8621QT
*Zero power consumption in OFF mode can only be achieved by disconnecting
the AC main cable from the display.
**Maximum power consumption with maximum luminance, and USB active.
This document is informational only and reflects laboratory performance. Your product may
perform differently, depending on the software, components and peripherals you ordered and
shall have no obligation to update such information. Accordingly, the customer should not
rely upon this information in making decisions about electrical tolerances or otherwise. No
warranty as to accuracy or completeness is expressed or implied.
Activate the computer and the monitor to gain access to the OSD.
NOTE: This monitor is ENERGY STAR certified.
NOTE:
P
on
: Power consumption of On Mode as defined in Energy Star 8.0 version.
TEC: Total energy consumption in kWh as defined in Energy Star 8.0 version.
18 | About Your Display
Pin Assignments
DP connector
Pin number 20-pin side of theconnected signal cable
1 ML3(n)
2 GND
3 ML3(p)
4 ML2(n)
5 GND
6 ML2(p)
7 ML1(u)
8 GND
9 ML1(p)
10 ML0(n)
11 GND
12 ML0(p)
13 CONFIG1/(GND)
14 CONFIG2/(GND)
15 AUX CH (p)
16 DP_Cable Detect
17 AUX CH (n)
18 Hot Plug Detect
19 GND
20 +3.3 V DP_PWR
About Your Display | 19
USB Type-C port
Pin Signal Pin Signal
A1 GND B12 GND
A2 SSTXp1 B11 SSRXp1
A3 SSTXn1 B10 SSRXn1
A4 VBUS B9 VBUS
A5 CC1 B8 SBU2
A6 Dp1 B7 Dn1
A7 Dn1 B6 Dp1
A8 SBU1 B5 CC2
A9 VBUS B4 VBUS
A10 SSRXn2 B3 SSTXn2
A11 SSRXp2 B2 SSTXp2
A12 GND B1 GND
20 | About Your Display
HDMI connector
Pin number 19-pin side of theconnected signal cable
1 TMDS DATA 2+
2 TMDS DATA 2 SHIELD
3 TMDS DATA 2-
4 TMDS DATA 1+
5 TMDS DATA 1 SHIELD
6 TMDS DATA 1-
7 TMDS DATA 0+
8 TMDS DATA 0 SHIELD
9 TMDS DATA 0-
10 TMDS CLOCK+
11 TMDS CLOCK SHIELD
12 TMDS CLOCK-
13 CEC
14 Reserved (N.C. on device)
15 DDC CLOCK (SCL)
16 DDC DATA (SDA)
17 DDC/CEC Ground
18 +5 V POWER
19 HOT PLUG DETECT
  • Page 1 1
  • Page 2 2
  • Page 3 3
  • Page 4 4
  • Page 5 5
  • Page 6 6
  • Page 7 7
  • Page 8 8
  • Page 9 9
  • Page 10 10
  • Page 11 11
  • Page 12 12
  • Page 13 13
  • Page 14 14
  • Page 15 15
  • Page 16 16
  • Page 17 17
  • Page 18 18
  • Page 19 19
  • Page 20 20
  • Page 21 21
  • Page 22 22
  • Page 23 23
  • Page 24 24
  • Page 25 25
  • Page 26 26
  • Page 27 27
  • Page 28 28
  • Page 29 29
  • Page 30 30
  • Page 31 31
  • Page 32 32
  • Page 33 33
  • Page 34 34
  • Page 35 35
  • Page 36 36
  • Page 37 37
  • Page 38 38
  • Page 39 39
  • Page 40 40
  • Page 41 41
  • Page 42 42
  • Page 43 43
  • Page 44 44
  • Page 45 45
  • Page 46 46
  • Page 47 47
  • Page 48 48
  • Page 49 49
  • Page 50 50
  • Page 51 51
  • Page 52 52
  • Page 53 53
  • Page 54 54
  • Page 55 55
  • Page 56 56
  • Page 57 57
  • Page 58 58
  • Page 59 59
  • Page 60 60
  • Page 61 61
  • Page 62 62
  • Page 63 63
  • Page 64 64
  • Page 65 65
  • Page 66 66
  • Page 67 67

Dell C8621QT User guide

Type
User guide

Ask a question and I''ll find the answer in the document

Finding information in a document is now easier with AI