
Dell Wyse 5070 Extended Thin Client
User Guide
Regulatory Model: N12D
Regulatory Type: N12D001
March 2020
Rev. A03

Notes, cautions, and warnings
NOTE: A NOTE indicates important information that helps you make better use of your product.
CAUTION: A CAUTION indicates either potential damage to hardware or loss of data and tells you how to avoid
the problem.
WARNING: A WARNING indicates a potential for property damage, personal injury, or death.
© 2018-2021 Dell Inc. or its subsidiaries. All rights reserved. Dell, EMC, and other trademarks are trademarks of Dell Inc. or its subsidiaries.
Other trademarks may be trademarks of their respective owners.

Chapter 1: Welcome to Dell Wyse 5070 extended thin client.......................................................... 6
Chapter 2: Chassis overview..........................................................................................................7
Chapter 3: Major components of your thin client .......................................................................... 9
Chapter 4: Supported system peripherals for Wyse 5070 thin client............................................ 10
Supported displays ........................................................................................................................................................... 10
Supported mounts .............................................................................................................................................................11
Supported system peripherals ........................................................................................................................................ 11
Chapter 5: Setting up the thin client............................................................................................12
Chapter 6: Before working on your thin client.............................................................................. 16
Chapter 7: After working on your thin client................................................................................ 17
Chapter 8: Removing and installing components.......................................................................... 18
Chassis cover...................................................................................................................................................................... 18
Remove the chassis cover......................................................................................................................................... 18
Install the chassis cover..............................................................................................................................................21
PCIe module........................................................................................................................................................................24
Remove the PCIe module.......................................................................................................................................... 24
Install the PCIe module.............................................................................................................................................. 26
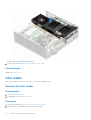
CAC reader......................................................................................................................................................................... 28
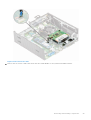
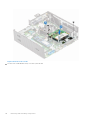
Remove the CAC reader............................................................................................................................................28
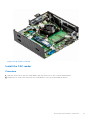
Install the CAC reader................................................................................................................................................. 31
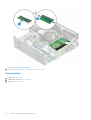
Memory................................................................................................................................................................................33
Remove the memory module....................................................................................................................................33
Install the memory module........................................................................................................................................ 35
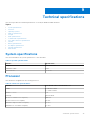
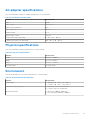
Chapter 9: Technical specifications............................................................................................. 37
System specifications.......................................................................................................................................................37
Processor.............................................................................................................................................................................37
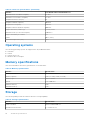
Operating systems............................................................................................................................................................ 38
Memory specifications..................................................................................................................................................... 38
Storage................................................................................................................................................................................ 38
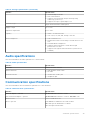
Audio specifications.......................................................................................................................................................... 39
Communication specifications........................................................................................................................................39
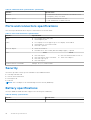
Ports and connectors specifications............................................................................................................................ 40
Security................................................................................................................................................................................40
Battery specifications...................................................................................................................................................... 40
AC adapter specifications................................................................................................................................................ 41
Contents
Contents 3

Physical specifications...................................................................................................................................................... 41
Environment........................................................................................................................................................................ 41
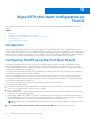
Chapter 10: Wyse 5070 thin client configuration on ThinOS........................................................ 42
Introduction........................................................................................................................................................................ 42
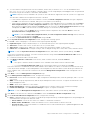
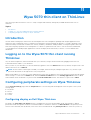
Configuring ThinOS using the First Boot Wizard...................................................................................................... 42
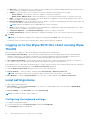
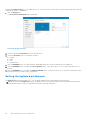
Logging on to the Wyse 5070 thin client running Wyse ThinOS...........................................................................44
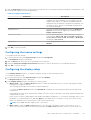
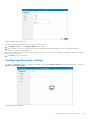
Local settings menu......................................................................................................................................................44
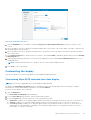
Configuring the keyboard settings.......................................................................................................................... 44
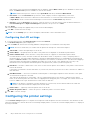
Configuring the mouse settings...............................................................................................................................45
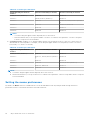
Configuring the display setup...................................................................................................................................45
Configuring the LPD settings................................................................................................................................... 46
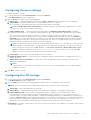
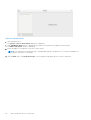
Configuring the printer settings.................................................................................................................................... 46
Configuring the ports settings................................................................................................................................. 47
Configuring the LPD settings................................................................................................................................... 47
Configuring the SMBs settings................................................................................................................................ 48
Using the printer setup options............................................................................................................................... 48
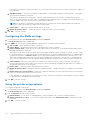
Chapter 11: Wyse 5070 thin client on ThinLinux........................................................................... 49
Introduction........................................................................................................................................................................ 49
Logging on to the Wyse 5070 thin client running ThinLinux.................................................................................. 49
Configuring peripherals settings on Wyse ThinLinux................................................................................................49
Configuring display on Dell Wyse ThinLinux..........................................................................................................49
Setting the keyboard preferences.......................................................................................................................... 50
Customizing the display..............................................................................................................................................51
Setting the mouse preferences............................................................................................................................... 52
Configuring the printer settings.............................................................................................................................. 53
Chapter 12: Wyse 5070 thin client on Windows 10 IoT Enterprise................................................ 55
Introduction........................................................................................................................................................................ 55
Before configuring your thin clients............................................................................................................................. 55
Automatic and manual login............................................................................................................................................55
Enabling auto logon.....................................................................................................................................................56
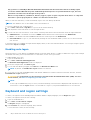
Keyboard and region settings.........................................................................................................................................56
Devices and printers......................................................................................................................................................... 57
Adding printers.............................................................................................................................................................57
Configuring multi-monitor display............................................................................................................................57
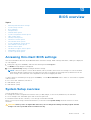
Chapter 13: BIOS overview.......................................................................................................... 59
Accessing thin client BIOS settings..............................................................................................................................59
System Setup overview...................................................................................................................................................59
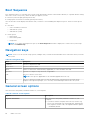
Boot Sequence.................................................................................................................................................................. 60
Navigation keys................................................................................................................................................................. 60
General screen options.................................................................................................................................................... 60
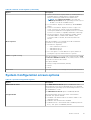
System Configuration screen options...........................................................................................................................61
Video screen option.......................................................................................................................................................... 63
Security screen options................................................................................................................................................... 63
Secure Boot screen options........................................................................................................................................... 65
Performance screen options.......................................................................................................................................... 65
4
Contents

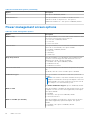
Power management screen options............................................................................................................................. 66
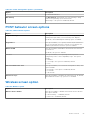
POST behavior screen options.......................................................................................................................................67
Wireless screen option..................................................................................................................................................... 67
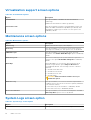
Virtualization support screen options...........................................................................................................................68
Maintenance screen options.......................................................................................................................................... 68
System Logs screen option............................................................................................................................................ 68
Chapter 14: Troubleshooting your system....................................................................................69
Power state and LED status...........................................................................................................................................69
Power behavior..................................................................................................................................................................69
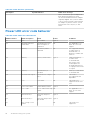
Power LED error code behavior.....................................................................................................................................70
Contents 5

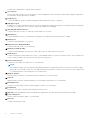
Welcome to Dell Wyse 5070 extended thin
client
Wyse 5070 extended thin client is a high-performance thin client with quad core processors, designed for secure, and easy-to-
manage virtual desktop environments. The thin client supports ThinOS, ThinLinux, and Windows 10 IoT Enterprise operating
systems.
Dell Wyse 5070 is a 5000 series thin client which offers the following:
● Intel Gemini Lake Pentium Quad Core processor.
● Realtek ALC3253 and Intel audio controllers.
● Intel UHD Graphics 605 and an optional External Gfx Card (AMD E9173) with 4 GB GDDR5 memory.
● Common access card reader—optional.
1
6 Welcome to Dell Wyse 5070 extended thin client

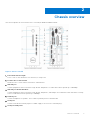
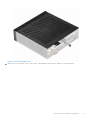
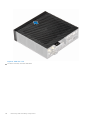
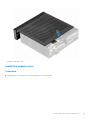
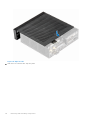
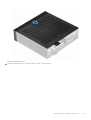
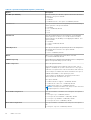
Chassis overview
This section explains the front and rear views of Dell Wyse 5070 extended thin client.
Figure 1. Chassis overview
1. Power button/Power light
Press to turn on the thin client if it is turned off, in sleep state.
2. Common Access Card reader
Reads the CAC or smart card for multi factor authentication.
3. USB 2.0 port
Connect peripherals such as external storage devices and printers. Provides data transfer speeds up to 480 Mbps.
4. USB 2.0 port with PowerShare
Connect peripherals such as external storage devices and printers, and charges the USB devices when thin client is in sleep
state. Provides data transfer speeds up to 480 Mbps.
5. Headset port
Connect headphones or speakers. This is valid for pentium processor based model.
6. Serial port
Connect serial device. Internal jumpers to enable supply of 5V/1A total to selected pin(s).
7. Serial port with power
2
Chassis overview 7

Connect the serial devices to transfer data and power.
8. Line out port
Denotes the audio output to the active speaker. Connect peripherals such as external storage devices, display, and printers.
Provides data transfer speeds up to 10 Gbps.
9. Headset port
Connect headphones output, a headset (headphone and microphone combo), or speakers.
10. USB Type-C port
Enables you to connect peripherals such as external storage devices, display, and printers. Provides data transfer speeds up
to 5 Gbps. It provides up to 5 V/3 A power output that enables faster charging.
11. USB 3.0 with Smart Power-on
Connect keyboard or monitor to wake up your thin client from off state.
12. USB 3.0 port
Connect peripherals such as storage devices and printers. Provides data transfer speeds up to 5 Gbps.
13. Display port
Connect an external display or a projector.
14. Expansion slot—RJ45/SFP/VGA
Connect RJ45/SFP/VGA to your thin client.
15. Display port without audio
Connect an external display or a projector. Video output only. No audio output from this port.
16. Network port
Connect an Ethernet (RJ45) cable from a router or a broadband modem for network or internet access. The two lights next
to the connector indicate the connectivity status and network activity.
17. Power connector port
Connect a power cable to provide power to your thin client.
NOTE:
DP1 is natural output from SOC directly while additional circuitry is required in the path of DP2/DP3 in order to support
DP2/Type C mux and DP3/VGA mux. The additional circuitry consumes more power once the DP2 or DP3 is being used.
To maintain ENERGY STAR designation you should use DP1.
18. Wireless antenna
Connect wireless card wire to extend the wireless connectivity of your thin client.
19. Pad lock
Apply pad lock to prevent unauthorized access to the hardware components of your thin client.
20. Kensington lock
Connect a security cable to prevent unauthorized movement of your thin client.
21. Parallel port
Connector that sends or receives data using more than one wire.
22. USB 3.0Connect peripherals such as storage devices and printers. Provides data transfer speeds up to 5 Gbps.
23. Power cable hook
Secures the power adaptor cable of your thin client.
24. PCIe slot
Connect internal Wi-Fi cards.
8
Chassis overview

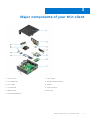
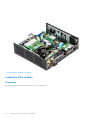
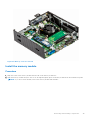
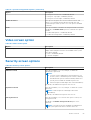
Major components of your thin client
1. Chassis cover 2. PCIe module
3. Coin-cell battery 4. Speaker and power button
5. CAC reader 6. Memory
7. System board 8. Solid-state drive
9. Wireless card 10. Heat sink
11. Serial and parallel port
3
Major components of your thin client 9

Supported system peripherals for Wyse 5070
thin client
This section contains details on the supported system peripherals that are shipped as part of Wyse 5070 thin client.
Topics:
• Supported displays
• Supported mounts
• Supported system peripherals
Supported displays
The following Dell displays are supported by Dell Wyse 5070 thin client:
● MR2416
● U2518D
● U2718Q
● U2419H/HC
● U2415
● U2719D/DC
● P2415Q
● P2417H
● P2317H
● P2217H
● P2016
● P2419H/HC
● P2719H/HC
● P4317Q
● E2417H
● E2318H
● E2218HN
● E2016H
● E1916H
● P3418HW
● P2219HC/P2219H
● P2319H
For more information about these displays, see Dell Support.
4
10 Supported system peripherals for Wyse 5070 thin client

Supported mounts
This section contains details on the supported mounts for Wyse 5070 thin client.
● P mount
● E mount
● U mount
● Dual VESA mount
● VESA Wall mount
NOTE: Vertical stand will be shipped as part of Wyse 5070 thin client.
For more information on mounts, see Dell Support.
Supported system peripherals
This section contains details on the supported system peripherals for Wyse 5070 thin client.
● Dell Pro stereo headset
●
Jabra Pro 935 wireless headset (mono)
● Microsoft LX-6000 headset
● Dell USB wired keyboard with optical mouse
● Dell USB wired keyboard with smart card reader
● Cherry smart card keyboard
● Dell wireless Keyboard and mouse
For more information on system accessories, see Dell Support.
Supported system peripherals for Wyse 5070 thin client
11

Setting up the thin client
This section explains how to setup the Wyse 5070 extended thin client on premise.
The Wyse 5070 extended thin client can be setup with any one of the operating systems at your work place:
● ThinOS
● Windows 10 IoT Enterprise
● ThinLinux
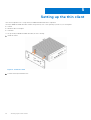
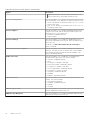
To set up the Wyse 5070 extended thin client, do the following:
1. Install the stand.
Figure 2. Install the stand
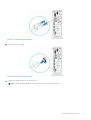
2. Connect the keyboard and mouse.
5
12 Setting up the thin client

Figure 3. Install keyboard and mouse
3. Connect the network cable.
Figure 4. Connect the network cable
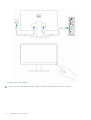
4. Connect the display and press the power button.
NOTE: The Wyse 5070 thin client must be mounted only on a vertical orientation.
Setting up the thin client 13

Figure 5. Connect the display
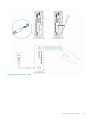
5. Connect the power cable and route the power cable through the cable clip, and press the power button.
14
Setting up the thin client

Figure 6. Connect the power cable
Setting up the thin client
15

Before working on your thin client
You must perform the below steps before you work on the thin client.
NOTE: For more safety best practices, see the Regulatory Compliance home page at www.dell.com/regulatory-compliance.
1. Save and close all open files and exit all open applications.
2. Click Start > Power > Shut down to shut down your thin client.
NOTE: For shut down instructions, see documentation of the respective operating system.
3. Disconnect your thin client and all the attached devices from their electrical outlets.
4. Disconnect all network cables from your thin client.
5. Disconnect all attached devices and peripherals, such as keyboard, mouse, and monitor, from your thin client.
6
16 Before working on your thin client

After working on your thin client
NOTE: You must not leave the stray or loose the screws inside your thin client. This may damage your thin client.
1. Reinstall all the screws and ensure that no stray screws remain inside your thin client.
2. Connect any external devices, peripherals, or cables you removed before working on your thin client.
3. Connect your thin client and all attached devices to their electrical outlets.
4. Turn on your thin client.
7
After working on your thin client 17

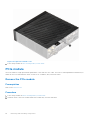
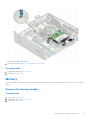
Removing and installing components
This section provides detailed information about how to remove or install the chassis and memory module of your thin client.
Topics:
• Chassis cover
• PCIe module
• CAC reader
• Memory
Chassis cover
Chassis cover provides security for the entire thin client and also helps in maintaining proper air flow inside the thin client.
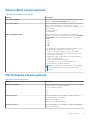
Remove the chassis cover
Procedure
1. Follow the procedure in Before working inside your thin client.
2. Loosen the thumb screw that secures the chassis cover to the thin client.
8
18 Removing and installing components

Figure 7. Loosen the thumb screw
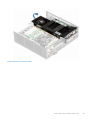
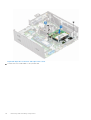
3. Slide the cover towards the front of the system to disengage the tabs from the guide slots on the thin client.
Removing and installing components
19

Figure 8. Slide the cover
4. Lift the cover away from the thin client.
20
Removing and installing components
Page is loading ...
Page is loading ...
Page is loading ...
Page is loading ...
Page is loading ...
Page is loading ...
Page is loading ...
Page is loading ...
Page is loading ...
Page is loading ...
Page is loading ...
Page is loading ...
Page is loading ...
Page is loading ...
Page is loading ...
Page is loading ...
Page is loading ...
Page is loading ...
Page is loading ...
Page is loading ...
Page is loading ...
Page is loading ...
Page is loading ...
Page is loading ...
Page is loading ...
Page is loading ...
Page is loading ...
Page is loading ...
Page is loading ...
Page is loading ...
Page is loading ...
Page is loading ...
Page is loading ...
Page is loading ...
Page is loading ...
Page is loading ...
Page is loading ...
Page is loading ...
Page is loading ...
Page is loading ...
Page is loading ...
Page is loading ...
Page is loading ...
Page is loading ...
Page is loading ...
Page is loading ...
Page is loading ...
Page is loading ...
Page is loading ...
Page is loading ...
Page is loading ...
-
 1
1
-
 2
2
-
 3
3
-
 4
4
-
 5
5
-
 6
6
-
 7
7
-
 8
8
-
 9
9
-
 10
10
-
 11
11
-
 12
12
-
 13
13
-
 14
14
-
 15
15
-
 16
16
-
 17
17
-
 18
18
-
 19
19
-
 20
20
-
 21
21
-
 22
22
-
 23
23
-
 24
24
-
 25
25
-
 26
26
-
 27
27
-
 28
28
-
 29
29
-
 30
30
-
 31
31
-
 32
32
-
 33
33
-
 34
34
-
 35
35
-
 36
36
-
 37
37
-
 38
38
-
 39
39
-
 40
40
-
 41
41
-
 42
42
-
 43
43
-
 44
44
-
 45
45
-
 46
46
-
 47
47
-
 48
48
-
 49
49
-
 50
50
-
 51
51
-
 52
52
-
 53
53
-
 54
54
-
 55
55
-
 56
56
-
 57
57
-
 58
58
-
 59
59
-
 60
60
-
 61
61
-
 62
62
-
 63
63
-
 64
64
-
 65
65
-
 66
66
-
 67
67
-
 68
68
-
 69
69
-
 70
70
-
 71
71


Ask a question and I''ll find the answer in the document
Finding information in a document is now easier with AI
Related papers
-
Dell Wyse 5070 Thin Client User guide
-
-
-
Dell Wyse Management Suite Administrator Guide
-
-
-
Dell Wyse 3040 Thin Client Administrator Guide
-
-
-
Other documents
-
Xtech XTA-170 Datasheet
-
HP t638 Thin Client User guide
-
-
-
Dell Wyse 920313-01L Datasheet
-
HP t730 Thin Client User guide
-
 Wyse Technology 060413 User manual
-
LG CL600W-1C User manual
-
 Altos T420 F1 Thin Client User guide
-
HP ElitePad 1000 G2 Healthcare Base Model Tablet User guide

