EKENA 1566833 Installation guide

Type
Installation guide
TRUE FIT PVC SHUTTERS
xed mount installation instructions
electric drill
ladder
caulk gun
exterior grade screws
putty knife
acrylic caulk
construction adhesive
TOOL & MATERIAL
CHECKLIST
IMPORTANT INFO
It is recommended to use 6 screws per shutter
Paint unnished shutters with 100% acrylic paint prior to installation.
Must allow space above and below for shutters to expand and contract with temperature.
Do not over-tighten fasteners to avoid bowing.
Hardware not included, must purchase separately.
If painted a dark color and in direct sunlight, additional installation measures should be taken.
For additional strength, use construction adhesive if installing shutters on a flat surface.
Store shutters flat until installation.
Disclaimer: Ekena Millwork is not liable for paint used on unnished PVC shutters and/or the
results of its use.
SAFETY INSTRUCTIONS
Make sure to use the correct tools recommended.
Wear safety goggles.
Follow xture, power tools, and paint manufacturers’ instructions and users manuals.
Use common sense and follow good construction practices.
General Fixed Mount Installation
1. Determine the position for the shutter by matching up the top and bottom of the
shutter with the window and mark its position.
2. Mark the shutter where you will fasten it to your installation surface by drilling through
the shutter to mark the facade at the top, middle and bottom of the shutter.
3. Remove the shutter and pre-drill pilot holes through the facade. Caulk each pre-
drilled hole with a clear waterproof and paintable sealant.
4. Using a level, set the shutter in place and fasten using non-corrosive exterior grade
screws. Be sure not to over-tighten the screws.
***IMPORTANT: When installing in lap siding, adhere the shutters to the highest point
of the siding or with shims/spacers to ll in the gap.
Fixed Mount Bracket Installation
1. Determine the position for the mounting brackets by matching up the top and bottom
of the shutter with the window and mark its position.
2. Using a level set the bottom bracket in place and fasten using the correct screws for
your installation surface. (Note: At this point it is recommended you place the shutter
in place and double check your marking for the top bracket.)
3. Using a level set the top and middle bracket in place and fasten using the correct
screws for your installation surface.
4. Set the shutter in place, mark the position of the holes on the shutter. Remove the
shutter and drill pilot holes using a 1/8” bit.
5. Place the shutters back in place and fasten the shutter in place using screws being
sure not to over-tighten the screws.
Tips for Painting Unnished or Primed Shutters
Remove water and dirt on the shutter rst and make sure they are completely dry
before painting. Let paint completely dry before installing the shutter to your home.
Unnished shutters need to be painted. Do not use oil based paint. Use a premium
100% acrylic exterior latex paint.
NOTE: Latex can take 2-4 days to dry. Avoid exposing shutters to moisture for a few
days after you have painted the shutters.
Avoid painting in damp or high humidity areas.
Seal with exterior grade clear acrylic top coat.
When painting cellular PVC shutters a dark color, choose paint colors that have an
equivalent of 55 LRV units or greater.
NOTE: Consult paint representative for recommended heat reflective paint
compatible with PVC.
We Can Help. Call (866) 607-0453
www.ekenamillwork.com
***
A)
B)
B
correctcorrectwrong
A
high point
shim
low point
top bracket top bracket
side bracket side bracket
bottom bracket bottom bracket
TRUE FIT PVC SHUTTERS
installation instructions
electric drill, l/8”&1/4”drill bit
ladder
shutter hardware
proper screws for installation surface
screw driver
level
pencil, marker, or chalk
TOOL & MATERIAL
CHECKLIST
IMPORTANT INFO
Primarily designed for xed mount installation. If choosing functional installation, use 2 hinges
for shutters up to 47” height. For 47” + use 3 hinges per shutter for additional support.
Store shutters flat until installation.
1/8” carbide drill bit is required for stucco, hardboard, ber cement, brick or masonry.
Hardware not included, must purchase separately.
If painted a dark color and in direct sunlight, additional nishing measures should be taken.
Paint unnished shutters with 100% acrylic paint prior to installation.
Disclaimer: Ekena Millwork is not liable for paint used on unnished PVC shutters and/or
the results of its use.
SAFETY INSTRUCTIONS
Make sure to use the correct tools recommended.
Wear safety goggles.
Follow xture, power tools, and paint manufacturers’ instructions and users manuals.
Use common sense and follow good construction practices.
General Functional Hardware Installation
1. Hold shutters in place in the window opening.
2. Using shims center the shutter in the opening to create a 1 /4” gap
around all four sides of the shutter, and 3/8” gap between the center
of the two shutters.
3. Determine where the hinges will be installed on the shutter and mark
the holes with a sharpie remove hinges and drill pilot holes. Fasten
the hinges using the pilot holes.
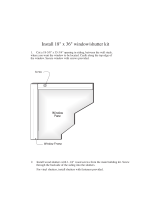
4. Slide the pintels into place with rod facing upward mark the holes,
remove the pintels, and drill pilot holes. Fasten the pintels into place
using the pilot holes. Diagram (A)
5. Note: It is recommend that functional shutters are installed so that
they lay flush against the window when in the closed position.
6. Note: Pintels come in three sizes: siding, brick, and rock. Siding
generally sticks out 1 1/4” from the home. Brick sticks out 2 1/4”
from the home and rock sticks out 4 1/16 inches from the home. The
wrong pintel will not allow the shutters to offset the right distance
and may keep the shutters from lying flush and could cause bowing/
warping.
Tips for Painting Unnished or Primed Shutters
Avoid painting in direct sunlight or on a surface that is too
warm.
Remove water and dirt on the shutter rst.
Make sure they are completely dry before painting.
Do not use oil based paint. Use a premium 100% acrylic
exterior latex paint.
NOTE: Latex can take 2-4 days to dry. Avoid exposing shutters
to moisture for a few days after you have painted the shutters.
Avoid painting in damp or high humidity areas.
Seal with exterior grade clear acrylic top coat.
Let paint completely dry before installing the shutter to your
home.
Functional installation is not necessarily recommended with PVC
shutters. These install instructions are for general information only.
We Can Help. Call (866) 607-0453
www.ekenamillwork.com
Industry leading manufacturer of urethane, PVC, wood, rustic, and metal millwork
Back of
Shutter
Center
A
Note: Hinges should be installed at the top, bottom and middle for
best results. If not installed correctly, shutters can bow or warp.
NOTE: An S-Shaped piece of hardware
called a shutter stay should be used to
hold the shutter open. It is installed in
the bottom opposite corner of the hinges,
directly to the home’s surface. Follow
hardware installation as instructed.
CORRECT INSTALLATION
WRONG INSTALLATION
ARCHITECTURAL PVC SHUTTER FAQS
What is PVC?
Each shutter is made of stable high-density cellular PVC that won't rot, split or chip, and doesn’t
absorb water. PVC resists all forms of insect infestations, mold and mildew.
PVC shutters are generally recommended for fixed mount installation (for decorative purposes).
IF CHOOSING TO INSTALL AS FUNCTIONAL the following guidelines should be considered for
best results.
GENERAL DO’s & DON’Ts:
Allow shutters to acclimate to environment/temperature for at least 24 hours before
installing.
Store shutters lying flat until installation.
Hinges should be installed at the top, bottom, and middle of shutter for best results. If not
installed correctly, shutters can bow or warp.
If choosing functional installation, use 2 hinges for shutters up to 47” height. For 47” + use 3
hinges per shutter for additional support.
An S-Shaped piece of hardware called a shutter stay should be used to hold the shutter open
at all times. It is installed in the bottom opposite corner of the hinges, directly to the home’s
surface.
For shutters in full sun exposure, light paint colors are recommended.
What paint can I use on PVC?
It is recommended to use 100% acrylic latex paint with an LRV of 55 or higher.
For paint colors with an LRV of 55 or lower, you MUST use a paint that has been specifically developed for application on
PVC. Using paint with an LRV below 55 allows the product to absorb excessive heat, which may cause PVC shutters to
bow or buckle.
Always consult the paint manufacturer for the LRV of your paint choice and follow the paint manufacturer’s
recommendations for the use and application of the paint.
WARNING: Should you choose to paint a darker color (LRV of 54 or lower) your warranty could be voided.
Industry leading manufacturer of urethane, PVC, wood, rustic, and metal millwork.
  • Page 1 1
  • Page 2 2
  • Page 3 3

EKENA 1566833 Installation guide

Type
Installation guide

Ask a question and I''ll find the answer in the document

Finding information in a document is now easier with AI