Page is loading ...

Instruction No Version Part. No.
30752136 1.1 30752135
Subwoofer
Instruction No Version Part. No.
30752136 1.1 30752135
Subwoofer
Installation instructions, accessories
Volvo Car Corporation Gothenburg, Sweden
©
Volvo Car Corporation Subwoofer
-
30752136
-
V1.1
Page 1 / 33

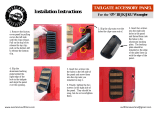
Equipment
A0000162 A0000161 A0801178
IMG-
216522
Installation instructions, accessories
Volvo Car Corporation Gothenburg, Sweden
©
Volvo Car Corporation Subwoofer
-
30752136
-
V1.1
Page 2 / 33

IMG-
213320
Installation instructions, accessories
Volvo Car Corporation Gothenburg, Sweden
©
Volvo Car Corporation Subwoofer
-
30752136
-
V1.1
Page 3 / 33

INTRODUCTION
Read through all of the instructions before starting installation.
Notifications and warning texts are for your safety and to
minimise the risk of something breaking during installation.
Ensure that all tools stated in the instructions are available
before starting installation.
Certain steps in the instructions are only presented in the form
of images. Explanatory text is also given for more complicated
steps.
In the event of any problems with the instructions or the
accessory, contact your local Volvo dealer.
Note!
Explanation of kit illustration
A Always required
B Required for cars without RTI and
EU cars with RTI and Vehicle Identification Number: S40 CH
80923-,
V50 CH 78749
-
C Required for
all cars with RTI and Vehicle Identification Number: S40 CH
-
80922, V50 CH
-78748
US cars with RTI and Vehicle Identification Number: S40 CH
80923-,
V50 CH 78749
-
D and E always required in S40
F required in S40 with low cargo compartment floor
G always required in V50
H required in V50 with low cargo compartment floor
Note!
This accessory is connected to the car's electrical system. It
requires software unique to the car.
Steps 1–27 apply to the S40
Installation instructions, accessories
Volvo Car Corporation Gothenburg, Sweden
©
Volvo Car Corporation Subwoofer
-
30752136
-
V1.1
Page 4 / 33

1
J8504553
Steps 1–27 apply to the S40
Turn the ignition switch to position 0.
Remove the cargo compartment carpet.
2
J8504552
Applies to cars with a high cargo compartment floor
Remove the upper floor supports on the right and left-hand
sides. The left-hand floor support shall not be used again.
Installation instructions, accessories
Volvo Car Corporation Gothenburg, Sweden
©
Volvo Car Corporation Subwoofer
-
30752136
-
V1.1
Page 5 / 33

3
J8504554
Removing the sill trim panel from the boot lid:
Unscrew the two external clips at the front edge/bottom edge of
the sill trim panel on the boot lid.
Pry up one of the corners of the sill trim panel using a
weatherstrip tool so that the two clips at that end release.
Pull up the sill trim panel at the other end so that the remaining
two clips release. Remove the sill trim panel.
Remove the rubber strip from the boot lid opening where it
covers the side panels on the left and right-hand sides.
4
J8504621
Fold forward the seat cushions and backrests on both sides of
the rear seat.
Installation instructions, accessories
Volvo Car Corporation Gothenburg, Sweden
©
Volvo Car Corporation Subwoofer
-
30752136
-
V1.1
Page 6 / 33

5
J8504626
Removing the side cushion:
Grasp the upper edge of the left-
hand side cushion. Pull the side
cushion forward so that the clip on the rear side releases.
Slide the side cushion upwards.
Remove the right
-hand side cushion in the same way.
6A
J8505017
6B
J8504629
Illustrations A and B
Removing the side panels:
Remove the five clips (1, illustrations A and B) holding the left-
hand side panel in the bodywork.
Unhook the front edge of the parcel shelf panel at the mounting
(2, illustration A). Pull the side panel away from the parcel shelf
panel and the panel on the C
-post.
Unhook the side panel from the mounting (3, illustration B) on the
underneath of the parcel shelf.
Unhook the side panel from the load securing eyelet (4,
illustration A). Remove the side panel.
Remove the right
-hand side panel in the same way.
Installation instructions, accessories
Volvo Car Corporation Gothenburg, Sweden
©
Volvo Car Corporation Subwoofer
-
30752136
-
V1.1
Page 7 / 33

7
J8504616
Remove the lower floor supports on the right and left-hand sides
by unscrewing the three clips in the bottom of the compartments,
and then lifting them out. The left
-hand floor support shall not be
used again.
8
J8504717
Remove the screw in the bracket for the rear seat backrest.
Installation instructions, accessories
Volvo Car Corporation Gothenburg, Sweden
©
Volvo Car Corporation Subwoofer
-
30752136
-
V1.1
Page 8 / 33

9
J3905342
Take the subwoofer from the kit and turn it so that the front of
the speaker faces up.
Take three screws from the same kit and install the bracket for
the S40 on the subwoofer as illustrated. (Foam padding and V50
bracket not used.)
10
J3905072
Take two screws from the kit. Install the front bracket on the
subwoofer.
Installation instructions, accessories
Volvo Car Corporation Gothenburg, Sweden
©
Volvo Car Corporation Subwoofer
-
30752136
-
V1.1
Page 9 / 33

11
J3904728
Position the subwoofer in the left-hand side of the cargo
compartment.
Take the M8x24 screw (1) and washer from the kit. Install the
screw and washer in the left-hand bracket.
Take the screw (2) from the bracket for the backrests. Install the
screw in the right-hand bracket for the subwoofer.
Tighten the M10 screw. Tighten to 50 Nm (37 lbf.ft.).
Tighten the M8 screw. Tighten to 24 Nm (18 lbf.ft.).
12
Connecting fibre optic cables
Note!
Cars without RTI
see steps 13-14
US cars with RTI
see steps 15-17
EU cars with RTI
and CH
-80922, see steps 15-17
and CH 80923
-, see steps 18-19
Installation instructions, accessories
Volvo Car Corporation Gothenburg, Sweden
©
Volvo Car Corporation Subwoofer
-
30752136
-
V1.1
Page 10 / 33

13A
J3904733
13B
J3904734
Steps 13–14 apply to cars without RTI
Illustration A
Disconnect the fibre optic cable (1) from the underside of the
amplifier.
Illustration B
Take the T
-fibre optic cable (B in the kit illustration) from the kit.
Connect the long end (1) to the subwoofer.
Connect the connector (2), which was disconnected from the
amplifier, to the female terminal (3) on the T
-fibre optic cable.
Connect the remaining connector (4) on the T-fibre optic cable to
the amplifier.
14
J3904735
Secure the cable splice terminals to the fibre optic cables (1)
using the clip (2) for the panel edge.
Note!
Do not bend the fibre optic cable too tightly.
Check the bend radius of the fibre optic cables. If the bend
radius is less than 25 mm (1"), remove the tape from the thick
cable harness and increase the radius.
Continue to step 20.
Installation instructions, accessories
Volvo Car Corporation Gothenburg, Sweden
©
Volvo Car Corporation Subwoofer
-
30752136
-
V1.1
Page 11 / 33

15
J3904731
Steps 15-17 apply to US cars with RTI, and EU cars with
RTI and CH
-80922
Disconnect the fibre optic cables (1) from the GPS antenna and
the underside of the amplifier.
Separate the connectors at the join of the fibre optic cables (2).
Place the T
-fibre optic cable, which is completely disconnected,
to one side (there is a new fibre optic cable in the kit).
16
J3904732
Take the adapter fibre optic cable (C in the kit illustration) from
the kit. Connect the long end (1) to the subwoofer.
Connect the male connectors (2) of the adapter fibre optic cable
to the amplifier and GPS antenna.
Note!
The end equipped with the label must be connected to the GPS
antenna.
Connect the female connector (3) of the adapter fibre optic cable
to the connector (4) on the fibre optic cable that was
disconnected from the removed T-fibre optic cable.
Installation instructions, accessories
Volvo Car Corporation Gothenburg, Sweden
©
Volvo Car Corporation Subwoofer
-
30752136
-
V1.1
Page 12 / 33

17
J3904729
Take a double tie strap from the kit. Secure the cable splice
terminals for the fibre optic cable harness at the existing cable
harness.
Note!
Do not bend the fibre optic cable too tightly.
Check the bend radius of the fibre optic cables. If the bend
radius is less than 25 mm (1"), remove the tape from the thick
cable harness and increase the radius.
Continue to step 20.
18
J3905329
Steps 18-19 apply to EU cars with RTI and CH 80923-
Disconnect the fibre optic cable (1) from the underside of the
amplifier.
Installation instructions, accessories
Volvo Car Corporation Gothenburg, Sweden
©
Volvo Car Corporation Subwoofer
-
30752136
-
V1.1
Page 13 / 33

19
J3905330
Take the T
-fibre optic cable (B in the kit illustration) from the kit.
Connect the long end (1) to the subwoofer.
Connect the female connector of the adapter fibre optic cable to
the connector on the fibre optic cable that was disconnected
from the amplifier.
Connect the male connector (3) of the adapter fibre optic cable
to the amplifier.
Secure the cable splice terminals to the fibre optic cables using
the clip (2) for the panel edge.
Note!
Do not bend the fibre optic cable too tightly.
Check the bend radius of the fibre optic cables. If the bend
radius is less than 25 mm (1"), remove the tape from the thick
cable harness and increase the radius.
20A
IMG-
217260
Connecting the power supply cable
Illustration A
Take the T
-cable for power supply (A in the kit illustration).
Connectors:
to the subwoofer (1)
to the pre-routed single pole connector (2)
to the connector detached from the amplifier (3)
to the amplifier (4)
Illustration B
Installation instructions, accessories
Volvo Car Corporation Gothenburg, Sweden
©
Volvo Car Corporation Subwoofer
-
30752136
-
V1.1
Page 14 / 33

20B
IMG-
216822
Note!
The previously installed fibre optic cable is not illustrated.
Plug connector (1) into the rear end face of the subwoofer.
Plug the connector (2) into the pre-routed black connector (5)
which is taped on the cable harness at the rear edge of the left-
hand rear wheel arch.
Detach the existing connector in the amplifier and plug it into
connector (3) in the T-cable.
Plug the remaining connector (4) in the T
-
cable to the amplifier.
Clamp the relay (6) and all loose connectors in at the car's
existing cable harness to prevent rattling.
21
J3904737
Using butyl tape, tape the cables for the subwoofer to the floor
and straight back approximately 200 mm (7 7/8"). The cables
must be positioned in the cut
-out on the underside of the floor
support when this is installed.
Installation instructions, accessories
Volvo Car Corporation Gothenburg, Sweden
©
Volvo Car Corporation Subwoofer
-
30752136
-
V1.1
Page 15 / 33

22A
J8504768
22B
J8504716
Illustration A
Take the left
-hand small floor support from the kit and fit it in the
rear left-hand corner of the cargo compartment.
Illustration B
Ensure that the cables (1) for the subwoofer are positioned in
the cut-out (2) on the underside of the floor support so that they
are not trapped against the lower floor in the cargo compartment.
23
J8504719
Press the floor support into place using the existing clip.
Transfer the towing eyelet to the new floor support.
Installation instructions, accessories
Volvo Car Corporation Gothenburg, Sweden
©
Volvo Car Corporation Subwoofer
-
30752136
-
V1.1
Page 16 / 33

24
J8504720
Reinstall the existing right
-hand lower floor support using the
existing clips.
Reinstall the side panels using the existing clips.
Reinstall the rubber strip on the sides in the boot lid opening.
25
J8903966
Applies to cars with grocery bag holder on the cargo
compartment floor
Prepare the upper floor support (E and F in the kit illustration):
Press in an adapter on the left and right-hand upper floor
supports according to the existing marking as illustrated.
Installation instructions, accessories
Volvo Car Corporation Gothenburg, Sweden
©
Volvo Car Corporation Subwoofer
-
30752136
-
V1.1
Page 17 / 33

26
J8504722
Reinstall the sill trim panel in the boot lid opening using the
existing clips.
Take the left
-hand upper floor support (E in the kit illustration)
from the kit. Install the floor support.
(If there is an adapter for grocery bag holder, then its clips
should be in the opening of the sill trim panel.)
27
J8504721
Applies to cars with a low cargo compartment floor
Take the right
-hand upper floor support (F in the kit illustration)
from the kit. Install the floor support.
(If there is an adapter for grocery bag holder, then its clips
should be in the opening of the sill trim panel.)
Reinstall the side cushions
Take the new, wider cargo compartment carpet from the kit.
Install the carpet.
Applies to cars with a high cargo compartment floor
Reinstall the right
-hand upper floor support.
(If there is an adapter for grocery bag holder, then its clips
should be in the opening of the sill trim panel.)
Reinstall the side cushions.
Reinstall the cargo compartment carpet.
(If it is a cargo compartment carpet with grocery bag holder then
its two knobs should be in the corresponding holes in the
adapter.)
Applies to all models
Fold the backrests and the seat cushions back into place.
Program the function.
Steps 28–57 apply to the V50
Installation instructions, accessories
Volvo Car Corporation Gothenburg, Sweden
©
Volvo Car Corporation Subwoofer
-
30752136
-
V1.1
Page 18 / 33

28
J8504575
Steps 28–57 apply to the V50
Turn the ignition switch to position 0.
Remove the cargo compartment carpet.
29
J8504577
Removing the sill trim panel from the tailgate:
Pry off the four external clips at the front edge/bottom edge of
the sill trim panel on the tailgate.
Pry up one of the corners of the sill trim panel using a
weatherstrip tool so that the two clips at that end release.
Pull up the sill trim panel so the remaining six clips release.
Remove the panel.
Remove the rubber strip from the tailgate opening where it
covers the side panels on the left and right-hand sides.
Installation instructions, accessories
Volvo Car Corporation Gothenburg, Sweden
©
Volvo Car Corporation Subwoofer
-
30752136
-
V1.1
Page 19 / 33

30
J8504621
Fold forward the seat cushions and backrests on both sides of
the rear seat.
31
J8504715
Removing the side cushion:
Grasp the upper edge of the left-hand side cushion (A). Pull the
side cushion forward so that the clip on the reverse releases.
Slide the side cushion upwards.
Remove the right
-hand side cushion in the same way.
Removing the panels:
Remove the screw at the rear edge of the panel (B) at the
front/top of the left-
hand side panel.
Pull the panel upwards so that the four clips on the inside
release.
Remove the panel by the right
-hand side panel in the same way.
Installation instructions, accessories
Volvo Car Corporation Gothenburg, Sweden
©
Volvo Car Corporation Subwoofer
-
30752136
-
V1.1
Page 20 / 33
/