Page is loading ...

HP Photosmart A440 series
User Guide

Hewlett-Packard Company notices
The information contained in this document is subject to change without notice.
All rights reserved. Reproduction, adaptation, or translation of this material is prohibited without prior written permission of Hewlett-Packard, except
as allowed under copyright laws. The only warranties for HP products and services are set forth in the express warranty statements accompanying
such products and services. Nothing herein should be construed as constituting an additional warranty. HP shall not be liable for technical or editorial
errors or omissions contained herein.
© 2007 Hewlett-Packard Development Company, L.P.
Windows, Windows 2000, and Windows XP are U.S. registered trademarks of Microsoft Corporation.
Windows Vista is either a registered trademark or trademark of Microsoft Corporation in the United States and/or other countries.
Intel and Pentium are trademarks or registered trademarks of Intel Corporation or its subsidiaries in the United States and other countries.

Contents
1Welcome
One touch photo printing at your fingertips ................................................................................3
Find more information ................................................................................................................3
Printer parts ...............................................................................................................................4
Optional accessories .................................................................................................................7
Use the Print menu ....................................................................................................................8
2 Paper basics
Choose and load paper .............................................................................................................9
Choose the best paper for the job .......................................................................................9
Load your paper ..................................................................................................................9
3 Print basics
Dock your camera ....................................................................................................................11
Print from a docked camera ....................................................................................................12
View photos to print ...........................................................................................................12
Print photos ........................................................................................................................12
Set print quality ........................................................................................................................13
Enhance your photos ...............................................................................................................13
4 Print from other devices
PictBridge-certified camera .....................................................................................................15
Print from a PictBridge-certified camera ............................................................................15
Computer .................................................................................................................................15
About HP Photosmart Essential, HP Photosmart Mac, and HP Photosmart Share ..........16
Transfer photos to a computer ..........................................................................................16
5 Maintain and transport the printer
Insert the print cartridge ...........................................................................................................17
Remove ink from your skin and clothing ..................................................................................18
Clean and maintain the printer ................................................................................................19
Clean the outside of the printer .........................................................................................19
Automatically clean the print cartridge ...............................................................................19
Manually clean the print cartridge contacts .......................................................................20
Print a test page ................................................................................................................21
Align the print cartridge ......................................................................................................21
Update the HP Photosmart software .......................................................................................22
Store the printer and print cartridge .........................................................................................22
Store the printer .................................................................................................................23
Store the print cartridge .....................................................................................................23
Maintain the quality of photo paper .........................................................................................23
Transport the printer ................................................................................................................24
6 Troubleshooting
Printer hardware problems ......................................................................................................27
Printing problems .....................................................................................................................30
1

Error messages .......................................................................................................................33
7 Specifications
System requirements ...............................................................................................................35
Printer specifications ...............................................................................................................35
8 HP support
Check the HP support Web site first ........................................................................................37
HP support by phone ...............................................................................................................37
Phone support period ........................................................................................................37
Placing a call ......................................................................................................................38
After the phone support period ..........................................................................................38
Warranty ..................................................................................................................................39
Additional warranty options .....................................................................................................40
Regulatory model identification number VCVRA-0703 ............................................................40
Environmental statements .......................................................................................................40
A HP Photosmart A440 series menus
Printer menus ..........................................................................................................................41
B Quick Reference.....................................................................................................................43
Index..............................................................................................................................................45
2
1Welcome
Thank you for your HP Photosmart purchase! This HP Photosmart A440 series is an
innovative pairing of camera and printer in one easy-to-use device. The printer uses
HP Real Life technologies, such as red-eye removal, to make it easy for you to get better
prints with or without a computer.
NOTE: In this guide, references to the printer mean the part of the HP Photosmart
A440 series product other than the camera.
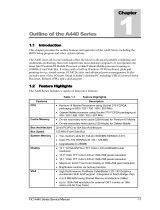
One touch photo printing at your fingertips
The HP Photosmart A440 series makes printing your photos convenient, easy, and fast.
Just follow these basic steps for most of your printing needs:
1. Choose and load paper. Use HP Advanced Photo paper for the best results. For
more information, see “
Choose and load paper” on page 9.
2. Dock your camera and view photos. For more information, see “
Dock your
camera” on page 11 and “View photos to print” on page 12.
3. Print a photo with the press of a button. Press Print to print any photo you are
viewing. It's that easy!
For a more complete look at each step, see “
Print basics” on page 11.
Find more information
Your new HP Photosmart A440 series printer comes with the following documentation:
• Quick Start Guide: The setup instructions that explain how to set up the printer and
camera, and install the HP Photosmart software. Read this document first.
• Printer User Guide: The printer User Guide is the book you are reading. This guide
describes the basic features of the printer, explains how to use the printer without
connecting it to a computer, and contains hardware troubleshooting information.
• Electronic Help: The electronic Help describes how to use the printer with a
computer and contains software troubleshooting information.
• Camera User Guide: This documentation explains how to use the camera to take
pictures and includes troubleshooting and maintenance information. The camera
Welcome 3

documentation is provided in electronic format and can be found in one of the
following locations, depending on where you purchased the camera and if you
purchased it separately or not:
• Europe, the Middle East, Africa, or Latin America: If you purchased the camera
and printer as a combined product, the camera User Guide is provided on the HP
Photosmart User Guide CD included with your combined product. If you
purchased the camera separately, the camera User Guide is provided on the HP
Photosmart software CD included with your camera. See the printed camera
Quick Start Guide that came with your camera for specific instructions on how to
access the camera User Guide on the CD.
• North America: If you purchased the camera and printer as a combined product,
the camera User Guide is provided on the HP Photosmart software CD included
with your combined product. If you purchased the camera separately, the camera
User Guide is provided on the HP Photosmart software CD that came with your
camera. See the printed Quick Start Guide that came with your camera for specific
instructions on how to access the camera User Guide on the CD.
After you have installed the HP Photosmart software on your computer, you can view the
electronic Help on your computer:
• Windows: From the Start menu, select Programs or All Programs, point to HP,
HP Photosmart A440 series, and then click Help.
• Mac: Choose Help, Mac Help in the Finder, and then choose Library,
HP Photosmart Printer Help.
Printer parts
This section gives an overview of the parts of your printer, and provides references to
sections where the parts and functions are described in more detail.
Figure 1-1 Front view (closed)
1 Control panel: Control the basic functions of the printer from here.
2 Camera dock cover: Open this to dock the camera on the printer.
3 Output tray (closed): Open this to print or to connect a PictBridge-certified digital camera to
the camera port on the front of the printer.
Chapter 1
4Welcome
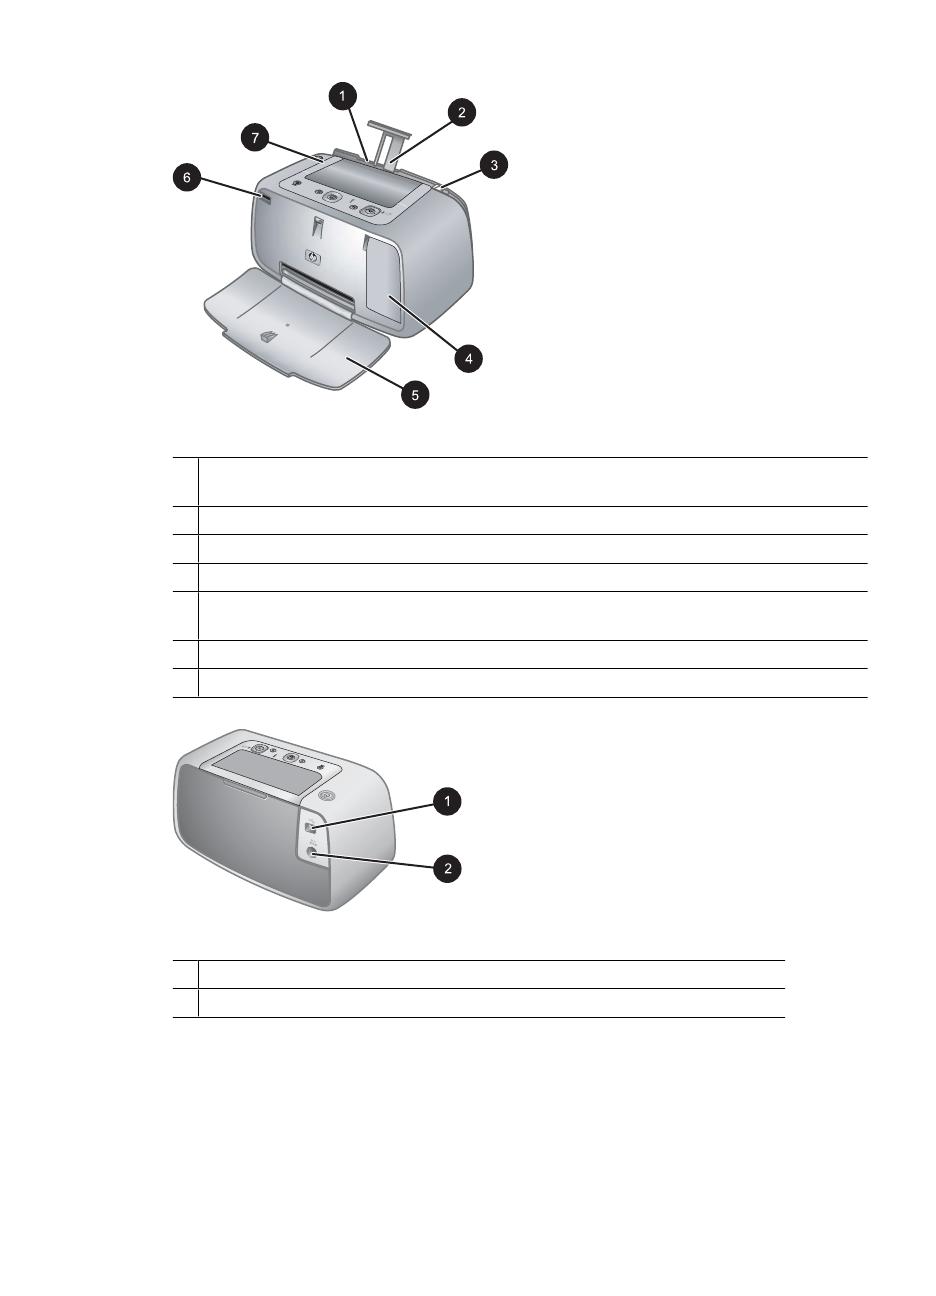
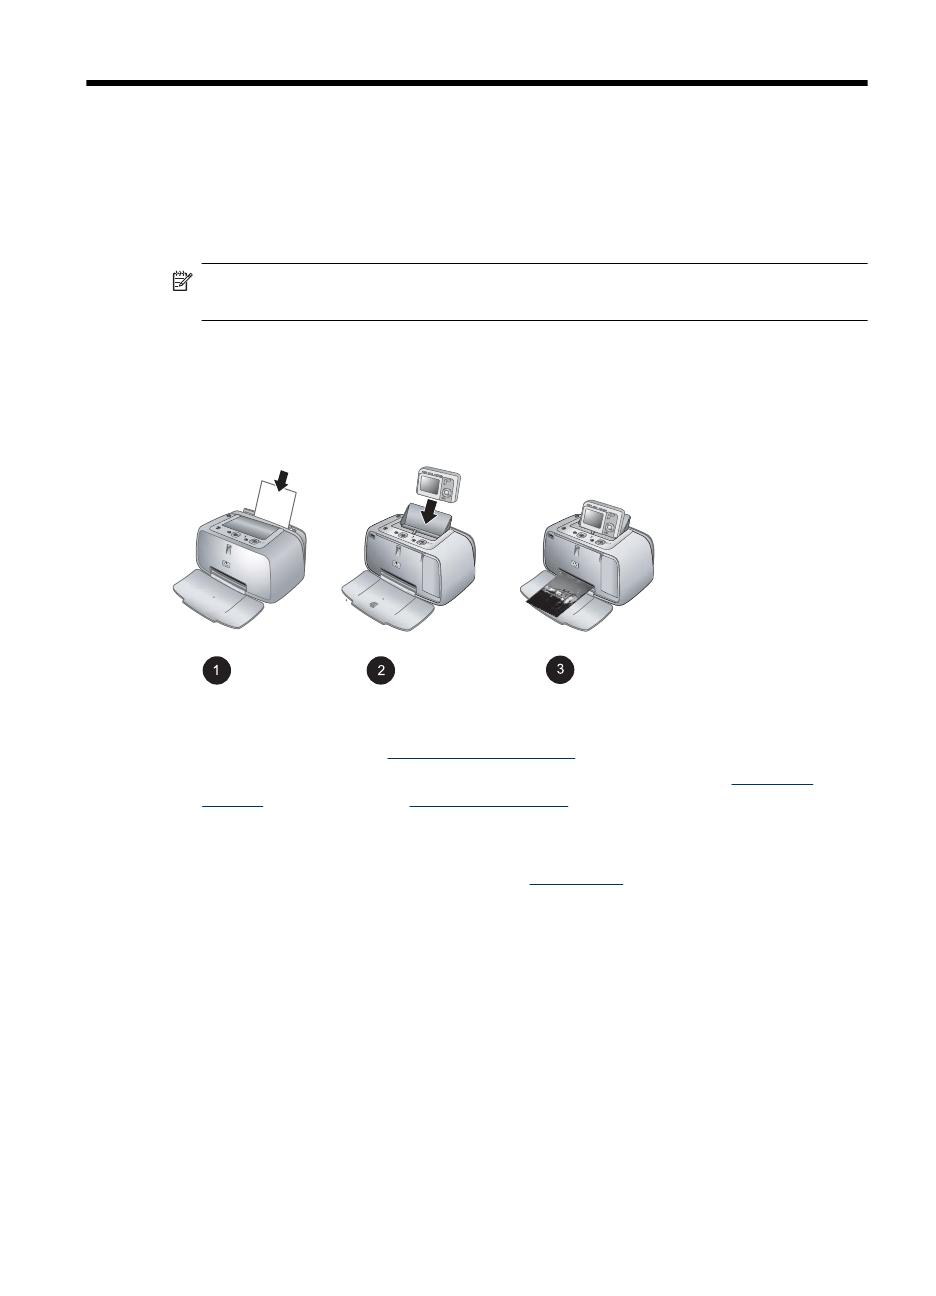
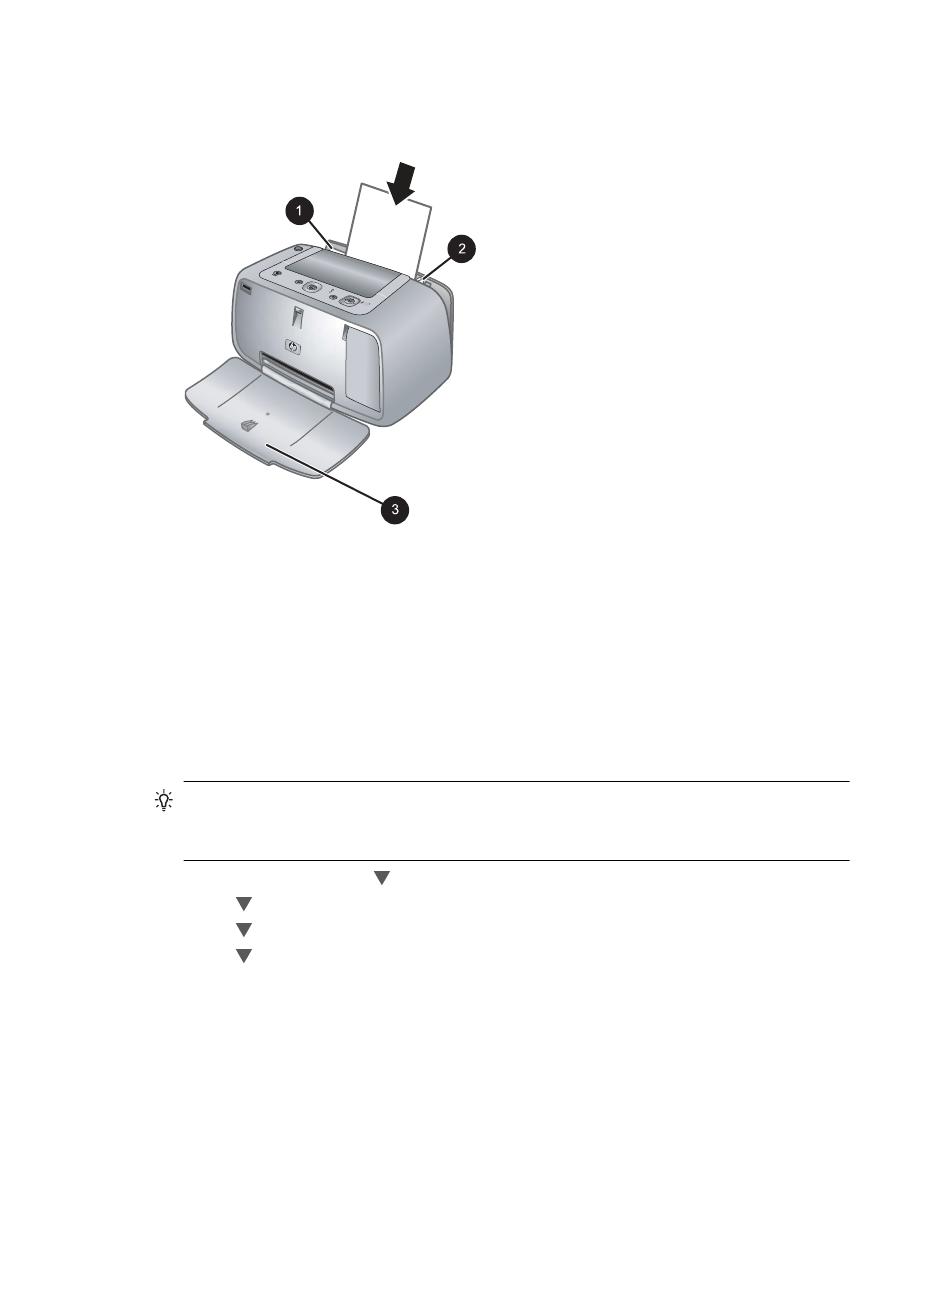
Figure 1-2 Front view (open)
1 Input tray: Load paper here. Open the output tray first. The input tray opens automatically
when you open the output tray. To close the input tray you must close the output tray first.
2 Input tray extension: Pull out to support paper.
3 Paper-width guide: Move to the width of the current paper to position the paper properly.
4 Print cartridge door: Open to insert or remove the HP 110 Tri-color Inkjet print cartridge.
5 Output tray (open): The printer deposits prints here. The input tray opens automatically when
you open the output tray.
6 Camera port: Connect a PictBridge-certified digital camera to this port.
7 Handle: Extend to carry the printer.
Figure 1-3 Rear of printer
1 USB port: Connect the printer to a computer using the supplied USB cable here.
2 Power cord connection: Connect the power cord here.
Printer parts 5
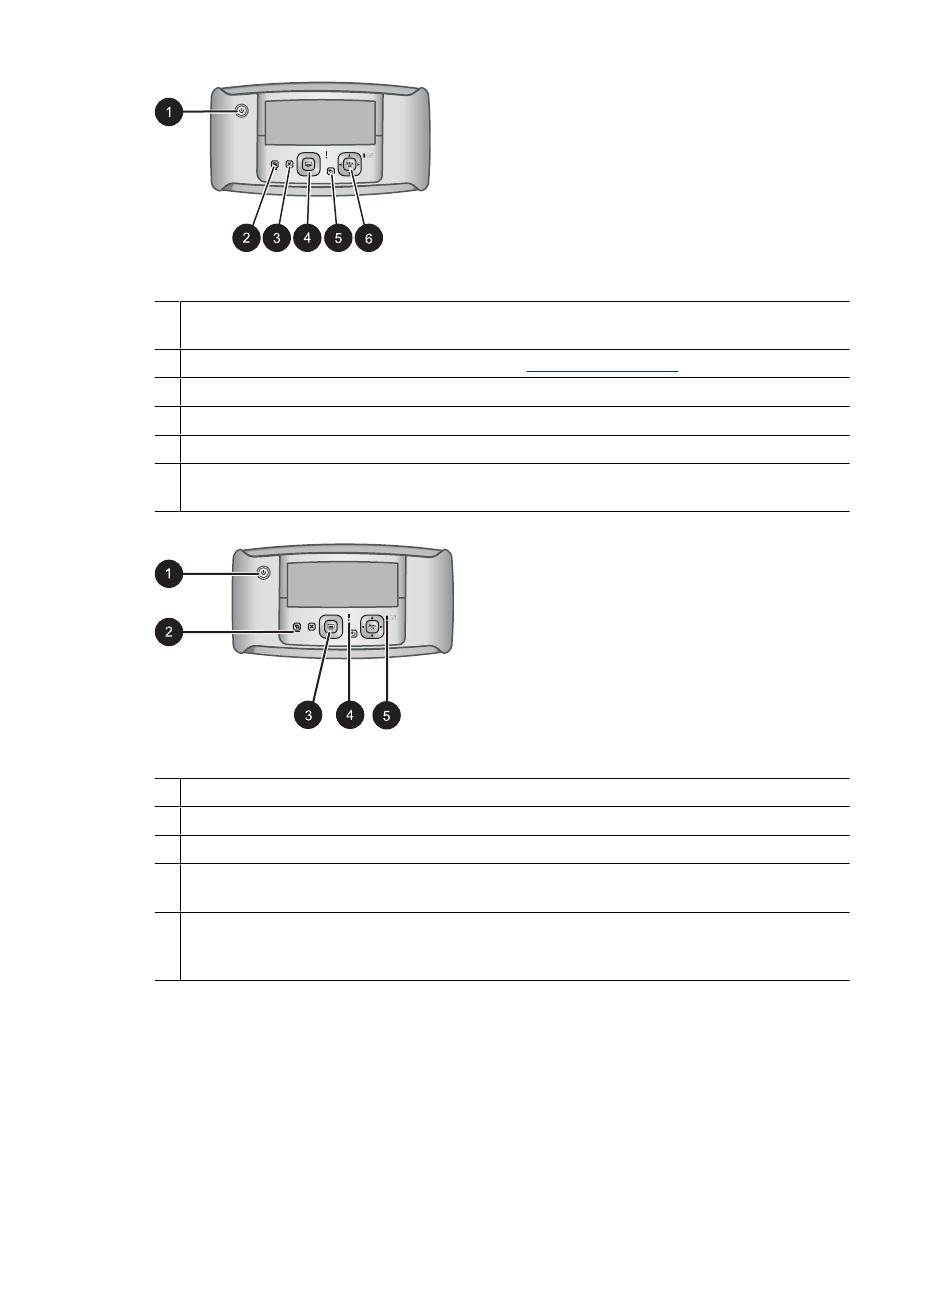
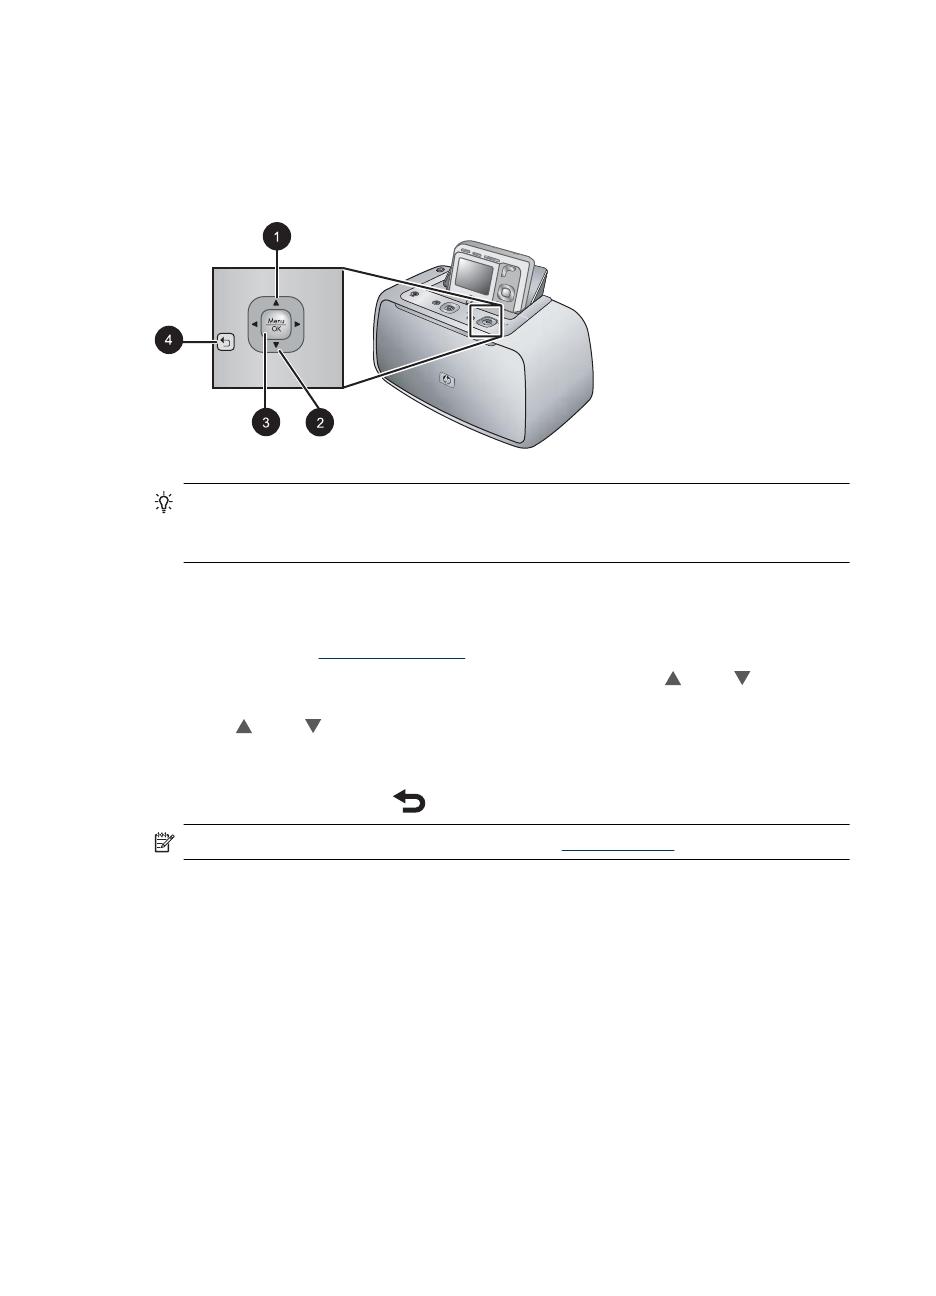
Figure 1-4 Control panel
1 On: Press to turn the printer on or off. If you have a camera docked on the printer, this button
will turn the camera off/on also.
2 Red Eye: Press to turn Red Eye on or off. See “Enhance your photos” on page 13.
3 Cancel: Press to stop a print action.
4 Print: Press to print the current photo. Each additional press prints the same photo again.
5 Back: Press Back to step back one screen at a time.
6 4–way arrow button: Press the 4–way arrow button to scroll through photos, or to navigate
the menus. Press Menu/OK to open/close a menu option.
Figure 1-5 Indicator lights
1 On light: Solid green if the printer is on, flashing if the printer is turning on or off.
2 Red Eye light: Solid green if Red Eye is turned on.
3 Print light: Solid green if the printer is ready to print, pulsing green if the printer is busy printing.
4 Status light: Flashing red if there is an error or if some user action is required. An error
message on the camera image display describes the problem.
5 Camera batteries light: Solid green if the camera rechargeable batteries are charged, flashing
if the batteries are charging. If you dock a fully charged camera, the camera batteries light is
off.
Chapter 1
6Welcome
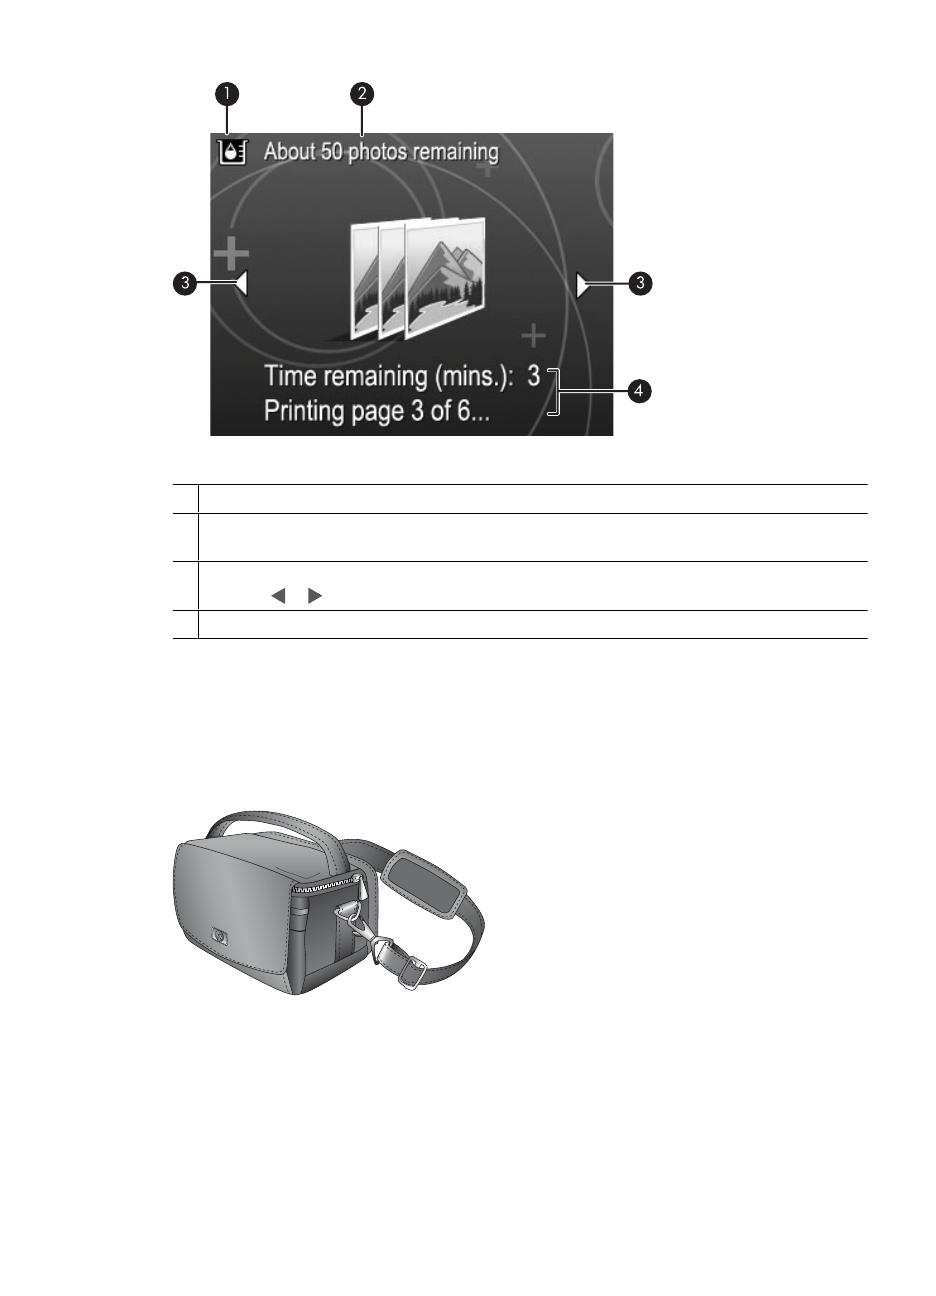
Figure 1-6 Photo summary screen
1 Ink-level indicator: Displays the ink level of the HP 110 Tri-color Inkjet print cartridge.
2 Estimated prints remaining status: Displays the approximate number of photos you can
print with the current print cartridge.
3 Navigation arrows: These arrows indicate there are other photos you can browse through by
pressing
or on the printer control panel.
4 Messaging area: Displays printer messages.
Optional accessories
There are optional accessories available for Photosmart printers that enhance their use
for printing anywhere, anytime. The accessory or accessories available for your printer
appear in this section. The appearance of the accessories may vary from what is shown.
Figure 1-7 HP Photosmart Carrying Case
The lightweight, durable HP Photosmart Carrying Case holds and protects everything
you need for hassle-free printing on the go.
Optional accessories 7
Use the Print menu
The Print menu contains many features for printing photos, changing print settings, and
more. When the camera is not in the camera dock, different menus are displayed. For
more information, see the camera User Guide.
TIP: The menu contains many useful commands and options, but common
functions, such as printing, are usually available with a single button press on the
printer control panel.
To use the Print menu
1. With the camera turned off, insert it into the dock on top of the printer. For more
information see “
Dock your camera” on page 11.
2. Press Menu/OK (3) to open the Print Options menu, press
(1) or (2) to select
Print Menu, and then press Menu/OK again.
3. Press
(1) or (2) to navigate through the options under the menu. Menu options
that are not accessible are dimmed.
4. Press Menu/OK (3) to select an option.
5.
To exit a menu, press the
button (4).
NOTE: For a list of printer menu options, see “Printer menus” on page 41.
Chapter 1
8Welcome

2 Paper basics
This section provides some basic information about paper and other media you can use
with your printer.
Choose and load paper
Learn how to choose the right paper for your print job and how to load it into the input
tray for printing.
•
Choose the best paper for the job
•
Load your paper
Choose the best paper for the job
Use HP Advanced Photo Paper. It is especially designed to work with the inks in your
printer to create beautiful photos. Other photo papers will produce inferior results.
For a list of available HP-designed inkjet paper, or to purchase supplies, go to:
•
www.hpshopping.com (U.S.)
•
www.hpshopping.ca (Canada)
•
www.hp.com/eur/hpoptions (Europe)
•
www.hp.com (All other countries/regions)
The printer is set by default to print the best quality photos on HP Advanced Photo Paper.
If you print on a different type of paper, be sure to change the paper type. For information
on changing the paper type in the printer menu, see “
To change the paper type”
on page 10.
Load your paper
Paper loading tips:
• You can print on photo paper, index cards, L-size cards, A-6 cards, or panoramic
paper.
• Before loading paper, slide out the paper-width guide to make room for the paper.
• Load only one type and size of paper at a time. Do not mix paper types or sizes in
the input tray.
• Do not load more than 20 sheets of 10 x 15 cm (4 x 6 inches) photo paper.
• Do not load more than 10 sheets of 10 x 30 cm (4 x 12 inches) photo paper for
panoramic printing. Loading more than ten sheets can cause paper feed problems.
• If you are using tabbed paper, load the paper so the tab feeds in last.
Paper basics 9
To load paper
1. Open the output tray. The input tray opens automatically.
2. Load up to 20 sheets of photo paper with the print side or glossy side facing the front
of the printer. If you are using tabbed paper, load the paper so tab feeds in last. When
loading, slide the paper to the left side of the input tray and push the paper down firmly
until it stops.
3. Adjust the paper-width guide to fit close to the edge of the paper without bending the
paper.
To change the paper type
TIP: If you are printing on a paper type other than the recommended HP Advanced
Photo Paper, be sure to change the paper type setting to improve the results. Best
quality can be achieved with HP Advanced Photo Paper only.
1. Press Menu/OK, press to select Print Menu, and then press Menu/OK again.
2. Press
to select Tools, and then press Menu/OK.
3. Press
to select Paper type, and then press Menu/OK.
4. Press
to select one of the following paper types:
• HP Advanced Photo Paper (default)
• HP Premium Photo Paper
• Other
5. Press Menu/OK.
Chapter 2
10 Paper basics
3 Print basics
The printer lets you produce amazing prints without even going near a computer. After
setting up the printer using the setup instructions that came in the box, you are just a few
steps away from printing your photos. This section contains the following topics:
• “
Dock your camera” on page 11
• “
Print from a docked camera” on page 12
• “
Set print quality” on page 13
• “
Enhance your photos” on page 13
NOTE: In the following instructions, always use the buttons on the printer control
panel, unless instructed otherwise. Also note that all camera buttons are disabled
when the camera is in the camera dock.
Dock your camera
To print photos you have taken with the camera, dock the camera on the printer. Dock
the camera only when it is turned OFF.
CAUTION: Do not attempt to dock an incompatible camera on the printer. Docking
an incompatible camera could damage the connector. Go to
www.hp.com/support for
a list of compatible HP cameras for the printer.
CAUTION: Do not undock the camera while printing. If you undock the camera while
printing, all print jobs are cancelled.
NOTE: You can also connect a PictBridge-certified camera to the camera port on
the front of the printer using the USB cable that came with the camera. However, you
cannot connect another camera if the HP Photosmart A440 series camera is already
docked on the printer. See “
PictBridge-certified camera” on page 15.
Print basics 11

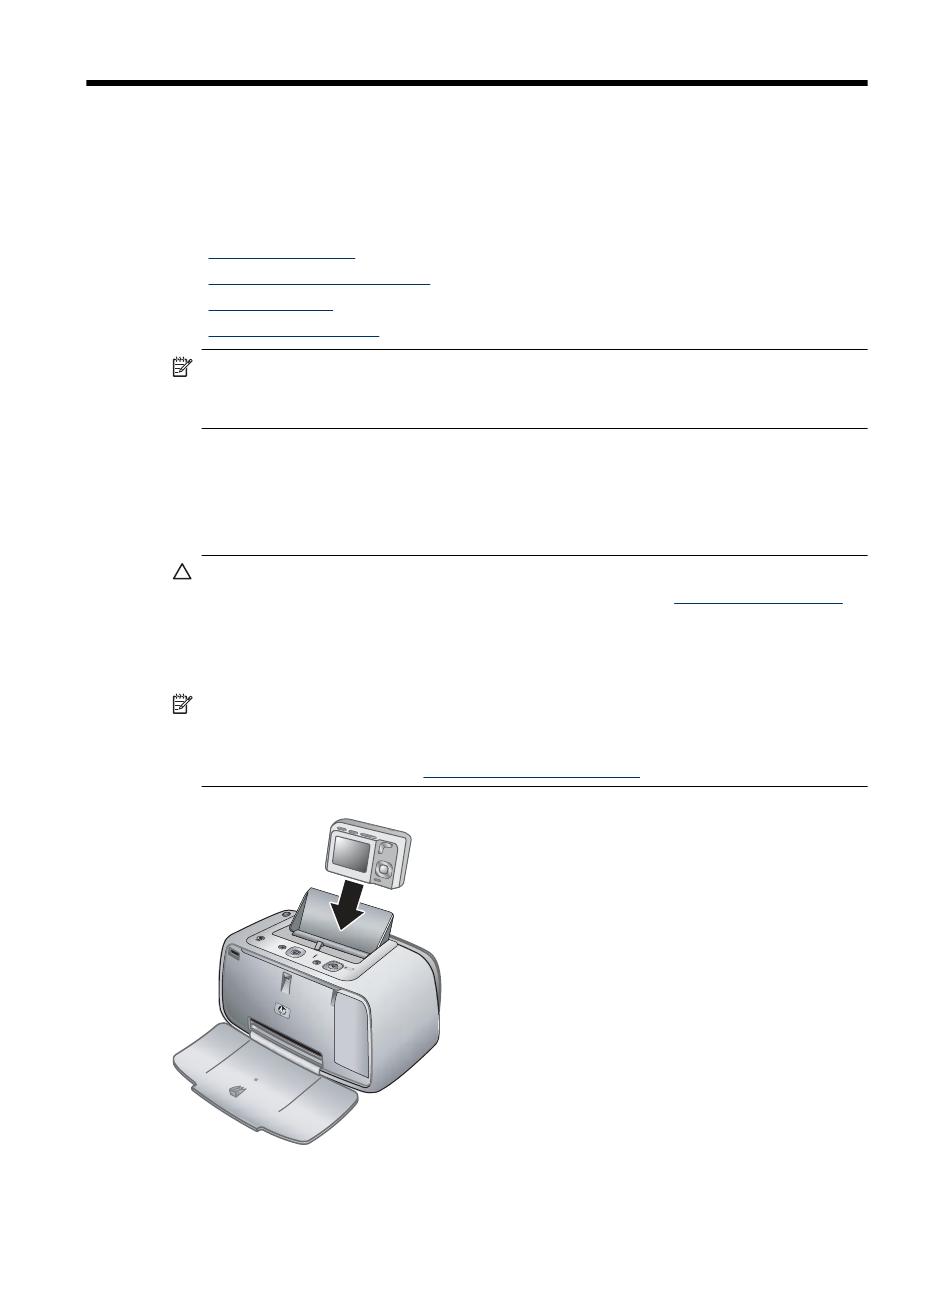
To dock the camera on the printer
1. Open the camera dock cover, if necessary.
2. Hold the camera so the camera image display faces you and the bottom of the camera
is down.
3. Make sure the camera is turned off.
4. Press the camera into the dock so that the connector tab in the camera dock plugs
into the connector slot on the bottom of the camera.
5. In most cases, docking the camera turns on both the printer and the camera. If it does
not, press On on the printer control panel.
NOTE: While the camera is docked, the camera image display dims after eight
minutes of inactivity, and turns off after ten minutes. The camera image display turns
back on if you send a print job from a connected computer,or if you press any button
on the printer.
Print from a docked camera
Printing photos directly from the docked camera is the easiest and fastest way to turn
your digital photos into outstanding prints. This section contains the following topics:
• “
View photos to print” on page 12
• “
Print photos” on page 12
View photos to print
You can browse and print from the camera image display.
You select the photos you want to print by using the printer control panel. Make sure the
camera has photos in its internal memory or on an optional memory card in the camera,
and make sure the camera is properly docked.
To view photos
▲ Browse the photos on the camera by pressing
or on the printer control panel.
Print photos
Important: Your photos are instantly dry, and can be handled immediately after they are
printed. However, HP recommends that you leave the printed surface of your photos
exposed to the air for 3 minutes after printing to allow the colors to fully develop before
you stack them with other photos or place them in albums.
One touch photo prints
1. Navigate to a photo you want to print.
2. Press Print once for each copy of the photo you want to print. This adds the photo to
the print queue.
3. Press
or to browse to the next photo you want to print. You do not have to wait
for the first photo to finish printing.
Chapter 3
12 Print basics

NOTE: You can also print the current photo by pressing Menu/OK, selecting Print
this image now in the Print Options menu, and then pressing Menu/OK again.
To print all photos
1. Press Menu/OK, press
to select Print Menu, and then press Menu/OK again.
2. Press
to select Print All, and then press Menu/OK.
3. Follow the prompts on the camera image display.
To print a photo index
1. Press Menu/OK, press
to select Print Menu, and then press Menu/OK again.
2. Press
to select Print Index, and then press Menu/OK.
A photo index shows thumbnail views and index numbers for all photos. Use an index
card or plain paper to conserve photo paper.
Set print quality
You can set the printer to print photos at a higher or lower level of quality. For the best
quality photos, choose Best. This mode produces the highest quality photo, but is also
a slightly slower print mode. If you want to print a photo quickly and are not concerned
with obtaining the highest quality, choose the lower quality setting, Fast.
To change the print quality
1. Press Menu/OK, press
to select Print Menu, and then press Menu/OK again.
2. Select Printer Settings, and then press Menu/OK.
3. Select Print quality, and then press
or to select the desired print quality.
4. Press Menu/OK.
Enhance your photos
Red Eye automatically enhances your photos using HP Real Life Technologies that:
• Sharpen blurred photos.
• Improve the dark areas of a photo without affecting the light areas of a photo.
• Reduce red-eye that can occur in photos taken with a flash.
• Improve the overall brightness, color, and contrast of photos.
Red Eye is on by default when you turn on the printer for the first time. If you want to print
a photo without using the Red Eye improvements, turn off Red Eye.
To turn off Red Eye
▲ Press Red Eye.
Red Eye remains off until you press Red Eye again.
Set print quality 13

Chapter 3
14 Print basics

4 Print from other devices
Use the printer with other devices to share photos with friends and family. You can print
from a:
• “
PictBridge-certified camera” on page 15
• “
Computer” on page 15
PictBridge-certified camera
You can print photos by connecting a PictBridge-certified digital camera directly to the
camera port of the printer with a USB cable. When you print from a digital camera, the
printer uses the settings that you selected on the camera. For more information, see the
documentation that came with the camera.
Print from a PictBridge-certified camera
Using a PictBridge-certified camera with the printer is easy and fast.
NOTE: Make sure that there is not a camera docked before connecting a camera to
the camera port. You can only have one camera connected at a time.
To print using a PictBridge-certified camera
1. Load HP Advanced Photo Paper into the printer.
2. Turn on the PictBridge-certified digital camera.
3. Make sure the USB configuration setting of the camera is set to Digital Camera (non-
HP cameras only), and then connect the camera to the camera port of the printer
using the USB cable that came with the PictBridge-certified camera.
See the camera documentation for more information about the USB configuration
setting. The name of the setting and its options may differ on non-HP digital cameras.
4. If you already selected photos for printing on the camera, the Print DPOF Photos?
or Print marked pictures? dialog box is displayed on the camera. Select No to
bypass printing pre-selected photos or Yes to print them before proceeding.
DPOF (Digital Print Order Format) provides information to the printer about photos
preselected on the camera for printing, along with information on the number of copies
to be printed and other image settings.
5. Use the options and controls on your camera to print your photos. See the camera
documentation for more information.
Computer
You need to transfer your photos to the computer before you can use them with
HP Photosmart software that lets you print from a computer. First install the
HP Photosmart software. For more information, see “
Transfer photos to a computer”
on page 16.
For information on installing the HP Photosmart software, see the setup instructions that
came in the box with the printer. The HP Photosmart software includes the interface that
is displayed whenever you print from a computer.
Print from other devices 15

Be sure to download the latest software update every couple of months to ensure you
have the latest features and improvements. For more information, see “
Update the
HP Photosmart software” on page 22.
NOTE: The electronic Help provides more information on the many print settings
available when you print from a computer. To learn how to open the electronic Help,
see “
Find more information” on page 3.
About HP Photosmart Essential, HP Photosmart Mac, and HP Photosmart Share
HP Photosmart Essential and HP Photosmart Mac let you:
• Print panoramic photos
• Print passport photos
• Add a decorative border to a photo
• Use your photos for creative projects such as scrapbooking albums, greeting cards,
and iron-on transfers
• Organize your photos in albums and search through them by keyword and dates
(Windows only)
• Edit and enhance your photos by adding text or doing color correction
• Share your photos online with family and friends by using HP Photosmart Share.
For more information on the HP Photosmart software, explore the electronic Help.
Use HP Photosmart Share to share photos with friends and relatives using e-mail, online
albums, or an online photo finishing service. The printer must be connected through a
USB cable to a computer with Internet access and have all the HP software installed. If
you try to use HP Photosmart Share and do not have all the required software installed
or configured, a message prompts you through the required steps. For more information
on HP Photosmart Share, see the camera User Guide.
Transfer photos to a computer
You can transfer photos to a computer from a docked camera or other connected device,
if you have set up a USB connection between the computer and the device. In addition
you must have installed the HP Photosmart software. You need to transfer the photos to
your computer to use them in image editing software, including the HP Photosmart
software that came with the printer.
To transfer photos to a computer
1. Connect the printer to the computer with a USB cable.
2. Turn off the camera if it is on.
3. Dock a camera on the printer or connect a PictBridge camera to the camera port.
4. HP Solution Center opens on the computer. Click Transfer Photos, and then follow
the prompts on the computer. For more information, see the HP Photosmart Software
Help.
Chapter 4
16 Print from other devices
5 Maintain and transport the printer
The printer requires very little maintenance. Follow the guidelines in this chapter to extend
the life span of the printer and printing supplies, and to ensure that your prints are always
of the highest quality. This section contains the following topics:
• “
Insert the print cartridge” on page 17
• “
Remove ink from your skin and clothing” on page 18
• “
Clean and maintain the printer” on page 19
• “
Update the HP Photosmart software” on page 22
• “
Store the printer and print cartridge” on page 22
• “
Maintain the quality of photo paper” on page 23
• “
Transport the printer” on page 24
For information on maintaining the camera, see the camera User Guide.
Insert the print cartridge
Use the HP 110 Tri-color Inkjet print cartridge to print black-and-white and color photos.
HP Vivera Inks deliver true-to-life photo quality and exceptional fade resistance, resulting
in vivid colors that last. HP Vivera Inks are specially formulated and scientifically tested
for quality, purity, and fade resistance.
For optimal printing results, HP recommends using only HP print cartridges. Inserting an
incorrect cartridge may invalidate the printer warranty.
CAUTION: Check that you are using the correct print cartridges. Also, note that HP
does not recommend modifying or refilling HP cartridges. Damage that results from
modifying or refilling HP cartridges is not covered by the HP warranty.
For best print quality, HP recommends that you install all retail print cartridges before the
date stamped on the box.
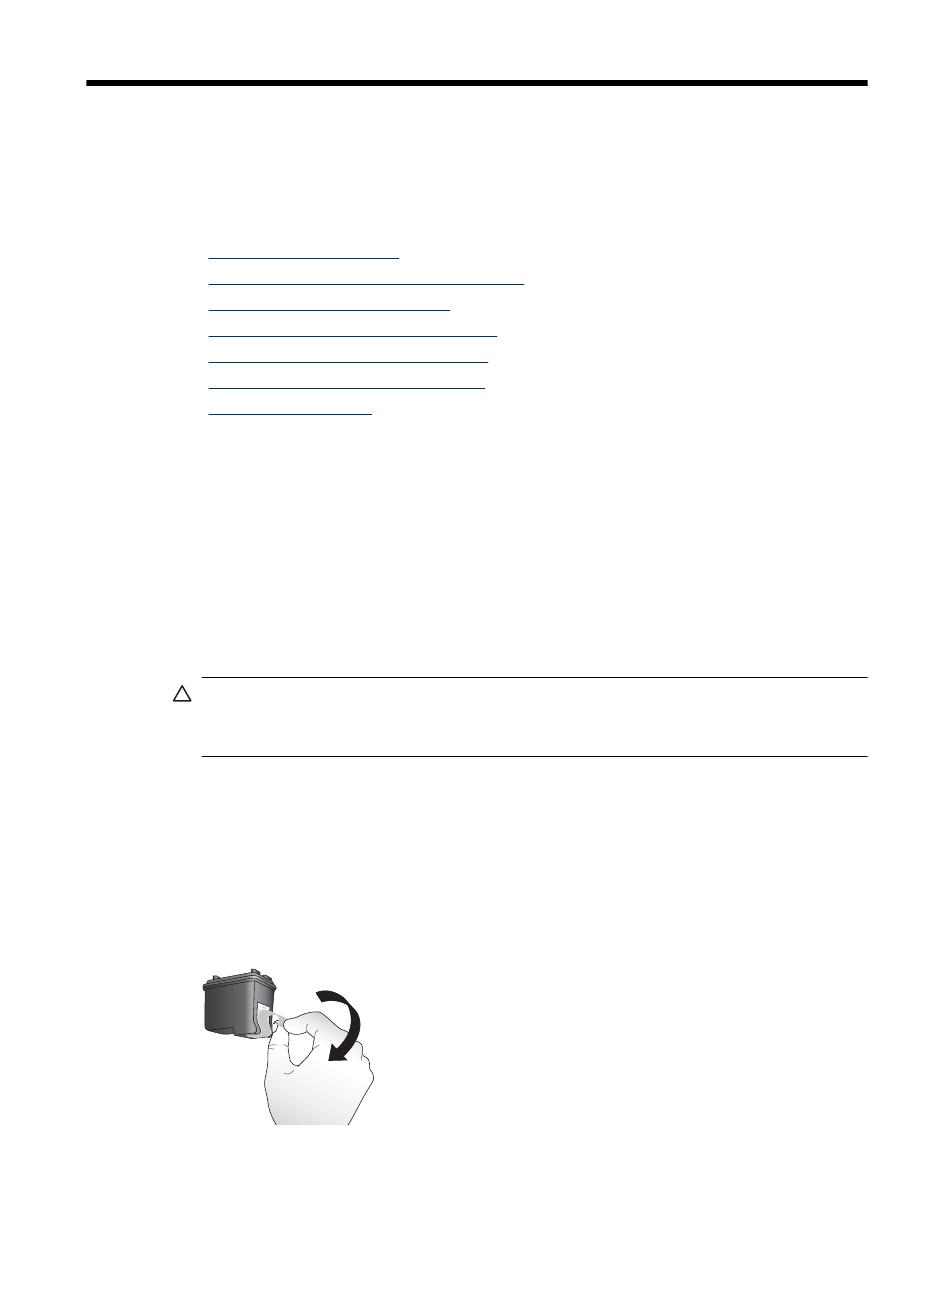
To prepare the printer and cartridge
1. Make sure the printer is on.
2. Open the print cartridge door of the printer.
3. Remove the bright pink tape from the cartridge.
Figure 5-1 Remove the pink tape
Maintain and transport the printer 17

Figure 5-2 Do not touch here
To insert the cartridge
1. If you are replacing a cartridge, push down and pull outward on the cartridge in the
cradle to remove it.
2. Hold the replacement cartridge with the label on top. Slide the cartridge at a slight
upward angle into the cradle so the copper-colored contacts go in first. Push the
cartridge until it snaps into place.
3. Close the print cartridge door. The camera screen shows an icon with the approximate
ink level for the installed print cartridge. No ink-level icon is displayed if the cartridge
is not a genuine HP cartridge, or if the cartridge has been used in a different printer.
4. Load HP Advanced Photo Paper in the input tray, press Menu/OK, and then follow
the onscreen instructions to align the cartridge.
NOTE: Ink from the cartridges is used in the printing process in a number of different
ways, including in the initialization process, which prepares the device and cartridges
for printing, and in printhead servicing, which keeps print nozzles clear and ink flowing
smoothly. In addition, some residual ink is left in the cartridge after it is used. For more
information see
www.hp.com/go/inkusage.
Remove ink from your skin and clothing
Follow these instructions to remove ink from your skin and clothing:
Surface Remedy
Skin Wash the area with an abrasive soap.
White fabric
Wash the fabric in cold water and use chlorine
bleach.
Chapter 5
18 Maintain and transport the printer
/