Page is loading ...

Page/Seite 2
RTF Contents
Shown
Zeigt RTF
Inhalt
Congratulations on your purchase of the Transition VTOL, a highly advanced model capable
of both hovering and forward flight. Before you build the model, please read the instructions
the whole way through, to help you understand the construction sequence.
Note: Please charge your flight battery now, then it will be ready when we get to it.
Herzlichen Glückwunsch zum Kauf des Transition VTOL. Dieses hochentwickelte Modell ist in
der Lage zu Schweben und Vorwärts zu fliegen. Vor der Montage des Modells lesen Sie bitte
die Anweisungen vollständig durch. Dies hilft Ihnen den Montageablauf zu verstehen.
Notiz: Laden Sie bitten jetzt den Flugakku, damit dieser einsatzbereit ist.
• Instructions
• Decal Sheet
• 1 x Foam Fuselage
• 2 x Foam Wings
• 1 x Foam Fin
• 2 x Propeller Set (2 x Blade A & 2 x Blade B)
• Undercarriage Set (2 x Mains, 1 x Nose)
• 4S 14.8V 1300-1500mAh LiPo (RTF Only)
• 4S LiPo Battery Charger (RTF Only)
• 6 Channel 2.4GHz Radio (RTF Only)
• Anleitung
• Dekor
• 1x Schaumrumpf
• 2x Schaumflügel
• 1x Schaumfinne
• 2x Propeller Set (2x Blatt A & 2x Blatt B)
• Fahrwerk Set ( 2x Haupt, 1x Bug)
• 4S 14.8V 1300-1500mAh LiPo (nur RTF)
• 4S LiPo Akku Ladegerät (nur RTF)
• 6 Kanal 2.4GHz Fernsteuerung (nur RTF)
• 2mm Wire or 2mm Allen Key
• Double Sided Tape or Hook & Loop (ARTF Only)
• 4S 14.8V 1300-1500mAh LiPo (ARTF Only)
• 4S LiPo Battery Charger (ARTF Only)
• 6 Channel 2.4GHz Radio (ARTF Only)
• 5 Minute Epoxy Glue
Warning: Do not use a bigger/heavier battery, even if
it fits. The front motors will be overworked, will overheat
and could fail.
•2mmDrahtoder2mmInnensechskantschlüssel
•DoppelseitigesTapeoderKlettband(nur ARTF)
•4S14.8V1300-1500mAhLiPo(nur ARTF)
•4SLiPoAkkuLadegerät(nur ARTF)
•6Kanal2.4GHzFernsteuerung(nur ARTF)
•5min.EpoxidKleber
Warnung: Verwenden Sie niemals größere/schwerer
Akkus, auch wenn diese passen. Die vorderen Motoren
könnten überlastet werden, überhitzen und ausfallen.
Introduction | Einführung
Kit Contents
Baukasteninhalt
Required to Complete
Zur Endmontage wird benötigt

Page/Seite 3
Kleben Sie die Finne an den Rumpf. Stellen sie
sicher, dass die Finne im rechten Winkel zum
Flügel ist.
Öffnen Sie die Abdeckung für das Elektronikfach
an der Unterseite des Rumpfes.
Schließen Sie Ihren Empfänger an den
Ausgängen des Flugreglers an. Achten Sie
darauf, dass die Kanalbelegung für die
Fernsteuerung richtig ist. Schieben Sie den
Empfänger in die Aussparung der Kabinenhaube
und sichern diesen mit doppelseitigem Klettband.
Befestigen Sie das hintere Fahrwerk, wie gezeigt.
Glue the fin to the fuselage. Ensure that the fin is
square to the wings.
Locate and open the flight controller bay on the
bottom of the fuselage.
Plug in your receiver to the flight controller
outputs. Take care to ensure the channel
assignment is correct for your radio. Push the
receiver through to the canopy area and secure
the receiver using double sided tape.
Plug in the rear undercarriage as shown.
Step 1 | Schritt 1
Step 2 | Schritt 2
Step 3 | Schritt 3
Step 4 | Schritt 4
RTF Builders please skip to step 4.
Beim Montieren des RTF Modells gehen
Sie jetzt zu Schritt 4.
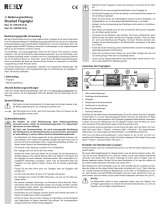
Gear (Tilt) - Getriebe (Neigung)
Rudder - Ruder
Throttle - Gas
Elevator - Höhenruder
Aileron - Querruder
Flight Controller
Channel Guide
Anschlussdiagramm
für Flugregler
Kanäle

Page/Seite 6
Step 15 | Schritt 15
Check the amount of control throw (against the diagram right) and adjust if necessary if you
have a computer radio or by moving the clevis up or down holes in the elevon horns.
Elevon (Low) Up = 13mm
Down = 13mm
Elevon (High) Up = 20mm
Down = 20mm
Aileron (Low) Up = 13mm
Down = 13mm
Aileron (High) Up = 20mm
Down = 20mm
Thanks to the gyro stabilisation, the movements
are not critical. We suggest that you fly first on
the low rate control throws and then increase to the higher rates.
Überprüfen Sie die Ruderausschläge (wie rechts im Diagramm gezeigt) und stellen diese ggf.
mit einer Computer Fernsteuerung ein, oder indem Sie die Gabelköpfe nach oben oder unten
in den Löchern der Ruderhörnern verändern.
Höhenruder (Anfang) nach oben = 13mm
nach unten = 13mm
Höhenruder (Fortgeschritten) nach oben = 20mm
nach unten = 20mm
Querruder (Anfang) nach oben = 13mm
nach unten = 13mm
Querruder (Fortgeschritten) nach oben = 20mm
nach unten = 20mm
Dank der Gyro -Stabilisierung sind die Ruderausschläge nicht so kritisch. Für die ersten Flüge
empfehlen wir Ihnen geringere Ausschläge, die dann später erhöht werden können.

Page/Seite 8
In vertical take off mode the transition should
balance horizontally at a point between
120 -135mm back from the leading edge (at the
root) of the front wing.
So you don’t run out of battery in flight the
Transition includes a bright LED battery monitor.
When the light is GREEN your battery is safe
to fly, when it starts flashing RED you have
approximately 60 seconds to land safely.
Im senkrecht Start Modus sollte der Schwerpunkt
zwischen 120
-135mm gemessen von der
Vorderkante des Flügels (Flügelwurzel) liegen.
Dabei sollte das Modell horizontal ausgewogen
sein.
Damit Ihnen während des Fluges nicht der
Strom ausgeht ist die Transition mit einer hell
leuchtenden LED Batterieanzeige ausgerüstet.
Wenn das Licht GRÜN leuchtet ist genügend
Energie im Akku, und es ist sicher das Modell
zu fliegen. Fängt die LED an ROT zu blinken
bleiben Ihnen noch ca. 60 Sekunden zum
Landen.
Centre of Gravity | Schwerpunkt
Battery Indicator | Akkuanzeige
120mm 15mm

Page/Seite 9
•Completelychargeyourtransmitterandightbatterybeforeying.
•Carefullycheckyourmodelovertoensurethatallscrewsaretight.
•DoublechecktheCentreofGravity.
•Checkthecontrolsurfacesforboththecorrectthrowanddirection.Ensurethatboth
surfaces move freely, without any binding.
•Openthecanopyandcheckthatthemotortiltmechanismmovesfreelyandthelinkagesare
free from cables.
Always fly the Transition in a safe location at a recognised club. For further information on
flying in the UK, please contact:-
British Model Flying Association (BMFA)
Chacksfield House, Tel: (+44) 116 2440028
31 St Andrews Road, Fax: (+44) 116 2440645
Leicester. LE2 8RE www.bmfa.org
•LadenSieIhreSender-undEmpfängerAkkusauf,bevorSiezumFliegengehen.
•ÜberprüfenSieIhrgesamtesModell,undstellenSiesicher,dassalleSchraubenfestsind,
und alles gesichert ist.
•ÜberprüfenSiemehrfachdenSchwerpunkt.
•ÜberprüfenSiedieRuderfunktioneninbeidem,demkorrektenRuderweg,undderrichtigen
Richtung. Stellen Sie sicher, dass jedes Ruder frei beweglich ist, und ohne Widerstand läuft.
•ÖffnenSiedieKabinenhaubeundprüfenobsichderNeigungsmechanismusderMotoren
frei bewegt, und die Anlenkungen frei von Kabeln sind.
Fliegen Sie immer Ihre Transition an einem sicheren Platz bei einem anerkannten Flugverein.
Preflight Checks | Vor - Flug Check

Page/Seite 10
Now your ready to fly the Transition, here are a few tips.
In hover mode the model is very stable and flies just like a quadcopter with the addition of extra
stability in pitch. If you are unfamiliar with flying quadcopters we suggest that for your first flight you
practice hovering safely first and get used to the controls.
The motors are designed to rotate forward so there is more hovering control authority forwards
than backwards. This enables you to hover forwards into stronger winds much easier. During faster
hovering manoeuvres you may see the propellers stop, don’t worry, this is because the wings are
creating enough lift that the gyro reduces the power to that motor, it is completely normal. Only once
you are comfortable with hovering should you progress to a transitional flight.
For your first transitional flight, take off in hover mode and climb to 15m (50ft). Flick the transition
switch and the transition is completely controlled for you by the on-board flight controller. In flight
mode, the Transition flies similar to a normal delta aircraft. Although there is no rudder surface,
the on-board mixers use differential throttles to give the same effect. Using both rudder and aileron
allow for much tighter turning with practice. When you want to transition back into hover mode you
must allow space (approx 15m or 50ft) for the transition to take place. Keep the throttle at normal
flying levels then flick the switch back and the transition is controlled for you.
It is quite important to make sure you do not run out of power so if your radio has the option, a timer
is recommended (4S 1300mAh = 5 minutes). For those without timers the built in LED light is the
easiest way to check the battery level, the bright LED with start to flash red when the battery is low,
from that point you have approximately 60 seconds to transition and land before power drops. The
power will progressively drop but this reduces your control authority.
Whilst it is possible to take off and land in aircraft mode, we recommend that you do not attempt
to do this. Any small gust or rough ground could lean the model over causing the propellers to strike
the ground and damage the model.
Pilots Notes
/