3
For Ratings at the following temperatures, multiply the 150° rating by the multiplier of the desired temperature.
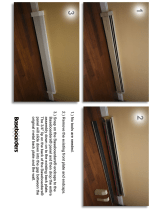
No. 9A Base-Ray
®
Ratings – Steam and Hot Water (2000 LBS/HR Flow Rate **)
Ratings based on active length. Active length same as total
length.
9A Base-Ray Water Content - 2.5 lbs. or .3 gal. per linear ft.
**The Hot Water Ratings at 2000 lb. Flow Rate are limited to installations where the
water ow rate through the Base-Ray is greater than 2000 lbs. per hour (four gallons
per minute). Where the water ow rate through the Base-Ray is not know, the rating
at the standard ow rate of 500 lbs. per hour mst be used.
*Add ½" to length for each bushing. Add 5" to length for each valve enclosure.
***Based on ¾" pipe connections.
Temperature – Multiplier
150° - 1.0
140° - .82
130° - .68
120° - .54
110° - .42
100° - .32
90° - .22
Length in
Lineal Feet*
Steam
Rating
Square
Feet
Steam
Ratings
BTU Per
Hr. At
215°F
HOT WATER RATINGS IN BTU PER HOUR AT
500 LBS./HR. (ONE GPM) FLOW RATE**
AT AVERAGE WATER TEMPERATURE OF
Pressure Drop
in Inches of
Water***
230°F 220°F 210°F 200°F 190°F 180°F 170°F 150°F
Per Lin. Ft. 3.40 820 940 880 810 750 690 620 550 410
1.5 5.1 1,230 1,410 1,320 1,220 1,130 1,040 930 830 615 1.29
2.0 6.8 1,640 1,880 1,760 1,620 1,500 1,380 1,240 1,100 820 1.39
2.5 8.5 2,050 2,350 2,200 2,030 1,880 1,730 1,550 1,380 1,025 1.50
3.0 10.2 2,460 2,820 2,640 2,430 2,250 2,070 1,860 1,650 1,230 1.61
3.5 11.9 2,870 3,290 3,080 2,840 2,630 2,420 2,170 1,930 1,435 1.71
4.0 13.6 3,280 3,760 3,520 3,240 3,000 2,760 2,480 2,200 1,640 1.82
4.5 15.3 3,690 4,230 3,960 3,650 3,380 3,110 2,790 2,480 1,845 1.93
5.0 17.0 4,100 4,700 4,400 4,050 3,750 3,450 3,100 2,750 2,050 2.03
5.5 18.7 4,510 5,170 4,840 4,460 4,130 3,800 3,410 3,030 2,255 2.14
6.0 20.4 4,920 5,640 5,280 4,860 4,500 4,140 3,720 3,300 2,460 2.25
6.5 22.1 5,330 6,110 5,720 5,270 4,880 4,490 4,030 3,580 2,665 2.35
7.0 23.8 5,740 6,580 6,160 5,670 5,250 4,830 4,340 3,850 2,870 2.46
7.5 25.5 6,150 7,050 6,600 6,080 5,630 5,180 4,650 4,130 3,075 2.57
8.0 27.2 6,560 7,520 7,040 6,480 6,000 5,520 4,960 4,400 3,280 2.68
8.5 28.9 6,970 7,990 7,480 6,890 6,380 5,870 5,270 4,680 3,485 2.78
9.0 30.6 7,380 8,460 7,920 7,290 6,750 6,210 5,580 4,950 3,690 2.89
9.5 32.3 7,790 8,930 8,360 7,700 7,130 6,560 5,890 5,230 3,895 3.00
10.0 34.0 8,200 9,400 8,800 8,100 7,500 6,900 6,200 5,500 4,100 3.10
10.5 35.7 8,610 9,870 9,240 8,510 7,880 7,250 6,510 5,780 4,305 3.21
11.0 37.4 9,020 10,340 9,680 8,910 8,250 7,590 6,820 6,050 4,510 3.32
11.5 39.1 9,430 10,810 10,120 9,320 8,630 7,940 7,130 6,330 4,715 3.42
12.0 40.8 9,840 11,280 10,560 9,720 9,000 8,280 7,440 6,600 4,920 3.53
12.5 42.5 10,250 11,750 11,000 10,130 9,380 8,630 7,750 6,880 5,125 3.64
13.0 44.2 10,660 12,220 11,440 15,030 9,750 8,970 8,060 7,150 5,330 3.74
13.5 45.9 11,070 12,690 11,880 10,940 10,130 9,320 8,370 7,430 5,535 3.85
14.0 47.6 11,480 13,160 12,320 11,340 10,500 9,660 8,680 7,700 5,740 3.96
14.5 49.3 11,890 13,630 12,760 11,750 10,880 10,010 8,990 7,960 5,945 4.06
15.0 51.0 12,300 14,100 13,200 12,150 11,250 10,350 9,300 8,250 6,150 4.17
15.5 52.7 12,710 14,570 13,640 12,560 11,630 10,700 9,610 8,530 6,355 4.28
16.0 54.4 13,120 15,040 14,080 12,960 12,000 11,040 9,920 8,800 6,560 4.38
16.5
56.1 13,530 15,510 14,520 13,370 12,380 11,390 10,230 9,080 6,765 4.49
17.0 57.8 13,940 15,980 14,960 13,770 12,750 11,730 10,540 9,350 6,970 4.60
17.5 59.5 14,350 16,450 15,400 14,180 13,130 12,080 10,850 9,630 7,175 4.70
18.0 61.2 14,760 16,920 15,840 14,580 13,500 12,420 11,160 9,900 7,380 4.81
18.5 62.9 15,170 17,390 16,280 14,990 13,880 12,770 11,470 10,180 7,585 4.92
19.0 64.6 15,580 17,860 16,720 15,390 14,250 13,110 11,780 10,450 7,790 5.03
19.5 66.3 15,990 18,330 17,160 15,800 14,630 13,460 12,090 10,730 7,995 5.13
20.0 68.0 16,400 18,800 17,600 16,200 15,000 13,800 12,400 11,000 8,200 5.24
20.5 69.7 16,810 19,270 18,040 16,610 15,380 14,150 12,710 11,280 8,405 5.35
21.0 71.4 17,220 19,740 18,480 17,010 15,750 14,490 13,020 11,550 8,610 5.45
21.5 73.1 17,630 20,210 18,920 17,420 16,130 14,840 13,330 11,830 8,815 5.56
22.0 74.8 18,040 20,680 19,360 17,820 16,500 15,180 13,640 12,100 9,020 5.67