Page is loading ...

Cable Cubby® 100 Retractor Bracket •
Installation Guide
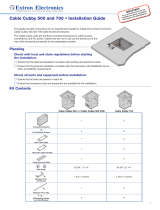
Step 1 — Install the Retractor Bracket
For enclosure installation, see the Cable Cubby 100
Installation Guide at www.extron.com.
12
Insert the bracket
into the opening
under the enclosure.
Secure the bracket
using two included
#6-32 screws.
Cable Cubby 100 Enclosure
Retractor
Bracket
Right-facing Retractor Left-facing Retractor
NOTE: The retractor
bracket and module
can be installed either
left-facing or right-
facing (see below).

© 2023 Extron — All rights reserved. www.extron.com
All trademarks mentioned are the property of their respective owners.
Extron USA West, 1025 E. Ball Road, Anaheim, CA 92805, 800.633.9876
See the Extron Safety and Regulatory Compliance Guide on the
Extron website.
68-3754-50
Rev. B
11 23
2
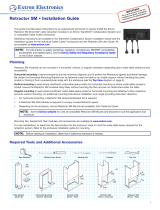
Ensure pin holes on the
bracket and retractor
module are aligned.
3
Secure the retractor
module with the
included pin and
clip.
Clip
Retractor
Bracket
Pin
Retractor
Module
1
Raise the retractor
module into the
bracket
Step 2 — Install the Retractor Module
For additional retractor module instructions, see the
Retractor Series Installation Guide at www.extron.com.
/