Page is loading ...

Thank you for choosing Rough Country for all your vehicle needs.
Please read instructions before beginning installation. Check the kit hardware against the kit contents shown below. Be
sure you have all needed parts and know where they go.
If question exist, please call us @1-800-222-7023. We will be happy to answer any questions concerning this product.
Check all fasteners for proper torque. Check to ensure for adequate clearance between all components.
Periodically check all hardware for tightness.
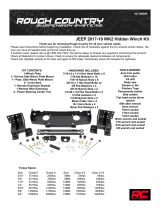
KIT CONTENTS:
Step Brackets/Actuators x 4
Electric E Board x 2
E Board Wiring Harness x1
E Board Lights x4
Magnetic Door Triggers x4
Motor Guards x2
TOOLS NEEDED:
13mm Wrench or Socket
Torque Specs:
Size Grade 5 Grade 8 Size Class 8.8 Class 10.9
5/16” 15 ft/lbs 20ft/lbs 6MM 5ft/lbs 9ft/lbs
3/8” 30 ft/lbs 35ft/lbs 8MM 18ft/lbs 23ft/lbs
7/16” 45 ft/lbs 60ft/lbs 10MM 32ft/lbs 45ft/lbs
1/2” 65 ft/lbs 90ft/lbs 12MM 55ft/lbs 75ft/lbs
9/16” 95 ft/lbs 130ft/lbs 14MM 85ft/lbs 120ft/lbs
5/8” 135ft/lbs 175ft/lbs 16MM 130ft/lbs 165ft/lbs
3/4” 185ft/lbs 280ft/lbs 18MM 170ft/lbs 240ft/lbs
JEEP 2020-23 Gladiator Electric Step
PSR610530

1. Place the module bracket to the pinch weld, securing it to the cab using (2) supplied bolts. See Photo 1.
2. Place the flags nut into the body of the vehicle for the front and rear motor mount. NOTE: The 90 Deg. Bend on the
bracket is toward the front of the vehicle. See Photo 2.
3. Secure the front of the motor using the supplied bolt, Then transfer the center of the motor mount onto the pinch
weld. See Photo 3.
4. Use a .406 drill bit to drill a mounting hole into the pinch weld. See Photo 4.
5. Place (1) square washer behind the pinch weld. Then secure the motor to the pinch weld with the supplied hard-
ware. See Photos 5 and 6.
Photo 1 Photo 2
Photo 3 Photo 4
Photo 5 Photo 6
Install the module bracket. Install the flag nut.
Place the motor and mark the hole. Drill the hole in the pinch weld.
Install the square spacer. Secure the motor.
INSTALLATION INSTRUCTONS
Front

6. Mount the rear step motor to the pinch weld using the supplied hardware. See Photo 7.
7. Connect the plugs to the motors and route the harness to the passengers side of the vehicle. See Photo 8.
8. Remove the scuff plate and raise the carpet up to install the wiring harness to the front and rear set of doors on the
Driver and passengers side. See Photo 9.
9. Place the trigger sensor inside of the door jam and then place the sensor magnet onto the door. These will need to
be installed in such a way that the position the magnet aliens up with the trigger module. See Photo 10.
10. Place the rear trigger sensor inside of the front of the door jam and then place the sensor magnet onto the door.
These will need to be installed in such a way that the position the magnet aliens up with the trigger module. See
Photo 11.
11. Connect the trigger sensor grounds to the nearest bolt inside of the trim panel.
12. Install the E-Board onto the bracket actuator using the supplied 5mm socket head bolts. The aluminum sliders on the
E-Board can be positioned into the block hasp of the bracket and the bolts installed. Leave the bolts loose so the
board can be slid into the desired position. Stand back from the vehicle and make sure the step is in the best posi-
tion front to back so that when it is retracted it will not hit the front fender. Once in position, tighten the bolts down
using a 5mm hex wrench. Repeat for opposite side of the vehicle. See Photos 12 and 13.
Photo 7 Photo 8
Photo 9 Photo 10
Photo 11 Photo 12
Mount the rear step motor. Connect the harness.
Lift up the carpet and install harness. Mount the sensor in the door jam.
Alien the magnet up with trigger module. Install the E-Board.

13. The step kick includes entry lights. These are installed close to the area where you will be stepping down onto the
board. Once this location is found, clean the surface of the body and stick the lights in place by peeling the backing
off the double sided tape and pressing firmly onto the body. Connect the lights to their harnesses. See Photo 14.
14. Place the carpet and scuff plate in to the stock position. See Photo 15.
15. Under the vehicle, Use the provided zip ties to tuck all of the harness up and out of the way.
16. Install the nut on the upper flag nut and tighten all step motor hardware using a 13mm socket. See Photo 16.
17. Locate the front guard and hardware. See Photo 17.
18. Place the tension block into the bottom of the frame and secure the guard using the supplied 10mm bolt. See Photo
18.
Photo 13 Photo 14
Photo 15 Photo 16
Photo 17 Photo 18
Tighten the step. Install the included entry lights.
Replace the carpet and scuff plate. Tighten the step hardware.
Front guard and hardware. Install the lower guard to the hardware.

19. Secure the upper guard using the flag nut into the slot in the frame and the provided 10mm Flat washer, Lock wash-
er and 10mm nut. Tighten the hardware to the frame using a 13mm wrench. See Photo 19.
20. Route the wiring harness to the battery of the vehicle. See Photo 20.
21. Connect the power harness to the battery. See Photo 21.
22. Open and close each door of the vehicle to ensure each sensor is working correctly.
Photo 19 Photo 20
Photo 21
Tighten the guard to the vehicle. Route the wiring harness to the battery.
Connect the power harness to the battery.

By purchasing any item sold by Rough Country, LLC, the buyer expressly warrants that he/she is in compliance with all
applicable, State, and Local laws and regulations regarding the purchase, ownership, and use of the item. It shall be the
buyers responsibility to comply with all Federal, State and Local laws governing the sales of any items
listed, illustrated or sold. The buyer expressly agrees to indemnify and hold harmless Rough Country,
LLC for all claims resulting directly or indirectly from the purchase, ownership, or use of the items.
/