Page is loading ...

KÖBER SRL VADURI BRANCH
Image for presentation only. Product
may look slightly different depending
on the area and the purchase period.
KÖBER SRL, no. 25 Vaduri,
Al
Tel.:+40.233.24.17.46,
233.24.19.33,
www.motan.ro
KÖBER SRL VADURI BRANCH
USER MANUAL
GAS BOILER
C32SPV24MEFB
C32SPV31MEFB
C22SPV23MEF
Al
exandru cel Bun Commune, N
eam
233.24.19.33,
Fax:+40.233.24.19.29
eam
t 617511, Romania

USER MANUAL CENTRAL HEATING STATION TYPE C32SPV24MEFB; C32SPV31MEFB; C22SPV23MEF
REV.12.06.2017
2 of 19
Contents
1 Safety instructions and symbols ................................................................................................................................................... 3
2 Valability of instructions ................................................................................................................................................................ 3
3 EC Marking .................................................................................................................................................................................... 3
4 Use according to destination ....................................................................................................................................................... 3
5 Safety instructions .......................................................................................................................................................................... 3
5.1 Instalation and adjustment ....................................................................................................................................................................3
5.2 Gas smell ...................................................................................................................................................................................................3
5.3 Changes in the area adjiacent to the heating station .....................................................................................................................3
6 Technical and functional characteristics .................................................................................................................................... 4
7 Mounting ........................................................................................................................................................................................ 5
7.1 Mounting set ............................................................................................................................................................................................5
7.2 Dimensions and mounting positions .....................................................................................................................................................5
8 Installation ...................................................................................................................................................................................... 6
8.1 Conditions for the installation of the central heating station ...........................................................................................................6
8.1.1 Installation directions............................................................................................................................................................6
8.1.2 Protection of the station in order to keep the warranty ................................................................................................6
8.2 Racordul de gaz ......................................................................................................................................................................................7
8.3 General directions for the heating installation ...................................................................................................................................7
8.4 General directions for the hot water circuit ........................................................................................................................................7
8.5 Connecting pipe of the safety valve ...................................................................................................................................................8
8.6 Air/ burnt gases input/ output pipes ....................................................................................................................................................8
8.7 Electric grid connection .........................................................................................................................................................................8
8.8 Installation filling and emptying ............................................................................................................................................................8
9 Operation instructions ................................................................................................................................................................. 10
9.1 Control Panel ........................................................................................................................................................................................ 10
9.2
Description of functions and of graphic contexts diplayed on the control panel LMC1112
............................................ 10
9.2.1
LIGHT function
................................................................................................................................................................... 10
9.2.2
Graphic context – station startup
................................................................................................................................ 10
9.2.3
Graphic context - Stand-by
.......................................................................................................................................... 10
9.2.4
Graphic context – error state
........................................................................................................................................ 11
9.2.5
Graphic context – waiting state
................................................................................................................................... 11
9.2.6
Graphic context – functioning state
........................................................................................................................... 11
9.2.7
Graphic context – adjustment of functioning parameters
.................................................................................... 11
9.2.8
Graphic
context - Service submenu ............................................................................................................................. 12
9.3 Central heating station startup .......................................................................................................................................................... 12
9.4 Functioning as waste hot water station (WHW) .............................................................................................................................. 12
9.5 Functioning as heating station (HS) ................................................................................................................................................... 12
9.6 Preset functions related to station safety ......................................................................................................................................... 12
9.7 Setting additional functions ................................................................................................................................................................ 12
9.8 Error signals ............................................................................................................................................................................................ 13
9.9 Station switch off in safety conditions ............................................................................................................................................... 14
9.10 User training ........................................................................................................................................................................................... 14
9.11 Quality Conditions and Warranty ...................................................................................................................................................... 14
10 Inspection and maintenance ..................................................................................................................................................... 14
10.1 Inspection and maintenance intervals ............................................................................................................................................. 14
11 Drawings necessary for mounting and installation ................................................................................................................... 15
11.1 Types of configurations for mounting for mural central heating stations with forced flue C32SPV24MEFB / C32SPV31MEFB
15
11.2 Types of configurations for mounting for mural central heating stations with forced flue C22SPV23MEF ............................. 16
11.3 Minimum distances recommended for the mounting of the co-axial kit ................................................................................... 16
11.4 Hydraulic characteristic of ER P pump (EEI≤0,2).............................................................................................................................. 17
11.5 Hydraulic characteristic of non-ER P pump ..................................................................................................................................... 17
11.6 Functioning schemes covered by warranty .................................................................................................................................... 18
11.6.1 Central heating with radiators and instant preparation of domestic hot water .................................................... 18
11.6.2 Underfloor central heating and instant preparation of domestic hot water .......................................................... 18
11.6.3 Central heating with radiators and accumulated preparation of domestic hot water (accummulation boiler)
19
11.6.4 Underfloor central heating and accumulated preparation of domestic hot water (accummulation boiler) .. 19

USER MANUAL CENTRAL HEATING STATION TYPE C32SPV24MEFB; C32SPV31MEFB; C22SPV23MEF
REV.12.06.2017
3 of 19
1
Safety instructions and symbols
When installing the central heating station we ask you to respect the safety instructions contained in this manual!
This manual is the property of KÖBER SRL-Vaduri branch. Copying or reproduction without written consent KÖBER SRL-Vaduri
branch is strictly forbidden.
The following lines explain the symbols used in the text:
Danger!
-
direct danger for corporal integrity and life.
Danger!
-
danger of death by electrocution.
Caution!
-
pontentially dangerous situation for the product and the environment.
Note!
-
useful notes and information. This symbol indicates a necessary activity.
2
Valability of instructions
These instructions are valid exclusively for central heating stations type C32SPV24MEFB / C32SPV31MEFB / C22SPV23MEF.
3
EC Marking
EC marking applied on this product guarantees that the equipment complies with the esential conditions stipulated in
the applicable European legislation:
- Directive regarding gas equipment 2009/142/CE (ex. 90/396/CEE)
- EcoDesign Directive 2009/125/EC
- Directive regarding energy efficiency 92/42/EEC and European Regulations no.811-814/2013
- Directive regarding electromagnetic compatibility 2004/108/EC (ex. 89/366/CEE)
- Directive for low frequency 2006/95/EC (ex. 73/23/EEC).
4
Use according to destination
-
Central heating stations C32SPV24MEFB / C32SPV31MEFB / C22SPV23MEF are designed following current technical standards
and observing recognized safety norms
;
- In case of misuse or inappropriate use, the health or life of users or third parties can be put in danger, as well as the central
heating station and other goods;
- This equipment must not be used by people with limited psychological and sensitive capacities (including children), or by
people with no experience or/ and no knowledge;
- The station provides both heating in closed circuit central heating installations, as well as hot water. Use for other purposes or for
additional purposes other than stipulated is considered inappropriate use. The manufacturer is not responsible for possible
damage resulting from inappropriate use.
The user is the only one responsible;
- Compliance with the use and installation instructions, the additional documentation, as well as with the inspection and
maintenance stipulations is part of what is understood by use according to destination.
5
Safety instructions
5.1 Instalation and adjustment
Installation and commissioning can be done only by a company authorized and agreed by KÖBER SRL-Vaduri Branch!
This company will assume responsibility for the correct installation and commissioning.
Adjustment work, as well as maintenance and repair are allowed to be performed only by a company authorized and agreed
by KÖBER SRL-Vaduri Branch!
Danger!
Danger of death by poisoning and explosion because of breeches in the gas pipes and connections in case of
incorrect installation!
Danger of deterioration when inappropriate tools are used. For tightening or unscrewing connection screws use
appropriate wrenches (no box wrenches, extensions etc).
5.2 Gas smell
When gas smell appears, take the following into account:
- Do not activate electric switches in the dangerous zone;
- Do not smoke in the dangerous zone;
- Do not use mobile phones in the dangerous zone;
- Turn off the gas tap;
- Air the dangerous zone;
- Notify the gas distribution company.
5.3 Changes in the area adjiacent to the heating station
Modifications of the following installations are not allowed:
- The central heating station;
- The gas or water pipes or electric cables;
- Air/ gas incoming/ outgoing pipes.

USER MANUAL CENTRAL HEATING STATION TYPE C32SPV24MEFB; C32SPV31MEFB; C22SPV23MEF
REV.12.06.2017
4 of 19
6
Technical and functional characteristics
Tab. 1 Technical characteristics
Name SIGMA24 TF
EKO MT
SIGMA31 TF
EKO MAX KPLUS
Type C32SPV24MEFB C32SPV31MEFB C22SPV23MEF
Gas category II2H3B/P, I2H, I2E+, II2ELL3B/P, II2HS 3B/P,
II2E3P, II2L3B/P I2H
Flue type Forced
Burning room Sealed
Energy efficiency symbol (dir. 92/42/CEE) ***
Class NOx (natural gas) 3
Energy efficiency class on central heating circuit C
Energy efficiency class on domestic hot water circuit A
Clasa CONFORT apa calda menajera (EN13203) **
Thermal efficiency
G20
93 %
Power (min/max) G20 10 – 24 KW 11 – 31 KW 9 – 23 kW
Rated pressure gas input G20
20 mbar
Pressure (min/max) on thermal circuit 0.5÷3.5 bar
Maximum pressure on DHW circuit 8 bar
Temperature on thermal circuit 30÷80 °C
Temperature on the floor heating system circuit 15-45 °C
Temperature on domestic hot water circuit 35÷55 °C
Hot water flow
∆ t = 30 °C
10 l/min
Electric characteristics
Input
~230VAC/50 Hz
Rated power
(
EEI
pump <0,2)
80 W
Construction characteristics
Height 700 mm
Width 436 mm
Depth 306 mm 328 mm 306 mm
Weight 32 kg 36 kg 32 kg
Capacity primary heat switch 1 l
Conectors
Thermal input, output 3/4‘’
Cold water input, hot water output 1/2'’
Gas input 3/4'’
Expansion vessel with membrane 7 l
Air/ gas incoming/ outgoing pipes Co-axial - Ø100/Ø60,
Dual - Ø80 **
Length of burnt gases connecting pipe Co-axial - maxim 3 m,
Dual - maxim 5 m **
Evacuation type C12, C22, C32, C42, C52,
C62, C72, C82 C12, C22, C82
Burnt gases (maximum temperature) ~150 °C
Classes of electric protection Class I
Protection class IP 40
** The boiler is standard delivered with 1m co-axial flue.

USER MANUAL CENTRAL HEATING STATION TYPE C32SPV24MEFB; C32SPV31MEFB; C22SPV23MEF
REV.12.06.2017
5 of 19
7
Mounting
7.1 Mounting set
Check whether the mounting set is complete and undamaged – see table 2.
7.2 Dimensions and mounting positions
7.2.1 Installation site
When choosing the installation site, please take into consideration the following safety instructions:
Caution!
Do not install the station in spaces that are
exposed to freezing! In case of freezing the sation can be
damaged.
This equipment can not be installed and used in open air.
Outdoor installation can cause functioning flaws.
Caution!
It is not recommended to install the central heating station
in bathrooms or kitchens or other areas with high humidity.
The station can be installed only in rooms with maximum
60% humidity between 20-30°C in order to prevent the
damaging of electronic components.
Caution!
The burning air of the station must not contain
substances such as flourine vapours, chlorine, sulphur,
dissolvants, colorants, adhesives or gasoline. These
substances can lead in time to the corrosion of the
equipment and air/ gas incoming/ outgoing pipes.
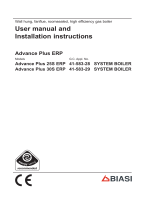
Legend:
A – Thermal input connector
B – Hot water output connector
C - Fuel input connector
D - Cold water input connector
E - Thermal output connector
Fig. 1.2 Dimensions and mounting positions
Tab. 2 Mounting set
Pos.
Item
Name
1 1 Station
2 1 Station support
3 1 Bag of small elements - it contains:
- mounting screws 8x80 - 2 items.
4 1
Printed packet – it contains:
- user manual - 1 item
- conformity statement - 1 item
- warranty certificate – 1item
Model
Dimensions (mm)
a b c d e f
C32SPV24MEFB 231 205
145 107 176 306
C22SPV23MEF 231 205
145 107 176 306
C32SPV31MEFB 271 165
168 129 197 328
Fig. 1.2
3
4
Fig.1.1

USER MANUAL CENTRAL HEATING STATION TYPE C32SPV24MEFB; C32SPV31MEFB; C22SPV23MEF
REV.12.06.2017
6 of 19
7.2.2 Minimum necessary distances/ free spaces for mounting
Both for the mounting/ installation of the central
heating stations and for later maintenance operations
you will need the following minimum distances (fig.
1.3), respectively minimum free spaces for mounting:
– distance to the lateral: 100 mm
– distance to the bottom part: 250 mm
– distance to the upper part: 400 mm
- distance to front part: 500mm
Caution!
Danger of damaging the equipment by
incorrect setting!
The equipment can be mounted only on a flat, fixed
surface.
Note!
Minimum necessary distances/ free spaces
for mounting are valid also for mounting
with/ within pieces of furniture.
8
Installation
Danger!
Danger of death by poisoning and explosion because of breeches in the gas pipes and connections in case of
incorrect installation!
Installation and commissioning can be done only by a company authorized and agreed by KÖBER SRL-Vaduri
Branch!
This company will assume responsibility for the correct installation and commissioning.
8.1 Conditions for the installation of the central heating station
8.1.1 Installation directions
The central heating station will be subject to corrosion from the moment it is filled with water!
To receive warranty during the entire warranty period it is essential to take into consideration the following directions in order
not to increase the corrosion!
- The burning gas must have the sulphur content within the limits of the applicable European standard: it is accepted for a short
period of time to have a maximum of 150 mg/m3, but the yearly average must be of 30 mg/m3.
- The burning air must not contain chlorine, ammonia, alkaline agents, halogenated hydrocarbs, freon, plaster particles, lints,
dirt or dust;
- Installation of the central heating station in the proximity of a swimming pool, washing machine or cleaner can result in the
contamination of the burning air with these compounds.
- Water pH must be within the following limits: 7,5<pH<9,5
- It is recommended to check the water and thermal agent pH frequently and if the value does not fall within the limits provided
by the manufacturer, it will be treated again.
- Water asperity must be within the limits 5°F <TH <15°F (5°F (French degrees), equivalent to 50 mg CaCO
3
or an equivalent
quantity of other Ca and Mg salts).
- It is recommended to have repeated station startup cycles with the fuel tap off in order to air the installation.
- If the central heating station is not used for a long period of time during the cold season, full emptying of the installation is
recommended to prevent damage caused by freezing.
8.1.2 Protection of the station in order to keep the warranty
Before and during installation, the central heating station must be kept away from impurities: construction dust, sand, copper
dust, fats etc as well as welding splashes, scoria. In any of theses cases, the installation must be washed with clean water mixed
with a highly concentrated cleaning agent.
Genereally, in order to keep the warranty it is necessary to apply any neccesary treatment to prevent the contamination of
water with the following:
Black mud (magnetite - Fe3O4) formed as a result of the continuous electrolyte corrosion occurring in any installation
which is not protected with an inhibitor.
Red mud (rust - Fe2O3) produced during oxidation.
Calcarous deposits produced especially on the hottest areas of the central heating station.
A combination of these three factors mentioned above causes the majority of the problems occurring with heating systems.
Caution!
The presence of these substances (black mud/ red mud/ calcarous deposits) means that the standard measures to
prevent problems of the heating system were not observed. This is one of the causes resulting in losing warranty!
Fig.
1
.3

USER MANUAL CENTRAL HEATING STATION TYPE C32SPV24MEFB; C32SPV31MEFB; C22SPV23MEF
REV.12.06.2017
7 of 19
8.2 Racordul de gaz
Danger!
Danger of death by poisoning and explosion because of breeches in the gas pipes and connections in case of
incorrect installation!
Installation of gas pipes is allowed to be performed only by an authorized agent. During installation all legal
stipulations, as well as the local regulations of gas distribution companies are to be observed.
When installing the gas pipe it is essential that it is not tensed so as not to create areas of leakage!
Caution!
Maximum safety pressure for the gas valve is 60 mbar! Going above this pressure limit may result in damage.
Work pressure with G20 natural gas functioning must be 20 mbar!
Gas pressure at the entry into the gas valve if GPL gas is used must be maintained between 30÷37 mbar!
Caution!
Is is obligatory to istall a pressure regulator on the fuel input circuit, adjusted at 20 mbar.
Caution!
In case parasite voltage appears on the gas pipe, it can be insulated by installing an electroinsulating piece
(according to the Technical Norms for the planning and execution of natural gas input systems).
Central heating boiler types C32SPV24MEFB / C32SPV31MEFB / C22SPV23MEF function on GN natural gas. The gas connecting
pipe is made of stainless steel with an interior diameter of 16.4 mm. The gas input pipe must not have a diameter smaller than
that of the gas connecting pipe of the central heating station.
The fuel input must be done according to applicable legal stipulations.
8.3 General directions for the heating installation
When designing the central heating system, please take in consideration the hydraulic characteristic of the pump that equips
this boiler model! See chapter 11 for pump characteristic.
Caution! Before connecting the central heating station carefully wash the entire heating installation! In this way, you
eliminate from the pipes various debris such as welding splashes, scoria, grummet, putty, dirt or similar. Otherwise,
these substances can form deposits in the heating switcher and can cause damage or malfunctioning.
Caution!
It is obligatory to install an impurity filter on the return of the thermal circuit installation!
When installing connecting pipes it is essential for these not to be tensed to avoid creating areas of leakage!
Maximum working pressure allowed is 3bar.
Recommended working pressure is 1.5 bar!
Caution!
It is forbidden to use the central heating station without thermal agent or partilally filled – danger of explosion!
It is forbidden to use the central heating station if it is not completely aired!
The equipment is provided with a 7l capacity and 1 bar loading pressure expansion vessel. Before installing the equipment,
check whether this volume is sufficient. If not, an additional expansion vessel must be installed on the aspiration side of the
pump.
Caution!
Check the pressure inside the expansion vessel before commissioning.
Pressure inside the expansion vessel must be 0.8÷1bar.
8.4 General directions for the hot water circuit
Connect the central heating station to the hot water installation.
It is obligatory to install filters to de-harden the water and a mechanical impurity filter on the cold water input
connecting pipe!
Caution!
When installing connecting pipes it is essential for these not to be tensed to avoid creating areas of leakage!
The apparition of pressure shocks (input pressures higher than 3-4 bars in addition to symoultaneously activating
quick closing taps) can affect the components of the hydraulic circuit inside the central heating station. We recommend the
installation of a pressure regulator adjusted to 3-4 bars!
Damage caused by the apparition of pressure shocks or by the use of higher pressure than recommended on the cold water
input circuit is not covered by the warranty!
We recommend the installation of a pressure regulator! Damage caused by the use of pressure higher than recommended on
the cold water input circuit is not covered by the warranty!
It is forbidden to install one-way valves on the the cold water input circuit.
The cold water input pipe of the hot water preparation circuit will always be open (closing the network is done only by
activating the taps at the consumer points) to allow take-over of possible dilatations on this circuit.
Note!
It is recommended that the distance between the hot water connecting pipe of the central heation station and the
nearest conumer is minimum 6m of pipe. Otherwiswe, there is always the risk of hot water burns.

USER MANUAL CENTRAL HEATING STATION TYPE C32SPV24MEFB; C32SPV31MEFB; C22SPV23MEF
REV.12.06.2017
8 of 19
8.5 Connecting pipe of the safety valve
Caution!
Danger of hot water burns!
The connecting pipe of the pressing of the safety valve is connected to the drain pipe to the sewage system.
Otherwise, there is always the risk of flooding, for which the manufacturer of the central heating station is not responsible.
8.6 Air/ burnt gases input/ output pipes
The central heating station does not use the air in the room where it is placed or adjiacent rooms. To ensure the efficient
functioning of the central heating station is recommended that the air necessary for burning is taken from the outside of the
building.
Caution!
The kit will obligatorily have a 3% incline (approximatively 2°) to be able to eliminate the condensation towards the
exterior.
It is obligatory to place central heating stations in rooms with proper ventilation systems according to applicable norms.
Danger!
It is completely forbidden to use the central heating station without the burnt gases output pipes because it endangeres
people’s life and health of people.
Installation is to be performed only by authorized personnel following applicable laws.
Caution!
In order to obtain the efficiency guaranteed by the producer, while observing the limits of the compounds resulting from
the burning gases, it is necessary to install the membranes delivered with the central heating station.
8.7 Electric grid connection
The central heating station must be connected to one-phase network of 230V - 50Hz with protection null.
Dispersion withstand of the earthing switch (earthing) must comply with applicable norms (maximum 4 ohm, and the working
null must not have residual current).
Electric powering of the central heating station will be executed from a separate circuit provided with differential protection
fuses of 30 mA.
External connections must comply with applicable norms. Connection to the electric grid of the building must allow the entire
electric insulataion of the central heating station for situations when interventions are required.
Grid connection is done taking into account the symbolism of colours as follows: Brown = phase, Blue = null, Green and Yellow =
earthing.
The current plug must be accessible so that the user can easily disconnect it.
Caution!
It is not allowed to mount the central heating station with a defective electric installation or with no earthing.
Danger of death by electric shock with electric contacts!
8.8 Installation filling and emptying
The following operations are executed to fill the installation:
- ellectrically power the central heating station;
- open the filling tap (fig. 1.4) of the central heating station
and of the thermal/ house water installation;
- load the boiler with a pressure of about 0.4 bar, indicated on
the display;
- open the pump air vent;
- activate the boiler ventilation module to vent the system:
press the J7( ) key for activation and the pump will start,
the boiler is in the OFF (Stand-by) state, to deactivate it press
the J7( ) or by turning on the POWER button;
- Adjust the pump operation (5, 6 or 7m) depending on the
installation (see chapters 8.3 and 11);
- continue to fill the system, with the ventilation function
switched on up to 1.1-1.5 bar;
*figure contains ERP pump
- check the tightness of the entire system. If there are losses, the problems must be remedied;
In the case of plants equipped with automatic ventilation: keep the pump on until noises are heard in the installation;
In the case of plants without automatic ventilators: manually operate the manual air vent to remove the air from the main
exchanger until noises are heard in the installation;
- heat the radiators;
- Make 2-3 cycles of 50-60 seconds of air-venting, following the steps described above;
- check the system pressure indicated on the display. If necessary, fill with thermal agent following the above steps.
- Remove the flexible hose.
If necessary, fill with thermal agent following the above steps.
Fig. 1.4
Water filling tap
OPEN

USER MANUAL CENTRAL HEATING STATION TYPE C32SPV24MEFB; C32SPV31MEFB; C22SPV23MEF
REV.12.06.2017
9 of 19
Caution! Obligatory operation!
Check the correct functioning of the pump with no fuel in the central heating station.
Defficient thermal transfer can cause the melting of the vent pipe of the ventilator, errors of the central heating station
damage of the main switch of the station.
Incorrect airing of the installation can cause damage of the main heating switch.
Note!
Recommended pressure on the thermal circuit is 1.5 bars.
Emptying the central heating station
Emptying of the station implies the following:
- turn off the station by pressing Power si switch off the electric power, close the gas tap;
- close the thermal tap and the cold water input tap;
- open the filling tap (fig.1.4), and then the consumer point of hot house water.
Caution!
Danger of hot water burns when emptying the station.

USER MANUAL CENTRAL HEATING STATION TYPE
REV.12.06.2017
9
Operation instructions
9.1 Control Panel
The LMC1112 control panel (fig.1.5)
allows the visualization and change of parameters
central heating station. It consists of:
-
8 keys (J1÷J8) - tab.3
-
LCD display, where communication messages (graphic symbols)
(S1÷S10) is presented in table 4.
Table 3: Control panel keys
Key Symbol
J1 CH +
Used to increase the set thermal temperature or to navigate the installation submenu
J2 CH -
Used to decrease
J3 DHW +
Used to increase the set temperature on hot water circuit or the value of the current parameter
in the installation submenu
J4 DHW -
Used to decrease the set temperature on hot water circuit or the value
parameter in the installation submenu
J5 POWER
Used to switch
J6 RESET
Used to reset the electronic control board from an error state
J7
Used to change the functioning mode winter/ summer
J8 LIGHT
Used to activate/ deactivate the light on the display
Table 4
: Description of graphic symbols in the LCD display
Key Symbol
S1
It diplays the temperature (°C), set value, parameter values, informative values, various
messages („On”, “SP”,
S2 It displays
informative
S3
It shows the state of the central heating station (Closed
inactiv
e symbol
S4
It shows the presence of flame
S5
It shows whether the
S6
It shows whether the set functioning mode is WINTER
S7
The symbol is displayed continuously, which means that the station functions as thermal station.
The symbol is displayed interrupted whenthe thermal temperature is set.
S8
If this symbol is displayed continuously it means that the station functions as hot water station.
The symbol is displayed interrupted whenthe hot water temperature is set.
S9
It shows the fact that the S2 symbol displays the value of the pressure inside the installation
(activ
e symbol
S10
It shows the fact that there was an unsaved change of parameters in the EEPROM
memory (it flashes
9.2
Description of functions and of
graphic contexts diplayed on the control panel LMC1112
9.2.1
LIGHT function
LIGHT
k e y ( J8 fig.1.5)
is used to activate/ deactivate the light on display function.
9.2.2
Graphic context –
station startup
When started, the station is in an intermediary
During this interval the diplay shows only the message
figure 1.6).
9.2.3
Graphic context - Stand-by
This context is
associated with an inactive/
state all the activation elements are inactive and every burning demand is ignored.
USER MANUAL CENTRAL HEATING STATION TYPE
C32SPV24MEFB; C32SPV31MEFB; C22SPV23MEF
allows the visualization and change of parameters
defining the functioning of the
LCD display, where communication messages (graphic symbols)
are displayed. The meaning of the 10 types of symbols
Description:
Used to increase the set thermal temperature or to navigate the installation submenu
Used to decrease
the set thermal temperature
or to navigate the installation submenu
Used to increase the set temperature on hot water circuit or the value of the current parameter
in the installation submenu
Used to decrease the set temperature on hot water circuit or the value
parameter in the installation submenu
Used to switch
the station on/ off
Used to reset the electronic control board from an error state
Used to change the functioning mode winter/ summer
Used to activate/ deactivate the light on the display
: Description of graphic symbols in the LCD display
Description:
It diplays the temperature (°C), set value, parameter values, informative values, various
messages („On”, “SP”,
“Co”, “EI”, “SI”, etc.)
informative
values, parameter values, pressure
It shows the state of the central heating station (Closed
(OFF) = activ
e symbol, Open (ON) =
e symbol
)
It shows the presence of flame
It shows whether the
set functioning mode is SUMMER (activ
e symbol
It shows whether the set functioning mode is WINTER
(active symbol
)
The symbol is displayed continuously, which means that the station functions as thermal station.
The symbol is displayed interrupted whenthe thermal temperature is set.
If this symbol is displayed continuously it means that the station functions as hot water station.
The symbol is displayed interrupted whenthe hot water temperature is set.
It shows the fact that the S2 symbol displays the value of the pressure inside the installation
e symbol
)
It shows the fact that there was an unsaved change of parameters in the EEPROM
memory (it flashes
)
graphic contexts diplayed on the control panel LMC1112
is used to activate/ deactivate the light on display function.
station startup
When started, the station is in an intermediary
state for 5 seconds, necessary to initialise the system.
During this interval the diplay shows only the message
“
On
” on the S1
symbol on the interface
associated with an inactive/
waiting state of the central heating station. In the stand
state all the activation elements are inactive and every burning demand is ignored.
Fig.
1.5
LMC1112
10 of 19
defining the functioning of the
are displayed. The meaning of the 10 types of symbols
Used to increase the set thermal temperature or to navigate the installation submenu
or to navigate the installation submenu
Used to increase the set temperature on hot water circuit or the value of the current parameter
Used to decrease the set temperature on hot water circuit or the value
of the current
It diplays the temperature (°C), set value, parameter values, informative values, various
e symbol, Open (ON) =
e symbol
)
)
The symbol is displayed continuously, which means that the station functions as thermal station.
The symbol is displayed interrupted whenthe thermal temperature is set.
If this symbol is displayed continuously it means that the station functions as hot water station.
The symbol is displayed interrupted whenthe hot water temperature is set.
It shows the fact that the S2 symbol displays the value of the pressure inside the installation
It shows the fact that there was an unsaved change of parameters in the EEPROM
graphic contexts diplayed on the control panel LMC1112
state for 5 seconds, necessary to initialise the system.
symbol on the interface
(see
waiting state of the central heating station. In the stand
-by
LMC1112
control panel
Fig.1.6
Fig.1.7

USER MANUAL CENTRAL HEATING STATION TYPE C32SPV24MEFB; C32SPV31MEFB; C22SPV23MEF
REV.12.06.2017
11 of 19
An exception to the rule:
the anti-freezing function
(generated by a value of water temperature in the installation lower
than 9°C, which will initiate a burning cycle to prevent the freezing of the thermal agent in the installation.
Entering and exiting this regine is done by pressing
POWER
key for at least one second.
-
POWER
– comute between ON/OFF states;
-
LIGHT
– activation or deactivation of light functions.
Figure 1.7 is a good example of display in the stand-by state (pressure on the thermal installation 1,8 bar).
9.2.4
Graphic context – error state
The display of an error is asociated with a state of malfunctioning/ error of the station. There are
three types of errors:
- Critical errors: all the activating/state elements of the central heating station are inactive and any
burning request is ignored. Getting out of this critical error state is done by pressing the RESET key;
- Normal errors: all the activating/state elements of the central heating station are active and any
burning request is ignored. Getting out of a normal error state is done by pressing the RESET key;
- Informative errors: all the activating/state elements of the central heating station are active and all burning requests are
accepted. Getting out of an informative state is done automatically when the cause of error disappears.
In this context the diplay flashes a message with the error code
.
Possible actions:
-
RESET
– reset critical or normal errors;
-
LIGHT
- activation or deactivation of light functions – possible only if the central heating station is not in a state of critical
error.
Figura 1.8 is a good example of display of an error (in our case E20).
9.2.5
Graphic context – waiting state
Waiting state is associated with a functioning state of the station, but with no burning request.
All the
activating/state elements of the central heating station are active and all burning requests are accepted
if no error is present. In this state, the display shows pressure and thermal temperature, as well as the
functioning mode summer/ winter.
Possible actions:
-
POWER
- comute between ON/OFF states;
-
IN/SU
– comute between summer/ winter functioning modes;
-
LIGHT
- activation or deactivation of light functions;
-
CH+
- display and setting of maximum thermal temperature;
-
CH-
- display and setting of minimum thermal temperature;
-
DHW+
- display and setting of maximum hot water temperature;
-
DHW-
- display and setting of minimum hot water temperature.
Figura 1.12 is an example of display in the waiting state (pressure in the heating installation is 1,4 bar, working mode is
summer, and the temperature in the installation is 17°C.
9.2.6
Graphic context – functioning state
This state is associated with the presence of flame or the functioning of the circulation pump of the station. In this state, all the
activating/state elements of the central heating station are active and the burning request is accepted.
The display shows the
delivered instant temperature on the circuit meeting the request (heating ot hot water – symbols S5 or S6), regardless of the
presence or lack of flame, the pressure inside the installation and the functioning mode summer/ winter
Possible actions:
-
POWER
- comute between ON/OFF states;
-
IN/SU
comute between summer/ winter functioning modes;
-
LIGHT
- activation or deactivation of light functions;
-
CH+
- display and setting of maximum thermal temperature;
-
CH-
- display and setting of minimum thermal temperature;
-
DHW+
- display and setting of maximum hot water temperature;
-
DHW-
- display and setting of minimum hot water temperature.
Figures 1.10 and 1.11 are two examples of graphic display of this context. Figure 1.10 – pressure in the heating installation is
1,8 bar, central heating station is in winter mode, flame is present, heating demand is satisfied and the instant thermal
temperature is 43°C;
Figura 1.11 – pressure in the heating installation is 1,7 bar, central heating station is set on winter
mode, flame is present, station deliveres hot water, and the instant hot water temperature is 53°C.
9.2.7
Graphic context – adjustment of functioning parameters
The adjustment of the main functions of the station (thermal temperature, hot water temperature) can be
done both in the waiting state and in the functioning state.
When we enter the state display of these values, the last value previously set will be displayed. Only in the period the set value is
displayed we can make changes of its value. Practically, at any moment of functioning of the station, by pressing J1 (CH+) or J2
(CH-) keys, the set value of the thermal temperature will be displayed and can be changed.
Similarlry, at any moment of functioning of the station, by pressing the J3 (DHW+) or J4 (DHW-) keys, the set value of the hot
water temperature will be displayed and can be changed.
While doing these settings, the display will show the value of the set temperature (thermal or hot water),
the pressure in the installation and the functioning mode of the station (winter/ summer).
Getting out of this setting mode is done automatically if no key is pressed for at least 3 seconds.
Figures 1.12 and 1.13 are two examples of displaying temperature in the setting mode.
Figure 1.12 – pressure in the heating installation is 1,8 bar, central heating station is set on winter
mode, set value of thermal temperature is 42°C;
Fig.1.8
Fig.1.9
Fig.1.10
Fig.1.11
Fig.1.12
Fig.1.13

USER MANUAL CENTRAL HEATING STATION TYPE
REV.12.06.2017
Figure 1.13 – press
ure in the heating installation
temperature is 60°C.
9.2.8
Graphic
context - Service
submenu
In the Service submenu,
various functioning parameters of the central heating station can be viewed/ changed/ checked. This
submenu can be accessed only by service personnel authorised by
9.3 Central heating station startup
To startup the station press J5(POWER)
key
Choosing the functioning mode winter/ summer
By pressing J7 key ( )
you can change the functioning mode winter/ summer.
S5/S6 will be activated.
Adjusting temperature on the thermal circuit
The adjustment of temperature is done by pressing
decrease temperature. Simbol S9( )
will flash
Adjusting water temperature on the hot water circuit
The adjustment of temperature is done by presing
decrease temperature. Simbol S10(
)
9.4 Functioning as waste
hot water station (WHW)
The station can function as WHW in both seasons
The WHW request has priority over the heating request in the „winter” mode.
The station can function as instant WHW or as accumulation boiler WHW (the boiler is
functioning of the station as an accumulation boiler WHW station please contact an authorised service company.
In intant regime, the minimum flow of hot water detected by the station is
For confort in using the station as a WHW station we recommend to exploit the station at a flow of approximately
When the station functions with low flows, the station functions continuously at the minimum charge as long as the hot water
tempera
ture is under the threshold limit of
burner is closed and a new burning will happen when the hot water temperature is lower than the limit of
When the station functions wit
h high flows, the hot water temperature will be the opposite of the hot water flow, but lower than
the set temperature.
With instant WHW configuration on request the
authorized service company.
This function allows the delivery of hot water as soon as possible, while keeping the boiler hot.
starts when the hot water temperature is equal to the set hot water temperature; the boiler stops when the hot water
temperature is 8°C ( fixed value)
higher than the set hot water temperature. If the water heated in t
within one hour, the CONFOR
T function is automatically deactivated.
9.5
Functioning as heating station (HS)
The station functions in this mode when „winter” season is selected. For the selection of the type of heating installation (f
radiators) please contact an authorised service company.
If a thermoregulator is connected to the electronic board, the stations functions in thermal mode only when the surrounding
temperature is lower than the set temperature in the thermoregulator
9.6
Preset functions related to station safety
1. Anti-freezing protection function. I
f the temperature in the installation drops below
minimum charge until the temperature reaches
2. Post-
circulation of the hot water and heating pump function.
BURNING state.
Advantages:
a) it prevents the water from
becoming stationary at high temperatures inside the heat switch. In
are reduced significantly
b) it prevents water from boiling inside the heat switch
These advantages have as result the protection of the heat switch.
3. Pump anti-blocking
system and three
If the station did not go through a burning cycle in the last
this time the three-
way valve is also activated and deactivated.
4. Post-ventilation
After each station stop, the ventilator
still functions for some time to evacuate completely the burning gases out of the station
and also the water vapours they contain
which cools down partially, are prot
ected.
5. “Legionella” bacteria p
revention function
This function is active
for the functioning of the station as accumulation boiler WHW.
When hot water is prepared in the boiler, the ANTILEGIONELLA function is actived automatically. This function implies that
a week the temperature of the water in the boiler is kept at the value of 65°C.
9.7 Setting additional functions
Setting additional functions is done only in the
USER MANUAL CENTRAL HEATING STATION TYPE
C32SPV24MEFB; C32SPV31MEFB; C22SPV23MEF
ure in the heating installation
1,6 bar,
central heating station is set on winter mode
submenu
various functioning parameters of the central heating station can be viewed/ changed/ checked. This
submenu can be accessed only by service personnel authorised by
KOBER SRL Vaduri Branch.
key
fig.1.5.
Choosing the functioning mode winter/ summer
you can change the functioning mode winter/ summer.
This can be viewed on the display, symbol
Adjusting temperature on the thermal circuit
The adjustment of temperature is done by pressing
J1 and J2 keys. Press J1
to increase temperature and
will flash
intermitent.
Adjusting water temperature on the hot water circuit
The adjustment of temperature is done by presing
J3 and J4 keys. Press J3
to increase temperature and
)
will flash intermitent.
hot water station (WHW)
The station can function as WHW in both seasons
– winter and summer.
The WHW request has priority over the heating request in the „winter” mode.
The station can function as instant WHW or as accumulation boiler WHW (the boiler is
functioning of the station as an accumulation boiler WHW station please contact an authorised service company.
In intant regime, the minimum flow of hot water detected by the station is
2.4 l/min
For confort in using the station as a WHW station we recommend to exploit the station at a flow of approximately
When the station functions with low flows, the station functions continuously at the minimum charge as long as the hot water
ture is under the threshold limit of
63°C.
When the hot water temperature reaches the mentioned limit of
burner is closed and a new burning will happen when the hot water temperature is lower than the limit of
h high flows, the hot water temperature will be the opposite of the hot water flow, but lower than
With instant WHW configuration on request the
CONFORT
function can be activated/ deactivated.
This function allows the delivery of hot water as soon as possible, while keeping the boiler hot.
If the function is active, the boiler
starts when the hot water temperature is equal to the set hot water temperature; the boiler stops when the hot water
higher than the set hot water temperature. If the water heated in t
T function is automatically deactivated.
Functioning as heating station (HS)
The station functions in this mode when „winter” season is selected. For the selection of the type of heating installation (f
radiators) please contact an authorised service company.
If a thermoregulator is connected to the electronic board, the stations functions in thermal mode only when the surrounding
temperature is lower than the set temperature in the thermoregulator
.
Preset functions related to station safety
f the temperature in the installation drops below
9°C,
the system turns on the heating at
minimum charge until the temperature reaches
30°C.
circulation of the hot water and heating pump function.
The post-circulation cycle
starts only if the system is not in
becoming stationary at high temperatures inside the heat switch. In
b) it prevents water from boiling inside the heat switch
in the post-heat interval.
These advantages have as result the protection of the heat switch.
system and three
-way valve.
If the station did not go through a burning cycle in the last
24h, the pump will be started for
12 seconds
way valve is also activated and deactivated.
still functions for some time to evacuate completely the burning gases out of the station
and also the water vapours they contain
.
In this way, both the ventilator control electric circuit and the primary heat switch,
ected.
revention function
for the functioning of the station as accumulation boiler WHW.
When hot water is prepared in the boiler, the ANTILEGIONELLA function is actived automatically. This function implies that
a week the temperature of the water in the boiler is kept at the value of 65°C.
Setting additional functions is done only in the
"Service" menu.
Please contact an authorised service company.
12 of 19
central heating station is set on winter mode
, set value of hot water
various functioning parameters of the central heating station can be viewed/ changed/ checked. This
This can be viewed on the display, symbol
to increase temperature and
J2 respectively to
to increase temperature and
J4 respectively to
purchased separately). For the
functioning of the station as an accumulation boiler WHW station please contact an authorised service company.
For confort in using the station as a WHW station we recommend to exploit the station at a flow of approximately
7-8 l/min.
When the station functions with low flows, the station functions continuously at the minimum charge as long as the hot water
When the hot water temperature reaches the mentioned limit of
63°C, the
burner is closed and a new burning will happen when the hot water temperature is lower than the limit of
60°C.
h high flows, the hot water temperature will be the opposite of the hot water flow, but lower than
function can be activated/ deactivated.
Please contact an
If the function is active, the boiler
starts when the hot water temperature is equal to the set hot water temperature; the boiler stops when the hot water
higher than the set hot water temperature. If the water heated in t
his way is not consumed
The station functions in this mode when „winter” season is selected. For the selection of the type of heating installation (f
loor or
If a thermoregulator is connected to the electronic board, the stations functions in thermal mode only when the surrounding
the system turns on the heating at
starts only if the system is not in
the
becoming stationary at high temperatures inside the heat switch. In
this way, calcareous deposits
12 seconds
to avoid its blocking. In
still functions for some time to evacuate completely the burning gases out of the station
In this way, both the ventilator control electric circuit and the primary heat switch,
When hot water is prepared in the boiler, the ANTILEGIONELLA function is actived automatically. This function implies that
once
Please contact an authorised service company.

USER MANUAL CENTRAL HEATING STATION TYPE C32SPV24MEFB; C32SPV31MEFB; C22SPV23MEF
REV.12.06.2017
13 of 19
9.8 Error signals
Possible errors of the system are indicated by the following codes which appear on the display.
Table 5:
Meaning of error signals which appear on the display:
Codul Non-
volatila Semnificatie Mod resetare
E01 YES Problems of the feeding source AUTO- RESETTABLE when the cause
diappears
E02 NO Malfunction of the electronic board AUTO- RESETTABLE when the cause
diappears
E04 NO
Malfunctions of the interface mode AUTO- RESETTABLE when the cause
diappears
E06 NO
Frequent resetting of the electronic board Manually resettable by pressing RESET
E07 NO
Installation parameters in the electronic board memory
are corrupted
Manually resettable by pressing RESET
E08 YES Internal memory is corrupt Manually resettable by pressing RESET
E10 NO
Water system pressure is incorrect.
Water pressure in the installation is too low (lower than 0,8
bars).
Resettable error when the cause disappears!
Fill the installation with water to the recommended
working pressure (1.5 bars) and monitor the pressure for a
few days.If pressure continues to drop, check for water
leakage on one of the joints of the thermal installation. If
you checked and it is allright, but the presuure continues
to drop, contact an authorised service company.
AUTO- RESETTABLE when the cause
diappears
E11 YES Rapid increase of the output water temperature AUTO- RESETTABLE when the cause
diappears
E13 NO Difference between input/ output temperatures too big AUTO- RESETTABLE when the cause
diappears
E15 YES
No water flow signal when the boiler pump is activated Manually resettable by pressing RESET
E20 YES
Failed burning after three attempts Manually resettable by pressing RESET
E22 YES
Malfunction of flame detection Manually resettable by pressing RESET
E23 YES
Malfunction of flame detection Manually resettable by pressing RESET
E25 YES
BCU malfunction Manually resettable by pressing RESET
E30 YES
Malfunctioning burnt gases sensor Manually resettable by pressing RESET
E31 NO Malfunctioning thermal input sensor Manually resettable by pressing RESET
when the cause disappears
E32 NO Malfunctioning thermal output sensor Manually resettable by pressing RESET
when the cause disappears
E35 NO
Malfunctioning external temperature sensor Manually resettable by pressing RESET
when the cause disappears
E36 NO
Mafunctioning WHW temperature Manually resettable by pressing RESET
when the cause disappears
E37 NO
Malfunctioning boiler temperature sensor 1 Manually resettable by pressing RESET
when the cause disappears
E38 NO
Malfunctioning boiler temperature sensor 2 Manually resettable by pressing RESET
when the cause disappears
E40 YES Temperature of burning gases is too high Manually resettable by pressing RESET
when the cause disappears
E41 NO
Temperature of thermal agent on the thermal input is too
high or too low
Manually resettable by pressing RESET
when the cause disappears
E42 NO
Temperature of thermal agent on the thermal output is
too high or too low
Manually resettable by pressing RESET
when the cause disappears
E45 NO
External temperature too high Manually resettable by pressing RESET
when the cause disappears
E46 NO
WHW temperature too low/ too high Manually resettable by pressing RESET
when the cause disappears
E47 NO
Temperature displayed by boiler sensor 1 is too low/ high Manually resettable by pressing RESET
when the cause disappears
E48 NO
Temperature displayed by boiler sensor 2 is too low/ high Manually resettable by pressing RESET
when the cause disappears
E50
YES
Malfunctioning with feeding of ventilator at 230VAC
Malfunctioning with fresh air intake / burned gases
exhaust
Malfunctioning with overheating thermostat
Malfunctioning with differential air pressure-switch
Manually resettable by pressing RESET
E51 YES
Error with command/ state of ventilator Manually resettable by pressing RESET
E52 YES
Incorrect ventilator functioning (ex. rotation) Manually resettable by pressing RESET

USER MANUAL CENTRAL HEATING STATION TYPE C32SPV24MEFB; C32SPV31MEFB; C22SPV23MEF
REV.12.06.2017
14 of 19
9.9 Station switch off in safety conditions
If the user observes abnormal functioning of the equipment, if error codes are displayed repreatedly or if the user cannot
understand the actions of the central heating station, the user must stop the functioning of the station immediately and in
maximum safety conditions. For this, the user must perform the following operations:
- Press ON-OFF key and interrupt the functioning of the station;
-Disconnect the central heating station from the main power line by unplugging it (if applicable);
- Interrupt the fuel circuit by turning off the gas taps;
-Interrupt the flow of house water and of heatined water by turning off the corresponding taps for these circuits;
After the station is switched off in safety conditions, the user will contact the authorized service company in the area.
9.10 User training
It is obligatory for the specialized personnel commissioning the station to instruct the user about the following aspects:
1. Central heating station switch on/ off procedure in safety conditions by checking the following elements:
- electrical power connection;
- fuel (gas) connection;
- feeding and filling the thermal circuit;
- the station filling tap must be turned off;
- the pressure in the installation by reading the control panel (1.5bar);
- the station taps on the house water circuit must be turned on.
2. The functioning way of the station and possible problems that may occur. Also each key and symbol on the control panel
must be explained.
3. Warn the user that a drop in the water pressure of the system is caused by loss of thermal agent which needs to be mended
before using the station again.
4. Warn the user on the works performed on the air/ gases input/ output systems. Warn the user that changing them is strictly
forbidden.
5. It is recommended that the user should have the station verified by an authorized person at least once a year.
6. Warn the user about the the precautions that need to be taken against freezing.
7. Hand the user the user manual of the central heating station.
At the end of training a commissioning statement is signed (table 2), by which the user signs that they are aware of the correct
way of using the central heating station. .
This statement is also signed by the authorized person who commissioned the central heating station.
The authorised person who commissions the station has the right to refuse to sign the station commissioning statement if they
notice defects of the local connecting installations and will not sign the commissioning statement until these defects have been
remedied.
9.11 Quality Conditions and Warranty
The company KÖBER S.R.L. - VADURI BRANCH as the manufacturer, guarantees the correct functioning of the central heating
station if are observed ALL conditions for the installation, commissioning, use and periodical technical revision established in the
“Warranty Certificate” given by the manufacturer and signed by the authorized company in the presence of the beneficiary
when the product is purchased.
The Warranty Certificate that comes with the product details all the limits of the warranty. Please carefully follow the directions in
the Warranty Certificate and before reporting any malfunctioning of the station make sure that all the local connecting
installations are of the required quality!
Caution!
Not observing the conditions of the warranty certificate results in losing warranty.
10
Inspection and maintenance
10.1 Inspection and maintenance intervals
It is obligatory to perform the periodical technical inspection in accordance to applicable law.
In the warranty period of the station the periodical technical inspection will be performed by companies authorised by KÖBER
S.R.L. - VADURI BRANCH.
In order to ensure permanent availability, safety in functioning, efficiency and extended working life, it is recommended that a
yearly technical inspection should be performed by the authorized agreed company. This is why we recommend that you sign
a service and maintenance agreement.
It is recommended that this inspection should be performed before the cold season when the station is used at full capacity.
Danger!
Inspections, maintenabce and repair work are allowed only to technicians authorised and agreed by KÖBER S.R.L. -
VADURI BRANCH.
Not having inspections/ maintenance work can result in material and physical damage.
In order to benefit from all the station function for an extended period of time we recommend the use of original
spare parts.

USER MANUAL CENTRAL HEATING STATION TYPE C32SPV24MEFB; C32SPV31MEFB; C22SPV23MEF
REV.12.06.2017
15 of 19
11
Drawings necessary for mounting and installation
11.1 Types of configurations for mounting for mural central heating stations with forced flue C32SPV24MEFB / C32SPV31MEFB
C12, C22, C32, C72, C82
C42, C52, C62

USER MANUAL CENTRAL HEATING STATION TYPE C32SPV24MEFB; C32SPV31MEFB; C22SPV23MEF
REV.12.06.2017
16 of 19
11.2 Types of configurations for mounting for mural central heating stations with forced flue C22SPV23MEF
C12
C12 x
C82
C32
C32 x
C42
C12
11.3 Minimum distances recommended for the mounting of the co-axial kit
GARAGE, ANNEX, ETC
LEGEND:
A – distance under the window/ ventilation hole = 300mm
B - distance over the window/ ventilation hole = 300mm
C – distance left/ right to the window/ ventilation hole =
300mm
D, E – distance from the roof/ gutter = 250mm
F – distance from the garage roof/ balcony = 250mm
G – distance to vertical gutter = 250mm
H – distance to internal/ external corners = 250mm
H* - distance to windows/ doors = 300mm
I – distance to ground/ balcony = 300mm
J – distance over the door = 600mm
L – distance to the door/ window in the garage = 1200mm
M – vertical distance to another terminal = 1500mm
N – horizontal distance to another terminal = 300mm
O – distance to the wall of another construction = 1200m
H

USER MANUAL CENTRAL HEATING STATION TYPE C32SPV24MEFB; C32SPV31MEFB; C22SPV23MEF
REV.12.06.2017
17 of 19
11.4 Hydraulic characteristic of ER P pump (EEI≤0,2)
When designing the thermal installation, the hydraulic characteristics of the pump need to be taken into consideration.
Pump settings:
The pump can be set to function in four modes (4 steps).
Table 6 – Pump functioning modes
UPM3 Flex As
[m]
LED 1
red
LED 2
yellow
LED 3
yellow
LED 4
yellow
LED 5
yellow
4 • •
5* • • •
6 • • • •
7* • • •
(*)functioning mode set in the factory.
To set on another curve please contact the authorized service company.
NOTE!
To save on energy and to maintain the possible functioning noises to a low level, please choose a low characteristic
curve.
Pump error codes
If the pump has detecte one or more errors, the bi-colour LED 1 changes from green to red. When an error is active, LEDs
indicate the type of error as presented in table 7.
If more alarms are active at the same time, LEDs show the rror with the highest priority.
Tab. 7 Pump error codes
11.5 Hydraulic characteristic of non-ER P pump
Q PUMP FLOW [mc/h]
Display Meaning Pump action Repair
1 LED red + 1 LED yellow
(LEDl 5)
Blocked rotor Pump tries to restart every 1.5 seconds Wait or deblock the
engine shaft
1 LED red + 1 LED yellow
(LEDl 4)
Feeding voltage too
low Only warning, the pump functions Check the feeding
voltage
1 LED red + 1 LED yellow
(LEDl 3) Electrical error
Pump is stopped because the feeding
volatage is too low or feeding is
incorrect
Check the feeding
voltage / replace the
pump
PU
MPPRESSURE
[kpa]
80
70
60
50
40
30
20
Q PUMP FLOW [mc/h]
LED 1
P PUMP PRESSURE[mca]

USER MANUAL CENTRAL HEATING STATION TYPE C32SPV24MEFB; C32SPV31MEFB; C22SPV23MEF
REV.12.06.2017
18 of 19
11.6 Functioning schemes covered by warranty
11.6.1 Central heating with radiators and instant preparation of domestic hot water
11.6.2 Underfloor central heating and instant preparation of domestic hot water

USER MANUAL CENTRAL HEATING STATION TYPE C32SPV24MEFB; C32SPV31MEFB; C22SPV23MEF
REV.12.06.2017
19 of 19
11.6.3 Central heating with radiators and accumulated preparation of domestic hot water (accummulation boiler)
11.6.4 Underfloor central heating and accumulated preparation of domestic hot water (accummulation boiler)
/