Page is loading ...

REV.042021-2
Thank you for purchasing our product.
GAMING CHAIRS MODELS:
ASSEMBLY INSTRUCTIONS
TS42, TS43, TS50, TS51,
TS52, TS61, TS62C and TS63C.

A
x1
B
x1
C
x1
D
x1
Backrest Seat 5-Leg star
base
Mechanism
MAIN PARTS LIST
E
x1
F
x5
G-L
x1
G-R
x1
Hydraulic
gas lift
Casters Left
armrest
Right
armrest
H
X1 Set
I-L
x1
Covers for
gas lift
Left cover for
seat bracket
I-R
x1
Right cover for
seat bracket
LIST OF HARDWARE
PART
QTY ITEM USE IN
K1Allen Wrench Steps 2, 3, 5 and 6
L4
(sets)
M8x20 screw
and felt gasket Mechanism to seat
M12 M8x25 Armrests to seat;
Seat to backrest
N2M6x12 Covers to brackets
O16 O-Rings Mechanism, armrests
and seat brackets
P16 Washers Mechanism, armrests
and seat brackets
Q2Hole covers Seat side covers
P. 1 Models: TS42, TS43, TS50, TS51, TS52, TS61, TS62C, TS63C P. 1
Sitting on the chair, not looking at it
J-L
x1
Lumbar pillow J-N
x1
Neck pillow
Except TS61, TS62C

BEFORE YOU START THE ASSEMBLY, PLEASE READ THE FOLLOWING TIPS
AND WARNINGS.
❶Do a quick inventory to
make sure the package
contains all the parts and
hardware listed in the
assembly instructions.
❷Missing, damaged
and defective parts can
be replaced at no cost to
you. Please refer to the
last page in this manual.
❸The replacement parts
service is limited to the
continental United States.
If you reside in Alaska,
Hawaii, Puerto Rico,
U.S. Dependencies or other
countries, please contact
the supplier from where the
unit was purchased.
❹If during assembly
you find an issue or
need clarification,
please contact our
Customer Service for
assistance. Please refer
to the last page in this
manual.
❺On each step read
the instructions and
analyze the
illustrations thoroughly
before proceeding to
do the assembly.
❽Do not overtighten
or force the screws as
they might break, strip,
damage the threads of
the holes or get stuck
inside the part.
❻Make sure you
understand which hardware
will be used on each step.
Using the wrong size of
screw, bolt or pin might
strip the threads or cause
damage to the part in which
it is being used.
❼To avoid
misalignments, always
leave the screws loose
and tighten them until
all pieces are
positioned correctly.
❾If the hole seems too big or too small for the
screw, first make sure you are using the correct
size of screw and that it’s been installed in the
correct hole. Test another of the same screw
into the same hole, as well as test the screw
onto different holes for the same part. If the
hole still appears to be too small, do not force
it, it needs replacing.
P. 2 Models: TS42, TS43, TS50, TS51, TS52, TS61, TS62C, TS63C P. 2

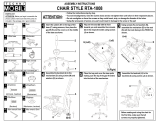
ASSEMBLY STEPS
Flip over the seat B, and place
the felt washers Lover the
innermost holes then place the
mechanism D, and secure it with
screws L, O-rings Oand washers
P, making sure the tension knob
faces towards the FRONT as
shown.
P. 3 Models: TS42, TS43, TS50, TS51, TS52, TS61, TS62C, TS63C P. 3
(Front)
STEP 2
Hardware
K
LM8x20
Felt
4
Sets
OO-Ring
4
Pcs
PWasher
4
Pcs
Insert the casters Finto the
legs of the base Cusing
pressure, then place the gas
lift Ein the middle of the
base and cover it with H.
STEP 1
L
P
O
L
B
D
C
F
E
H
Assemble the armrests Gto
the seat Bin their respective
sides with screws M, O-rings
Oand washers P as shown.
LEFT
G-L
RIGHT
G-R
IMPORTANT: The
O-ring O must go
above the washer. P
STEP 3
Hardware
K
MM8x25
8
Pcs
O8
Pcs
P8
Pcs
M
P
O
(Front) (4 sets of
hardware
per armrest)
B
(Felt)
(Metal)
IMPORTANT: The
O-ring O must go
above the washer. P
O
O

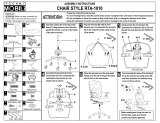
Assemble the backrest Ato
the brackets on the seat B
with screws M, O-rings Oand
washers Pas shown.
Attach the covers Ito the seat brackets on their respective sides
with screws Nthen cover the screw holes with Q.
P. 4 Models: TS42, TS43, TS50, TS51, TS52, TS61, TS62C, TS63C P. 4
ALL DONE! Give yourself a nice pat on the back. You did a great job!
Put the seat over the base parts
making sure the tip of the gas lift
Eenters into the hole of the
mechanism D.
(Front)
STEP 4
D
E
STEP 5
Hardware
K
MM8x25
4
Pcs
O4
Pcs
P4
Pcs
B
IMPORTANT: The
O-ring O must go
after the washer. O P
A
MOP
STEP 6
Hardware
K
NM6x12
2
Pcs
Q2
Pcs
QN
I-R
Q
N
I-L
STEP 7Attach the pillows J-L and J-N to the backrest Aby fastening the
buckles from behind.
Except TS61
and TS62C
J-N
J-L
(2 sets of
hardware on
each side)
A

①Chairs’ height: Pull UP the lever under the seat. The chair goes down while sitting on it, or up if
you lift your body.
②Seat tilting: Pull the same lever OUT horizontally to unlock this function, and IN to lock again.
NOTE: Unlike regular office chairs, these racing/gaming chairs have their base components
off-center, and the tilting won’t be much and might actually feel hard to tilt.
③Tilt tension: Turn the mechanism’s knob in either direction to apply more or less tension. With
less tension, the tilting will feel easier. Please read the above note about the tilting.
④Backrest reclining: pull UP the lever located on the rear right side of the seat and release it
when the desired position is reached.
WARNING: For your safety, the seat’s tilt function ②should be in the LOCKED (IN) position
prior to use the backrest reclining function.
⑤Armrest height: Pull UP the button that is under the armrest. Some models have additional
functions like forward/back, in-out and pivot.
CHAIR’S FUNCTIONS
P. 5 Models: TS42, TS43, TS50, TS51, TS52, TS61, TS62C, TS63C P. 5
2
1
CHAIR’S FUNCTIONS
WARNINGS
• Do not exceed the indicated weight limits on any of the chairs.
• Do not stand up on the chair or use it as ladder.
• Use the chair to seat only one person at a time.
• Do not use the chair if parts are damaged or if screws are loose or missing.
• Do not sit near the edge of the seat and always sit properly on the chair to avoid going
beyond your balance point and fall off the chair.
• The chair is intended for teenagers and adults. If small children are using the chair,
please keep close observation on them.
• Do not allow small children to play with the chair.
• Not paying attention to these warnings could result in severe injuries.
•To clean the chair it is recommended to use a soft cloth lightly damped in a solution of
smooth soap and water, then dry with a clean towel.
•Do not use solvents or abrasive materials to clean any part of the chair.
•Before applying a cleaning agent, test on a small hidden area of the chair, like
underneath the seat.
•Do not expose the product to direct sunlight or to extreme environmental conditions.
•Every 4 months, inspect the chair completely and make sure that all screws are
tighten.
CARE AND MAINTENANCE
❹
❺
3
Weight
Limit Model
250 Lbs TS43
300 Lbs
TS42
TS50
TS51
TS52
TS61
TS62C
TS63C

TECHNI SPORT WARRANTY
Gaming Chair: 2-YEAR WARRANTY
Gaming Desk: 5-YEAR WARRANTY
Gaming Chair Metal Frame: LIFETIME WARRANTY
RTA Products, LLC has warranted the Techni Sport products to the original purchaser who
acquired a new product from RTA Products or its authorized re-sellers of the product against
defects in material or workmanship.
This warranty is expressly limited to the repair or replacement (at its option) of defective product
components or materials as a result of a defect in materials or workmanship. This warranty is
limited to merchandise purchased in the Continental United States. No assembly labor is included.
The word "defects" as used in this warranty, is defined as imperfections that impair the utility of the
product.
This warranty applies under conditions of normal use, but does not apply to defects that result from
intentional damage, wear & tear, negligence, unreasonable use or exposure.
Liability for consequential damages is excluded to the extent exclusion is permitted by law. This
warranty gives you specific legal rights, and you may have other rights that vary from State to
State.
RTA Products does not warrant: a) natural variations in character marks b) changes in surface
finishes due to aging or exposure to light c) marks, scars, or wrinkles occurring naturally in leather
d) failure resulting from normal wear and tear e) the matching of colors, grains, or textures of
natural materials f) the colorfastness or the matching of textiles, including an exact match to
cuttings or to swatch cards g) damage, marking, or staining of veneer surfaces due to contact with
rubber or similar compounds, damage from sharp objects or imprinting from writing instruments, or
prolonged exposure to direct sunlight h) we do not warrant products that are exposed to extreme
environmental conditions or that have been subject to improper storage.
RTA Products shall not be liable for loss of time, inconvenience, commercial loss, or incidental or
consequential damages.
Any modification to the original product voids the warranty. We do not warrant the performance of
the product when used in combination with other than original products.
This product has been designed for and is intended for office, home-office and gaming use only.
This warranty is Original Purchaser’s sole remedy for product defects, and this warranty does not
extend to any product, or damage to any product, caused by or attributed to abuse or misuse,
products used for commercial or rental purposes, use modifications of, or attachments to the
product, and products or parts not used, maintained, or extended here under is in lieu of any and
all other warranties, express or implied, including without limitations any implied warranty or
merchant ability or of fitness for a particular purpose.
Report any defects to RTA Products, LLC together with your sales receipt or other proof of
purchase. If the chair is defective within the terms of the warranty, RTA Products, LLC will furnish a
replacement chair (at its option) at no cost of equal or similar value and design.
RTA Products will advise you of the procedure to follow in making warranty claims. The following
are the procedures for warranty claims:
a) Call us Monday –Friday, from 9am-5pm (Eastern Time) at (866) 782-5520 to explain the defect
and give your name, address and phone number. Please have ready the model number of our
product, date and place of purchase. You can also write to us by e-mail to
[email protected] and include the same information.
b) If we determine that replacement will remedy the situation, and in order to determine the extent
or the cause of the defect, purchaser will need to send the part in question at purchaser’s expense.
Once we receive the part, we will examine it and determine whether the claim is valid (or not), and
then proceed to send the replacement. We will ship the replacement at our expense.
P. 6 Models: TS42, TS43, TS50, TS51, TS52, TS61, TS62C, TS63C P. 6

SUPPORT OPTIONS:
_________________________________________________________________
GO TO: TECHNISPORTUSA.COM
CLICK ON SUPPORT TAB
Scan QR Code to order replacement parts
CONTACT US BY EMAIL:
SUPPORT@TECHNISPORTUSA.COM
P. 7 Models: TS42, TS43, TS50, TS51, TS52, TS61, TS62C, TS63C P. 7
•Assembly questions
•Damage issues
•Replacement parts
_________________________________________________________________
_________________________________________________________________
/