Techni Mobili RTA-4902 Assembly Instructions
- Type
- Assembly Instructions

REV.SHU-4-7602-0923
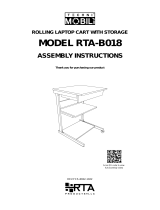
MEDIUM BACK EXECUTIVE OFFICE
CHAIR WITH FLIP-UP ARMS
MODEL RTA-4902
ASSEMBLY INSTRUCTIONS
Thank you for purchasing our product

P.1 P.1
RTA-4902
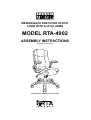
MAIN PARTS LIST
Part # QTY SIZE/Description Item
Replacement Parts for International
Customers & AK-HI-PR orders:
RTA Products will replace the part free of
charge, while the customer is responsible
for shipping costs plus any International
local taxes or duties.
Do a quick inventory
of all the parts and
hardware listed below.
For Support, assembly questions
& Replacement Parts within the
48 Contiguous United States:
Please email us at:
2 5/16x25mm
I
2 5/16x20mm
J
8 1/4x25mm
K
8 Hole cap
L
HARDWARE LIST
If you will be using your own
power driver:
• Make sure to have on hand the
appropriate bits and sizes.
• Start using at a low torque or
speed to avoid stripping the
screws.
M5 Allen Wrench
1
INCLUDED TOOLS
A
x1
B
x1
C
x1
D
x1
Backrest Seat 5-Leg star base Mechanism E
x1
F
x5
G-L
x1
G-R
x1
Lift cylinder
Caster Left armrest Right armrest H
x1
Set
Covers for lift
cylinder
Sitting on the
chair, not
looking at it
Sitting on the
chair, not
looking at it
(Front)
(Front)
M5

P.2 P.2
BEFORE YOU START THE ASSEMBLY, PLEASE READ THE FOLLOWING TIPS AND WARNINGS.
• Do not discard this manual or any of the packaging
material until the unit is completely assembled.
• Please read the assembly instructions throughly and
follow step by step.
√
√
M6
30mm
M6x30
• Make sure you understand which
hardware will be used on each step. Using
the wrong size of screw, bolt or pin might
strip the threads or cause damage to the
part in which it is being used.
• To avoid misalignments, always leave the screws
loosely and do not tighten them until all the pieces
are positioned correctly.
• Do not overtighten or force the screws as they might
break, strip, damage the threads of the holes, or get
stuck inside the parts.
• If the hole seems too small for the screw, make sure
you are using the correct size of screw and/or that
you are installing it in the correct hole.
• Sometimes the fabric or material might cover partially
or entirely the screw hole, making the hole appear to
be too small or not visible at all.
RTA-4902

P.3 P.3
RTA-4902
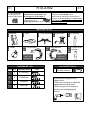
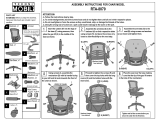
ASSEMBLY STEPS
• Turn the seat B upside-down and place the mechanism D over the holes,
making sure the knob faces towards the front of the seat.
• Attach the mechanism D to the seat B using the following screws:
SCREWS I (M6x25): LONGER, for the 2 front holes.
SCREWS J (M6x20): SHORTER, for the 2 back holes.
J
(Front)
(Front)
(Front)
(Back)
(Back)
(Back)
(Left)
(Right)
J FOR THE BACK
STEP 1
STEP 2
Hardware
I5/16x25
5/16x25
2
Pcs
Tools (included)
Insert the casters F into each leg of
the base C using pressure, then
place the lift cylinder E in the middle
of the base and cover it with H.
F
B
D
C
E
H
J5/16x20
5/16x20
2
Pcs
I FOR THE FRONT
I

P.4 P.4
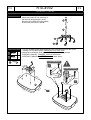
Join the seat B to the base parts making
sure the tip of the lift E enters correctly
into the hole of the mechanism D.
RTA-4902
(Front)
(Front)
Leave all
screws loose!
STEP 4
Hardware
K1/4x25mm
4
Pcs
Tools (included)
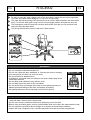
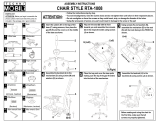
• Assemble the backrest A to the armrests G-L, G-R with screws K.
• Proceed to tighten all the screws on the armrests.
• Cover the screwholes with L.
E
D
STEP 3
Assemble the armrests G-L, G-R to the seat B in their respective sides with
screws K. Please note that the armrest side (left or right) is you sitting on the
chair, not looking at it.
Do not tighten the screws in this step to allow flexibility for the next step
B
RIGHT
G-R
LEFT
G-L
K
1/4x25
K
1/4x25
STEP 5
Hardware
K1/4x25mm
4
Pcs
LHole cap
8
Pcs
Tools (included)
ARIGHT
G-R
LEFT
G-L
L
Cap

RTA-4902
P.5 P.5
• To clean the chair it is recommended to use a soft cloth lightly damped in a solution of smooth
soap and water, then dry with a clean towel.
• Do not use solvents or abrasive materials to clean any part of the chair.
• Before using a cleaning agent, test on a small hidden area of the chair, like underneath the seat.
• Do not expose the product to direct sunlight or to extreme environmental conditions.
• Inspect the chair completely every 4 months and make sure that all screws are tightened.
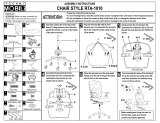
CHAIR'S FUNCTIONS
CARE AND MAINTENANCE
WARNINGS
• Do not exceed the indicated weight limit.
• Do not use if parts are bent, damaged, or if screws are loose or missing.
• Only one person at a time can sit on the chair.
• Do not sit babies or toddlers alone.
• If children (3 years and older) are sitting on the chair, always keep close
observation on them.
• Do not allow small children to play with the chair.
• Do not stand up on the chair or use it as ladder.
• Do not sit too close to the edge of the seat to avoid going beyond your
balance point and falling off the chair, and always sit properly.
• Not paying attention to these warnings could result in injuries.
WEIGHT LIMIT
220
Lbs
(100 Kg)
To raise or lower the chair’s height, pull UP the lever that is under the seat on the right side.
The chair goes down while sitting on it, or up if you lift your body.
The chair also tilts by pulling OUT the same lever to unlock. While unlocked, the chair will tilt
freely. To lock the chair again, bring it to the normal upright position and push the lever IN.
The mechanism under the seat has a tension knob at the front that you can turn and it will
make the tilting feel little easier.
You flip-up the armrest to use the chair as if it was armless.
1
2
3
4
3
TENSION
2
1
4
CHAIR HEIGHT
TILTING
FLIP-UP

P.6 P.6
RTA-4902
TECHNI MOBILI WARRANTY
RTA Products, LLC has warranted the Techni Mobili office chairs to the original purchaser who acquired a
new product from RTA Products or its authorized resellers of the product against defects in material or
workmanship.
This warranty is expressly limited to the repair or replacement (at its option) of defective chair components
or materials that fails under normal use as a result of a defect in materials or workmanship. This warranty is
limited to merchandise purchased in the Continental United States, excludes AK, HI and PR. No assembly
labor is included. The word "defects" as used in this warranty, is defined as imperfections that impair the
utility of the product.
This warranty applies under conditions of normal use, but does not apply to defects that result from
intentional damage, negligence, unreasonable use or exposure.
Liability for consequential damages is excluded to the extent exclusion is permitted by law. This warranty
gives you specific legal rights, and you may have other rights that vary from State to State.
RTA Products does not warrant: a) natural variations in character marks b) changes in surface finishes due
to aging or exposure to light c) marks, scars, or wrinkles occurring naturally in leather d) failure resulting
from normal wear and tear e) the matching of colors, grains, or textures of natural materials f) the
colorfastness or the matching of textiles, including an exact match to cuttings or to swatch cards g)
damage, marking, or staining of veneer surfaces due to contact with rubber or similar compounds, damage
from sharp objects or imprinting from writing instruments, or prolonged exposure to direct sunlight h) we do
not warrant products that are exposed to extreme environmental conditions or that have been subject to
improper storage.
RTA Products shall not be liable for loss of time, inconvenience, commercial loss, or incidental or
consequential damages.
Any modification to the original product voids the warranty. We do not warrant the performance of the
product when used in combination with other than original products.
This product has been designed for and is intended for office and home-office use only. This warranty is
Original Purchaser’s sole remedy for product defects, and this warranty does not extend to any product, or
damage to any product, caused by or attributed to abuse or misuse, products used for commercial or rental
purposes, use modifications of, or attachments to the product, and products or parts not used, maintained,
or extended hereunder is in lieu of any and all other warranties, express or implied, including without
limitations any implied warranty or merchantability or of fitness for a particular purpose.
To file a Claim within the 48 contiguous United States: Email us to [email protected] to explain
the defect and provide your name, address, phone number, model number of our product, date and place,
and proof of purchase. Please provide pictures of the damage or defect.
If we determine that a replacement will remedy the situation, and in order to determine the extent or the
cause of the defect, purchaser may be requested to send the part in question at purchaser’s expense.
Once we receive the part, we will examine it and determine whether the claim is valid (or not), and then
proceed to send the replacement. We will ship the replacement at our expense.
Replacement Parts for International Customers & AK-HI-PR orders: RTA Products will replace the part free
of charge, while the customer is responsible for shipping costs plus any International local taxes or duties.
TECHNI MOBILI CHAIR WARRANTY
EXECUTIVE/MANAGER CHAIR: 2-YEAR WARRANTY
-
 1
1
-
 2
2
-
 3
3
-
 4
4
-
 5
5
-
 6
6
-
 7
7


Techni Mobili RTA-4902 Assembly Instructions
- Type
- Assembly Instructions
Ask a question and I''ll find the answer in the document
Finding information in a document is now easier with AI
Related papers
-
 Techni Mobili RTA-941C-BK Owner's manual
-
 Techni Mobili RTA-8850 Assembly Instructions
-
 Techni Mobili RTA-733DL-WAL Operating instructions
-
maocao hoom DJ-C-3802-GLS Installation guide
-
 Techni Mobili RTA-B005 Assembly Instructions
-
 Techni Mobili RTA-B018 Assembly Instructions
-
 Techni Mobili RTA-8070-BK Installation guide
-
 Techni Mobili RTA-1008 Owner's manual
-
 Techni Mobili RTA-1010-BK Owner's manual
-
 Techni Mobili RTA-739DL Assembly Instructions


Other documents
-
ROOMS TO GO 21321308 Assembly Instructions
-
 Techni Sport RTA-TS51-BK Owner's manual
-
-
 Article SKU18405 Assembly Instructions
-
HUANUO HNOC2 Installation guide
-
SunriseMedical Quickie 2 HP Owner's manual
-
Quickie 2 Family Owner's manual
-
Quickie QXi®/QX Owner's manual
-
-
Sunrise Medical Quickie XENON2 Owner's manual

