Page is loading ...

ENGLISH 1
INSTRUCTION MANUAL
MODEL #44362
ENGLISH
LCD DIGITAL MICROSCOPE
LCD HANDHELD DIGITAL MICROSCOPE
by

2 I ENGLISH
IN THE BOX
2. INTRODUCTION
Thank you for purchasing the Cosmos LCD Digital Microscope by Celestron with a 5MP sensor and 3.5” color LCD screen.
Your microscope is a precision optical instrument, made of the highest quality materials to ensure durability and long life. It is
designed to give you a lifetime of pleasure with a minimal amount of maintenance.
Before attempting to use your microscope, please read
through the instructions and reference the diagrams
below. Familiarizing yourself with the many features of
the Cosmos microscope will go a long way to making
your experience enjoyable.
The Cosmos microscope provides low power viewing
from 4x to 160x using the built-in software and
LCD screen. For additional magnification up to 800x,
connect the microscope to your PC (Magnification
depends on monitor size.) The Cosmos microcope is
a low magnification power microscope, mainly suited
for examining specimens like coins, stamps, rocks,
electronics, insects, and other 3D objects. Specimens
on slides can be viewed with top illumination, but this
microscope is not ideal for this purpose. See some of our
biological microscopes more suited to this type of viewing
at www.celestron.com.
The Cosmos LCD Digital Microscope does not use
an eyepiece like a traditional microscope. Instead,
the camera sensor “sees” the specimen with 10x
magnification, and the image is displayed on the high
resolution color LCD screen. This makes viewing fun,
cuts down on neck and eye strain and allows for easy
sharing with others. Recording still images and video is a
snap. Saving, transferring and sharing your image files is
quick and easy with the included 2.0 USB cable and your
home computer. Additionally, you can view on most TV
screens with the AV/TV Cable.
Take some time to read the simple care, maintenance
and troubleshooting tips provided for you in this manual
to ensure that your Cosmos microscope provides you
with years of quality performance, usage, and enjoyment.
Cosmos
LCD Digital
Microscope (1)
AC Adapter (1) Lithium Battery (1) USB cable (1) TV Out cable (1)
CD (1) QSG (1) Cleaning Fabric (1) Calibration Ruler (1)

ENGLISH 3
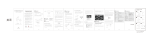
PARTS
FUNCTION
1. 3.5” Full Color LCD display
2. MicroSD card slot
3. Focus Wheel
4. Microscope Tube
5. Stage
6. Stage Lock Wheel
7. Stage Height Adjustment Wheel
8. Capture Button
9. LED Illuminator Adjustment Wheel
10. Digital Zoom Switch (•/-)
11. 5v DC In port
12. TV Out port
13. USB port
14. Battery Compartment
15. Battery Charge Indicator LED
LCD SCREEN DETAIL
Micro SD Card
Slot
LED
Adjustment
Knob
Zoom Out
Zoom In
Play Back/Left
Settings
Confirm
Mode/Up
Down
Power

4 I ENGLISH
SPECIFICATIONS
SKU 44362
LCD Monitor 3.5” (90 mm) TFT Color LCD /4X digital zoom/320 x 240 pixels, 4:3 ratio
Sensor Size 5 MP (mega pixels)
Stage Adjustable Height 4.38” x 4.38” x .38” (111 x 111 x 9.5 mm)
Lens 5 element IR cut , high quality glass/EFL(Equivalent Focal Length): 15.8mm /FOV: 13.0”
Magnification 4x to 160x using LCD screen (Up to 800x on computer monitor via USB connection)
Focuser Range 10 mm to infinity
Image Distortion .10%
Illuminator Upper ring- 8 bright white adjustable LEDs
Shutter Trigger On base – limits image shake
Still Image Resolution Adjustable: 5MP, 3MP, 1.3MP, VGA (12MP with interpolation*)
Video Resolution VGA, 30fps
Power 800 mAh rechargeable lithium battery
Memory MicroSD card slot- Supports up to 32G (card NOT included)
Computer Interface 2.0 USB- Battery charging option through USB also
AC Adapter 44362: (multi country plug)- 100 to 240V- 50/60Hz
Software On unit: Imaging software with zoom and timer features
On CD (for computers): Celestron Portable CapturePro (with measuring and note-taking
features)
Operating Systems Supported Windows: Windows XP/Vista/7.0/8.0 Mac: OSX 10.6/10.7
Software Languages On unit: (9) English, German, French, Spanish, Italian, Portuguese, Japanese, Chinese
Simple, Chinese traditional
On Computer: (12) English, German, French, Spanish, Russian, Italian, Portuguese, Dutch,
Polish, Japanese, Korean and Chinese
TV Output AV cable (included)
Dimensions 149 x 104 x 227 mm (5.80” x 4.10” x 8.90” )
Weight 1.5 lbs /24 oz. or 680 grams)
*Interpolation refers to software adding pixels to an image to artificially make it larger. This can be beneficial
when printing in larger formats.

ENGLISH 5
POWER ON
Press the POWER button to turn the unit on.
Press POWER button again to turn the unit off.
NOTE: The Microcsope has a Power Save feature. Refer to section 6.2.C for details.
3. SETUP
INSTALL BATTERY
Open the Battery Compartment and insert the Lithium battery,
making sure to align the connection points correctly.
NOTE: Although the battery has a partial charge, if you are going to use the microscope
with the battery only, be sure to charge the battery first. Refer to section 3.E
below for more details on charging the battery
INSERT MICRO SD CARD
To capture images with your microscope while NOT connected
to a computer, you need to insert a MicroSD card.
NOTE: The MicroSD card is NOT included. To capture images without a MicroSD card,
see section 5.E in this manual for instructions on installing the computer software
and using it to save images to your computer.
Locate the MicroSD card slot (2) on the side of the LCD
housing.
Slide the card into the slot until it clicks into place and latches.
Be sure not to force the card into the slot, as this may damage
the card or the slot.
NOTE: The MicroSD card should be formatted before use. See section 6.2.G for details
on formatting the card.
Power button

6 I ENGLISH
DISPLAY ICONS
NOTE: The Display Icons can be turned off by pressing the Zoom Button (10) inward.
MicroSD Card Recognized
Video Capture Setting
Current Resolution Setting
Battery Power Indicator
CHARGE THE BATTERY
•
Plug the small end of the power adapter into the DC
In port (11) located on the back of the unit.
•
Plug the other end into a standard AC wall outlet.
•
The Battery Charge Indicator LED (15) will light up
red to show the battery is charging.
•
When battery is fully charged, the Battery Charge
Indicator LED will turn off and you can unplug the unit.
•
You can now use the microcope without an external
power source continuously for up to 2 hours.
•
You can monitor the battery power level on the LCD
screen. Look for the Battery Power Indicator Icon
described above.
NOTE: If you purchased your Cosmos Microscope outside of North America (item
44362), you will notice that the AC adapter has 3 interchangeable plug
heads. Refer to section 7 to see how to change the plug heads.
Small Image Capture
Video Capture
Time Lapse Capture
Number of Images Taken/Number of
Images Remaining
Video Capture Time Remaining
(Hours:Minutes:Seconds)

ENGLISH 7
C. Rotate the Stage Height Adjustment Wheel (7) to bring
your specimen closer to the Microscope Tube (4).
E. When the desired focus is achieved, lock the stage
in position by tightening the Stage Lock Wheel (6)
D. Rotate the Focus Wheel (3) to get a fine focus on the object.
F. To record an image, press the Capture Button (8).
NOTE: Press the Playback/Left button on the LCD screen housing to scroll between
Still Image Capture mode and Video Capture mode.
B. Place your specimen on the stage (5). If your object is thin
enough, secure it to the stage using the chrome clips.
G. While in video mode, press the Capture Button to start
recording video. Press the button again to stop.
4. OBSERVING AND CAPTURING IMAGES:
DIGITAL IMAGING
A. Make sure your Cosmos, LCD Digital Microcope is powered ON.
Put object onto the stage

8 I ENGLISH
The following screen will appear with 3 choices:
1. Delete
2. Protect
3. Slide Show
DELETE IMAGE FILES
This choice deletes the selected image/video or
ALL images.
5. SOFTWARE FEATURES
REVIEW SAVED IMAGE FILES
To play back video or review a still image, simply press and hold the Playback/Left
button on the LCD housing.

ENGLISH 9
PROTECT IMAGE FILES
This choice allows you to ‘lock’ and ‘unlock’ the selected
image/video file or ALL images/video files on disk for
protection.
SLIDE SHOW
This choice creates a slide show using all the image
files on the MicroSD card. Select Slide Show, and then
choose the interval between each image.
FILTERS
When on the main screen or in viewing mode, press the
MODE/UP button to scroll between:
A. Color Image
B.. Negative Image
C. Black and White Image
A.
B.
C.

10 I ENGLISH
DIGITAL ZOOM
•
Press the Zoom Button up to zoom in, and down to
zoom out.
•
The Zoom has a range from 1.0x to 4.0x
TRANSFER FILES TO COMPUTER
•
Connect your micrcscope to your computer via USB 2.0
•
On the LCD screen, choose “Upload Images”, using the
OK button.
•
Your computer will copy the files on your MicroSD card
to your hard drive.
•
When the transfer is complete, you can open the files on
your computer.
CELESTRON PORTABLE
CAPTUREPRO SOFTWARE
• Connect the microscope to your computer as described
above.
• Choose “Preview on Computer” Mode from the 2 choices
on the LCD screen.
• Open the Celestron Portable CapturePro Software on
your PC.
NOTE: Refer to section 5.E in this manual for instructions on installing and using
the Celestron Portable CapturePro Software
NOTE: Once the software is launched, the LCD screen will go blank and you will begin controlling
the microscope with the computer. However, you will still use the microscope to control
the following features:
1. Illuminator Brightness
2. Focus Wheel
3. Stage Adjustment Wheel
4. Stage Lock Wheel
5. Power button
NOTE: When you connect to a computer via USB, the lithium battery will charge.
Zoom In
Zoom Out

ENGLISH 11
CONNECT TO TV
• Insert the 1/8-inch plug on the end of the supplied video
cable into the Cosmos Microscope’s AV OUT port located
on the back of the base.
• Insert the yellow RCA plug on the video cable into one
of your television’s yellow video input connectors.
NOTE: Refer to your television’s manual to locate your TV’s video connector.
• Turn on the television. (Be sure your television is tuned
to the appropriate input channel.)
• You should now see an image of the specimen you are
viewing on your television screen.
6. SOFTWARE MENU INTRODUCTIONS
MAIN MENU
•
Press SETTINGS button to enter Main Menu 1.
•
The menu choices will vary depending on whether you
are in still image or video mode.
•
When in still image mode, you will see:
1. Resolution
2. Time Lapse
3. Quality
4. Sharpness
•
There is only one setting in video mode:
1. Resolution
RESOLUTION SETTING:
•
In still image mode, choices are:
- 12.0 MP (interpolated*)
- 9.0 MP (interpolated*)
- 5.0 MP
- 3.0 MP
- 1.3 MP
- VGA
Video-in on TV monitor
Video-out

12 I ENGLISH
•
In video mode, choices are:
- VGA
- QVGA
TIME LAPSE SETTING
•
FRAMES: In this window, you will set the number
of frames you want to take.
•
INTERVAL: In this window the interval between
shots is set.
- Once you have made your selections, press OK
to confirm and press the Menu/Setup button to
go back to preview mode.
- When you press the Capture Button to begin
your time lapse, you will notice a new icon
is displayed in the upper left corner of the
screen.
- When all the frames are taken, the microscope
will go back to the preview screen.
- To stop the auto capture before it completes,
press the Capture Button once.
-NOTE: The TIME LAPSE setting only works in Still Image mode.
QUALITY
The Quality settings determine the level of compression
for the image you are about to take. The more compression,
the smaller the file size, but the less detail in the image.
There are 3 choices in the Quality setting window:
1. Super Fine (largest files, least compressed)
2. Fine
3. Normal (smallest files, most compressed)
NOTE: The number above represents 32 frames.
NOTE: The number above represents 15 seconds.

ENGLISH 13
SHARPNESS
Sharpness increases the differences the imaging process
detects between the edges of the pixels. There are no rules
when it comes to the sharpness settings. Experiment to find
out which works best for your specimens.
The Sharpness choices are:
1. Hard
2. Normal
3. Soft
MAIN MENU 2
While in MAIN MENU 1, press the left button to enter MAIN
MENU 2. The choices here are :
1. Language
2. Power Save
3. Frequency
4. Date Stamp
5. TV Out
6. Date/Time
7. Format SD
8. System Reset
9. Version
LANGUAGE
Cosmos Digital LCD Microscope may be used in 9 languages:
1. English
2. German
3. French
4. Spanish
5. Italian
6. Portuguese
7. Japanese
8. Simple Chinese
9. Traditional Chinese
•
Scroll to your preferred language and press OK to select it.

14 I ENGLISH
POWER SAVE
Power Save allows you to conserve battery power by setting
the unit to turn off automatically. The choices for times are:
1. OFF: Power Save feature is off; unit will not turn off
automatically
2. 5 min.: Unit will turn off after 5 minutes of non-use
3. 10 Min.: Unit will turn off after 10 minutes of non-use
4. 15 Min.: Unit will turn off after 15 minutes of non-use
5. 30 Min.: Unit will turn off after 30 minutes of non-use
FREQUENCY
This setting has to do with your TV’s refresh rate. For USA
(NTSC), use 60Hz; for others, use 50Hz.
DATE STAMP
If you wish, you can display a date stamp on image files (but
not on video files).
The choices are:
1. DATE/TIME: Displays both DATE and TIME on the saved
image file
2. DATE: Displays only the date on the image file
3. OFF: Will NOT display any DATE/TIME information
TV OUT
Set your TV out setting to either NTSC or PAL, depending on
your location.
1. Choose NTSC for:
- North America
- South America (excluding Brazil, Argentina,
Uruguay and French Guiana)
- Myanmar, South Korea, Taiwan, Japan and
the Philippines
2. Choose PAL for:
- All countries NOT listed above
NOTE: See map on following page.
NOTE: The DATE and/or TIME will NOT be displayed in the preview mode-
only on the recorded image file.

ENGLISH 15
DATE/TIME
•
Here you can set the correct Date and Time
•
You can also choose from the following date display options:
- YY/MM/DD
- DD/MM/YY
- MM/DD/YY
SD CARD
From this screen, you can format your MicroSD card. You
should format your MicroSD before using it for the first time.
NOTE: During formatting, ALL files will be erased from the card.
SYSTEM RESET
This screen allows you to reset ALL the settings to the factory
default settings.
VERSION
The Version screen will display information on your firmware
version. You cannot actually change any setting here.

16 I ENGLISH
7. MULTI-PLUG
There are 3 interchangeable plug heads that will fit outlets in
Europe, the United Kingdom, Hong Kong and China.
To change the plug head:
- Grasp the main plug housing with one hand
and the plug head of choice with the other.
- Press the small button release on the plug
housing (circled in below image).
- Locate and interlock the tabs on the plug head
with the grooves on the plug housing.
- Rotate the plug head clockwise 90° until you
hear a “click” as the plug head locks into place
To remove the plug head, press the small button release and
rotate the plug head counterclockwise until it releases.
8. CARE AND MAINTENANCE
Your microscope with digital camera is a precision optical instrument and should be treated with care at all times. Follow these
care and maintenance suggestions and your microscope will need very little maintenance throughout its lifetime.
•
Store your microscope in a dry, clean place.
•
Never use your microscope where operation of such devices
is restricted. Improper use creates the risk of serious
accident.
•
Do not try to access the internal components of your
microscope or attempt to modify it in any way. Only
authorized technicians should perform maintenance
or repairs.
•
Keep your microscope away from water and other liquids.
Never use it in the rain or snow. Moisture creates the danger
of fire and electric shock.
•
To clean dust or smudges from the LCD screen or other
optical component, first blow the dust off with a camel’s hair
brush or air blower. Then use the included dry, microfiber
cloth to wipe the surface.
•
If the exterior surfaces of your microscope need cleaning,
wipe with a moist cloth.

ENGLISH 17
10. WARRANTY
Your Cosmos Digital LCD Microscope has a two year limited warranty. Please visit the Celestron website for detailed
information on all Celestron microscopes: www.celestron.com
9. TROUBLESHOOTING
PROBLEMS SOLUTION
The unit does not turn on. Check the battery power. If necessary, recharge by plugging into AC power.
The screen is blank.
•
Ensure that the power is on.
•
Check the battery power and recharge the battery if necessary.
•
Verify that the object you want to magnify is positioned correctly under the lens.
There are smudges or blemishes on the
screen.
Clean the screen and lens carefully with the included microfiber cloth.
Microscope is connected to a television, but
no image appears on the television screen.
•
Ensure that the television is on.
•
Switch to the appropriate video input channel on your television. (This will vary by
manufacturer.)
•
Ensure that the video cable is securely connected to the microscope’s Video Out port
and plugged into the correct video input on your television
The battery indicator LED is not illuminating,
even though the power adapter is connected
and plugged into a wall socket.
-or-
The battery is not charging.
Make sure the cable is plugged into the proper port.
Check that the outlet has power and is not malfunctioning. If the outlet is connected
to a wall switch, make sure that the switch is on.
FCC Statement :This equipment has been tested and found to comply with the limits for a Class B digital device, pursuant to part 15 of the FCC
Rules. These limits are designed to provide reasonable protection against harmful interference in a residential installation. This equipment generates,
uses, and can radiate radio frequency energy and, if not installed and used in accordance with the instructions, may cause harmful interference to
radio communications. However, there is no guarantee that interference will not occur in a particular installation. If this equipment does cause harmful
interference to radio or television reception, which can be determined by turning the equipment off and on, the user is encouraged to try to correct the
interference by one or more of the following measures:
• Reorient or relocate the receiving antenna.
• Increase the separation between the equipment and receiver.
• Connect the equipment into an outlet on a circuit different from that to which the receiver is connected.
• Consult the dealer or an experienced radio/TV technician for help.
© 2014 Celestron. Celestron and Symbol are trademarks of Celestron, LLC. All rights reserved.
Torrance, CA 90503 • Telephone: 1(800) 421-9649
TM & © 2014 Cosmos Studios, Inc. All rights reserved.
This product is designed and intended for use by those 14 years of age and older.
Product design and specifications are subject to change without prior notification.
Made in China | Fabriqué en Chine | Hecho en China | Hergestellt in China | Fabbricato in Cina

18 I FRANÇAIS
MANUEL D’INSTRUCTION
MODÈLE #44362
FRANÇAIS
MICROSCOPE NUMÉRIQUE ACL
LCD HANDHELD DIGITAL MICROSCOPE
by

DEUTSCH 35
BEDIENUNGSANLEITUNG
MODELL #44362
DEUTSCH
DIGITALES LCD-MIKROSKOP
LCD HANDHELD DIGITAL MICROSCOPE
by

52 I ESPAÑOL
ESPAÑOL
MANUAL DE INSTRUCCIONES
MODELO #44362
MICROSCOPIO DIGITAL LCD
LCD HANDHELD DIGITAL MICROSCOPE
by
/