Page is loading ...

Sliding Door Hardware – 9890 & 9891 - Bi-Fold
Installation Instructions
I-SD00327
Rev 4, Rev Date: 8/07/20 Always visit www.hagerco.com for the latest Installation Instructions Page 1 of 3
HAGER COMPANIES 139 Victor Street, St. Louis, MO 63104 • (800) 325-9995
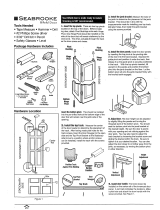
1 PREPARE THE OPENING
MAX OPENING HEIGHT = DOOR HEIGHT + 4-11/16”
MIN OPENING HEIGHT = DOOR HEIGHT + 3-1/2”
CONTENTS 9890 9891
1. TRACK (9801)
2. CARRIER (9827)
3. QUICK RELEASE PLATE (9610)
4. TOP PIVOT SET (9828)
5. BOTTOM PIVOT SET (9828)
6. BI-FOLD ALIGNER (9559)
7. BUMPER STOP (9815)
8. 3.5 X 3.5” HINGE (1741)
9. #8 X 3/4” PPHS
10. #8 X 1-1/2” PPHS
11. #10 X 3/4” FHS
1
1
1
1
1
-
1
3
5
25
18
1
2
2
2
2
2
2
6
10
50
36
11
.
8
.
9
.
3.
4.
1.
2.
6.
7.
5.
10
.
Fig 12
Fig 13
Fig 14

Sliding Door Hardware – 9890 & 9891 - Bi-Fold
Installation Instructions
I-SD00327
Rev 4, Rev Date: 8/07/20 Always visit www.hagerco.com for the latest Installation Instructions Page 2 of 3
HAGER COMPANIES 139 Victor Street, St. Louis, MO 63104 • (800) 325-9995
2 INSTALL THE TRACK AND HARDWARE
2-panel doorway (9890)
Track length should be 1/8” less than the opening
width
Place the top pivot bracket and carrier loose in the
track with the pivot bracket on the pivot side
Line up the track flush against the header and guide
side jamb
Secure track with (#8x1-1/2”) screws
Move the top pivot bracket 2-1/8” from the pivot side
jamb and hand tighten (Fig 15)
Secure the bottom pivot floor plate on the floor, at the
center of the jamb depth, 2-1/8” from the pivot side
jamb with (#8x1-1/2”) screws (Fig 15)
Drill a 1-3/4” deep 3/8” diameter hole, at the center of
the bottom door thickness, 1-3/4” from the pivot side
door edge (Fig 16)
Align the pivot hole with the bottom pivot plate hole
and secure with (#8x1-1/2”) screws (Fig 16)
Position the top pivot plate center of the top door edge
thickness, 1-3/4” from the pivot side door edge (Fig
16)
Position the quick release plate center of the top door
edge thickness, 1-3/4” from the guide side door edge
(Fig 16)
Secure both plates onto the door with (#8x1-1/2”)
screws
Place door pair side by side as if folded
Secure the hinges with (#10x3/4”) screws (Fig 17)
4-panel doorway (9891)
Track length should be 1/8” less than the opening
width
Place the top pivot brackets and carriers loose in the
track with a pivot bracket at each end of the track
while both carriers are in the middle
Line up the track flush against the header, center of
the opening
Secure track with (#8x1-1/2”) screws
Move each top pivot bracket 2-1/8” from each jamb
and hand tighten (Fig 15)
Secure a bottom pivot floor plate on the floor, at the
center of the jamb depth, 2-1/8” from each jamb with
(#8x1-1/2”) screws (Fig 15)
Identify each door pair’s pivot and guide side (Fig 16)
Drill a 1-3/4” deep 3/8” diameter hole, at the center of
the bottom door thickness, 1-3/4” from the pivot side
door edge, for each door pair (Fig 16)
Align each pivot hole with each bottom pivot plate hole
and secure with (#8x1-1/2”) screws (Fig 16)
Position the top pivot plate, center of the top door
edge thickness, 1-3/4” from the pivot side door edge,
for each door pair (Fig 16)
Position the quick release plate, center of the top door
edge thickness, 1-3/4” from the guide side door edge,
for each door pair (Fig 16)
Secure all four plates onto the door with (#8x1-1/2”)
screws
Place each door pairs side by side as if folded
Secure the hinges with (#10x3/4”) screws (Fig 17)
Fig 15
Fig 17
Top Pivot Bracket
Fig 16

Sliding Door Hardware – 9890 & 9891 - Bi-Fold
Installation Instructions
I-SD00327
Rev 4, Rev Date: 8/07/20 Always visit www.hagerco.com for the latest Installation Instructions Page 3 of 3
HAGER COMPANIES 139 Victor Street, St. Louis, MO 63104 • (800) 325-9995
3 HANG THE DOORS
2-panel doorway (9890)
Fold the doors together and engage the top pivot guide
into the top pivot bracket (Fig 18)
Set the bottom pivot assembly into the floor plate (Fig
19)
Slide the carrier bolt into the quick release plate and
close the latch (Fig 18)
4-panel doorway (9891)
Fold each door pair together and engage each top pivot
guide into each top pivot bracket (Fig 18)
Set each door pair’s bottom pivot assembly into each
floor plate (Fig 19)
Slide each door pair’s carrier bolt into each quick
release plate and close the latches (Fig 18)
4 ADJUST THE DOORS AND FINISH
2-panel doorway (9890)
Adjust the carrier and pivots so the doors are square
with frame
Slide the top pivot bracket side to side to adjust the tilt
Tighten the bottom pivot adjusting nut to adjust the
height (Fig 20)
Mount the bumper stops inside the track (Fig 21)
Slide the bumper stop close to the guide side jamb and
tighten
4-panel doorway (9891)
Adjust the carriers and pivots so the doors are square
with frame
Slide the top pivot brackets side to side to adjust the tilt
Tighten each door pair’s bottom pivot adjusting nut to
adjust the height (Fig 20)
Install the aligners behind the doors where the two
door pairs meet, 12” from the bottom door edge with
(#8x3/4") screws (Fig 20)
Mount the bumper stops inside the track (Fig 21)
Slide the bumper stops to the center of the opening
Bottom
Top
Fig 18
Fig 19
Fig 20
Fig 21
/