Page is loading ...

Viega PEX
Fire Sprinkler System
For Residential Applications
Installation Manual
The global leader
in plumbing, heating
and pipe joining systems

IM-PF 724572 0615 (Fire Sprinkler)
2
Welcome
IMPORTANT NOTICE
This installation guide is intended to assist in the design and installation of Viega multipurpose re
protection sprinkler/plumbing systems. System installation shall be done by installers trained through
industry recognized or approved programs.
NOTE: References to ViegaPEX made throughout this publication include Black ViegaPEX Ultra and Viega
PEX Press Fittings w/ attached sleeves.
NOTE:
Zero Lead identies Viega
®
products meeting the lead-free requirements of NSF 61-G through
testing under NSF/ANSI 372 (0.25% or less maximum weighted average lead content).
IN THE EVENT OF CONFLICT OR INCONSISTENCY BETWEEN THESE INSTALLATION GUIDELINES
AND LOCAL BUILDING OR PLUMBING CODES, LOCAL CODES SHOULD TAKE PRECEDENCE.
NOTE: Failure to follow the installation instructions will void the Viega Plumbing Warranty. Nothing in
this publication is intended to create any warranty beyond Viega’s applicable warranty. For additional
information, contact Viega at 800-976-9819.
Viega, heritage of quality, vision for the future
Viega’s heritage of superiority demands nothing but
the best for our customers. Engineered to be efficient,
Viega products perform at the highest possible level
of quality, providing confidence and peace of mind.
Viega is the only manufacturer to offer press systems
in multiple pipe joining materials, including polymer.
More than one million Viega press fittings are installed
every day around the world and, with a Supply Chain
that can process orders in less than 24 hours, Viega
is positioned to provide customers the best, most
versatile support in the industry.
MANUAL CONTENT AND USE
It is the responsibility of the contractor,
specifying engineer or installer to appropriately
design the PEX system, determine that the
selection of components in the system are
the proper ones for the intended application
in the locale in which they will operate and
that employees working on the job site
observe the proper installation practices.

3
IM-PF 724572 0615 (Fire Sprinkler)
Contents
Important warning symbols
Important, read and understand the warnings
accompanying this symbol to ensure your
Viega product is installed correctly and safely.
Ignoring these warnings could result in product
failure and/or void your warranty.
Limit direct UV exposure (sun light) to products
that have this warning symbol present.
Maximum UV exposure durations may vary
based on the type of product being installed.
Review the warning and/or limitation listed
with the product being installed.
Do not expose products with these warnings
to any foreign substances that include VOC
(volatile organic chemical) compounds, paints,
solvents, glues, cleaners and disinfectants.
Products that are exposed to these types of
substances are at risk of having failures (leaks).
Contact Viega Technical Services for questions
concerning chemical compatibility.
Terms Used In This Guide:
PEX . . . . . . . . . . . . . . . ViegaPEX cross-linked polyethylene tubing
AHJ . . . . . . . . . . . . . . . Authority Having Jurisdiction
NFPA . . . . . . . . . . . . . . National Fire Protection Association
NSF . . . . . . . . . . . . . . . NSF International, Inc. (formerly National
Sanitation Foundation)
CAN/CSA . . . . . . . . . . . Canadian Standards Association
“shall” . . . . . . . . . . . . . Required; a mandatory procedure
“may” or “should” . . . . A suggested optional procedure
1. Introduction
1.1 Viega PEX solutions .............................4
1.2 Viega PEX system concepts ......................5
2. System Components and Properties
2.1 ViegaPEX Ultra black ............................6
2.1.1 PEX - The superior tubing ...................6
2.1.2 Colors ...................................6
2.1.3 ViegaPEX Ultra properties and performance .....6
2.1.4 Tubing markings ...........................6
2.1.5 ViegaPEX Ultra tubing dimensions .............6
2.2 Viega PEX Friction loss ..........................7
2.3 Viega PEX Press fittings ..........................8
2.3.1 Viega PEX Press bronze .....................8
2.3.2 Viega PEX Press polymer ....................8
2.3.3 Viega Smart Connect feature .................8
2.3.4 Viega PEX Press fitting markings ..............8
2.4 Viega PEX Press Friction loss. . . . . . . . . . . . . . . . . . . . . .8
2.5 PEX Press tools ................................9
2.5.1 PEX Press hand tools .......................9
2.5.2 RIDGID power tools with PEX Press jaws .......9
2.6 Making a Viega PEX Press connection .............10
2.6.1 Trimming and inserting the tubing .............10
2.6.2 Pressing with a hand tool ...................10
2.6.3 Pressing with a power tool ..................10
2.7 Sprinklers ....................................11
2.7.1 Types of sprinklers ........................11
2.7.2 Sprinkler temperature ratings ................11
2.7.3 Sprinkler orifice size (K-factor) ...............12
2.7.4 Additional requirements ....................12
3. Sprinkler System Planning and Design
3.1 General ......................................13
3.2 Local jurisdiction requirements ...................13
3.3 Residence information ..........................13
3.4 Water supply source ............................13
3.5 Water supply service line ........................14
3.5.1 Shut-off valve ............................14
3.5.2 Water meters .............................14
3.5.3 Pressure reducing valves ...................14
3.5.4 Backflow requirements .....................14
3.5.5 Water softeners ...........................14
3.5.6 Smoke detectors and waterflow alarms ........14
3.5.7 Sprinkler head requirements .................14
3.6 Piping system layout ...........................15
3.6.1 Piping configurations ......................15
3.6.2 Plumbing system connections ...............16
3.6.3 System pressure gauge ....................16
3.6.4 Connections to domestic cold water plumbing
systems. . . . . . . . . . . . . . . . . . . . . . . . . . . . . . . . .16
3.6.5 Hot water distribution system layout ..........16
3.6.6 Required hydraulic calculations ..............16
4. Installing the ViegaPEX Ultra Tubing System
4.1 Installation ...................................17
4.2 Additional information / guidelines .................17
4.3 Handling ViegaPEXtubing .......................17
4.4 Uncoiling ViegaPEXtubing .......................17
4.5 Bending ViegaPEX tubing .......................18
4.6 Installation temperature range ....................18
4.7 Removing Viega PEX Press connections (attached
sleeves) ......................................18
4.8 Repairs ......................................18
4.9 Tubing expansion ..............................18
4.10 Freezing ....................................19
4.11
Heaters, flues, vents and recessed lights ..............
20
5. Viega PEX Sprinkler System Tubing Support
Requirements
5.1 Wood frame construction ........................21
5.2 Steel construction .............................21
5.3 Supporting ViegaPEXtubing .....................21
5.3.1 Fixed support points .......................22
5.3.2 Sliding sleeve support device ................22
6. Viega Plastic Fire Sprinkler Brackets
6.1 Viega plastic fire sprinkler bracket .................23
6.1.1 Tee and elbow adapter installation ............23
6.1.2 Straight adapter installation .................24
7. Mounting Sprinkler Fittings
7.1 Mounting sprinkler fittings .......................25
7.1.1 Plastic bracket ...........................25
7.1.2 Fittings with integral mounting bracket .........30
8. New System Management
8.1 Pressure testing ...............................33
8.1.1 Leak detection. . . . . . . . . . . . . . . . . . . . . . . . . . . .33
8.2 Flow testing ..................................33
8.3 System flushing ...............................33
8.4 Visual inspection ..............................33
8.5 System maintenance ...........................33
9. Codes, Standards and Certifications
9.1 Codes .......................................34
9.2 Standards ....................................34
9.3 Certifications .................................34

IM-PF 724572 0615 (Fire Sprinkler)
4
1. Introduction
This manual is intended as a reference guide to aid
in the design and installation of Viega’s PEX Press
Fire Sprinkler systems.
All installations must comply with the appropriate
model and local codes as well as NFPA 13D
“Installation of One- and Two- Family Dwellings and
Manufactured Homes.”
1.1 Viega PEX solutions
Viega PEX systems are the most complete system
solutions available on the North American market.
With tubing, ttings and distribution manifolds,
Viega provides everything you need for a total PEX
system that is not only easy to install but also helps
reduce energy costs and water waste.
Viega provides the highest-quality PEX tubing with
the best UV and chlorine ratings in the industry.
Viega PEX Press ttings allow installers to make
secure connections in less than seven seconds.
With Viega press technology, pressure testing can
be completed immediately after connections are
made without waiting for glues or solvents to dry
or for expansions to contract. Viega PEX
Press
ttings are approved for potable water and hydronic
heating applications and are available
in sizes
ranging from ⅜" through 2" in both Zero Lead and
high-grade polymer materials. With a comprehensive
10-year transferable warranty and unmatched quality
in the industry, Viega offers a complete system
solution for all your plumbing needs.
Do more with Viega
Viega press technology is consistent and reliable,
providing the same quality pipe connections every
time. Viega PEX Press polymer ttings incorporate
the Viega Smart Connect feature, which helps
installers identify unpressed connections easily.
ViegaPEX tubing and Viega PEX Press polymer
ttings are manufactured in the United States and
provide secure, reliable connections for residential
and light commercial projects, ranging from potable
water to snow melting applications.
A true innovator since 1899, Viega is at the forefront
of pipe joining technology. With personalized
support, efcient delivery processes and
trustworthy quality, no other manufacturer can
provide the same level of service. The global leader
in plumbing, heating and pipe joining systems,
Viega is the name you can trust.

5
IM-PF 724572 0615 (Fire Sprinkler)
1.2 Viega PEX system concepts
Viega PEX is a high-quality exible PEX system for
hot and cold potable water distribution.
The Viega PEX plumbing system offers maximum
security thanks to cold press and full circle crimp
tting techniques. These ttings guarantee the
plumber quick installation, suitability for use inall
types of applications at the construction site and
vast reductions in the required number of ttings
and necessary installation time.
Top quality materials such as brass, bronze,
stainless steel and durable, environmentally
compatible polymers provide the basis for the very
highest standards of quality at Viega.
PEX tubing offers outstanding versatility. More
than 655 million feet of Viega PEX tubing has
been manufactured since 2006. This is conclusive
evidence of this product’s considerable importance
in plumbing installation, in both quality and quantity.
This is clearly the result of excellent workmanship,
fast and simple installation and the reliability and
safety that are characteristic of theViega system
concept.
The efciency of the integrated system concept for
Viega branded products is conrmed by:
• perfectly coordinated components
• quick delivery at short notice
• time-saving installation
• complete installation of an entire system from
one supplier
Viega’s comprehensive services include technical
support and warranty coverage, subject to the
exclusive use of Viega PEX system components.
Viega PEX is a high-quality plumbing system. It
is able to withstand high levels of thermal and
mechanical stress.
The systems incorporate:
• ViegaPEX Ultra tubing: red, white, blue and
black cross-linked polyethylene tubing with
added resistance to UV
• A range of bronze or polymer ttings for PEX
Press tting systems
• A range of inline, manifold and stop valves for
Viega tting systems
• Viega PEX Press tools and jaws for the
PEX Press tting systems

IM-PF 724572 0615 (Fire Sprinkler)
6
2. System Components and Properties
2.1 ViegaPEX Ultra black
ViegaPEX Ultra tubing is a high-density cross-
linked polyethylene tubing (PEX). Cross-linking
produces a strong, durable tubing ideal for both hot
and cold potable water systems.
2.1.1 PEX - The superior tubing
Cross-linked polyethylene is the ideal tubing choice
for potable water systems. Compared to ordinary
polyethylene tubing (PE), cross-linked tubing has higher
temperature resistance and higher burst pressure.
ViegaPEX Ultra tubing is manufactured to ASTM
F876/F877 standards and listed to ANSI/NSF
standards 14 and 61. It is PEX 5306 (CL5) chlorine
resistance rated for both traditional and continuous
recirculation applications.
In addition, the smooth walls of ViegaPEX Ultra
tubing are resistant to corrosion and scaling.
2.1.2 Colors
ViegaPEX Ultra black tubing is the only ViegaPEX
tubing approved for NFPA 13D re sprinkler
systems. The UV resistance of this tubing enables
exposure of up to 6 months. It also blocks
transmission of visible light, preventing most types
of algae growth from occurring.
2.1.3 ViegaPEX Ultra properties and performance
Linear Expansion Coefcient:
• 1.1 inch per 100 feet per 10°F
Temperature and Pressure Ratings:
• 100 psi at 180°F*
• 130 psi at 120°F
• 160 psi at 73.4°F
UV Resistance:
• Maximum exposure 6 months
Flexibility:
ViegaPEX Ultra can be easily bent by hand 8 times
the radius of the actual tubing outside diameter
(O.D.).
Print Line Markings
Length Marker 000 Feet
Company Viega
Product Name ViegaPEX™ Ultra
Nominal Tubing Size ½"
Standard Dimension
Ratio Tube Size
SDR 9 CTS
(copper tube size)
Material Designation Code PEX 5306
Temperature & Pressure Rating
100 PSI @ 180F
160 PSI @ 73F
NSF Listing (Potable) cNSF
®
us-pw
NSF Chlorine Listing CL5
ASTM
Tubing Standards Certification
F876/F877
Canadian Standard Assoc CSA B137.5
Fittings System Compatibility
Viega PEX - ASTM F877/
F1807/F2159
IAPMO listing UPC
®
UL Listing Rating**
cULus 3SAV UL1821 130
PSI @ 120 F
Plenum Rating***
FS/SD 25/50
ASTM E84
CAN/ULC S102.2
Fire Resistance Ratings
CAN/ULC S101
ANSI/UL 263
ICC Listing ES-PMG
™
- 1038
AWWA Listing C904
HUD Listing MR 1276
Manufacturer's Date Code 1/1/2010
Material Code X14.2
Country of Manufacture Made in the USA
Table 2.1
** ¾" through 2" Black ViegaPEX Ultra only
*** 2" and smaller tube sizes when wrapped with ½" - 1" thick E84 rated
insulation, ½" and smaller with no insulation per ULC S102.2 listing.
Tubing may include fitting connections when wrapped.
2.1.4 Tubing markings
ViegaPEX Ultra tubing is marked every 2 to 5 feet with
the following representative information:
2.1.5 ViegaPEX Ultra tubing dimensions
Nominal
Size
Inner
Diameter
Outer
Diameter
Wall
Thickness
Capacity
gal/ft
¾" .671 .875 .102 0.18
1" .863 1.125 .131 0.30
1¼" 1.053 1.375 .160 0.45
1½" 1.243 1.625 .190 0.63
2" 1.629 2.125 .248 1.08
NOTE: Dimensions are in English units. Tolerences shown are
ASTM requirements. ViegaPEX Ultra is manufactured within these
specications.
*Does not apply to fire sprinkler system
Table 2.2

7
IM-PF 724572 0615 (Fire Sprinkler)
2.2 Viega PEX Friction loss
ViegaPEX pipe has a Hazen-Williams coefcient C-value of 150. Pipe friction loss calculations shall be performed
according to the NFPA standards. The following table lists pressure loss in psi/ft of pipe for various ow rates.
Table 2.3
60°F (16°C) Water
Flow Rate
GPM
Pressure Loss PSI/ 100 ft of Pipe
¾ 1 1¼ 1½ 2
0.5
0.75
1.0
Pressure Loss <1 PSI
1.5
2.0 1.1
2.5 1.6
3.0 2.3
3.5 3.0
4.0 3.9 1.1
4.5 4.8 1.4
5.0 5.9 1.7
6.0 8.2 2.4
7.0 10.9 3.2 1.2
8.0 14.0 4.1 1.6
9.0 17.4 5.1 1.9
10.0 21.1 6.2 2.3 1.0
11.0 25.2 7.4 2.8 1.2
12.0 29.6 8.8 3.3 1.5
13.0 34.3 10.1 3.8 1.7
14.0 11.6 4.4 2.0
15.0 13.2 5.0 2.2
16.0 14.9 5.6 2.5
17.0 16.7 6.3 2.8
18.0 18.5 7.0 3.1
19.0 20.5 7.7 3.4
20.0 22.5 8.5 3.8 1.0
25.0 12.8 5.7 1.5
30.0
Pressure Loss Excessive
as Flow velocity
is > 12 ft/Sec
18.0 8.0 2.2
35.0 10.7 2.9
40.0 13.7 3.7
45.0 17.0 4.6
50.0 5.6
55.0 6.6
60.0 7.8
65.0 9.0
70.0 10.4
75.0 11.8
NOTE: Pressure Loss based on Hazen-Williams Formula (C = 150)
Pressure Loss for Actual Length can be calculated by following formula: Actual Length / 100 ft X Value from chart above
½" PEX tting connections are only to be used downstream of the sprinkler system to feed non-sprinkler applications.

IM-PF 724572 0615 (Fire Sprinkler)
8
2.4 Viega PEX Press Friction loss
Hydraulic calculations for the sizing of ViegaPEX
pipe and Viega PEX Press ttings shall be
calculated by using the Hazen-Williams C-value of
150. Pipe friction loss calculations shall be made
according to NFPA Standard 13. The following table
shows the allowance of friction loss for ttings,
expressed as equivalent length of pipe.
Size Coupling 90° Elbow
¾" 1 8
1" 1 10
1¼" 2 11
1½" 2 13
2" 1 19
Size Coupling 90° Elbow
¾" 2.5 18.9
1" 3.1 17.7
1¼" 4.0 18.6
1½" 5.2 29.4
2" 8.9 36.4
Size
Tee
Flow Through
Tee
Turned 90°
¾" 1 9
1" 2 10
1¼" 2 11
1½" 2 12
2" 2 18
Size Tee Run Tee Branch
¾" 3.6 19.1
1" 3.8 18.4
1¼" 6.4 18.7
1½" 7.9 28.3
2" 10.2 37.5
Size
Horizontal
Sprinkler Tee
Vertical
Sprinkler Tee
¾" 2 2
1" 2 6
Size Sprinkler Tee
¾" 4.6
1" 5.6
Viega PEX Press Bronze Friction Loss
Equivalent Feet of SDR9 PEX Tubing
Viega PEX Press Polymer Friction Loss
Equivalent Feet of SDR9 PEX Tubing
2.3 Viega PEX Press fittings
Viega PEX Press ttings are available in Zero
Lead Bronze and polymer and include a factory-
assembled stainless steel sleeve with three viewing
holes and a tool locator ring to ensure a proper
press connection. The following design criteria
make Viega PEX Press ttings ideal for use in
potable water applications:
• High corrosion resistance
• Excellent strength properties
• Resistant to stress corrosion
• Superior wear properties
• Compatible with all materials
All Viega PEX tubing, fittings and manifolds are NSF
certified for use in potable water systems.
2.3.1 Viega PEX Press bronze
Viega PEX Press bronze ttings are manufactured
from a high-quality Zero Lead material specically
designed for press technology meeting or
exceeding all manufacturing requirements.
2.3.2 Viega PEX Press polymer
Viega PEX Press polymer ttings are
manufactured from Radel R
®
and incorporate
the Viega Smart Connect feature.
2.3.3 Viega Smart Connect feature
The Viega PEX Press polymer tting system
incorporates the Viega Smart Connect feature,
which is designed to identify unpressed
connections by intentionally leaking under test
pressures of .5 psi to 100 psi. This can be visually
identied by water leaking from the unpressed
tting joint. Press any connections that may have
been missed and/or replace connections found to
be in question. Repeat the pressure test.
2.3.4 Viega PEX Press fitting markings
Each Viega PEX Press fitting is marked where space
permits with the following information:
Manufacturer VIEGA
ASTM standard ASTM F877
Temperature
rating
180°F (Potable)
200°F (Hydronic heating)
Certications
cNSF
®
us pw-G, CSA B137.5
UPC
®
or UP Code, cULus
®
ICC-ES PMG
™
1038 / 1015
NOTE: All ttings may not be listed with each
organization shown.
This information is based on tubing nominal flow rate.
(@ 8 fps flow velocity)

9
IM-PF 724572 0615 (Fire Sprinkler)
2.5 PEX Press tools
2.5.1 PEX Press hand tools
The Viega PEX Press connection must always be
carried out with the aid of a Viega PEX Press tool.
The hand tool incorporates a forced compression
mechanism to complete a secure connection each
time. A ratchet inside the tool prevents the tool
from being opened until the proper force has been
applied to the press sleeve. A safety release screw
allows the tool to be opened at any time, but any
connection made without full tool compression
must be redone.
The reduced grip feature permits one-handed
operation, making the Viega PEX Press system
perfect for tight spaces and awkward locations.
The compression of the tool also allows press
connections to be made in temperatures as low as -4°F.
2.5.2 RIDGID power tools with PEX Press jaws
The Viega PEX Press connection may also be carried
out with one of the RIDGID power tools. These tools
are designed to make the same consistent press as
the Viega PEX Press hand tools. The compression of
the tool also allows press connections to be made in
temperatures as low as 23°F.
Compact Power Tool
Use only Viega stainless steel attached
PEX Press sleeves and press tools with
Viega PEX Press fittings.
Viega PEX Press polymer fittings must
be protected from UV exposure, which
can damage them. In the event of
incidental UV exposure during storage,
installation and handling, combined
exposure of PEX Press fittings shall not
exceed 15 days.
Do not expose Viega products to any
foreign substance that includes but
is not limited to VOC (volatile organic
chemical) compounds, paints, solvents,
glues, cleaners and disinfectants.
Viega products that are exposed to
these types of substances are at risk of
having failures (leaks).

IM-PF 724572 0615 (Fire Sprinkler)
10
2.6 Making a Viega PEX Press connection
2.6.1 Trimming and inserting the tubing
2.6.2 Pressing with a hand tool
2.6.3 Pressing with a power tool
1.
Square off tubing to proper length. Uneven, jagged or irregular cuts will produce unsatisfactory connections.
2. Insert PEX Press tting with attached sleeve into tubing and engage fully.
3. Ensure full tubing insertion at view holes in attached press sleeve. Full insertion means tubing must be
completely visible in at least two view holes and partially visible in the one.
4. Position press tool perpendicular over press sleeve, resting it against the tool locator ring.
Note: The tool locator ring must be in the factory-installed position while making a press to provide a
consistent leakproof connection. It may be necessary to rotate the tool locator ring to avoid interference
between the ring and tool.
5. Close handles, using trigger to reduce grip span if desired.
6. Extend handle and continue ratcheting until automatic tool release occurs at proper compression force.
7. Warning: The connection is not leakproof when the tool has been opened by emergency release.
The tool locator ring must be present to ensure a proper PEX Press connection.
4. Insert the appropriate Viega PEX Press jaw into the press tool and push in the holding pin until it locks.
5. Open jaw and position perpendicular over press sleeve, resting it against the tool locator ring.
Note: The tool locator ring must be in the factory-installed position while making a press to provide a
consistent leakproof connection. It may be necessary to rotate the tool locator ring to avoid interference
between the ring and tool.
6. Start pressing process; hold the trigger until the jaw has automatically released.
7. When press connection is complete, open and remove jaw.
8. Warning: The tool locator ring must be present to ensure a proper PEX Press connection.
1 2
3
Pure
Flow
1/2”
5
Pure
Flow
1/2”
6
Pure
Flow
1/ 2”
7
Turn screw for
emergency release.
4
4 6
7
5

11
IM-PF 724572 0615 (Fire Sprinkler)
2.7 Sprinklers
Automatic sprinkler heads are heat-actuated
suppression devices that when exposed to
temperatures at or above its thermal rating,
automatically allow water to ow through the
sprinkler head which disperses water onto the
heat source. Residential re sprinklers are primarily
designed to save lives by provided adequate time
for occupants to exit the area experiencing the re.
Viega only recommends listed residential re
sprinkler heads as dened by their ratings
(temperature / ow rate). Installation of these heads
shall be per the manufacturer’s specied listings
and or limitations.
2.7.1 Types of sprinklers
Residential re sprinkler installations primarily have
four types of sprinkler heads; Flush concealed,
concealed recessed pendent, recessed pendent,
and horizontal sidewall sprinklers.
Each type of sprinkler head is intended for a specic
mounting application and has distinct advantages
focused mostly on aesthetic in the home. Cover
plates are also available and may come in various
colors direct from the manufacturer.
Sprinkler head design typically utilizes either a
fusible link or a heat-sensitive glass bulb that upon
sensing heat, expands are bursts triggering the
water to ow.
Residential re sprinkler head must have all
appropriate listings and must comply with the
appropriate model and local codes as well as NFPA
13D “Installation of One- and Two- Family Dwellings
and Manufactured Homes.”
2.7.2 Sprinkler temperature ratings
There are two types of sprinkler head temperature
ratings dened as ordinary or intermediate.
Recessed pendents and horizontal side wall type
heads are considered ordinary having a rating of
155°F (68°C). These shall not be installed where
ceiling temperatures can exceed 100°F (38°C). Cover
plate assemblies on concealed pendent sprinklers
shall have a temperature rating of 135°F (57°C).
Flush concealed sprinkler heads have a
temperature rating of 140°F (60°C) and their cover
plate assembly is rated at 135°F (57°C).
Intermediate sprinkler heads have a temperature
rating of 175°F (79°C) and shall be installed when
ceiling temperature range from 101°F (39°C) and
150°F (66°C). Temperatures shall not exceed 120°F
(49°C) to be in accordance with the UL and C-UL Listing.
Sprinkler heads shall not be stored in areas that
could experience temperatures above 100°F (38°C).
Each type of sprinkler head and associated cover
plate has an maximum application temperature rating
that must be specied within the design. Ambient
temperature exposure must be taken into account
during the design of the re sprinklers system.
Flush concealed sprinklers with components
Flush concealed sprinklers are designed to be
concealed behind a ceiling surface. A cover plate
mounts ush with the ceiling.
Concealed recessed pendent sprinklers with components
Concealed recessed pendent sprinklers typically have
a conical shaped trim plate cover that extends down
from the nished ceiling surface.
Recessed pendent sprinklers with components
Recessed pendent sprinklers remain visible once
installed (no cover plate).
Horizontal sidewall sprinklers with components
Horizontal sidewall sprinklers remain visible once
installed in the wall (no cover plate).

IM-PF 724572 0615 (Fire Sprinkler)
12
Storage cabinets for spare heads and wrenches
Keep heads within protective shell during installation
Sprinkler wrenches
2.7.3 Sprinkler orifice size (K-factor)
Sprinkler ow rates are typically expressed using a
K-factor, and this is used to calculate the sprinklers
ow rate based on a specic pressure. The size of
a sprinklers orice is proportional to the size of its
K-factor and the larger the orice the higher the
K-factor. Typical residential re sprinkler heads have
K-factors ranging between 5.5, 5.2, 4.9, 4.3 and 4.1.
This relation can be shown in the formula below:
P = (F/K)2
P = pressure (psi)
F = ow from sprinkler (gpm)
K = K-factor of sprinkler head
2.7.4 Additional requirements
It is important to handle the sprinkler heads with
extreme care protecting them from any type of
damage. As these are life safety devices, never
install a sprinkler head that has been damaged
in any way if suspicion of damage has occurred.
Some examples of damage include prolonged
exposed to maximum ambient temperatures and
cracked glass bulbs. If a damage is head is found,
it should be permanently disposed of.
Sprinkler protection
Sprinkler heads are generally shipped with a
removable cover that protects the heat-sensing
element from damage. It is recommended that this
plastic cover be kept in place during all phases of
construction including painting or texturing of the
ceiling and walls. Removal of these plastic shells
must be done prior to placing the system in service.
It may be helpful to keep spare protective caps in
the sprinkler cabinet for future use.
Spare sprinkler
While spare sprinklers are not typically required
to be left on site consult with your AHJ as local
requirements may differ.
Sprinkler wrenches
As with any specialty system, special tools are
required. Residential re sprinkler systems utilize
various wrenches designed for each type of head.
These wrenches are essential to proper installation
by ensuring proper leverage and minimizing
slippage. The use of standard wrenches will
increase the potential of damage to the head. Check
with your sprinkler head manufacturer / supplier for
the appropriate installation tool required.

13
IM-PF 724572 0615 (Fire Sprinkler)
3. Sprinkler System Planning and Design
3.1 General
Prior to the installation of the system, the building
plans outlining the piping layout, hydraulic ow
/ pressure demand (expressed in GPM and PSI)
and sprinkler head locations shall be submitted to,
and approved by the Authority Having Jurisdiction
(AHJ). All deviations from the approved plans
will require permission from local authorities. The
system design, including the piping layout, sprinkler
head location and hydraulic demand calculations,
shall conform to the NFPA 13D Standard.
The following steps will assist in proper design and
planning of your system:
•
Identify local jurisdiction requirements, including
determination of pertinent building codes, re
protection codes and plumbing codes.
•
Obtain information on the residence including “Use
Group Classication” and specics on the type of
residence in which the system will be installed.
•
Identify the water supply source and available ow
in gallons per minute and supply pressure in psi.
• Identify the water supply service line including
elevation difference between connections and
routing of the service line into the residence.
•
Determine the specications for the sprinkler
heads including water ow and operating pressure
requirements and coverage area specications.
• Lay out the piping system in the residence as a
looped or gridded system.
• Lay out the piping system for the cold water
distribution and hot water distribution.
• Perform the hydraulic calculations on the
system to determine system performance.
3.2 Local jurisdiction requirements
The rst step in starting a sprinkler system
design is you must determine the local authorities
requirements, to include getting clarication of
which pertinent plumbing codes and NFPA sprinkler
installation standards are being followed by the AHJ.
This also includes identifying the required licensing
need to be a qualied sprinkler system installer.
Note: Fire sprinkler plans for NFPA 13D systems
are reviewed by the local AHJ, therefore, It is the
responsibility of a qualied sprinkler designer to be
familiar with all local requirements for the system
design and layout.
3.3 Residence information
The next step is to ensure the residence
characteristics qualify for being protected by an
NFPA 13D sprinkler system. These are typically
categorized as being one-family dwellings, two-
family dwellings, multiple single-family dwellings,
modular homes and manufactured housing.
Note: Conrm with the local AHJ as to whether
any local building codes requirements, such as the
use of re separation walls, could allow more than
two dwelling units to be protected by a NFPA 13D
sprinkler system.
After verifying that the residence qualies to be
protected by an NFPA 13D system the remaining
construction details of the residence must be
identied. This encompasses being familiar with
every level of home as identied on the building
plan for the over all layout, room sizes, ceiling
heights (type, pitch and or slope) including crawl
space, basement, garages, attics and individual levels.
3.4 Water supply source
All Multipurpose systems shall have at least one
automatic water supply as identied by the NFPA
13D standard. Any of the following automatic water
supply systems are acceptable:
• A connection to a reliable waterworks system
(with or without automatic pump)
• An elevated water storage tank
• A pressure tank designed to ASME standards
for a pressure vessel and connected to a
reliable pressure source
• A stored water source with an automatically
operated pump
For systems using stored water as the sole source
supply, the minimum water volume required to be
stored in the supply shall be equal to the maximum
system ow demand rate multiplied by 10 minutes,
which includes 5 GPM for domestic use. The total
capacity typically works out to be 350 gallons. This
is based off the ow demand of two sprinkler heads
at 15 GPM each plus the 5 GPM domestic (35 GPM
total) multiplied by 10 minutes. Refer to NFPA 13D
for additional stored water supply requirements.
Upon identifying the type of water supply source
being used, the next step is to determine its
available gallons per minute ow and pressure. This
can be measured at a near by hydrant or obtained
by contacting the local water works authority.

IM-PF 724572 0615 (Fire Sprinkler)
14
When determining the system supply pressure,
minimum pressure conditions occurring during
periods of heavy use, such as overnight or summer,
must be considered. An accurate assessment of
the available ow and supply pressure is critical for
proper design and layout of the sprinkler system.
The desirable range for available water ow to the
systems is 30 to 50 GPM. The desirable range for
system supply pressure is 60 to 80 psi. Hydraulic
calculations are required to determine the exact
requirements for each system.
3.5 Water supply service line
Use standard sizing practices per local code to
identify your water service supply, then determine
the layout of the piping. This should include all
typical pressure losses associated with both the
plumbing and re sprinkler system demand.
Using standard code sizing practices for service
line sizing includes pressure drop caused by any
elevation (0.433 psi/ft)differences between the
service system and shall include other conditions
affecting pressure as follows:
3.5.1 Shut-off valve
The NFPA requires that a single control valve in
the main service supply line be present to shut
off both the plumbing and sprinkler systems. If
separate valves are used for these systems the
sprinkler valve shall be locked in the open position
or observed by a monitoring system.
The main shut off valve shall have a an attached
sign adjacent to it with lettering ¼" or larger stating
the following:
“Warning, the water system for this home supplies
re sprinklers that require certain ows and
pressures to ght a re. Devices that restrict to
ow or decrease the pressure or automatically shut
off the water to the re sprinkler system, such as
water softeners, ltration systems, and automatic
shutoff valves, shall not be added to this system
without a review of the re sprinkler system by a re
protection specialist. Do not remove this sign.”
This requirement may vary based on local AHJ
for clarification.
3.5.2 Water meters
When sizing water meters for multipurpose
systems, always take into consideration their
pressure and ow limitations, exceeding these
could result in poor or improper system operation.
It is the responsibility of the installer to verify that
the pressure loss and ow rate through the selected
meter is within the acceptable limits. Refer to the
below table for general water meter pressure losses.
Meter (in) 18 GPM 23 GPM 26 GPM
¾ 7 11 14
1 2 3 3
1½ 1 1 2
2 1 1 1
Meter (in) 31 GPM 39 GPM 52 GPM
¾ 22 35 -
1 4 6 10
1½ 2 4 7
2 1 2 3
Common pressure loss through water meters
at various flows shown in psi
3.5.3 Pressure reducing valves
Use a pressure reducing valve (PRV) for systems
exceeding a supply pressure above 80 psi.
To insure proper system operation, it is the
responsibility of the installer to account for any
pressure and/or ow losses associated with the PRV.
3.5.4 Backflow requirements
Back ow prevention is not required for service
lines supplying both domestic and sprinkler
systems. It is the responsibility of the installer to
check with the local AHJ for any additional back
ow requirements.
3.5.5 Water softeners
It is the responsibility of the installer to account
for any additional pressure loss or ow restriction
caused by a water softener present in the water
supply system. Improper operation of the re
sprinkler system could result if the softener is not
properly accounted for in the system design.
3.5.6 Smoke detectors and waterflow alarms
A waterow alarm on a multipurpose piping system
is not required under the NFPA standard when
the dwelling has smoke detectors installed in
accordance with NFPA 72, National Fire Alarm and
Signaling Code.
3.5.7 Sprinkler head requirements
Viega does not currently offer sprinklers, therefore,
installers are welcome to source any brand they prefer.

15
IM-PF 724572 0615 (Fire Sprinkler)
Sprinkler head performance requirements are
designated by the amount of coverage area they
can achieve based on available water ow and
operating pressure. Its recommended practice
to source a sprinkler head with the lowest ow
providing the greatest coverage area. A favorable
sprinkler coverage area ranges from 12’ x 12’ to
20’ x 20’ at 13-15 gpm with a 7-9 psi operating
pressure. Refer to the NFPA13D standard and the
residential sprinkler head manufacturers listing for
proper minimum and maximum head spacing. If the
heads are mounted too close the spray from one
hitting the other can interfere with the heads ability
to operate properly. Do not exceed the maximum
spacing requirements of the sprinklers listing.
Note: Consider proper clearance from ceiling
fans, duct work, DWV piping, replaces, lights and
registers when locating the sprinkler heads.
3.6 Piping system layout
NFPA 13D denes several types of wet pipe system
layouts, these include multipurpose, passive purge
and stand alone.
Multipurpose
A system that combines cold water plumbing
supply lines off from the sprinkler piping.
Passive Purge
A system that uses a single cold water plumbing
supply line connected to the sprinkler piping.
Stand Alone
The stand alone system’s above ground piping is
dedicated to supplying the sprinkler system only, it
does not have any plumbing lines connected to it.
Check with the local AHJ for acceptability when
using PEX tubing.
The re sprinkler system shall be appropriately
sized taking into account system ow and pressure
requirements utilizing ¾" as the minimum pipe size
per NFPA 13D.
3.6.1 Piping configurations
The NFPA 13D Standard allows three types of
multipurpose sprinkler system congurations to be
used in residential occupancies: gridded, looped,
straight run or combinations thereof.
Gridded
This system is connected by multiple branch lines.
An activated sprinkler is provided with water from
both sides, while other branch lines help transfer
the water. This method is not commonly used due
to the complexity of its design.
Gridded System
Straight Run System
Looped System
Looped
In this system, multiple cross mains are connected,
but the branch lines are not. This method improves
the hydraulic characteristics of the system by
providing additional water paths through the main
piping.
Straight Run
In this system, also known as a tree-type system,
each sprinkler head is served by only one water
ow path. This piping method is most common for
stand alone systems. Due to its inefciency it can
require larger supply lines.

IM-PF 724572 0615 (Fire Sprinkler)
16
3.6.2 Plumbing system connections
Piping systems intended to serve both re protection
and domestic plumbing needs is a multipurpose
piping system as dened in NFPA 13D.
Local plumbing codes may apply to these types
of systems. Consult your local AHJ for applicable
requirements.
3.6.3 System pressure gauge
Although not mandatory, a system pressure gauge
can be installed to monitor system pressure. This
pressure is considered to be the working (static
pressure) or non-owing pressure.
3.6.4 Connections to domestic cold water
plumbing systems
If allowed by the AHJ, Viega PEX Press tees may
be installed in the ViegaPEX re sprinkler main
for connecting potable water xture supplies. It is
required by NFPA 13D that the plumbing supply
piping comply with local plumbing codes. ViegaPEX
tubing and Viega ttings meet all requirements for
domestic plumbing applications.
3.6.5 Hot water distribution system layout
The domestic hot water system sizing and layout is
to be determined by the governing local plumbing
codes. Viega PEX Press Polymer re sprinkler
adapters are for use in domestic cold water
systems only.
Do not use in hot water systems.
3.6.6 Required hydraulic calculations
In order to ensure proper sprinkler head operation,
hydraulic calculations must be performed. NFPA
13D establishes required design criteria. The
layout, calculations and installation of systems
installed in accordance with this standard shall only
be performed by knowledgeable people trained
through industry recognized or approved programs.
Check with the local AHJ whether specic
credentials are required (NICET III or PE).
Viega Technical Services provide re sprinkler
designs. Please call: 877-843-4262.
The following information is required prior to
obtaining a re sprinkler design:
Service Line / Source:
• Street Pressure (PSI)
• Distance from street to house (ft)
• Distance from meter to house (ft)
• Material for Service (copper/PEX PVC)
• Service line size
• Location of service, where entering house
• Additional in line devices adding pressure drop
• Elevation change from street to base of house
• Water supply type (city / well)
Approval / System Design:
• Material AHJ approved?
• Type of installer AHJ approved?
• Is plumbing integrated?
• Is a NICET III stamp required on design?
• Preferred Head type (concealed,pendent,
sidewall)
• Brand preference for heads (Tyco,Viking,
Reliable)
Construction Details:
• Ceiling height (ft)
• Architectural features on plans (tray ceilings,
knee walls..)
•
Vaulted ceilings / stairs (peak location and pitch)
• Plans available in AutoCAD?
• Are appliances and heat sources shown on
plans?
• Should areas not required to have sprinklers be
considered? (baths under 55 sq ft., all closets)

17
IM-PF 724572 0615 (Fire Sprinkler)
4. Installing the ViegaPEX Ultra Tubing System
4.1 Installation
Black ViegaPEX Ultra is available in sizes ¾" - 2"
and is UL and cUL listed for use in residential re
protection systems per NFPA 13D. ViegaPEX Ultra
is also listed for potable water applications. Consult
the local AHJ for any additional requirements.
4.2 Additional information / guidelines
Below are important guidelines that must be followed
when using ViegaPEX Ultra and PEX Press ttings:
1. ViegaPEX Ultra (black only) and PEX Press
fittings, sizes ¾" - 2" are approved for use
in potable water applications and have a
UL listing for use in residential fire sprinkler
systems per NFPA 13D.
2. Viega fire sprinkler fittings are intended for
use in residential fire sprinkler applications
only per NFPA 13D. Installations should not
include a fire department connection and
shall be designed to withstand a maximum
working pressure and temperature of 130 psi
at 120°F.
3. Adequate protection must be provided for the
Viega tubing and fittings and must include a
minimum of ⅜" gypsum wallboard, a metal
gridded suspended ceiling utilizing lay-in tiles
having a weight of not less than 0.35 lbs/
sq ft, or ½" plywood soffits. Viega offers a
ProPress
®
fitting system for copper tubing
that may be acceptable for use in exposed
areas. Consult with your AHJ for approval
and or any additional requirements for this
type of installation.
4. For remodels, adequate protection must be
provided for all Viega tubing and fittings to
prevent damage.
5. Viega fire sprinkler systems shall not be
used in concealed combustible areas where
sprinklers are required by NFPA 13D.
6. Maintain 24" minimum clearance from
openings in the ceiling such as return grilles.
7. Viega fire sprinkler systems are not intended
for outdoor use and are intended for wet pipe
systems only.
Note: For detailed information, please consult
NFPA 13D, the local building codes and the AHJ.
4.3 Handling ViegaPEXtubing
The properties of ViegaPEX tubing make it very
easy to work with and install in most types of
construction. Some care must be taken to prevent
damage to the tubing before and during installation:
• Use care to protect ViegaPEX and tubing
from physical damage during storage and
installation. Keep the tubing away from sharp
objects, open ames, etc., and do not place
heavy objects on the tubing.
• Damaged sections of tubing should be cut out
and discarded.
• Do not expose ViegaPEX tubing to sunlight or
any UV source for extended periods of time
(less than 6 months for ViegaPEX Ultra).
• Do not store ViegaPEX tubing outdoors where it
may be exposed to UV light.
4.4 Uncoiling ViegaPEXtubing
An uncoiler should be used to preventtwisting
when removing tubing from ⅜"–1" coils. Roll coils
out and use care to avoid twisting 1¼", 1½" and
2" coils or when a uncoiler is unavailable. If larger
diameter tubing is used for short run sections,
straight lengths are also available which can assist
in this type installation.
Uncoiler, Stock Code 53509

IM-PF 724572 0615 (Fire Sprinkler)
18
L
L
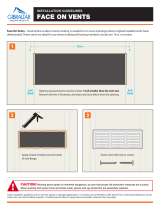
4.5 Bending ViegaPEX tubing
UL listed ViegaPEX tubing can be free bent
(unsupported bend) to a minimum radius of 8x the
actual tubing O.D. ViegaPEX that is not UL rated can
be bent to a minimum radius of 5x the tubing O.D.
with the use of a Viega approved bend support. The
tubing O.D. can be calculated by adding ⅛" to the
PEX nominal size (ex: 1" PEX + ⅛" = 1⅛" O.D.).
To calculate the minimum bend radius multiply the
O.D. dimension by the bend factor (8x) (ex: 1⅛" x 8
= 9" bend radius). If bending against a PEX coil bend
direction, the bending radius is 24x the tubing O.D.
To reduce damaging stress on Viega PEX ttings,
bend supports or tubing fasteners must be used
to anchor all bends made close to ttings. Support
must be provided for tubing bends located closer
to ttings than distance “L” in table below See the
diagrams below for typical installation examples.
This will ensure the re sprinkler tting stays aligned
within the mounting bracket the pendents remain
even with the nished ceiling.
4.6 Installation temperature range
The exibility of ViegaPEX tubing and the strength
of the Viega PEX connections combine to provide
a system that can be installed during any weather.
The positive compression provided by the
Viega PEX Press hand tools allow installation in
temperatures downto -4°F (23°F for power tools).
4.7 Removing Viega PEX Press connections
(attached sleeves)
Should a mistake be made, simply cut out the PEX
tting and replace with a new one. Do not reuse
Viega PEX Press ttings.
4.8 Repairs
Sections of kinked tubing should be repaired by
cutting out the damaged section and installing a
repair coupling.
Tubing
size
Distance from
fitting to bend
⅜" PEX L = 6 inches
½" PEX L = 8 inches
¾" PEX L = 10 inches
1" PEX L = 12 inches
1¼" PEX L = 14 inches
1½" PEX L = 16 inches
2" PEX L = 18 inches
Using a tubing fastener near a
connection to support bend and
reducestress on fitting
Using a bend support near a Viega
PEX connection to reduce stress
on fitting
Bend
Radius
R
Minimum
bending radius
for ViegaPEX
tubing
OD
Inserting a coupling to repair kinked tubing
4.9 Tubing expansion
When installing ViegaPEX tubing, expansion and
contraction of the material must be considered.
ViegaPEX tubing should not be pulled tight when
installed, as cold water will cause tubing to shrink
slightly as the system is lled. Aslight amount of slack
should be left in eachrun to allow for this contraction
without stressing the ttings.
Expansion of the tubing in hot water lines should
be accommodated by using expansion loops or
offsets. Fasteners should not grip tubing tightly so
that it can move slightly as expansion takes place.
Expansion loops or offsets will give tubing a place to
grow without stressing ttings. Using suspension clip
fasteners at all penetrations will allow tubing to move
without creating noise.

19
IM-PF 724572 0615 (Fire Sprinkler)
Using a loop to accommodate tubing expansion
Offsets also provide room for tubing expansion
Allow some slack in all runs to prevent
damage from tubing contraction.
⅛" to
3
/
16
"
slack per foot
4.10 Freezing
The exibility of ViegaPEX tubing makes it
resistant to damage from freezing, but precautions
to prevent freezing should be taken when low
temperatures might be encountered.
Insulating each PEX tube individually or as a
group is not generally necessary if the PEX tubing
is installed within the insulation envelope of the
structure, i.e. the heated area. For example, the
tubing may be installed under the insulation in the
attic or within an interior wall of a heated space.
Typically, local codes dictate the type and amount
of insulation required in ceiling spaces. All piping,
ttings and sprinkler heads shall be installed within
the building insulation envelope on the “warm side”
of the insulation. Installation of the insulation shall
follow the guidelines of the insulation manufacturer.
PEX tubing systems should not be intentionally
installed in areas subjected to freezing.
Do not use open torch or excessive heat to thaw
PEX tubing. Tubing failure or damage can result.
Heat (DO NOT USE A TORCH) must be applied
directly to the frozen tubing section. Temperature
on tubing shall not exceed 180°F.
Several suitable methods exist to thaw PEX
tubing.
They include:
• Hot water
• Wet hot towels
• Hand-held hair dryer
•
Low wattage electrical heating tape (self limiting)
• A commercial system that pumps heated water
through a tube to the ice blockage, and returns
the cooled water for reheating
ViegaPEX expands or contracts 1.1” in length per 100
feet of tubing for every 10°F change in temperature.

IM-PF 724572 0615 (Fire Sprinkler)
20
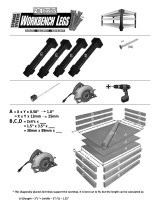
4.11
Heaters, flues, vents and recessed lights
Keep ViegaPEX tubing a MINIMUM of 12" vertically
and 6" horizontally from sources of high heat such
as gas ue vents, heating appliances or electric
motors. Concerning recessed lighting (including low
voltage types) and proper installation clearance,
Viega recognizes the following types of lighting
xtures: “Type IC,” or “Inherently Protected,” which
allow direct contact with thermal insulation and
other combustible materials, and “Type Non-IC,”
which require a minimum clearance of 3" to thermal
insulation. If room does not allow for the minimum
clearance spacing specied by Viega, then the
PEX tubing must be insulated with a suitable pipe
insulation capable of withstanding the specic
maximum temperatures generated by the xture.
Minimum clearance between any pipe insulation
and xture shall be per the requirements of the
xture type and local building codes.
Forced air heating ducts and PVC power vent ues
are not generally considered sources of high heat.
These areas of installation should be rechecked
after further construction and other mechanical
systems have been installed.
In cases where light leakage (direct beam) from
a UV generating light source (special lighting or
heating type lamps) is possible tubing must be
adequately protected with light blocking insulation.
Maintain a minimum 12" of vertical and 6"
of horizontal clearance from recessed lights
and appliance or heater vents.
6" minimum
12 " minimum
/