Page is loading ...

INVERTER
Heatsink Protrusion Attachment
<FR-A8CN01 to 09>
ENCLOSED ITEMS
1
Thank you for choosing this Mitsubishi Electric inverter option unit.
This Instruction Manual provides handling information and precautions for use of the equipment. Incorrect handling might
cause an unexpected fault. Before using this product, always read this Instruction Manual carefully to use this product
correctly.
Please forward this Instruction Manual to the end user.
This attachment allows approximately 70% of the heat generated by the inverter to be radiated outside the enclosure by
protruding the inverter heatsink section out from the rear side of the enclosure.
1 ENCLOSED ITEMS
Check the attachment model, and check that the following items are enclosed with the indicated quantity.
For the FR-A8CN06 to 09, the lower installation frame (c) is not enclosed. Use the inverter's lower installation frame by changing its installation
position.
Use the fixing screws for the standard installation feet of the inverter.
SAFETY INSTRUCTIONS
While power is ON or for some time after power-OFF, do not touch the inverter and attachment since they will be
extremely hot. Touching these devices may cause a burn.
The product must be transported in correct method that corresponds to the weight. Failure to do so may lead to injuries.
Special attention must be paid to the edges of the product.
Foreign conductive objects must be prevented from entering the inverter. That includes screws and metal fragments or
other flammable substance such as oil.
Symbol
Enclosed
items
Attachment model
FR-A8CN01 FR-A8CN02 FR-A8CN03 FR-A8CN04 FR-A8CN05 FR-A8CN06 FR-A8CN07 FR-A8CN08 FR-A8CN09
a
Upper
installation
frame
111111111
b Upper cover
111111111
c
Lower
installation
frame
11111
d
Upper/lower
frame
installation
screw
4 (M5-12) 4 (M5-12) 4 (M5-12) 4 (M8-16)
e
Cover
installation
screw
2 (M4-10) 3 (M4-10) 3 (M4-10) 4 (M4-10) 4 (M4-10) 4 (M4-10) 4 (M4-10) 4 (M4-10) 4 (M4-10)
f
Right installation
frame
———— 1 1 1 1 1
g
Left installation
frame
———— 1 1 1 1 1
h
Left/right frame
installation
screw
————4 (M4-10)4 (M4-10)4 (M4-10)4 (M4-10)4 (M4-10)

2
APPLICABLE MODELS
2 APPLICABLE MODELS
For replacement from the FR-F720(P)-75K, the enclosure cut dimensions are not compatible with those of the heatsink protrusion attachment
(FR-A7CN10) of the FR-F720(P)-75K.
3 ENCLOSURE CUT DIMENSIONS
(1) Cut an enclosure to the following dimensions according to the inverter capacity.
Model
Applicable attachment
FR-A8CN01 FR-A8CN02 FR-A8CN03 FR-A8CN04 FR-A8CN05 FR-A8CN06 FR-A8CN07 FR-A8CN08 FR-A8CN09
FR-A820
00105(1.5K)
00167(2.2K)
00250(3.7K)
00340(5.5K)
00490(7.5K)
00630(11K)
00770(15K)
00930(18.5K)
01250(22K)
01540(30K)
01870(37K)
02330(45K)
03160(55K)
03800(75K)
04750(90K)
—
FR-A840
00023(0.4K)
00038(0.75K)
00052(1.5K)
00083(2.2K)
00126(3.7K)
00170(5.5K)
00250(7.5K)
00310(11K)
00380(15K)
00470(18.5K)
00620(22K)
00770(30K)
00930(37K)
01160(45K)
01800(55K)
—
03250(110K)
03610(132K)
02160(75K)
02600(90K)
FR-F820
00105(2.2K)
00167(3.7K)
00250(5.5K)
00340(7.5K)
00490(11K)
00630(15K)
00770(18.5K)
00930(22K)
01250(30K)
01540(37K)
01870(45K)
02330(55K)
03160(75K)
03800(90K)
04750(110K)
—
FR-F840
00023(0.75K)
00038(1.5K)
00052(2.2K)
00083(3.7K)
00126(5.5K)
00170(7.5K)
00250(11K)
00310(15K)
00380(18.5K)
00470(22K)
00620(30K)
00770(37K)
00930(45K)
01160(55K)
01800(75K)
—
03250(132K)
03610(160K)
02160(90K)
02600(110K)
FR-A8CN01 FR-A8CN02 FR-A8CN03 FR-A8CN04
6-M5 screw
112
100
90
280
7.5
265
365
136
145
(Unit:mm)
6-M5 screw
175
102
90280
7.5
265
367
195
212
(Unit:mm)
6-M5 screw
175
102
90320
7.5
305
407
195
212
(Unit:mm)
6-M8 screw
12.5
230
40
40 102
335
517
244
200
260
90440
(Unit:mm)

ENCLOSURE CUT DIMENSIONS
3
(2) Refer to "INSTALLATION PROCEDURE" on page 5 to assemble the attachment to the inverter. After assembly,
install the inverter in the enclosure.
NOTE
• Since the cooling section, which comes out of the enclosure, has a cooling fan, avoid environment with water drops, oil mist,
dust, etc.
• Be careful not to drop screws, dust, etc. into the inverter and cooling fan section.
• A gap of approximately 1 mm is left between the FR-A8CN and the inverter. (The inverter is not in an enclosed condition.)
FR-A8CN05 FR-A8CN06 FR-A8CN07
FR-A8CN08 FR-A8CN09
6-M8 screw
265
516
270
95
290
540 85
12
330
(Unit:mm)
611
380
440
4-M10 screw
510 105
590
15
380
410
(Unit:mm)
615
440
477
4-M10 screw
662 108
740
13
410
470
(Unit:mm)
770
440
477
4-M10 screw
702 108
780
13
400
470
(Unit:mm)
810
440
477
4-M10 screw
582 108
660
13
400
470
(Unit:mm)
690

4
OUTLINE DIMENSION DRAWINGS
4 OUTLINE DIMENSION DRAWINGS
(------: Enclosure cut dimensions)
FR-
A8CN01 FR-A8CN02
FR-A8CN03 FR-A8CN04
FR-A8CN05 FR-A8CN06
6-φ6 hole
136
150
8 280 90
(11.5)
389.5
18
(260)
111.5
97
(140)
43
(5.4)
2.3
Attachment
Panel
24.3
Panel
Attachment
(Unit:mm)
195
245
22
72
408.5
280 90
(16.5)
156
116.5
(260)
32
21.3
2.3
86
(170)
84
(5.4)
Attachment
Attachment
Panel
Panel
6-φ6.5 hole
(Unit:mm)
195
245
(16.5)
9032022
72
448.5
156
116.5
(300)
32
21.3
101
(190)
89
Attachment
Panel
Attachment
Panel
2.3
(5.4)
6-φ6.5 hole
(Unit:mm)
230
280
(11.5)
9044012.5
172
554
Panel
Attachment
40.6
113.5
(400)
32
Attachment
Panel
96.7 93.3
(190)
(9.1)
82
(Unit:mm)
6-φ10 hole
2.3
Attachment
10
270
14 600
(40)
654
298
326
357
290
85540
(15)
130
(480)
44
130.8 64.2
(195)
105
3.2
Panel
Panel
(Unit:mm)
4-φ10 hole
2-φ10 hole
Attachment
410
478.2
(486)
(50)
650
10 590
12
380
145
(465)40
96
(250)
154
3.2
55
Attachment
Panel
Panel
(Unit:mm)
2-φ12 hole

INSTALLATION PROCEDURE
5
5 INSTALLATION PROCEDURE
FR-A8CN07 FR-A8CN08
FR-A8CN09
FR-A8CN01 FR-A8CN02
120
470
510.2
(518)
740
410
12
10
(55)
805
130
(250)
45 (610)
150
Attachment
Panel
Panel
3.2
105
2-φ12 hole
(Unit:mm)
400
12
10
(518)
510.2
470
845
780
(55)
(650)
150
45
(360)
183.5176.5
3.2
40
Panel
Panel
Attachment
2-φ12 hole
(Unit:mm)
(518)
510.2
470
400
12
725
660
(55)
10
Panel
Panel
3.2
65
(530)
150
45
Attachment
(300)
147.7152.3
2-φ12 hole
(Unit:mm)
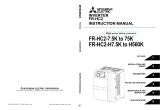
(a) Upper installation frame
(d) Upper/lower frame
installation screw M5
(b) Upper cover
(c) Lower
installation frame
(e) Cover installation
screw M4
Install after making sure
that the lug is firmly fitted
into the groove.
∗
(a) Upper installation frame
(d) Upper/lower frame
installation screw M5
(b) Upper cover
(e) Cover
installation
screw M4
(c) Lower
installation frame

6
INSTALLATION PROCEDURE
FR-A8CN03 FR-A8CN04
FR-A8CN05 FR-A8CN06
FR-A8CN07 FR-A8CN08
(a) Upper installation frame
(d) Upper/lower frame
installation screw M5
(b) Upper cover
(e) Cover
installation
screw M4
(c) Lower
installation frame
(a) Upper installation frame
(d) Upper/lower frame
installation screw M8
(b) Upper cover
(e) Cover
installation
screw M4
(c) Lower
installation frame
(a) Upper installation
frame ∗1,∗3
(d) Upper/lower frame
installation screw
(d) Upper/lower frame
installation screw
(h) Left/right frame
installation screw M4
∗4
∗5
(e) Cover
installation
screw M4
(b) Upper cover
(g) Left
installation
frame
(f) Right
installation
frame
(c) Lower installation frame
(a) Upper installation
frame ∗1,∗3
(g) Left
installation
frame
(f) Right
installation
frame
(d) Upper/lower frame
installation screw
(h) Left/right frame
installation screw M4
∗4
(e) Cover
installation
screw M4
(b) Upper cover
(c) Lower installation frame ∗2
(a) Upper installation
frame ∗1,∗3
(g) Left
installation
frame
(f) Right
installation
frame
(d) Upper/lower frame
installation screw
(h) Left/right frame
installation screw M4
(e) Cover
installation
screw M4
(b) Upper cover
(c) Lower installation frame ∗2
∗4
(a) Upper installation
frame ∗1,∗3
(d) Upper/lower frame
installation screw
(h) Left/right frame
installation screw M4
(e) Cover
installation
screw M4
(b) Upper cover
(g) Left
installation
frame
(f) Right
installation
frame
(c) Lower installation frame ∗2
∗4

DEPTH DIMENSIONS
7
When carrying the inverter, do not hold the upper section of the upper installation frame (a). Doing so may change the frame shape.
For the FR-A8CN06 to 09, change the position of the standard installation feet/lower section and use it instead of the lower installation frame (c).
For the FR-A8CN05 to 09, fit the upper cover (b) to the upper installation frame (a) first, and then install the upper installation frame (a) to the
inverter. When the upper cover (b) is installed to the upper installation frame (a), a gap may sometimes remain between the lower part of the
upper cover (b) and the upper installation frame (a). Install the upper cover after checking that no gap exists.
Remove the standard installation foot/upper section of the inverter. Use the fixing screws for the standard installation feet to fix the upper
installation frame.
Remove the standard installation foot/lower section of the inverter. Use the fixing screws for the standard installation feet to fix the lower
installation frame.
NOTE
• When replacing the cooling fan, remove the upper cover (b) and then replace the cooling fan from the opening. (For details
on the cooling fan replacement, refer to the Instruction Manual of the inverter.)
6 DEPTH DIMENSIONS
When a 700 series option unit is replaced with an 800 series option unit, depth requirements outside and inside the enclosure
differ as shown in the shaded area of the table below.
FR-A
8CN09
(a) Upper installation
frame ∗1,∗3
(g) Left
installation
frame
(f) Right
installation
frame
(d) Upper/lower frame
installation screw
(h) Left/right frame
installation screw M4
(e) Cover
installation
screw M4
(b) Upper cover
(c) Lower installation frame ∗2
∗4
(a) Upper installation
frame
(b) Upper cover
A gap may
be left.
Push the cover so that
there is no gap left.
Inverter
D D1
Attachment
Panel
Panel
Attachment
Before replacement After replacement
Attachment model D (mm) D1 (mm) Attachment model D (mm) D1 (mm)
FR-A7CN01 97 48.4 FR-A8CN01 97 48.4
FR-A7CN02 86 89.4 FR-A8CN02 86 89.4
FR-A7CN03 89 106.4 FR-A8CN03 89 106.4
FR-A7CN04 88.5 110.6 FR-A8CN04 96.7 102.4
FR-A7CN05, 06 123.5 71.5 FR-A8CN05 130.8 64.2
FR-A7CN07 96 154 FR-A8CN06 96 154
FR-A7CN11 97 153 FR-A8CN07 130 120
FR-A7CN10 176.5 183.5 FR-A8CN08 176.5 183.5
FR-A7CN08, 09 116.5 183.5 FR-A8CN09 152.3 147.7

HEAD OFFICE: TOKYO BUILDING 2-7-3, MARUNOUCHI, CHIYODA-KU, TOKYO 100-8310, JAPAN
IB(NA)-0600553ENG-B(1412)MEE Printed in Japan Specifications subject to change without notice.
/