Dometic CT4050, CTLP4110, CTS4110 Installation guide
- Category
- Sanitary ware
- Type
- Installation guide
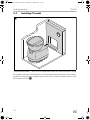
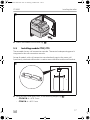
Dometic CT4050, CTLP4110, CTS4110 mobile toilets are the ideal option for recreational vehicles like caravans or motor homes. They are designed to provide a comfortable and convenient toilet experience while on the road, with features like a removable cassette tank for easy waste disposal and a compact design for space-saving installation. The CT4050 model is a detached toilet without a water tank or console, making it a versatile option for various vehicle layouts.
Dometic CT4050, CTLP4110, CTS4110 mobile toilets are the ideal option for recreational vehicles like caravans or motor homes. They are designed to provide a comfortable and convenient toilet experience while on the road, with features like a removable cassette tank for easy waste disposal and a compact design for space-saving installation. The CT4050 model is a detached toilet without a water tank or console, making it a versatile option for various vehicle layouts.


-
 1
1
-
 2
2
-
 3
3
-
 4
4
-
 5
5
-
 6
6
-
 7
7
-
 8
8
-
 9
9
-
 10
10
-
 11
11
-
 12
12
-
 13
13
-
 14
14
-
 15
15
-
 16
16
-
 17
17
-
 18
18
-
 19
19
-
 20
20
-
 21
21
-
 22
22
-
 23
23
-
 24
24
-
 25
25
-
 26
26
-
 27
27
-
 28
28


Dometic CT4050, CTLP4110, CTS4110 Installation guide
- Category
- Sanitary ware
- Type
- Installation guide
Dometic CT4050, CTLP4110, CTS4110 mobile toilets are the ideal option for recreational vehicles like caravans or motor homes. They are designed to provide a comfortable and convenient toilet experience while on the road, with features like a removable cassette tank for easy waste disposal and a compact design for space-saving installation. The CT4050 model is a detached toilet without a water tank or console, making it a versatile option for various vehicle layouts.
Ask a question and I''ll find the answer in the document
Finding information in a document is now easier with AI
Related papers
-
Dometic Guide Wire Hold Down Installation guide
-
Dometic RTX 2000 User manual
-
-
-
-
-
-
-
Dometic CT4050/4110, CTLP4050/4110, CTS4050/4110, CTW4050/4110 Operating instructions
-
Other documents
-
Braun M-30, M-60, M-90 User manual
-
-
 SOG C200 Toilet Ventilation Door Kit Suit User manual
-
 SOG 200310 II Type 3000A Kit for Dometic CT3000 or CT4000 User manual
-
Braun 7680 User manual
-
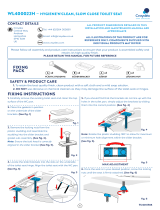 Croydex WL400022H Operating instructions
-
Medion Universal Remote Control MD 41666 User manual
-
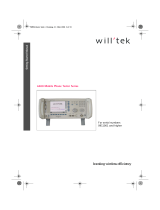 WILLTEK 4405 Getting Started Manual
-
Braun FreeStyle SI 6240 User manual
-
Rosemount CT4000 OEM Module Owner's manual


