Page is loading ...

CT4050, CTLP4110, CTS4110
Cassette toilet
Operating manual
EN
SANITATION
TOILETS
CT4000-O-AUS.book Seite 1 Dienstag, 6. März 2018 1:41 13

CT4000-O-AUS.book Seite 2 Dienstag, 6. März 2018 1:41 13

CT4000-O-AUS.book Seite 3 Dienstag, 6. März 2018 1:41 13

EN
CT4000
4
Please read this instruction manual carefully before first use, and store it in
a safe place. If you pass on the product to another person, hand over this
instruction manual along with it.
Table of contents
1 Explanation of symbols . . . . . . . . . . . . . . . . . . . . . . . . . . . . . . . . . . . . . . . .5
2 Safety instructions . . . . . . . . . . . . . . . . . . . . . . . . . . . . . . . . . . . . . . . . . . . .6
2.1 General safety . . . . . . . . . . . . . . . . . . . . . . . . . . . . . . . . . . . . . . . . . . . .6
2.2 Use of sanitary additives . . . . . . . . . . . . . . . . . . . . . . . . . . . . . . . . . . . .6
3 Intended use. . . . . . . . . . . . . . . . . . . . . . . . . . . . . . . . . . . . . . . . . . . . . . . . . .7
4 Technical description . . . . . . . . . . . . . . . . . . . . . . . . . . . . . . . . . . . . . . . . . .7
4.1 Description of the components . . . . . . . . . . . . . . . . . . . . . . . . . . . . . .8
4.2 Control and display elements. . . . . . . . . . . . . . . . . . . . . . . . . . . . . . . .9
5 Using the toilet. . . . . . . . . . . . . . . . . . . . . . . . . . . . . . . . . . . . . . . . . . . . . . . .9
5.1 Sanitary accessories . . . . . . . . . . . . . . . . . . . . . . . . . . . . . . . . . . . . . .10
5.2 Preparing the cassette tank. . . . . . . . . . . . . . . . . . . . . . . . . . . . . . . . .10
5.3 Using the toilet . . . . . . . . . . . . . . . . . . . . . . . . . . . . . . . . . . . . . . . . . .12
5.4 Draining the cassette tank. . . . . . . . . . . . . . . . . . . . . . . . . . . . . . . . . .14
5.5 Positioning the toilet seat . . . . . . . . . . . . . . . . . . . . . . . . . . . . . . . . . .17
5.6 Winter operation . . . . . . . . . . . . . . . . . . . . . . . . . . . . . . . . . . . . . . . . .17
5.7 Shutting down . . . . . . . . . . . . . . . . . . . . . . . . . . . . . . . . . . . . . . . . . . .18
6 Cleaning and maintenance. . . . . . . . . . . . . . . . . . . . . . . . . . . . . . . . . . . .18
6.1 Greasing the slider . . . . . . . . . . . . . . . . . . . . . . . . . . . . . . . . . . . . . . .19
6.2 Releasing the slider from the cassette . . . . . . . . . . . . . . . . . . . . . . . 20
6.3 Greasing the cassette seal . . . . . . . . . . . . . . . . . . . . . . . . . . . . . . . . .21
6.4 Cleaning the bayonet fitting and greasing the bayonet seal. . . . . . 22
6.5 Greasing the O-ring of the cassette vent . . . . . . . . . . . . . . . . . . . . . 23
7Maintenance. . . . . . . . . . . . . . . . . . . . . . . . . . . . . . . . . . . . . . . . . . . . . . . . 23
7.1 Spare parts. . . . . . . . . . . . . . . . . . . . . . . . . . . . . . . . . . . . . . . . . . . . . 23
7.2 Removing and replacing the lid and seat. . . . . . . . . . . . . . . . . . . . . 24
7.3 Replacing the cassette seal . . . . . . . . . . . . . . . . . . . . . . . . . . . . . . . . 25
7.4 Replacing the bayonet seal. . . . . . . . . . . . . . . . . . . . . . . . . . . . . . . . 27
7.5 Replacing the fuse in the operating unit. . . . . . . . . . . . . . . . . . . . . . 28
7.6 Replacing the wheels on the cassette tank . . . . . . . . . . . . . . . . . . . 29
CT4000-O-AUS.book Seite 4 Dienstag, 6. März 2018 1:41 13

EN
CT4000 Explanation of symbols
5
8 What to do in case of problems . . . . . . . . . . . . . . . . . . . . . . . . . . . . . . . 30
9Warranty . . . . . . . . . . . . . . . . . . . . . . . . . . . . . . . . . . . . . . . . . . . . . . . . . . . 30
10 Disposal . . . . . . . . . . . . . . . . . . . . . . . . . . . . . . . . . . . . . . . . . . . . . . . . . . . . .31
11 Technical data . . . . . . . . . . . . . . . . . . . . . . . . . . . . . . . . . . . . . . . . . . . . . . .31
1 Explanation of symbols
!
!
A
I
WARNING!
Safety instruction: Failure to observe this instruction can cause fatal or
serious injury.
CAUTION!
Safety instruction: Failure to observe this instruction can lead to injury.
NOTICE!
Failure to observe this instruction can cause material damage and impair
the function of the product.
NOTE
Supplementary information for operating the product.
CT4000-O-AUS.book Seite 5 Dienstag, 6. März 2018 1:41 13

EN
Safety instructions CT4000
6
2 Safety instructions
The manufacturer accepts no liability for damage in the following cases:
• Damage to the product resulting from mechanical influences and excess voltage
• Alterations to the product without express permission from the manufacturer
• Use for purposes other than those described in the operating manual
The declaration of conformity can be requested from the manufacturer (contact
information on the back).
2.1 General safety
!
WARNING!
• This device can be used by children aged 8 years or over, as well as by
persons with diminished physical, sensory or mental capacities or a
lack of experience and knowledge, providing they are supervised, or
have been taught how to use the device safely and are aware of the
resulting risks.
• Cleaning and user maintenance must not carried out by unsupervised
children.
• Children must be supervised to ensure that they do not play with the
device.
A
NOTICE!
• Do not shake the cassette tank vigorously.
• Do not hang the cassette tank on a bicycle or other vehicle for trans-
portation.
• Do not use antifreeze. These agents may damage the cassette toilet.
• The toilet is designed for a person weighing no more than 130 kg.
2.2 Use of sanitary additives
!
CAUTION!
• Store the sanitary accessories so that children cannot access them.
A
NOTICE!
• When using sanitary additives for use and cleaning of the toilet, pay
attention to the instructions for use on the packaging.
CT4000-O-AUS.book Seite 6 Dienstag, 6. März 2018 1:41 13

EN
CT4000 Intended use
7
3 Intended use
The toilet is designed for installation and use in recreational vehicles such as camper
vans or motor caravans.
4 Technical description
The cassette toilet CTx 4xxx consists of a toilet permanently installed in the vehicle
and a removable, mobile cassette as a holding tank. The cassette is externally acces-
sible through a door. Depending on the model, the toilet is supplied with rinse water
from the vehicle-side freshwater tank or a tank integrated in the housing.
The following model versions of the toilet are available:
• CT4050: detached, without water tank, without console
• CTLP4110: detached, without water tank, low console
• CTS4110: detached, without water tank, with console
The 4050 models can be installed in a wet room.
CT4000-O-AUS.book Seite 7 Dienstag, 6. März 2018 1:41 13

EN
Technical description CT4000
8
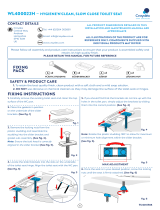
4.1 Description of the components
No. in fig. 1 Designation
1 Housing for cassette tank
2 Draining slider for toilet bowl
3 Toilet bowl, ceramic
4 Lid and seat, rotatable
5Console
6 Control and operating panel
7 CTLP, CTS only: Wall bracket
8 Cassette tank (capacity 19 l)
9 Service door (accessories)
6
9
8
4
5
3
2
1
7
1
CT4000-O-AUS.book Seite 8 Dienstag, 6. März 2018 1:41 13

EN
CT4000 Using the toilet
9
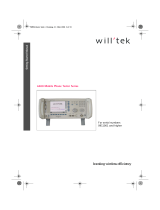
4.2 Control and display elements
5Using the toilet
I
No. in fig. 2 Label
1 Flush button
2 “Cassette tank full” indicator
3 “Cassette tank 3/4 full” indicator
4 “Fill freshwater tank” indicator
(Not always connected when using the on-board tanks)
5 “Cassette tank removed” indicator
NOTE
• Before putting the toilet into operation, you should clean inside and
outside with a soft cloth and lukewarm water with a mild cleaning
agent (also refer to chapter “Cleaning and maintenance” on
page 18).
• Clean and grease the seals of your toilet regularly (see chapter
“Cleaning and maintenance” on page 18).
• Conventional toilet paper can clog the toilet. Use a special
fast-dissolving toilet paper.
The manufacturer recommends Dometic COMFORT CARE.
1
2
3
5
4
2
CT4000-O-AUS.book Seite 9 Dienstag, 6. März 2018 1:41 13

EN
Using the toilet CT4000
10
5.1 Sanitary accessories
Sanitary additives for the holding tank decompose faeces and prevent unpleasant
odours.
The manufacturer recommends:
• Dometic POWER CARE TABS
• Dometic GREEN CARE TABS
When using sanitary additives, please note the instructions for use on the packaging.
I
On the Dometic website (see back page) you can find further information about
sanitary accessories.
5.2 Preparing the cassette tank
Removing the cassette tank
Proceed as follows (fig. 3):
➤ Open the service door.
➤ Push the catch upward to unlock the cassette tank.
➤ Pull the cassette tank out of the cassette housing. When pulling out the tank,
resistance has to be overcome.
NOTE
Conventional toilet paper can clog the toilet. Use a special
fast-dissolving toilet paper. The manufacturer recommends
Dometic COMFORT CARE.
1.
2.
3
CT4000-O-AUS.book Seite 10 Dienstag, 6. März 2018 1:41 13

EN
CT4000 Using the toilet
11
Adding sanitary additive
➤ Position the cassette tank upright.
➤ Rotate the drain pipe approx. 90° upward (fig. 4).
I
➤ Twist off the cap (fig. 5 1).
➤ Add sanitary additive into the cassette tank via the drain pipe (fig. 5 2).
Observe the instructions for the sanitary additive.
NOTE
Avoid turning the drain pipe more than 90°, as it otherwise can come off
(fig. 4).
90°
> 90°
4
1.
2.
5
CT4000-O-AUS.book Seite 11 Dienstag, 6. März 2018 1:41 13

EN
Using the toilet CT4000
12
Pushing the cassette tank into the cassette housing
A
➤ Slide the cassette tank all the way into the cassette housing.
✓ The cassette tank lock locks by itself upon being pushed in.
➤ Check that the cassette tank is securely installed.
➤ Close and lock the service door.
5.3 Using the toilet
I
The toilet lid remains in a position of approximately 70° (fig. 7).
NOTICE!
Ensure that the cassette tank can be pushed into the cassette housing
easily. Make sure that the cassette tank does not bump into other
objects or components.
NOTE
The slider must be closed while driving, and no liquid should be above
the slider.
1.
3.
2.
6
CT4000-O-AUS.book Seite 12 Dienstag, 6. März 2018 1:41 13

EN
CT4000 Using the toilet
13
➤ Before use, press the flush button to allow some water to run into the bowl
(fig. 6 2).
➤ Pull the slider (fig. 6 3) forward. Leave the slider open during use.
➤ After use, press the flush button again to rinse the bowl (fig. 7 1).
➤ Close the slider (fig. 7 2).
The cassette tank has a capacity of 19 l. When the indicator lights up, the toilet
can only be used a few more times.
I
NOTE
With a 3/4-filled cassette, use is only possible when the slider is open.
With a tilted position (such as lasting inclination of the vehicle), the
cassette may only be 3/4 full. Overflowing through the vent is possible.
2.
1.
7
CT4000-O-AUS.book Seite 13 Dienstag, 6. März 2018 1:41 13

EN
Using the toilet CT4000
14
5.4 Draining the cassette tank
Empty the cassette tank when the indicator lights up.
➤ Remove the cassette tank (chapter “Removing the cassette tank” on page 10).
➤ Press the release button in the middle of the handle and pull the handle out to its
end position (fig. 8).
A
➤ Bring the tank to the nearest designated disposal location.
➤ Press the release button in the middle of the handle and push the handle back
into the cassette.
NOTICE!
• Do not shake the cassette tank vigorously.
• Do not hang the cassette tank on a bicycle or other vehicle for trans-
portation.
• Do not place heavy objects on the cassette tank during transport.
This can damage the housing and rollers.
2.
1.
8
CT4000-O-AUS.book Seite 14 Dienstag, 6. März 2018 1:41 13

EN
CT4000 Using the toilet
15
➤ Set the cassette tank upright and rotate the drain pipe 90° upward (fig. 9).
I
➤ Twist off the cap (fig. 0).
NOTE
Avoid turning the drain pipe more than 90°, as it otherwise can come
off.
90°
> 90°
9
0
CT4000-O-AUS.book Seite 15 Dienstag, 6. März 2018 1:41 13

EN
Using the toilet CT4000
16
➤ Hold the cassette tank by the handle with one hand (fig. a 3) and with the other
hand on the slider (fig. a 2), so that you can push the vent button (fig. a 1)
while it is draining.
➤ Press the vent button when the drain pipe points downwards.
✓ The tank drains steadily and without splashing.
➤ After draining, rinse out the cassette tank carefully.
➤ Add a sanitary additive to the cassette (chapter “Adding sanitary additive” on
page 11).
➤ Clear away course dirt from the wheels of the cassette tank to prevent scratching
of the cassette housing.
A
➤ Push the cassette tank into the cassette housing (chapter “Pushing the cassette
tank into the cassette housing” on page 12).
NOTICE!
Do not clean the inside of the cassette tank with a high-pressure cleaner.
This can damage the float for the level indicator.
1
2
3
a
CT4000-O-AUS.book Seite 16 Dienstag, 6. März 2018 1:41 13

EN
CT4000 Using the toilet
17
5.5 Positioning the toilet seat
The toilet seat can be swivelled continuously (fig. b).
5.6 Winter operation
A
You can also use the cassette toilet in the winter, as long as the toilet and cassette
tank are in a frost-free area.
If this is not the case, empty the freshwater tank, the cassette tank and the water line
of the freshwater supply.
This will prevent damage by frost (chapter “Shutting down” on page 18).
NOTICE!
Do not use antifreeze. Antifreeze may damage the cassette toilet.
b
CT4000-O-AUS.book Seite 17 Dienstag, 6. März 2018 1:41 13

EN
Cleaning and maintenance CT4000
18
5.7 Shutting down
Drain the freshwater tank and the water supply system completely if you are going to
take the toilet out of service for an extended period of time.
➤ Clean the toilet carefully (chapter “Cleaning and maintenance” on page 18).
➤ Operate the flush button until no more water is in the pipes.
➤ Interrupt the power supply to the toilet.
➤ Then drain the cassette tank and rinse it out carefully. Clean the cassette. To allow
the cassette tank to dry, do not close the drain pipe.
➤ Clean and grease all seals and moving parts of the toilet and the cassette tank
(chapter “Cleaning and maintenance” on page 18) and repeat this operation
before putting the toilet back into service.
6 Cleaning and maintenance
!
A
I
➤ Clean the toilet regularly inside and out with a soft cloth and lukewarm water with
a mild cleaning agent.
➤ Then wash the surfaces with clear water.
The manufacturer recommends:
• Grease: OKS
®
1110
• Silicone spray: OKS
®
1111
CAUTION!
Cleaning agents for the toilet may not contain chlorine or alcohol!
NOTICE!
• To prevent material changes, do not use hard, abrasive or
soda-based cleaning agents (scouring agents).
• Do not use polish for cleaning.
NOTE
• Clean and grease all seals on the toilet and cassette tank regularly.
In case of frequent use, perform these actions monthly or after
3 – 5 drainings of the cassette. Use grease or silicone-based spray.
• For regular cleaning of the toilet bowl, use a mild colourless cleaning
agent.
CT4000-O-AUS.book Seite 18 Dienstag, 6. März 2018 1:41 13

EN
CT4000 Cleaning and maintenance
19
!
The slide moves smoothly when it is regularly lubricated.
6.1 Greasing the slider
Greasing the slider rods
➤ Spray the rods of the slider with silicone spray (fig. d).
CAUTION!
When the slider is closed during cleaning or greasing, there is a risk of
crushing body parts (fig. c).
c
d
CT4000-O-AUS.book Seite 19 Dienstag, 6. März 2018 1:41 13

EN
Cleaning and maintenance CT4000
20
6.2 Releasing the slider from the cassette
!
➤ Remove the cassette tank and place it on a firm surface (fig. e).
➤ Unlatch the slider handle and pull it out. (fig. f).
CAUTION!
When the slider is closed during cleaning or greasing, there is a risk of
crushing body parts.
e
1.
2.
f
CT4000-O-AUS.book Seite 20 Dienstag, 6. März 2018 1:41 13
/