Veris PX3DLX02 Quick start guide

Type
Quick start guide
ZL0174-0C Page 1 of 7 ©2019 Veris Industries USA 800.354.8556 or +1.503.598.4564 / suppor[email protected] 0319
Alta Labs, Enercept, Enspector, Hawkeye, Trustat, Aerospond, Veris, and the Veris ‘V’ logo are trademarks or registered trademarks of Veris Industries, L.L.C. in the USA and/or other countries.
The Bluetooth word mark and logos are registered trademarks owned by Bluetooth SIG, Inc. and any use of such marks is under license. Other companies’ trademarks are hereby acknowledged to belong to their respective owners.
Quick Start Guide
Pressure Monitoring TM
DRAFT
Introduction
The Dierential Pressure / Air Velocity Transducer can be eld congured for either pressure or velocity
measurement for a wide variety of applications. In Pressure mode, building/room pressure, duct static pressure
or dierential pressure can be measured. In Velocity mode, air velocity can be measured for airow monitoring
applications. These devices are available in three congurations: duct, panel or universal. Duct and panel versions
have two eld-selectable pressure subranges: 0 to 1 in. WC/0 to 250 Pa or 0 to 10 in. WC/0 to 2,500 Pa. The
universal model can be mounted remotely in a panel or directly on a duct with pressure subranges from
0 to 10 in. WC/0 to 2500 Pa. All devices are available with or without an LCD display and have an IP65/NEMA 4
enclosure rating.
The Veris Sensors App provides the ability to connect to a device and congure a variety of eld-selectable
parameters remotely from a smartphone via Bluetooth® wireless technology. The app allows users to create and
store commonly used parameters that will reduce commissioning time and provide assurance that all parameters
are properly congured with no call backs. The app can also create a trend log while connected, providing critical
data for troubleshooting purposes.
This quick start guide provides high-level instructions intended to get new users up and running with the Veris
Sensors App. For a more in-depth description of how to use the app, see the Veris Sensors App Users Guide
available on the Veris website.
Note: Older devices without a Bluetooth logo on the front label are not supported by the Veris Sensors App.
Getting Started
The Veris Sensors app is free of charge and operates on iOS® and most Android® operating systems.
iOS Users
iOS users can download the app through the iOS App Store on their smart device. The app is compatible with iOS
version 10.3 and higher.
Android Users
Android users can download the app through the Google Play store on their smart device. The app is compatible
with Android version 6.0 and higher.
Veris Sensors App
For Use with Differential Pressure /
Air Velocity Transducers
ZL0174-0C Page 2 of 7 ©2019 Veris Industries USA 800.354.8556 or +1.503.598.4564 / suppor[email protected] 0319
Alta Labs, Enercept, Enspector, Hawkeye, Trustat, Aerospond, Veris, and the Veris ‘V’ logo are trademarks or registered trademarks of Veris Industries, L.L.C. in the USA and/or other countries.
The Bluetooth word mark and logos are registered trademarks owned by Bluetooth SIG, Inc. and any use of such marks is under license. Other companies’ trademarks are hereby acknowledged to belong to their respective owners.
Veris Sensors App User Guide
TM
DRAFT
1. Open the Veris Sensors App by touching the icon on your smart device’s Home
screen.
2. The Welcome screen appears, displaying the Veris logo.
3. The rst time you launch the app, you will be asked to review and accept the
license agreement. Touch Agree to proceed.
Basic Navigation
Accessing the App
Welcome Screen
Sensor Selection Screen,
Menu Icon
Top Level Navigation
At the top level, the Veris Sensors App consists of four main screens:
Sensor Selection Screen
Detected Devices Screen
Custom Congurations Screen
Product Information Screen
To navigate between the screens, either select the Menu icon on the left side of the
title bar at the top of the screen or swipe from left to right horizontally across the
screen. Both methods will bring you to the Product Menu which includes links to the
four main screens listed above.
iOS vs. Android Navigation
The screen shots shown throughout this quick start guide reect the iOS
environment. Navigation within the Android environment is almost identical, with
the exception of the three tabs visible on the Connected Device screen (Information,
Conguration and Trend Log). In the iOS environment, these tabs appear at the
bottom of the screen. In the Android environment, they appear at the top of the
screen.
Product Menu
ZL0174-0C Page 3 of 7 ©2019 Veris Industries USA 800.354.8556 or +1.503.598.4564 / suppor[email protected] 0319
Alta Labs, Enercept, Enspector, Hawkeye, Trustat, Aerospond, Veris, and the Veris ‘V’ logo are trademarks or registered trademarks of Veris Industries, L.L.C. in the USA and/or other countries.
The Bluetooth word mark and logos are registered trademarks owned by Bluetooth SIG, Inc. and any use of such marks is under license. Other companies’ trademarks are hereby acknowledged to belong to their respective owners.
Veris Sensors App User Guide
TM
DRAFT
Select Your Sensor Type
1. After following the steps in the Accessing the App section above, you will be
automatically directed to the Sensor Selection screen.
2. Select Dry Pressure/Velocity Transducer to be guided to the Detected Devices
screen.
Note: Once a sensor type has been selected, all other screens will pertain only to that type
of sensor. The app presently only supports the Dry Pressure Velocity Transducer, so only
Dry Pressure Velocity Transducer devices are displayed in the Detected Devices screen.
Custom Congurations displayed and created will only be of the Dry Pressure Velocity
Transducer type. Future versions of the app may support additional sensor types.
Sensor Selection Screen
Detected Devices
Screen
Detected Devices Screen
Choose From Detected Devices
1. Touch the device you wish to access from the list shown on the screen.
2. When the device is powered, a solid blue LED will illuminate on the device.
When you select a device name from the list, the LED will begin to blink quickly,
providing conrmation that you have connected to the desired device. Early
models may have a red LED.
Note: If the blue LED does not begin to blink quickly, touch Cancel at the Security
Password prompt and select another device from the list on the Detected Devices
screen. This may be an indication that you have connected to a dierent device.
Blue LED
Sensor Selection Screen
Create/Enter Your Password
1. After you have connected to the intended device, you will be asked to enter a
password specic to the device in order to access it. The default password is 0000.
2. After entering the default password, you will be prompted to enter a new
password. The new password must be four numeric digits (0-9). In addition, the
numbers may not all be the same and may not be sequential (i.e., 1234 or 7654,
etc.).
3. Once you have entered your password and are connected to the intended device,
you will automatically be guided to the Connected Device screen’s Information
tab.
Password Entry Dialog
ZL0174-0C Page 4 of 7 ©2019 Veris Industries USA 800.354.8556 or +1.503.598.4564 / suppor[email protected] 0319
Alta Labs, Enercept, Enspector, Hawkeye, Trustat, Aerospond, Veris, and the Veris ‘V’ logo are trademarks or registered trademarks of Veris Industries, L.L.C. in the USA and/or other countries.
The Bluetooth word mark and logos are registered trademarks owned by Bluetooth SIG, Inc. and any use of such marks is under license. Other companies’ trademarks are hereby acknowledged to belong to their respective owners.
Veris Sensors App User Guide
TM
DRAFT
The Connected Device screen includes three tabs to view various aspects of device
operation. The tab displayed can be selected from the top (Android) or bottom (iOS)
of the screen.
Information Tab
After entering your password, the Information tab is displayed. Here you can view
general characteristics of the selected device, along with real-time pressure or
velocity measurements as recorded by the device. The name of the device is displayed
in the title bar at the top of the screen.
1. Touch Zero Adjust if you would like to calibrate the baseline.
2. To move to the Configuration tab, click on its tab at the bottom of the screen.
Note: For iOS devices, the tabs will appear at the bottom of the screen. On Android
devices, the tab will appear at the top of the screen.
Connected Device
Screen DRY PRES-VEL TRANS
Device Information Screen
Conguration Screen
Configuration Tab
The Conguration tab provides a means to edit and upload settings to the connected
device. The title bar shows the name of the connected device. This screen provides a
list of custom congurations saved within the app. If no custom congurations have
been created, only one entry will be visible (Connected Device Cong). This entry
shows a preview of the settings in the connected device.
1. Select Connected Device Config (or one of the other congurations on the list)
to view or make changes to the to the conguration settings.
Custom Conguration Screen
2. The Custom Conguration screen appears, allowing the device settings to be
changed. Adjust the settings on the screen to the desired values.
3. Touch the Save button to save the conguration to the app’s internal storage.
Note: Saving the conguration is optional. It is possible to upload settings to a device without
saving those settings as a custom conguration.
4. Touch the Upload icon on the right side of the title bar to upload the
conguration to the connected device.
ZL0174-0C Page 5 of 7 ©2019 Veris Industries USA 800.354.8556 or +1.503.598.4564 / suppor[email protected] 0319
Alta Labs, Enercept, Enspector, Hawkeye, Trustat, Aerospond, Veris, and the Veris ‘V’ logo are trademarks or registered trademarks of Veris Industries, L.L.C. in the USA and/or other countries.
The Bluetooth word mark and logos are registered trademarks owned by Bluetooth SIG, Inc. and any use of such marks is under license. Other companies’ trademarks are hereby acknowledged to belong to their respective owners.
Veris Sensors App User Guide
TM
DRAFT
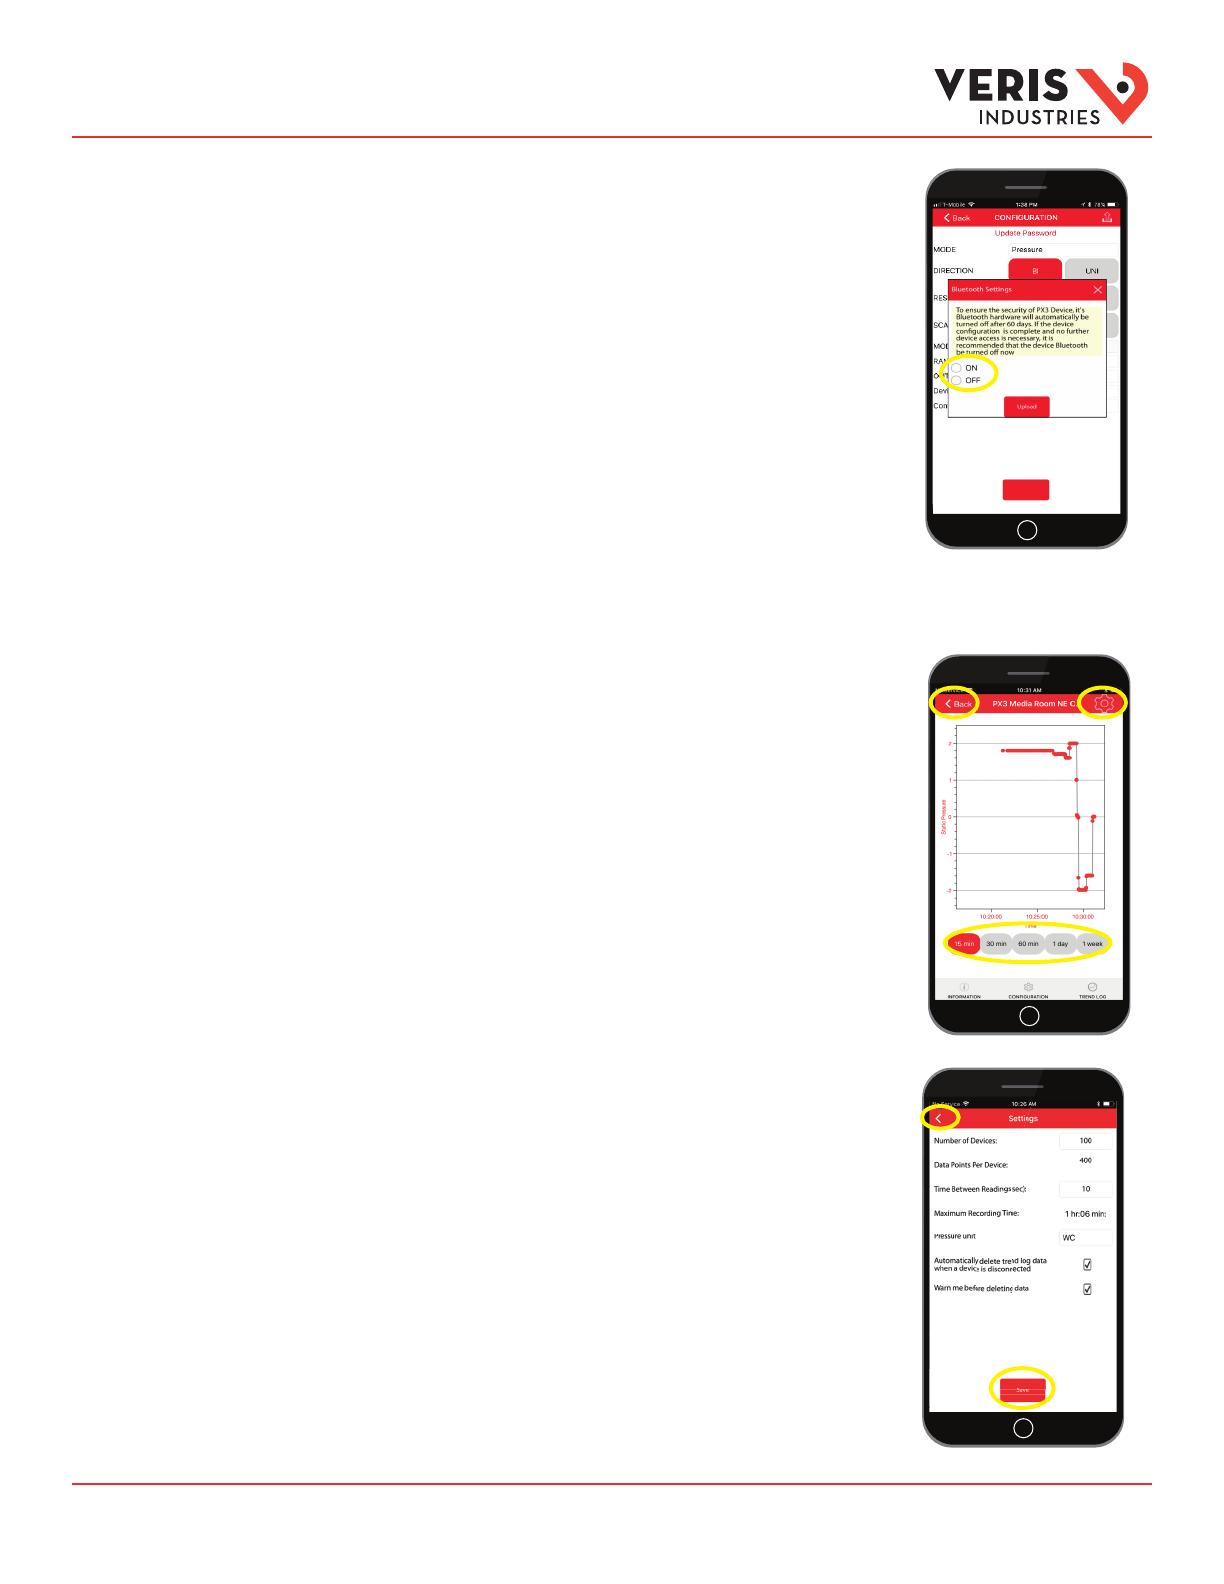
5. The Bluetooth Settings dialog will open.
The device will automatically disable Bluetooth capability after a period of time to
maintain device security. This dialog provides the option to either keep Bluetooth
enabled or disable it immediately. If the device is fully congured, and will not
need to be accessed again, it is recommended that the Bluetooth be disabled.
Notes:
If you turn o the Bluetooth capability after uploading, you will need to cycle (turn o/on
DIP switch #7 on the device) in order to turn the capability back on .
If you leave the Bluetooth capability on after uploading, it will remain on for 30 days. After
30 days, Bluetooth capability will be automatically turned o. Cycle DIP switch #7 if you
wish to turn it back on after this period and the 30-day counter will be reset.
6. Select the ON or OFF option, then touch Upload.
7. A conrmation dialog appears. Select OK to begin the settings upload.
8. Touch the Back button to clear the upload status notication.
9. Touch the Back button again to exit the Custom Conguration screen and return
to the Conguration tab.
Trend Log Tab
1. From the Connected Device screen, select the Trend Log tab to open the Trend
Log.
The Trend Log screen presents a graph showing data gathered from the connected
device over a period of time. The buttons at the bottom of the screen scale the
Time axis to the data gathered during the last time interval selected. For example,
touching 60 min will show the last 60 minutes’ worth of data from the connected
device.
2. Touch the gear-shaped Trend Log Settings icon on the right side of the title bar
to open the Trend Log Settings screen.
The Trend Log Settings screen appears, allowing the settings to be modied.
3. After making your selections, touch the Save button to save the Trend Log
settings.
4. Touch the Back Arrow button at the left side of the title bar to return to the Trend
Log tab.
5. Touch one of the Time Period buttons below the graph to see the most recent data.
6. Touch the Back button to disconnect from the device.
7. In the Conrm Disconnection dialog, choose Cancel.
8. A new dialog appears, stating that the app will remain connected to the device.
Touch OK.
9. You are returned to the Trend Log screen. Touch the Back button again to
disconnect from the device.
10. This time, touch OK to complete the disconnection.
11. If the Trend Log setting, “Warn me before deleting data” is checked, an Alert
appears, asking if you want Trend Log data to be deleted. Choose Cancel to keep
the data and continue or OK to delete the data and continue.
12. The app returns to the Detected Devices screen.
Bluetooth Settings Dialog
Connected Device
Screen (cont.)
Trend Log Tab
Trend Log Settings Screen
ZL0174-0C Page 6 of 7 ©2019 Veris Industries USA 800.354.8556 or +1.503.598.4564 / suppor[email protected] 0319
Alta Labs, Enercept, Enspector, Hawkeye, Trustat, Aerospond, Veris, and the Veris ‘V’ logo are trademarks or registered trademarks of Veris Industries, L.L.C. in the USA and/or other countries.
The Bluetooth word mark and logos are registered trademarks owned by Bluetooth SIG, Inc. and any use of such marks is under license. Other companies’ trademarks are hereby acknowledged to belong to their respective owners.
Veris Sensors App User Guide
TM
DRAFT
Create a Custom Configuration
1. From the Product Menu, select Custom Configurations. This opens the Custom
Congurations screen, which shows all custom congurations saved on the mobile
device.
2. Touch the Plus sign on the right side of the title bar. This is the Add button which
opens the Conguration Detail screen.
3. From the Conguration Detail screen, adjust any of the settings you would like to
save for future use.
4. Touch the Save button. If you have forgotten to enter a Conguration Name, you
will receive an alert asking you to do so.
5. Touch the Back button.
6. Your new custom conguration now appears in the list on the Custom
Conguration screen.
Custom Congurations
Screen
Custom Congurations Screen
Custom Conguration
Conguration Detail Screen
Using Custom Configurations
Once you build a list of custom congurations, as described above, you can quickly
select any conguration and upload it to a connected device.
1. From the Product Menu, select Detect Devices. This opens the Detected Devices
screen, which displays a list of all devices detected by the app.
2. Touch the device you wish to access from the list shown on the screen and enter its
corresponding password. You will be directed to the Device Information screen.
3. Select the Conguration tab to view the list of available custom congurations.
Creation Test 001
0 to 1 inWC, 0-10 Volts, Bi, Fast
Conguration Tab
ZL0174-0C Page 7 of 7 ©2019 Veris Industries USA 800.354.8556 or +1.503.598.4564 / suppor[email protected] 0319
Alta Labs, Enercept, Enspector, Hawkeye, Trustat, Aerospond, Veris, and the Veris ‘V’ logo are trademarks or registered trademarks of Veris Industries, L.L.C. in the USA and/or other countries.
The Bluetooth word mark and logos are registered trademarks owned by Bluetooth SIG, Inc. and any use of such marks is under license. Other companies’ trademarks are hereby acknowledged to belong to their respective owners.
Veris Sensors App User Guide
TM
DRAFT
4. From the list of available custom congurations, select the conguration you wish
to upload to the device. The Custom Conguration screen appears.
Note: Do not select the “Connected Device Cong” entry on the list, as this will write
the existing device conguration back to the device, if no changes are made to the
settings before uploading.
5. Touch the Upload icon on the right side of the title bar to upload the
conguration to the connected device.
6. The Bluetooth Settings dialog will open. Select the ON or OFF option, then touch
Upload.
7. A conrmation dialog appears. Select OK to begin the settings upload. You will
see two status boxes during this process. The second status box presents the nal
upload status – Successful or Failed.
8. Touch the Back button to clear the upload status notication.
9. Touch the Back button again to exit the Custom Conguration screen and return
to the Conguration tab.
Deleting Custom Configurations
If you wish to remove one or more custom congurations from the list, follow the
steps below.
1. From the list of available custom congurations, touch the check box to the left of
each conguration you wish to delete from the list.
2. A check mark appears in each check box, indicating that the conguration has
been selected.
3. A trash can shaped icon appears in the red bar at the top of the screen. This is the
Delete button.
4. Once the check marks appear, touch the Delete button.
5. The selected congurations disappear from the list.
For Further Information
1. Bring up the Product Menu by touching the left edge of the screen and swiping
right or use the Product Menu icon on the left-hand side of the title bar.
2. Select Product Information. Touch any of the items on this screen for additional
information.
Option Description
Product Page Link to the sensor’s product page on the Veris website.
Datasheet Link to the latest sensor datasheet on the Veris website.
Install Link to the latest sensor installation guide on the Veris website.
Corporate
Headquarters
Link to Google Maps showing the physical location of Veris Industries in
Tualatin, Oregon USA.
Phone Initiates a phone call to Veris Sales and Customer Support directly from
your smart device.
Email Address Initiates an email message to Veris Customer Support using the email
client on your smart device.
Custom Conguration Screen
Conguration Tab
Product Information Screen
Product Information
Screen
Custom Congurations
Screen (cont.)
  • Page 1 1
  • Page 2 2
  • Page 3 3
  • Page 4 4
  • Page 5 5
  • Page 6 6
  • Page 7 7

Veris PX3DLX02 Quick start guide

Type
Quick start guide

Ask a question and I''ll find the answer in the document

Finding information in a document is now easier with AI