Page is loading ...

De-Airing Pugmill
Instruction Manual
Please keep this instruction manual in a location that is always
available to the user.
Please make sure to read the entire
instruction manual thoroughly before
initial set-up, operation, maintenance and
inspection to ensure proper use.
92765F
NVA-04S

1
Safety Precautions
Make sure to read the entire instruction manual thoroughly before initial set-up, operation,
maintenance and inspection to ensure proper use. Start using only after you have read about
the equipment’s function, safety information and precautions.
This instruction manual provides three grades of safety warnings: "Danger", "Warning" and
"Caution". All precautions described hereunder concerning safety are to be read carefully.
Be sure to follow them.
This indicates the possibility of re, severe injury, and even death if the user
disregards the instruction.
Be sure to follow them.
Danger
This indicates the possibility of severe injury if the user operates the pug mill
improperly.
This indicates the possibility of minor injury or damage if a user operates the
pug mill improperly. However, depending on the circumstances, there is still the
possibility that severe injury may result. Be sure to follow them.
Warning
Caution
We categorize the type of those warnings using the following symbols throughout
the manual (example):
Installation
These are safety precautions regarding the installation of the pug mill.
Danger
Install on a level surface.
Securely install the pug mill on a level surface.
Vibration and/or noise could increase if the location
of installation is slanted or otherwise not level.
Heavy. Be careful when
handling.
Do not install in places
subject to rain, water, and/or
moist conditions.
Failure to follow this could result in re or
malfunction due to electric shock or leakage.
Do not overload the electric
circuit.
Be sure to ground the pug mill to prevent electrical
shock.
Properly ground.
If you drop the pug mill on your feet, you could be
injured.
Sharing the same outlet with other electric
products could result in re due to overcurrent.
A forced action you must always do.
A reminder to pay close attention.
A prohibited action you must not do.

2
Operation
Do not allow anyone to operate
the pug mill without proper
instructions and supervision.
Fix up long hair and keep
away from the pug mill.
It could be caught, resulting in serious injury.
Assign an operation supervisor in a facility where
many people may operate the unit, and supervise
operation. Children in particular should not be
allowed to operate the unit.
Wear proper clothing.
Loose tting ties, aprons and other clothing that
may hang above the clay hopper or clay nozzle
could be caught in the internal moving parts.
Do not operate any
switches with wet hands.
Operating switches or plug / unplug the power cable
with wet hands could result in electrical shock.
Turn o the power when not
in use.
If you do not plan on using for an extended period
of time, or there is a possibility of lightning strike,
turn o the power and unplug the power cable.
Do not insert hands.
Do not insert hands or ngers into the clay hopper
or clay nozzle. They could be caught, resulting in
serious injury.
These are safety precautions regarding the operation of the pug mill.
These are safety precautions regarding the maintenance of the pug mill.
Maintenance
Turn o the power before
inspection.
Unplug the unit.
Make sure to turn o the power as well as unplug
the unit before cleaning, inspection, adjustment,
or replacement.
Hold the power plug at the
base when pulling it from the
outlet.
Do not use the unit with a
damaged power plug base
and/or cable.
Do not operate the unit when the power plug base
and/or cable are damaged, or if the power outlet is
worn out. Failure to follow this could result in re
due to electric shock and/or short circuit.
Do not clean the unit with
water.
Do not pull or yank the cable when unplugging.
Failure to do so could result in re due to electric
shock and/or short circuit.
Do not use water for cleaning the unit. Failure to
follow this could result in re and/or damage to the
unit. Wipe o the unit thoroughly using a cloth.
* The clay hopper, screw case, and nozzle can be
washed only after disassembly.

3
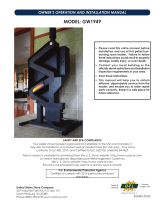
Lever
Screw case
Nozzle
Nozzle(front cover)
Breaker
Spacer
Black (top): ON (start)
Red (bottom): OFF (stop)
Screw switch
Hopper
De-airing switch
De-airing box
Clay roller
shelf
Cutter
Vacuum gauge
Clay hopper
(hopper cover)
Oil inlet opening
Glass cover
Acrylic glass (with rubber)
Screw shaft holder
Description Quantity Reference
Drive housing 1
Clay roller shelf 1
Hopper cover 1 Cover for clay hopper
Front cover 1 Cover for clay discharge slot
Spacer 2
Wrench 1 17 × 13 mm
Double-head wrench 1 for each 17 × 13 mm 13 × 10 mm For disassembly of the screw case
Allen wrench 1 2.5 mm in width
Hexagon bolt 2
M10 × 25 mm
For removal of the nozzle/for disassembly of the screw case
Acrylic glass 1 De-airing box cover (with rubber)
Metal cover 1 Metal cover
Instruction manual 1
Warranty card 1
Pug Mill Diagram
Package description

4
Install and secure the unit on a level surface.
2. Remove the front cover and hopper cover.
Place the clay roller shelf in front of the clay
discharge slot.
3. Place the spacers in the position as in the
gure to support the load.
2
2
1. Put the acrylic glass on the top of the de-
airing box then place the metal cover over it.
(Place the rubber side downward.)
1
3
Attention
Failure to place the spacers will cause the
screw case to sag. Clay will not extruded on
the roller table.
Installation / Preparation

5
1. Insert the power plug into an outlet.
Do not operate the power
plug with wet hands.
Danger
■
Operation
2. Turn on the de-airing switch.
3. Turn on the screw switch.
5. Close the valve next to the de-airing box.
Monitor the screw while placing clay into the
clay hopper in small amounts.
4. Close the valve next to the de-airing box.
6. Pull the lever down (screw rotates).
• If clay is not mixed well when it rst extrudes at start-up, run it through the pug mill two or three more
times to adjust the clay's consistency.
Using excessive force while operating the lever may result in the breaker being activated to shut o the
power supply. (Refer to P.9, Operation of breaker (Recovery of operation))
If it is used continuously for a long time, the pug mill may become hot due to friction with clay. After
using for 2 to 3 hours, allow 1 hour or more for cooling time.
Do not insert hands or
ngers into the clay
hopper or clay nozzle.
Danger
Only use clay soft enough to be wedged by hand.
Do not put in extremely soft clay, and/or dry clay waste.
Doing so could result in the screw stopping, and/or the clay may not mix well.
Be sure to use clay soft enough to be wedged by hand.
Doing so could result in the clay not mixing well and could result a poor quality mix.
Load small amounts of clay at a steady pace to produce better clay.
Do not load with large chunks of clay.
It is normal for the
vacuum gauge needle
to points to 0.09 MPa
or more while clay is
discharged.
Attention
• The vacuum gauge is a sensitive piece of
equipment. Take care not to drop or knock it to
avoid the risk of inaccurate readings.
• The vacuum gauge might not indicate 0.09
Mpa or more even in normal condition if
ambient air pressure decreases during use at
high altitudes, or due to changes in weather.
0.09 MPa
or more
* The de-airing pug mill can be used at normal pressure without using the vacuum pump (switch o the vacuum pump).
1
2
3
4
5
6
Clay hopper
Operation

6
□
Troubleshooting during operation
If you add too soft clay, it may not extrude. Add rmer clay
into the hopper until it runs through. Remix several times
until the clay consistency gets harder.
Please close the valve completely.
Load the clay several times until the clay is in good
condition.
Correct the position of the acrylic glass and place the
rubber side downward.
Close the hole in the de-airing box with your nger and
check if air is owing in.
Remove the nozzle and clean the internal parts.
(Refer to P.8, Disassembly Procedure)
It happens when clay adheres to the inside of the nozzle.
The screw will stop if a chunk of dry clay is loaded
into the clay hopper.
Be sure to add water to the clay and make it soft enough
to be wedged by hand before putting it into the clay hopper.
Possible causes are as follows:
Possible causes are as follows:
(1) Extremely soft clay is put into the clay hopper
(1) The valve next to the de-airing box is not
closed completely.
(4) De-airing does not work well depending on
the condition of clay.
(2) The acrylic glass placed on top of the de-airing
box is misaligned or the rubber side faces upward.
(3) The air lter is loose or the vacuum pump hose is
disconnected.
If you add too much hard clay, it will blow back and will not
mix well. Add water and leave for at least three days. If clay
still does not ow, disassemble and clean the internal parts
in order to remove the hard-set clay inside the pug mill.
(Refer to P.8, Disassembly Procedure)
(2) Too-hard clay is put into the clay hopper
(3) Clay has been left in the main unit and has
hardened
Disassemble the unit and clean the internal parts.
(Refer to P.8, Disassembly Procedure)
If you load a chunk of dry clay into the clay hopper,
or operate the lever with excessive force, the breaker
might be activated to shut o the power supply due to
overload.
The reset button pops out if the breaker is activated.
Remove the obstruction and
push the button inside.
Operation restarts.
Breaker
Dry clay comes out from the clay discharge slot
Screw stops
Clay does not mix well
De-airing does not work well
Operation stops (the breaker is activated to shut o the power supply)
*
If air is owing in, the vacuum gauge indicates 0.09 MPa or more.

7
1. Turn o the screw switch.
2. Open the valve next to the de-airing box when
pugging is completed.
3. Run the vacuum pump at idle operation for about
one minute to dry water inside, and then turn o
the de-airing switch.
4. Pull the lever down and place the hopper cover on.
5. Fit the front cover on the nozzle.
6. Unplug the unit.
■
After Operation
If dry clay sits in the barrel for too long,do not run the pug mill. Disassemble the barrel and remove all
clay before running it again.(Refer to P.8, Disassembly Procedure)
Do not leave clay in the main unit for a long period of time.
Failure to follow this could result in damage to the unit.
Dry the inside of the vacuum pump after use.
5
6
3
1
2
4
Hopper cover
Front cover
• Disassemble the pug mill according to the procedure for cleaning internal parts or removing clay completely.
(Refer to P.8, Disassembly Procedure)
Remove the clay inside the de-airing box according to the
following procedure.
Clay moves upward to the de-airing box depending
on the clay hardness.
If clay builds up inside the de-airing box, the clay
in the barrel will not be properly de-aired.
Only load clay that is soft enough to be kneaded by hand.
* If you can observe the auger screws rotating, then
the clay should be properly de-airing.
Clay is moving upward to
the de-airing box. (even the
screw cannot be seen)
(1) Turn o the screw switch and de-airing switch and pull
out the power plug.
* Completely remove clay using a wet sponge until the screw
can be seen. If clay still remains inside the box, it might move
upward to the de-airing box again.
(2) Take o the de-airing box cover (metal cover and
acrylic glass) and remove the clay carefully.
• Be sure to turn o the power
before operation.
How to remove clay inside the de-airing box
Danger
Clay moves upward to the de-airing box
• Do not handle the power plug with
wet hands.
Operation

8
■
Cleaning
□
Disassembly Procedure
Disassemble the pug mill according to the procedure for cleaning internal parts or removing clay
completely.
Be careful when handling the
screw as the sharp tip could
cause injury.
• Be sure to turn o the power
before operation.
• Do not handle the power plug with
wet hands.
• Rinse each of the disassembled parts carefully with water and dry them well.
• Clean the screw without removing from the screw holder.
• Do not disassemble parts other than as described, as it could result in damage to the pug mill.
1. Turn o the de-airing switch and screw switch.
Check that the power plug is pulled out.
4. Take o the four xed nozzle nuts using the
supplied wrench and spanner, and remove the
nozzle from the screw case.
2. Take o the hopper cover and front cover, if attached.
3. Pull out the vacuum pump hose and remove it.
Push A toward B, and pull out the hose.
9. Assemble the unit in the reverse order of the above
procedure.
8. Take o the bolts securing the vacuum plates to
each other and remove the plates.
6. Take o the six bolts of the screw holder using the
wrench and remove the upper screw case.
5. Take o the seven xed nuts on the upper and
lower sides of the screw case using the supplied
wrench and double-head wrench.
If the screw case is diffi cult to remove due to
hardened clay, insert a athead screwdriver
in between the upper and lower sides of the
screw case and move it up and down.
(Refer to diagram 6-1 on the right)
1
3
2
4
A
B
Nozzle
5
7 Spacer
8 Vacuum plates (inside the case)
6
Insert a athead
screwdriver in between
the upper and lower sides
of the screw case and
move it up and down.
If the nozzle is diffi cult to remove, tighten the
supplied bolts into the nozzle screw hole to
remove it more easily.
(Refer to the bottom right diagram 4-1)
Tighten the supplied bolts
into the nozzle screw hole
to remove it more easily.
4-1: When it is diffi cult to remove the nozzle
6-1: When it is diffi cult to remove the screw case
7. Pull out the spacer and remove the lower screw
case from the nozzle side.
(At this time, as it is hard to remove the screw case
when clay is stuck, remove any clay on the back of
the screw case.)
Danger
Danger
Maintenance

9
□
Checking after disassembly or assembly
■
Oil lling
Run a trial operation after disassembly or assembly
and be sure to check that the pug mill operates
normally according to the following procedure.
4. Pull the lever up and check if the screw stops.
(If the screw stops, it is in normal condition.)
3. Turn on the screw case switch and check that
there is no vibration and/or abnormal sound in
the main unit. (Do not put in clay at this time).
2. Turn on the vacuum pump switch and check that
the vacuum hose is properly installed, and that no
air leaks from the hose.
1. Insert the power plug into the outlet.
• Purchase over-the-counter machine oil (ISO
VG40 or less).• Heavy oil or grease are not
suitable.
• Do not put foreign materials and/or water into
the oil inlet opening.
In the following cases, remove the screw for the oil
inlet opening and lubricate with two or three drops
of machine oil.
• When the pug mill becomes noticeably louder
during operation.
• When using the pug mill for long hours
(approximately 50 periods)
• Once a month
(1) Remove the broken stainless wire.
(2) Hold the stainless wire on side A.
(3) Bend the cutter a little in the direction of B,
and hold on the stainless wire on the side C.
When the stainless wire is broken, replace it
according to the following procedure.
■
Replacement of stainless wire (Clay cutter)
1
2
3
4
Oil inlet
opening
• Purchase over-the-counter stainless wire
(piano wire is ideal).
• Do not handle the power plug with
wet hands.
• Do not insert hands or ngers into
the clay hopper or clay nozzle.
Danger
Discharge slot
Cutter
Stainless wire
A
B
C
Note)
Packing (rubber ring) may degrade over time
due to continuous usage and/or various external
conditions. Please check regularly and replace
accordingly to maintain optimum vacuum
performance.

10
Specications
Disposal Method
• Consult with your local government, as the disposal method will vary.
• Do not disassemble the pug mill when you dispose of it.
Stainless steel is used for the clay hopper, nozzle, clay pushing board, screw, and screw case.
Description NVA-04S
Dimensions 36"(52" including the clay roller shelf) × 16
1/2"
× 29
1/2"
mm
Weight Main body: 320 lbs. Clay roller shelf: 5 kg
Screw rotation 15 rpm 60 Hz
Screw motor Single phase: 115 V 400 W
Vacuum pump Single phase: 115 V 250 W
Extruding capacity 440 lbs./hour
Screw horizontal Clay hopper; two shafts Nozzle opening; one shaft
Extruding diameter Dia.3
1/2"
The breaker will not be activated under normal
conditions. If you force a large amount of clay or
hard clay into the clay hopper, the breaker might
be activated to shut o the power.
When the breaker is activated, it will pop out a
little, and the screw will stop. Press the breaker
over its waterproof cap. Operation restarts.
■
Operation of breaker (Recovery of operation)
Breaker

175 Wall Street Glendale Heights, IL 60139 U.S.A.
Phone : +1(800)237-7079 FAX : +1(630)924-7639
/