Page is loading ...

NIDEC CORPORATION
Pugmill/Mixer Instruction Manual
NVS-07
Please make sure to read the entire instruction manual thoroughly before initial
set-up, operation, maintenance and inspection to ensure proper use.
Please keep this instruction manual in a location that is available to the user.
92895B

2
The NVS-07, deairing pugmill / mixer, is designed to mix and pug clay to
make it suitable for use.
• Both wet and dry clay components can be mixed and pugged in this unit.
• The auger screw speed can be adjusted to accommodate various
consistencies of clay.
Also, mixing/pugging and extruding can be performed by changing the
direction of the auger screw.
• The main barrel of this pugmill/ mixer is stainless steel and is resistant
to corrosion. Porcelain clay can be used in this unit.
• The vacuum pump is used to de-air the clay while mixing and pugging.
• A safety limit switch sensor shuts off the pugmill when the hopper cover
is open.
• Both the nozzle and the auger screw are removeable for easy cleaning.
Unit description/Function description
Unit description
Function description
Safety precaution ····················································· 3
- Parts List ············································ 5
Items included • Installation and preparation ·················· 6
Before use • Principle for recycling of clay • Operation ····· 7
Preparation for use • Operation procedure ····················· 8 11
Display and description of indicators • Troubleshooting ···· 12
Maintenance ··························································· 13
Disposal method ······················································ 14
INDEX

3
We categorize the type of those precautions using the following symbols throughout the manual.
Before installing, operating or servicing this unit, please read the instruction manual carefully
and follow it for proper use. Start using only after you have read about the equipment’s
functions, safety information and precautions.
This instruction manual provides two grades of safety warnings: “Warning” and “Caution”.
Each of them is an important description related to safety. Be sure to follow them.
This indicates the possibility of severe injury or even death, and if a user
disregards the instruction and operates the unit improperly.
This indicates the possibility of injury or damage if a user operates the unit
improperly. However, depending on the circumstances, there is still the
possibility that severe injury may result.
Caution
Warning
Warning
Safety Precautions
Be sure to observe
A prohibited action you must not do.
A reminder to pay close attention.
An action you must always do.
Malfunctions
In the event of any malfunction, stop using
the unit immediately.
When a malfunction occurs, unplug the power cord. Failure to
and/or leakage.
• Smoke and/or abnormal smell/sound is detected.
• The unit has become deformed and/or parts are damaged.
• The auger screw continues to run even when the hopper cover is
opened.
Installation
Install the unit on a level surface.
Installing the unit on an uneven or sloped surface could cause the
unit to fall, which may result in injury.
Avoid installing the unit in places exposed to
rain, standing water and/or high humidity.
shock and/or leakage.
Power Cord and Plug
Do not use the unit if the power cord or plug
is damaged.
the outlet, do not use the unit. Failure to follow this could result in
* If the power cord is damaged, please contact your dealer or our
Do not overload the electric circuit.
If you share the outlet with other electric units, an overload could
Do not use the unit a voltage other than AC
115V.
Do not take any actions that could result in
damage to the power cord.
Do not pull, break, fabricate, and/or forcibly bend the power cord. Do
not move it close to any heating source, or place heavy materials on

Warning
CAUTION
Power cord and plug
Periodically remove dust on the power cord.
Accumulated dust could result in insulation failure due to moisture,
Ground the unit.
Be sure to ground the unit to avoid electric shock.
Do not touch switches and plugs with wet
hands.
Operating switches, plugging and unplugging the power cord with
wet hands could result in electric shock. If there is any clay on
them, remove it.
Foreign materials
materials inside the unit.
Installation
This unit is heavy. Pay attention when
handling.
Do not attempt to unpack this unit by yourself. Have three or more
people help unpack and/or move this unit. Excess strain could
cause injury. This unit is heavy, dropping it could result in injury.
Operation
accessories, and/or long hair.
Before operating this unit, be sure to remove or secure dangling
items such as loose clothing, jewelry, scarves, etc. Long hair
should be tied in back as well. Failure to do so may result in
getting caught in moving parts during operation.
Be careful when handling the hopper cover.
hopper cover.
Securely hold the handle, and slowly open/close the cover. Do not
remove your hand from the handle while opening/closing.
When the unit is not being used, open up the
vacuum pressure relief valve.
When the unit is not in use or when the vacuum is not needed
during the mixing process, be sure to open the pressure relief
valve. If any gases are generated during the processes of mixing
and pugging, pressure can build up inside the hopper.
Operation
Do not modify the unit. Do not use it for
purposes other than pottery making.
than mixing or pugging pottery clay. Failure to follow this could
result in malfunction and/or accident.
User limitation
In facilities where multiple people use this unit, designate a person
to supervise the pugmill’s use. Never allow anyone who is
unfamiliar with this unit to operate it. Everyone who has access to
use the pug mill should have a complete understaning of the
instruction manual.
Do not put hands into the clay extruding
slot.
result in injury.
Power cord and plug
Do not obstruct access to the power cord or
plug.
Failure to follow this could prevent you from easily unplugging the
power cord or plug in an emergency.
When the unit is not being used, turn the
power OFF.
When the unit is not being used for an extended period of time, or
there is a possibility of lighting, turn OFF the power as well as
unplugging the unit from the outlet.
Maintenance
Turn the power OFF and unplug the unit
before inspection or other relevant
circumstances.
Before cleaning, inspecting, adjusting or other replacement
procedures, turn OFF the power as well as unplug the unit from
the outlet.
Never pour water direct on the unit to clean.
Never pour water directly on the pugmill to clean it. Doing so
could result in electric leakage and/or malfunction. To clean, wipe
off the unit with a damp sponge, towel, etc.
* Only the auger screw and nozzle can be cleaned directly with
water after being fully disassembled.
4

5
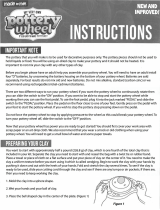
Vacuum gauge
Vacuum pressure relief valve
Limit switch sensor
Switch panel
Hopper case
Indicator
Caster
Power cord
Filter
Hopper cover
Vacuum chamber
Nozzle (with extruding slot)
Clay cutter
Clay roller shelf
Nozzle cover
Exhaust outlet
Hopper inlet
Auger screw
Air inlet
Switch panel
Power switch
(breaker)
Selector switch
Screw speed control
Vacuum pump switch
Model NVS-07
Power AC115V, 60Hz
Motor capacity 750 W
Vacuum pump 250 W
Ambient temperature +50 °F to 104 °F
Ambient humidity 85% or less (no condensation)
Altitude 3280 ft or less
External dimensions 48 in (including the supporting plate) x 17 in x 35 in
Weight 309 lbs
Diameter of the extruding slot Φ3.5 in
Supply of clay appox. 45 lbs
Extruding capacity 720 lbs/hr (pugging only)
Specifi cation
Parts List
Do not touch with wet hand.
Cause electric shock and breakdown.
CAUTION
Keep your hands out of the mill at all
times unless cord is unplugged
ELECTRIC HAZARD
Disconnect power before servicing.

6
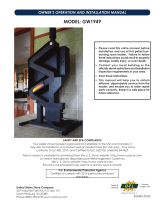
(Unpacking procedure)
• Remove the cardboards and cushioning materials
around the unit.
• Cut off the cardboard around the bottom of the
unit.
• Slightly tilt the unit to remove two bases that
support the unit.
• Unlock all four wheels.
• Slowly push the unit forward while holding it
securely. Then unload it from the pallet.
The toolbox contains the clay roller shelf, tools,
instruction manual, and warranty card.
Item Quantity Remarks
Main unit 1
Supporting plate 1
Front cover 1
Double-end wrench 2 17 x 13; used to tighten or loosen the nozzle and screws
Allen wrench 1 M2.5; used to replace stainless steel wire for clay cutter
Instruction manual 1
Warranty card 1
● Since the NVS-07 is very heavy, exercise care when unpacking so the unit does not drop.
The unit weight is approximately 309 lbs.
Have three or more people unpack this unit.
Cut off the cardboard
around the bottom of
the unit.
Slightly tilt the main unit to
remove the base (also the
opposite one).
Slowly unload the unit from the pallet.
(Installation)
• Install the unit. In a location for rattle-free
operation and lock the casters.
• Place the clay roller shelf in the groove and support
below the nozzle.
• Fit the front cover to the nozzle
Danger
Items included
Installation and preparation

7
Unplug the power cord from the outlet in an emergency. The power cord also works as a breaker.
* Install the unit properly so you can access the power cord immediately in an emergency.
Mixing conditions vary depending on the type of clay, its hardness as well as the amount of water added. To recycle
clay properly, familiarize yourself with this unit’s operations. Carefully read the instruction manual before use.
Mixing conditions vary depending on the type of clay, its hardness as well as the amount of water added. To
recycle clay properly, familiarize yourself with this unit’s operations. Carefully read the instruction manual
before use.
To vacuum pump
Vacuum chamber
Gap between hopper cover and case
Air intake
Switch panel
Power switch
(breaker)
Selector switch
Screw speed control
Vacuum pump switch
Function of each switch
Power switch (breaker)
Turns the power ON/OFF. Automatically turns OFF in the event of an
electrical overload or the like.
Selector switch
MIX Mixes clay with water.
STOP Stops the auger screw; resets any current error
PUG Extrudes clay
Screw speed control Controls the screw speed.
Vacuum pump switch
Turns ON/OFF the vacuum pump.
(When the case is vacuum inside, the vacuum pump may be inoperable.
To turn OFF the vacuum pump after the vacuum operation and then turn
it ON again, open the vacuum stopcock to achieve normal pressure and
then turn ON the vacuum pump.
*
Always start with the selector switch in the STOP position when turning ON the unit. The auger screw will not turn if the
selector switch is set at MIX or PUG. If it is in either position, set the selector back to STOP, then set to either MIX or PUG.
* If the unit shuts down due to overload or the indicator is showing an error (e.g., OL1), set the selector switch to STOP.
This will reset the error, allowing you to restart the operation.
Before use
Principle for recycling of clay
Operation

8
1. Close the hopper cover.
2. Open the pressure relief valve.
3. Check that the power switch is OFF.
4. Check that the selector switch is set to STOP.
5. Check that the vacuum pump switch is OFF.
6. Check that the power cord is unplugged.
7. Check that the auger screw
bolts are securely
tightened.
* Be sure to check each time before use. If the
screw becomes detached, the unit could become
damaged.
Possible unintended issues while operating:
• If the power cord and the limit switch sensor are
damaged, there is the potential danger of electric
shock and/or short circuit.
• The limit switch sensor and its cord are damaged,
as such, “the screw does not rotating” or “the auger
screw does not rotate”, regardless of opening/closing
the door.
• If the internal circuits are damaged, “the direction of
rotation could not be switched” or “the rotating speed
could not be adjusted”.
If these issues arise while operating, stop using the unit
and contact your dealer or our
Do not operate any switches with wet hands.
Warning
1
2
3
4
5
7
6·8
1. Supply clay.
• About 45 lbs of clay can be mixed at one time. If
the amount is too small, it will take longer for the
clay to be recycled or the clay will not extrude. It is
necessary to
the barrel to the appropriate level.
• If the clay is in large clumps, break them down to
an appropriate size
Very wet clay cannot be
recycled by itself. To recycle really wet clay, either
dry it out some,
then recycle it or add dry clay to
the mixture.
2. Feed clay.
• Do not add too much clay into the hopper at once,
otherwise the hopper cover may not shut. Add enough
clay to see the top of the auger screw.
• While mixing, more room may be created as the
mixture compacts, After a short mixing time, add
additional clay to
back up to the top of the auger
screw.
Make it smaller than your
Feed clay to a level that allows you to view the top of the screw.
Preparation for use
Operation procedure

9
The auger screw automatically stops after 2 hours of
continuous running, to prevent the mixed clay from
generating too much heat.
When the auger screw is stopped by the timer, “END”
will appear in the indicator box. Should this occur,
return the selector switch back to “STOP” to restart
the operation.
3. Add water.
• Add an appropriate amount of water.
• If the amount of water is not enough, an overload may
occur, causing the auger screw to stop. If the amount
of water is too much, the clay will become too soft,
preventing the clay from being mixed and extruded.
If you do not know how much water to add, add
water in gradually while keeping note.
Do not operate the vacuum pump until the clay has the
proper amount of water. Powdered components may clog
the vacuum chamber if the vacuum is turned on too soon.
Add an appropriate amount of water.
4. Close the hopper cover.
• Close the hopper cover. If there clay on either rim
surface of the case or hopper cover, wipe it off. both
surfaces must be clean to create a good seal.
Push down on the handle so the hopper cover can
properly lock into the case.
Push down on the handle so the hopper cover can properly
lock into the case.
5. Mixing process
Turn ON the power switch and set the selector switch to
MIX. Slowly turn the screw speed control to select 6 to 8.
• If there is not enough clay in the hopper, stop the
auger screw and add more clay and water. To stop the
auger, return the speed control to 0, set the selector to
STOP, then turn OFF the power switch.
• Continue mixing for a while. If the electric current of
the motor exceeds 3.0 A, add water.
Do not access any switch with wet hand.
Warning
screw speed control
to select 6 to 8.
Turn ON the
power switch
Set the selector
switch to MIX
Do not set the speed control between 0 to 3.5.
If the auger screw is turns at too low a speed,
too much current will
to the motor,
triggering the auger screw to stop.
Note)
The hopper cover has a limit switch sensor that
detects when the cover is open or closed. If too
much vibration is generated due to too large
of clay chunks, the limit switch sensor may be
triggered, causing the screw to stop.
If the limit switch sensor gets trigger too
frequently, the motor may shut down due to
overload.
Note)
Note) Note)
Operation procedure

10
7. Vacuuming (de-airing) process
• When the clay reaches the appropriate consistency,
remove any clay that might be clogging the air inlet. If
clay covers the air inlets, the readings on the vacuum
gauge will increase, but the inside of the may not be
de-aired.
6. Checking the mixed state
• Carry out mixing for a while and when the electric
current value of the motor becomes stable, check the
state of clay. If the clay is too hard, added water; if it
is too soft, add hard clay.
• Make sure the nozzle cover is clean, then place it over
the nozzle.
• Close the vacuum’s pressure relief valve, then turn ON
the vacuum pump. The reading on the vacuum gauge
will gradually increase. The gauge should reach a
minimum of 0.09 Mpa.
• Set the selector switch to MIX. Slowly set the speed
control to 6 to 8.
If the vacuum pressure suddenly increases,
the gap between the door, near the air inlet,
and the case might be clogged with clay.
Remove the clay in that gap. If this does not
the issue, there might be too much clay being
mixed. Decrease the amount of clay.
• Mix clay with water and then continue the operation
of the vacuum pump and the screw for about three
minutes.
Clay becomes harder as it is de-aired.
Therefore, the mixed clay should be softer than
what is desired for use.
Clean both surfaces of the hopper cover and the case
(including the gasket).
Remove clay
between the
hopper cover and
the case and from
the air inlet.
Gap between hopper cover and case
Air inlet
If the gap between the hopper cover, near the air inlet, and
the case are clogged with clay, do de-airing will occur.
Note)
Set the selector
switch to STOP
Note)
the
electric current
value showed in
the indicator
Operation procedure

11
9. When Pugging is complete
• When no more clay comes out of the nozzle, open
the pressure relief valve and stop the auger screw.
• In order to dry the inside of the vacuum pump,
continue to operate the vacuum pump for about one
minute.
8. Extruding process
• Install the roller clay shelf.
• After about three minutes of mixing with the vacuum,
change the selector switch from MIX to PUG.
Continue to de-air during this time.
• When clay comes out of the nozzle, remove the front
cover.
• Cut the clay into appropriate length.
Fit the pin on the roller clay
shelf into the groove on the
nozzle side to lock the shelf.
Open the vacuum stopcock and stop the screw.
If the vacuum pump is left with its inside wet, it
may malfunction over time.
• After the vacuum pump has operated without
clay, stop it, turn OFF the power switch, and then
disconnect the power plug.
• Securely
the nozzle cover so the clay inside will not
dry out.
• If you do not plan on using the unit for an extended
period of time, clean out the unit before letting it sit.
If the clay in the nozzle becomes hard, no clay
will be extruded when the NVS-07 is used.
To close the roller clay shelf, slowly do so
without releasing your hands until the shelf
becomes vertical.
Tips for successfully recycling clay
Note)
Note)
Note)
1. Immediately after water has been added, the screw
and clay stick to each other, causing the screw to
idle away. However, as mixing is continued in the
idling state, the clay will be homogeneously mixed
with water.
2. If not enough clay is added, it will take a longer time
to mix and extrude the clay successfully.
3. If too much clay is added, the gap near the air inlet
may get clogged with clay, preventing de-airing. If
this occurs remove some of the clay to reach the
desired amount.
4. If the clay is too hard after de-airing, begin de-airing
when the clay is softer.
Operation procedure

12
● Display of indicator
Display Description Remarks
0.00A
Shows the electric current output to the motor. It
is different from the consumption current of the
NVS-07.
See the following table for electric current values vs. clay
states.
OL1
Overload error:
Displayed when the clay is hard or there is too
much clay in the hopper.
Add water or decrease clay and then restart the NVS-07.
The displayed error can be reset by pressing the selector
switch once.
Er6
Start check error:Displayed when the selector
switch is set to MIX or PUG.
Temporarily change the selector switch to STOP and
then set it again to MIX or PUG.
LU
This will start the operation. Displayed if the
power supply voltage is
or if the
power is turned OFF and then immediately
turned ON again.
After all the display of the indicator has disappeared, turn
ON the power.
● Electric current values vs. clay states
Electric current value Clay state
2.0 A or less Clay sticks to the screw, which is therefore idling away.
2.0 - 2.3 A Clay is slightly soft.
2.3 - 3.0 A Clay is appropriately hard.
3.0 - 3.2 A Clay is slightly hard.
3.2 A or more The screw is overloaded;it stops during continuous operation.
Symptom Cause Remedial action
No clay is extruded.
There is not enough clay.
Add clay until the case is with that
clay.
The clay in the case is too soft.
Since the clay is soft, add slightly hard
clay.
The clay in the nozzle is hard. Remove the clay in the nozzle.
Rough-surfaced clay comes out of the
extruding slot.
Dry clay is stuck inside the nozzle. Clean the inside of the nozzle.
Clay is extruded as it rotates.
Clay is soft. Add slightly hard clay.
The extruded clay has holes.
The screw stops.The circuit breaker
trips.
Clay is hard during mixing. Add water to make the clay softer.
A large clay lump is caught between
the screw and the case.
Remove the clay lump.
There is too much clay. Remove some clay
The clay in the nozzle becomes hard. The clay in the nozzle is dried. Clean the nozzle by removing it.
The vacuum pressure is low.The
degree of vacuum does not increase.
The gap between the hopper cover
and the case becomes larger.
Use wet cloth or the like to clean the
mating surfaces of the case and the
hopper cover.
The
is clogged. Clean the
Clay is not de-aired.
The air inlet is clogged with clay.
Before de-airing, clean the air inlet and
its peripheral area. If the air inlet is still
clogged with clay during mixing, there
is too much clay. Remove some clay.
De-airing time was too short. Extend the mixing time in vacuum.
Clay comes up to the vacuum
chamber.
There is too much clay.
Remove the vacuum chamber cover
(acrylic plate) and remove clay.
The vacuum pump is not operating
properly.
The hopper case is already vacuumed,
preventing the pump valve from being
actuated.
The vacuum pump may stop working
when the hopper case is already
vacuumed. Open the pressure relief
valve to pressurize the hopper then
start the operating the vacuum.
The hopper cover will not open even if
the pressure relief valve is opened.
The air inlet is clogged with clay,
keeping the hopper case vacuumed.
Insert a thin rod or the like from the
nozzle end to allow air to
into the
hopper case.
Display and description of indicators
Troubleshooting

13
Be sure to unplug the power
cord before starting work. Do not
access the power plug with wet
hand.
Caution
1. Set the selector switch to MIX and rotate the
auger screw until the check bolt is positioned at
the top.
2. Unplug the power cord from the electric outlet.
3. Remove the roller clay shelf.
4. Remove the nozzle and clean its insides
thoroughly. Since the nozzle is heavy, handle it
with care.
5. Remove the auger screw.
• Loosen the check bolt on the auger screw and
pull it out.
• Clean the auger screw thoroughly. Carefully
clean the motor shaft mounting holes in the
auger screw. Remove any clay on the motor
shaft with a wet cloth or sponge.
6. Clean the inside of the hopper case thoroughly.
Do not clean the inside of the hopper by
it with water. This may cause electric devices to
get water on them.
Screw check
bolt
Nozzle check
bolt in four
places
Disassembling
1. Clean the motor shaft and the auger screw
mounting holes. If any clay remains, the auger
screw should not be installed; damage may occur,
preventing future assembly and disassembly.
2. Install the auger screw on the motor shaft and
securely tighten the auger screw mounting bolts.
3. Carefully clean the nozzle mounting surface of
the hopper case as well as the O-ring mounting
surface of the nozzle.
4. Attach the O-ring to the nozzle and mount the
nozzle back on to the hopper case.
Reassembling
1. Plug the power cord into the electric outlet. Start
test operation without adding clay.
2. Close the hopper cover.
3. Turn ON the power switch.
4. Set the selector switch to MIX and listen for
rotating sound of the auger screw.
5. Make sure that there is no vibration, rattling, and
abnormal noise in the main unit.
6. Check that the auger screw stops when the
hopper cover is opened.
Test operation
Replacing the
If the is clogged, preventing the hopper case
from vacuuming properly, replace the
1. Set the
selector
switch to MIX
2. Unplug the
power cord
3. Remove the
roller clay
shelf.
4. Remove the
nozzle
Maintenance

14
Remove the broken stainless steel wire.
Secure the wire to point A.
Slightly bend the cutter in direction B and
then secure the wire to point C.
If the stainless steel wire is broken, replace it as
follows:
• Purchase a commercially available
stainless steel welding rod
Φ0.045 gauge.
• Contact your local government as the disposal method differs depending on local governments.
• Do not disassemble the NVS-07 when disposing of it.
Replacing the stainless steel wire (to cut clay)
Extruding slot
Cutter
Stainless steel wire
A
B
C
Maintenance
Disposal method

15

MANUFACTURED BY
NIDEC-SHIMPO CORPORATION
175 Wall Street
Glendale Heights, IL 60139
Phone: 1-800-237-7079 Fax: 630-924-0340
/