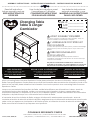
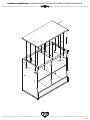
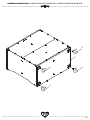
Delta Children Essex Changing Table/Bookcase Assembly Instructions
- Type
- Assembly Instructions

Read all instructions
before assembly and use.
KEEP INSTRUCTIONS FOR
FUTURE USE.
Lisez toutes les instructions avant
l’assemblage et l’utilisation.
CONSERVEZ LES INSTRUCTIONS
POUR UN USAGE ULTERIEUR.
Lea todas las instrucciones
antes de ensamblar y usar.
MANTENGA LAS INSTRUCCIONES
PARA SU USO FUTURO.
When contacting Delta Consumer Experience Center please reference the above information. Before contacting
Delta Consumer Experience Center please ensure that the information above matches the information found on the
label on the Top Shelf, please reference the information found on the product when contacting Delta Consumer
Experience Center.
Lorsque vous contactez le Service client de Delta, veuillez faire référence aux informations ci-dessus. Avant de
contacter le Service client de Delta, veuillez vous assurer que les informations ci-dessus correspondent aux
informations indiquées sur l’étiquette qui se trouve sur le Tablette supérieur; veuillez faire référence aux informations
indiquées sur le produit lorsque vous contactez le Service client de Delta.
Al contactar al servicio al cliente de Delta, entregue la información anteriormente mencionada. Antes de
contactar al servicio de atención al cliente de Delta, asegúrese de que la información anteriormente mencionada
calza con la que aparece en la etiqueta en el Estante superior; al contactar al centro de atención al cliente de
Delta, mencione la información que aparece en el producto.
CONSUMER EXPERIENCE CENTER
Delta Children’s Products Corp |114 West 26th Street New York, NY 10001
(646) 435-8727 | [email protected] | www.DeltaChildren.com
Style #:
Lot:
Date:
___________
___________
___________
A
REV
This product is not intended for institutional or commercial use.
Ce produit ne pas destine a un usage institutionnel ou commercial.
Este producto no esta hecho para uso institucional o comercial.
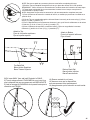
ADULT ASSEMBLY REQUIRED
Due to the presence of small parts during assembly, keep out
of reach of children until assembly is complete.
L’ASSEMBLAGE DOIT ETRE FAIT
PAR UN ADULTE
A cause de la presence de petites pieces, pendant l’assemblage
gardez hors de portee des enfants jusqu'a ce que celui-ci soit
termine.
DEBE SER ENSAMBLADO
POR UN ADULTO
Debido a la presencia de piezas pequeñas durante el
ensamblaje, mantenga fuera del alcance de los niños hasta que
complete el ensamblaje.
NEED EXTRA HELP?
We make assembly easy with
our tips & tricks video
https://www.deltachildren.com/
pages/instructions
BESOIN D'AIDE SUPPLÉMENTAIRE?
Nous facilitons l'assemblage avec
nos trucs et astuces vidéo
https://www.deltachildren.com/
pages/instructions
¿NECESITA AYUDA EXTRA?
Hacemos el montaje fácil con
nuestros consejos y trucos video
https://www.deltachildren.com/
pages/instructions
June 21, 2019, 29385, R0
©2019 DELTA ENTERPRISE CORP.
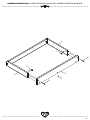
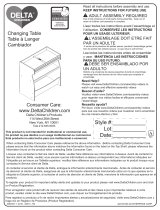
ASSEMBLY INSTRUCTIONS • INSTRUCTIONS DE MONTAGE • INSTRUCCIONES DE MONTAJE
Changing Table
Table à Langer
Cambiador

2
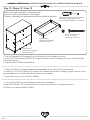
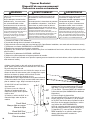
NOTES ON ASSEMBLY:
-During the assembly process whenever using screws or bolts, check each by placing the screw/bolt on
the diagram of the item which is drawn actual size and design. Be sure to use the proper size and shape
specified in the instructions.
-To assemble this unit you may be required to place the unit on it’s side and face. It is strongly
recommended that assembly is done on a soft, non-abrasive surface to avoid damaging the finish.
NOTES ON CARE AND MAINTENANCE:
- Do not scratch or chip the finish.
- Inspect the product periodically, contact Delta Children's Products for replacement parts or questions.
- Do not store the product or any parts in extreme temperatures and conditions such as a hot attic or a
damp, cold basement. These extremes can cause a loss of structural integrity.
-To preserve the luster of the high quality finish on your product, it is recommended to place a doily or
felt pad under any items you place on the finish.
-Clean with a damp cloth, then a dry cloth to preserve the original luster and beauty of this fine finish.
-Do not use abrasive chemicals.
-Do not spray cleaners directly onto furniture.
-Lift slightly when moving on carpeting to prevent leg breakage.
-Use of a vaporizer near furniture will cause wood to swell and finish to peel.
NOTES ON USE:
Keep children and others safe by following these simple rules:
- Do not allow any child to play on furniture
- Do not allow climbing on any piece of furniture.
- Do not allow hanging from any piece of furniture.
- Always monitor your child’s activity when in the nursery.
Fall Hazard Children have suffered serious injuries after falling from changing tables. Falls can happen
quickly.
• STAY within arm’s reach of the child.
•Read all instructions before use of the changing table.
•KEEP THESE INSTRUCTIONS IN A SAFE PLACE FOR FUTURE USE.
•Inspect the changing table periodically. Do not use the changing table if it is damaged or broken.
Contact Delta Children's Products with any questions.
•Tighten all loose screws and bolts before each use.
•The maximum recommended weight of the child is 30lbs for the changing table.
•Use only the pad provided by Delta Children’s Products.
WARNING
Page is loading ...
Page is loading ...

ASSEMBLY INSTRUCTIONS • INSTRUCTIONS DE MONTAGE • INSTRUCCIONES DE MONTAJEASSEMBLY INSTRUCTIONS • INSTRUCTIONS DE MONTAGE • INSTRUCCIONES DE MONTAJEASSEMBLY INSTRUCTIONS • INSTRUCTIONS DE MONTAGE • INSTRUCCIONES DE MONTAJE
Your Next Purchase From
DeltaChildren.com
Welcome to the
Here's a Gift From Us To You
DELTA FAMILY
*Subject to Change
*Exclusions Apply
DELTA10
USE CODE:
Visit Deltachildren.com To Start Shopping
REVIEW TO WIN $2500
R ULES T O E NTE R
My husband was impressed with the directions and organization of the hardware package.
He easily assembled this crib in an hour without any help. It's very sturdy and we like that it
has adjustable levels for the mattress height. To top it all off, it's so incredibly darling!!!
“We LOVE, LOVE, LOVE this crib”
WRITE A REVIEW for this product on the store’s website from where it was purchased
1
TAKE A SCREENSHOT of your review and upload it to www.DeltaChildren.com/Review
2
IT’S THAT EASY! Upon submission, you’ll be instantly ENTERED TO WIN $2,500
3
DELTA CHILDREN
SAVE BIG WITH
@deltachildren
FOLLOW US FOR MORE CHANCES TO WIN
SCAN HERE
For more
information &
to see all of
our products
5

ASSEMBLY INSTRUCTIONS • INSTRUCTIONS DE MONTAGE • INSTRUCCIONES DE MONTAJEASSEMBLY INSTRUCTIONS • INSTRUCTIONS DE MONTAGE • INSTRUCCIONES DE MONTAJEASSEMBLY INSTRUCTIONS • INSTRUCTIONS DE MONTAGE • INSTRUCCIONES DE MONTAJE
DELTA CHILDREN
@deltachildren
SUIVEZ NOUS POUR AVOIR PLUS DE CHANCES DE GAGNER /
SÍGANOS PARA TENER MAS CHANCES DE GANAR
SCANNEZ ICI / ESCANEE AQUÍ
Pour plus d'informations et
pour voir tous nos produits
Para más información y para
ver todos nuestros productos
ÉCONOMISEZ BEAUCOUP AVEC
AHORRE MUCHO CON
Visitez Deltachilren.com Pour Commencer Vos Achats
Visita Deltachilren.com Para Comenzar A Comprar
FAMILLE DELTA
Bienvenue dans la
Voici Notre Cadeau Pour Vous
Votre Prochain Achat Chez
*Subject to Change
*Exclusions Apply
*Des exclusions s’appliquent
*Sujet à changement
Aquí Está Nuestro Regalo Para Usted
FAMILIA DELTA
Bienvenido a la
Su Próxima Compra En
DeltaChildren.com
DELTA10
UTILISEZ LE CODE:
UTILICE EL CÓDIGO:
ECRIVEZ UN COMMENTAIRE CLIENT pour ce produit sur le site web du magasin où il a été acheté
CALIFIQUE EL PRODUCTO en la página web de la tienda donde haya sido comprado
1
FAITES UNE CAPTURE D’ECRAN de votre commentaire client et mettez la en ligne sur www.DeltaChildren.com/Review
HAGA UNA CAPTURA DE PANTALLA de su calificación y cárguela a la pagina www.DeltaChildren.com/Review
2
C’EST AUSSI SIMPLE QUE ÇA! Dès que c’est fait vous serez instantanément INSCRIT POUR GAGNER 2500$
ES ASÍ DE FÁCIL! En cuanto lo envíe ya estará instantáneamente PARTICIPANDO PARA GANAR $2.500
3
REGLEMENT DE PARTICIPATION / REGLAS PARA PARTICIPAR
LAISSEZ UN COMMENTAIRE CLIENT POUR GAGNER $2500
CALIFIQUE EL PRODUCTO PARA GANAR $2500
6

ASSEMBLY INSTRUCTIONS • INSTRUCTIONS DE MONTAGE • INSTRUCCIONES DE MONTAJE
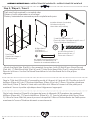
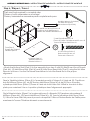
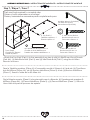
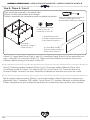
PARTS: MAKE SURE THAT ALL PRE-ASSEMBLED PARTS ARE TIGHT
PIÈCES : VÉRIFIEZ QUE TOUTES LES PIÈCES PRÉ-MONTÉES SONT BIEN SERRÉES.
PIEZAS: ASEGÚRESE DE QUE TODAS LAS PIEZAS PRE-ENSAMBLADAS ESTÁN BIEN APRETADAS.
ASSEMBLY INSTRUCTIONS • INSTRUCTIONS DE MONTAGE • INSTRUCCIONES DE MONTAJE
7
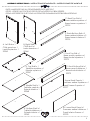
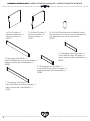
A. Left Side x 1
Côté gauche x 1
Lado izquierdo x 1
29365
H. Top Shelf x 1
Tablette supérieur x 1
Estante superior x 1
29367
J. Middle Shelf x 1
Tablette central x 1
Estante Medio x 1
29368
K. Bottom Shelf x 1
Tablette inférieur x 1
Estante inferior x 1
29369
B. Right Side x 1
Côté droit x 1
Lado derecho x 1
29366
C. Back Top Rail x 1
Barre arrière supérieur x 1
Barra trasero superior x 1
29374
E. Back Bottom Rail x 2
Barre arrière inférieur x 2
Barra trasero inferior x 2
29376
G. Front Bottom Rail x 1
Barre avant inférieur x 1
Barra frontal inferior x 1
29373
L. Upper Back Panel x 1
Panneau arrière Supérieur x 1
Panel Trasero Superior x 1
29377
M. Lower Back Panel x 1
Panneau arrière Inférieur x 1
Panel Inferior Trasero x 1
29378
F. Front Top Rail x 1
Barre avant supérieur x 1
Barra frontal superior x 1
29372
Page is loading ...

ASSEMBLY INSTRUCTIONS • INSTRUCTIONS DE MONTAGE • INSTRUCCIONES DE MONTAJEASSEMBLY INSTRUCTIONS • INSTRUCTIONS DE MONTAGE • INSTRUCCIONES DE MONTAJE
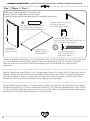
Parts: Hardware kits part#29384
Pièces: L'ensemble de quincaillerie - pièce n°29384
Piezas: El kit de herramientas - Pieza #29384
X. M6 x 40 mm Bolt x 4
Boulon M6 x 40 mm x 4
Perno M6 x 40mm x 4
5465
Y. M6 x 30 mm Bolt x 4
Boulon M6 x 30 mm x 4
Perno M6 x 30mm x 4
5463
W. M6 x 50 mm Bolt x 29
Boulon M6 x 50 mm x 29
Perno M6 x 50mm x 29
5467
Z. M6x13mm Barrel Nut x 29
Écrous À Portée Cylindrique M6x13 mm x 29
Tuerca Cilíndrica M6x13mm x 29
5483
M4 Allen Wrench (included)
Clé Allen M4 (inclus)
Llave Allen M4 (incluido)
1177
CC. 15 mm Screw x 20
Vis de 15 mm x 20
Tornillo de 15 mm x 20
5577
BB. 37 mm Screw x 3
Vis de 37 mm x 3
Tornillo de 37 mm x 3
5800
Flat Head Screwdriver (not supplied)
Tournevis à tête plate (non fourni)
Destornillador plano (no suministrado)
Phillips Screwdriver (Not Provided)
Tournevis’Phillips’(Non Prévu)
Destornillardor’Phillips’(No siempre)
No drills necessary. Do not use power
screwdriver.
Aucun forage n’est nécessaire. Ne pas
utiliser de tournevis électrique.
No hace falta taladrar No utilice
destornilladores eléctricos
AA. Φ6x30 mm Wood Dowel x 32
Cheville en bois Φ6x30mm x 32
Pasador de madera Φ6x30mm x 32
4491
9
YY. Short Screw x1
Vis Court
Tornillo corto
XX. Long Screw x1
Vis Longue
Tornillo Largo
TT. Washer x2
Rondelle
Arandela
ZZ. (1) Wall Strap/Sangle murale/Abrazadera
Page is loading ...

11
ASSEMBLY INSTRUCTIONS • INSTRUCTIONS DE MONTAGE • INSTRUCCIONES DE MONTAJEASSEMBLY INSTRUCTIONS • INSTRUCTIONS DE MONTAGE • INSTRUCCIONES DE MONTAJE
J
A
AA
Z
W
AA
Z
W
Page is loading ...

13
ASSEMBLY INSTRUCTIONS • INSTRUCTIONS DE MONTAGE • INSTRUCCIONES DE MONTAJEASSEMBLY INSTRUCTIONS • INSTRUCTIONS DE MONTAGE • INSTRUCCIONES DE MONTAJE
N
J
AA
AA
AA
BACK!
ARRIÈRE!
POSTERIOR!
AA
P
Page is loading ...

15
ASSEMBLY INSTRUCTIONS • INSTRUCTIONS DE MONTAGE • INSTRUCCIONES DE MONTAJEASSEMBLY INSTRUCTIONS • INSTRUCTIONS DE MONTAGE • INSTRUCCIONES DE MONTAJE
A
AA
Z
E
E
C
W
W
Z
W
Z
W
Z
AA
Z
W
AA
Z
W
BACK!
ARRIÈRE!
POSTERIOR!
Page is loading ...

17
ASSEMBLY INSTRUCTIONS • INSTRUCTIONS DE MONTAGE • INSTRUCCIONES DE MONTAJEASSEMBLY INSTRUCTIONS • INSTRUCTIONS DE MONTAGE • INSTRUCCIONES DE MONTAJE
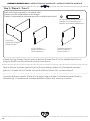
FRONT!
L'AVANT
el FRENTE
AA
Z
F
W
AA
AA
Z
G
W
Page is loading ...

19
ASSEMBLY INSTRUCTIONS • INSTRUCTIONS DE MONTAGE • INSTRUCCIONES DE MONTAJEASSEMBLY INSTRUCTIONS • INSTRUCTIONS DE MONTAGE • INSTRUCCIONES DE MONTAJE
B
W
W
W
W
Z
AA
AA
AA
AA
AA
AA
Z
Z
W
W
Z
Z
AA
Z

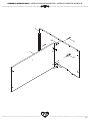
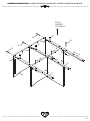
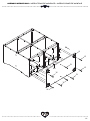
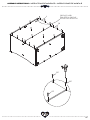
Attach the Bottom Shelf (Part K) to the assembly from step 5 with (8) Φ6x30 mm Wood Dowels
(Part AA), (8) M6x50mm Bolts (Part W) and (8) M6x13mm Barrel Nuts (Part Z) using the M4 Allen
Wrench as shown. Use the Flat Head Screwdriver to hold the Barrel Nut in the proper
alignment.
Fixez le Tablette inférieur (Pièce K) à l’ensemble monté à l’étape 5 à l’aide de (8) Cheville en
bois Φ6x30mm (Pièce AA), de (8) Boulons M6x50mm (Pièce W) et de (8) Écrou à portée
cylindrique M6x13mm (Pièce Z). Serrer à l’aide de la clé Allen M4. Utiliser le tournevis à tête
plate pour maintenir l’écrou à portée cylindrique dans l'alignement approprié.
Fije la Estante inferior (Pieza K) a la pieza del paso 5 utilizando (8) Pasadores de madera Φ
6x30mm (Pieza AA), (8) Pernos M6x50mm (Pieza W) y (8) Tuercas cilíndricas M6x13mm (Pieza
Z). Utilice la Llave Allen M4 para el proceso de apriete. Utilice el Destornillador de Paleta para
mantener la Tuerca Cilíndrica alineado correctamente.
From Step 5
À partir de l’étape 5
Desde el paso 5
ASSEMBLY INSTRUCTIONS • INSTRUCTIONS DE MONTAGE • INSTRUCCIONES DE MONTAJEASSEMBLY INSTRUCTIONS • INSTRUCTIONS DE MONTAGE • INSTRUCCIONES DE MONTAJE
20
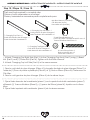
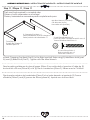
Step 6 / Étape 6 / Paso 6
Parts and tools required to complete step
Pièces et outils nécessaires au montage
Piezas y herramientas necesarias para completar este paso
Z. M6x13mm Barrel Nut x 8
Écrous À Portée Cylindrique M6x13 mm x 8
Tuerca Cilíndrica M6x13mm x 8
M4 Allen Wrench (included)
Clé Allen M4 (inclus)
Llave Allen M4 (incluido)
AA. Φ6x30 mm Wood Dowel x 8
Cheville en bois Φ6x30mm x 8
Pasador de madera Φ6x30mm x 8
W. M6 x 50 mm Bolt x 8
Boulon M6 x 50 mm x 8
Perno M6 x 50mm x 8
K. Bottom Shelf x 1
Tablette inférieur x 1
Estante inferior x 1

21
ASSEMBLY INSTRUCTIONS • INSTRUCTIONS DE MONTAGE • INSTRUCCIONES DE MONTAJEASSEMBLY INSTRUCTIONS • INSTRUCTIONS DE MONTAGE • INSTRUCCIONES DE MONTAJE
AA
W
K
W
W
W
W
W
W
Z
AA
AA
AA
Z
Z
Page is loading ...

23
ASSEMBLY INSTRUCTIONS • INSTRUCTIONS DE MONTAGE • INSTRUCCIONES DE MONTAJEASSEMBLY INSTRUCTIONS • INSTRUCTIONS DE MONTAGE • INSTRUCCIONES DE MONTAJE
H
AA
AA
Y
Y
AA
X
X
X
X
Y
Y
Page is loading ...

25
ASSEMBLY INSTRUCTIONS • INSTRUCTIONS DE MONTAGE • INSTRUCCIONES DE MONTAJEASSEMBLY INSTRUCTIONS • INSTRUCTIONS DE MONTAGE • INSTRUCCIONES DE MONTAJE
L
M
PRODUCT LABEL
ÉTIQUETTE DU PRODUIT
RÓTULO DEL PRODUCTO
CC
CC
CC

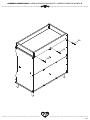
You have the option to attach either the (4) painted feet or the (4) natural color feet (Part R)
to the bottom of the case by hand, screwing them into the holes. Make sure all feet are tight
before standing your case back up.
Vous avez la possibilité d’attacher les (4) pieds peints ou les (4) pieds de couleur naturelle
(pièce R) au bas de la bibliothèque, en les vissant dans les trous. Assurez-vous que tous les
pieds sont fermement serrés avant de relever le Commode.
Tiene la opción de fijar los (4) pies pintados o los (4) pies de color natural (Pieza R) hacia la
parte inferior del mueble, atornillando a mano. Asegúrese de que todos los pies estén
apretados antes de volver a colocar el Cómoda derecho.
ASSEMBLY INSTRUCTIONS • INSTRUCTIONS DE MONTAGE • INSTRUCCIONES DE MONTAJEASSEMBLY INSTRUCTIONS • INSTRUCTIONS DE MONTAGE • INSTRUCCIONES DE MONTAJE
26
Step 9 / Étape 9 / Paso 9
Parts and tools required to complete step
Pièces et outils nécessaires au montage
Piezas y herramientas necesarias para completar este paso
From Step 8
À partir de l’étape 8
Desde el paso 8
R. Foot (x4 Painted and x4 Natural color)
Pied (peints x4 et de couleur naturelle x4)
Pie (pintado x4 y color natural x4)

27
ASSEMBLY INSTRUCTIONS • INSTRUCTIONS DE MONTAGE • INSTRUCCIONES DE MONTAJEASSEMBLY INSTRUCTIONS • INSTRUCTIONS DE MONTAGE • INSTRUCCIONES DE MONTAJE
K
R
R
R
R
Page is loading ...

V
U
Z
Z
W
W
T
29
ASSEMBLY INSTRUCTIONS • INSTRUCTIONS DE MONTAGE • INSTRUCCIONES DE MONTAJEASSEMBLY INSTRUCTIONS • INSTRUCTIONS DE MONTAGE • INSTRUCCIONES DE MONTAJE
Page is loading ...

V
U
Z
W
W
S
Z
31
ASSEMBLY INSTRUCTIONS • INSTRUCTIONS DE MONTAGE • INSTRUCCIONES DE MONTAJEASSEMBLY INSTRUCTIONS • INSTRUCTIONS DE MONTAGE • INSTRUCCIONES DE MONTAJE

ASSEMBLY INSTRUCTIONS • INSTRUCTIONS DE MONTAGE • INSTRUCCIONES DE MONTAJEASSEMBLY INSTRUCTIONS • INSTRUCTIONS DE MONTAGE • INSTRUCCIONES DE MONTAJE
32
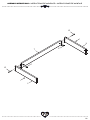
Step 12 / Étape 12 / Paso 12
Parts and tools required to complete step
Pièces et outils nécessaires au montage
Piezas y herramientas necesarias para completar este paso
From Step 11
À partir de l’étape 11
Desde el paso 11
From Step 9
À partir de l’étape 9
Desde el paso 9
Phillips Screwdriver (Not Provided)
Tournevis’Phillips’(Non Prévu)
Destornillardor’Phillips’(No siempre)
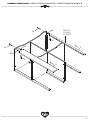
1. Set the Assembled Changing Top on the top of the Dresser as shown.
2. Insert (3) 37mm screws (Part FF) through the back of the Changing Top, into the pre drilled
holes the dresser.
3. Tighten with a Phillips Screwdriver.
1. Placer la Table à Langer maintenant assemblée sur le dessus de la commode.
2. Insérer (3) vis 37 mm (pièce FF) à partir de l’arrière de la table à langer, jusque dans les trous
de guidage que l’on vient de percer dans la commode.
3. Serrer au moyen d’un tournevis Phillips.
1. Poner el equipó de ensamblaje encima del cambiador.
2.Inserta (3) tornillos 37 mm (pieza FF) en la parte de atrás en los agujeros pilotos.
3.Apriete con destornillador Phillips.
BB. 37 mm Screw x 3
Vis de 37 mm x 3
Tornillo de 37 mm x 3
Page is loading ...
Page is loading ...
Page is loading ...
Page is loading ...
Page is loading ...
Page is loading ...
-
 1
1
-
 2
2
-
 3
3
-
 4
4
-
 5
5
-
 6
6
-
 7
7
-
 8
8
-
 9
9
-
 10
10
-
 11
11
-
 12
12
-
 13
13
-
 14
14
-
 15
15
-
 16
16
-
 17
17
-
 18
18
-
 19
19
-
 20
20
-
 21
21
-
 22
22
-
 23
23
-
 24
24
-
 25
25
-
 26
26
-
 27
27
-
 28
28
-
 29
29
-
 30
30
-
 31
31
-
 32
32
-
 33
33
-
 34
34
-
 35
35
-
 36
36
-
 37
37
-
 38
38


Delta Children Essex Changing Table/Bookcase Assembly Instructions
- Type
- Assembly Instructions
Ask a question and I''ll find the answer in the document
Finding information in a document is now easier with AI
in other languages
Related papers
-
 Delta Children Modbaby Changing Storage Unit User guide
-
 Delta Children 530240-026 User manual
-
 Delta Children Happy Home Storage Bookcase Assembly Instructions
-
 Delta Children Eclipse Changing Table Assembly Instructions
-
 Delta Children Lancaster Changing Table Installation guide
-
 Delta Children Bennington Elite Changing Table Assembly Instructions
-
 Delta Children Garrison Nursery Glider Swivel Recliner Featuring LiveSmart Fabric Assembly Instructions
-
 Delta Children Caleb Nursery Recliner Glider Swivel Chair Assembly Instructions
-
 Delta Children Independence 540242-026 Installation guide
-
 Delta Children Freedom Changing Table Assembly Instructions


Other documents
-
Kimex 031-1025 Installation guide
-
 Prime-Line F 2500 Installation guide
-
CAMBRIDGE SA-WU2730-WG Operating instructions
-
 MODWAY EEI-6401-LGR Assembly Instructions
-
 American Furniture Classics 1-504 Operating instructions
-
Home Decorators Collection 9484100410 Installation guide
-
Habitat 4077730 User manual
-
 Oxford & Garden Siena Sofa Assembly Instructions
-
 Oxford Garden Siena Club Chair Assembly Instructions
-
 Nursery Works LOOM CHANGING TABLE User manual


