Page is loading ...

OPERATOR’S MANUAL
844000
RELEASED: 9-13-99
REVISED:
4-
1-13
(REV.
E)
INCLUDING: OPERATION, INSTALLATION & MAINTENANCE
PULSATION DAMPENER
READ THIS MANUAL CAREFULLY BEFORE INSTALLING,
OPERATING O R SERVICING THIS EQUIPMENT.
It is the responsibility of the employer to place this information in the hands of the operator. Keep for future reference.
PULSATION DAMPENER DATA
Models 844000........................
Pump Type Non-metallic.....................
Material Conductive Acetal........................
Weight 5 lbs (2.3 kgs).........................
Maximum Fluid Inlet Pressure 100 p.s.i.g. (6.9 bar).......
Maximum Air Charge Pressure 100 p.s.i.g. (6.9 bar)......
Maximum Temperature Limits
Conductive Acetal 10_ to 180_ F(-12_ to 82_ C).........
PTFE 40_ to 225_ F(4_ to 107_ C)..................
Dimensional Data see page 6................
Material Inlet (standard) 1 - 11-1/2 N.P.T.F. - 1 (female)........
(fitting included) 1 - 11-1/2 B.S.P. (female)....
Air Inlet Air Chuck Style Valve........................
Accessories 873193 Mounting Pedestal..................
GENERAL DESCRIPTION
The Bink’s pulsation dampener is designed to work with 1:1 ratio pumps
having an outlet pressure not exceeding 100 p.s.i. (6.9 bar). The pulsa-
tion dampener will effectively reduce material pressure variations,
surges and shock to piping and delivery in fluid systems during pump re-
versal. It can significantly contribute to pulse reduction in low pressure
spray applications.
The pulsation dampener uses a single air pressurized, flexible bladder
working against the fluid line pressure. It requires manual pressurization
on initial start-up. An air pressure gauge is standard to monitor the air
side internal chamber pressure.
Pulsation dampener units can also be added in series to provide addi-
tional dampening on the material.
MODEL DESCRIPTION CHART
84400 0
Bladder Material
0 -- PTFE
R
CCN 99867038
U.S.A. / Canada Customer Service
195 Internationale Blvd
Glendale Heights, IL 60139
Tel. 630-237-5000
Fax. 630-237-5011
Toll Free Customer Service
and Technical Support
800-992-4657
Toll Free Fax
888-246-5732

844000Page 2 of 8
OPERATING AND SAFETY PRECAUTIONS
READ, UNDERSTAND AND FOLLOW THIS INFORMATION TO AVOID INJURY AND PROPERTY DAMAGE.
WARNING
EXPLOSION HAZARD. Do not exceed maximum
fluid inlet pressure of 100 p.s.i. (6.9 bar). Operating at higher
pressure can cause explosion resulting in properly damage or se-
vere injury.
WARNING
USE ONLY WITH COMPRESSED AIR. Do not use
bottled gas products to run the pulsation dampener. Unregulat-
ed high pressure bottled gas has the potential for over-pressuriza-
tion. Certain gasses such as Nitrogen can cause unpredictable
results. The pressure source MUST BE REGULATED.
WARNING
TEMPERATURE LIMITATIONS. Do not exceed
maximum temperature limits of 180_ F(82_ C). Excessive oper-
ating temperatures can weaken the body material. Limits are based
on mechanical stress only.
WARNING
CHEMICAL COMPATIBILITY HAZARD. Do not
usewithcertainfluids. Incompatiblefluidsmayattackandweaken
the housing causing rupture or explosion which can result In proper-
ly damage or severe injury. See manufacturers information on fluid
compatibility.
WARNING
DISASSEMBLY HAZARD. Do not disassemble
this unit when it is under pressure. Relieve all material pressure
in the pumping system before attempting service or disassembly.
Disconnect air lines and carefully bleed any pressure off the system.
Be certain the system is not maintaining pressure due to a material
restriction in the hose, line, dispensing device, or the spray or extru-
sion tip. Failure to relieve pressure both up stream and downstream
may result in an injury upon disassembly.
WARNING
MATERIAL ATOMIZATION. The relief / exhaust
valve must be piped away from the work area. In the event of a
diaphragm rupture, the material can be atomized and forced out the
relief / exhaust valve.
CAUTION
CHARGE WITH AIR BEFORE INTRODUCING MA-
TERIAL. Failure to charge with air first can damage diaphragm.
Air charge should not exceed 80% of the material inlet pressure.
CAUTION
NOT FOR STRUCTURAL SUPPORT. Do not use
this product to support other system components or use as a
step. Improper support can result in fracture of the housing, causing
damage. Plumbing must be supported to prevent stresses upon it.
Install using the mounting hardware supplied.
WARNING
CAUTION
NOTICE
= Hazards or unsafe practices which could
result in severe personal injury, death o r
substantial property damage.
= Hazards or unsafe practices which could
result in minor personal injury, product or
property damage.
= Important installation, operation or
maintenance information.
OPERATING INSTRUCTIONS
WARNING
HEED WARNINGS AS SHOWN IN “OPERATING
AND SAFETY PRECAUTIONS” ABOVE.
AIR REQUIREMENTS
Clean, dry air should be used to charge the unit.
Use a filter capable of filtering out particles larger than 50 microns on the
air supply.
INSTALLATION INSTRUCTIONS
Position the pulsation dampener as close to the pump discharge as pos-
sible.
Use the ground lug and 873067 grounding cable kit in applications
where flammable fluids are used, to help guard against static spark haz-
ard resulting in possible fire or explosion. The terminal on the end of the
ground wire must be removed and the wire stripped back 1/2” (13 mm) to
be accepted by the pulsation dampener ground fitting.
Mount the pulsation dampener in one of the recommended positions as
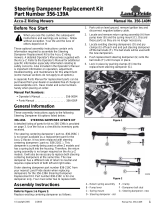
illustrated in the views in figure 1, page 3.
Different materials affect the mounting configuration. For best perfor-
mance and typical applications, mount the pulsation dampener upright
versus horizontally. Heavier particles in some fluids may settle out, grav-
ity will help discharge heavier particles when mounted vertically.
In many situations, mounting the unit directly to the pump outlet would
not be advisable due to the added weight of the unit. It should be inde-
pendently mounted and plumbed using flexible tubing and not expected
to physically support other components.
The material flow should be in the direction of the pulsation dampener,
not passing by at right angles for best results (see figure 1).
Use the mounting base as provided and additional 873193 mounting kit
is also available to gain extra vertical height. This may be necessary
when using pumps outlets 1” and larger, because of the increased size
and space requirements of the fittings. The second mounting kit is in-
verted to provide an elevated base (see figure 6, page 6).
When connecting pipe, cut or press the “knock-out” panels from the ped-
estal base as needed to accommodate piping. Do not alter or cut out oth-
er parts of the pedestal.
Pulsation dampeners used in series should be installed as illustrated in
figure 1.
OPERATION
1. Charge the shock blocker with 100 p.s.i. (6.9 bar) air pressure.
2. Operate the pump to generate material pressure.
NOTE: THE PULSATION DAMPENER INNER PRESSURE MUST BE
BELOW THE MATERIAL OPERATING PRESSURE FOR PROPER
RESULTS.
3. MONITOR THE GAUGE PRESSURE. RELIEVE OR ADD AIR
PRESSURE AS NEEDED to balance the pressure needed to deliv-
er the best pulsation dampening action. Best results will be obtained
when the dampener pressure is 80% of the material pressure.
4. Operate the system a few minutes between pressure adjustments
allowing for system equalizing.
NOTE: IF THE PRESSURE IS CHANGED, THE AIR SIDE MUST BE
ADJUSTED ACCORDINGLY.
SER VICE
NOTE: BE CERTAIN TO DISCONNECT THE AIR SUPPLY AND RE-
LIEVE FLUID PRESSURE BEFORE ATTEMPTING SERVICE OR
DISASSEMBLY.
CAUTION
RELIEVING AIR CHARGE WILL NOT AFFECT
THE FLUID SYSTEM PRESSURE. THE GAUGE READING
COULD FALSELY REPRESENT ANY RESIDUAL FLUID PRES -
SURE.

Page 3 of 8844000
INSTALLATION MOUNTING CONFIGURATIONS
Installation Note: The material flow should flow directly towards the pulsation dampener, not at a right angle to the flow path.
SINGLE UNIT
INSTALLATION
MULTIPLE UNIT
INSTALLATION
OUT OUT
OUT
OUT OUT
IN
IN
IN IN
IN
PREFERRED
PREFERREDNOT RECOMMENDED NOT RECOMMENDED
Figure 1
PULSATION DAMPENER PERFORMANCE
1” PUMP WITHOUT PULSATION DAMPENER
(From center chart at right)
1” PUMP WITH PULSATION DAMPENER
(From center chart at right)
1/2” PUMP % REDUCTION IN PULSATION
1” PUMP % REDUCTION IN PULSATION
1-1/2” & 2” PUMP % REDUCTION IN PULSATION
Figure 2
Flow (G.P.M.)
Flow (G.P.M.)
Flow (G.P.M.)
Fluid Pressure
PSI Back Pressure
Fluid Pressure
PSI Back Pressure
Fluid Pressure
PSI Back Pressure

844000Page 4 of 8
PARTS LIST
Item Description (size) Qty Part No. [Mtl]
1 Top Adapter (1) 873205 [GA]
2 Top End Cap (1) [GA]
3 Bottom End Cap (1) [GA]
4 Bottom Adapter (1 - 11-1/2 N.P.T. - 1) (1) 873206 [GA]
5 Ground Lug (1) [Co]
6 Self-Tapping Screw (1/4”-20x1”) (4) [C]
7 Square Ring (1) 873204 [B]
8 Bellows (1) 873203 [T]
9 Valve Assembly (1) 873328 [C]
10 Gauge (0 - 100 p.s.i. / 0 - 7 bar) (1)
11 “O” Ring (9/64” x 1-57/64” o.d.) (1) 873207 [B]
12 Relief Valve (1/4 - 18 N.P.T.) (1) 873329 [Br]
13 Bolt (M10-1.5x45mm) (10) [SS]
14 Washer (13/32” i.d.) (10) [SS]
15 Nut (M10 - 1.5) (10) [SS]
16 “O” Ring (9/64” x 1-31/32” o.d.) (2) 873208 [T]
17 Mounting Stand (see ‘‘A”, page 6) (1) 873193 [Pe]
18 Bottom Adapter (1 - 11-1/2 B.S.P.P.L.) (1) [GA]
19 Self-Tapping Screw (1/4”-20x1”) (1) [C]
20 Tube Seal (1/4” i.d. x 1-3/8” long) (2) [N]
21 Ground Kit (not shown) (1) 873067
MATERIAL CODE
[B] = Nitrile
[Br] = Brass
[C] = Carbon Steel
[Co] = Copper
[GA] = Groundable Acetal
[N] = Neoprene
[Pe] = Polyethylene
[SS] = Stainless Steel
[T] = PTFE
TROUBLE SHOOTING
No dampening effect or erratic performance.
S Check for bladder rupture.
S Check for blocked or restricted outlet hoses.
S Check for a solid object lodged in the fluid inlet or in the bladder area.
S Check to see that the air charge is 80% of the system pressure.
Fluid or air leakage at the top.
S Check for bladder rupture.
S Check for defective pressure relief valve.
S Check for damaged (11) “O” ring.
S Check the tightness of the flange bolts (50 - 60 in. lbs / 5.6 - 6.8 Nm).
Cracks in the housing.
S Discontinue use. This would indicate possible fluid incompatibility
with the pulsation dampener body material.
Figure 3
Suction
Outlet
Discharge
Air Pressure
Inlet
TYPICAL SYSTEM VIEW

Page 5 of 8844000
PARTS LIST
4/18
20
H 13
14
. 15
10
12
2
1 9 11 K
19
5
16 S
Torque Sequence
3
8
Figure 4
. Torque Requirements
,
(15) 50 - 60 in. lbs (5.6 - 6.8 Nm). Torque twice. Do not over-
tighten fasteners.
Lubrication
K Apply Key-Lube grease.
D Apply Key-Lube grease upon assembly if Key-Lube is compatible
with the fluid being pumped.
H Apply anti-seize compound to threads before assembly.
7

844000Page 6 of 8
DIMENSIONAL DATA
All dimensions are given in inches and (millimeters).
Figure 5
1/4 - 18 N.P.T.
5-9/32”
(134 mm)
7-1/2” (190.5 mm)
10-1/2”
(266.7 mm)
2-9/16”
(64.7 mm)
13-15/32”
(341.7 mm)
1-7/32”
(31 mm)
Air Chuck Valve
PEDESTAL DIMENSIONAL DATA
Figure 6
OPTIONAL 873193 PEDESTAL KIT
“A” A single pedestal is included along with four (6) screws with each unit.
“B” Optional 873193 accessory pedestal kit is available separately for use with
larger hoses and fittings to gain added height. The kit includes hardware.
10-1/2”
(266.7 mm)
21”
(533.4 mm)
23-9/16”
(598.1 mm)
5-1/4”
(133.4 mm)
15-3/4”
(400 mm)
18-5/16”
(464.8 mm)
5-13/16”
(147.6 mm)
3”
(76.2 mm)
2-1/2”
(63.5 mm)
3-3/4”
(95.3 mm)
8-1/8”
(206.4 mm)
9”
(228.6 mm)
1-11/16”
(42.9 mm)
3-3/8”
(85.7 mm)
4-1/2”
(114.3 mm)
45_
7/16” (11 mm)
3-3/4”
(95.3 mm)
(31.8 mm) 1-1/4”
1-1/4” Rad.
(31.8 mm)
11/32” Dia. (8.7 mm)
‘‘A”
‘‘A”
‘‘B”
Cut out panels as required.

Page 7 of 8844000

844000Page 8 of 8
PN 876046
/