Page is loading ...

Rev Date: 03/05/2018
Always visit www.hagerco.com for the latest Installation Instructions
COMPANIES 139 Victor Street, St. Louis, MO 63104 • (800) 325-9995
Page 1 of 4
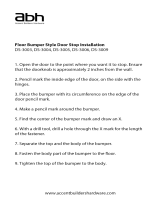
Tools Required
CONTENTS Quantity
MAXIMUM DOOR WEIGHT: 250 LBS.
MAXIMUM DOOR THICKNESS: 1-3/4"
Sliding Door Hardware
Flat Rail, Face Mount Installation Instructions
9457-72 Rev. 1
I-SD00378
HAGER
Pencil
Phillips Screwdriver
5/16" (8mm),
25/64"(10mm),
7/32" (5.5mm)
Drill Bits
Tape Measure
Square
Drill
Level
Router
1/4" (12.7mm) Router Bit
1/2" (6.35mm) Socket Set
Crescent Wrench
Allen Wrenches (included)
1
2
1
1
5
1
2
5
2
A. Flat Rail - 6'
B. Carrier
C. End Stop Right
D. End Stop Left
E. Mounting Plate
F. Floor Guide
G. Anti-Jump Bumper
H. M13
I. 4.2x32 Oval Head Screw
J. 8mm Anchor 2
A
B
C
D
G
J
I
F
H
E
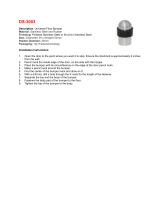
• Rail is designed to be secured on 16" centers or less (to line up with
wood or steel framing structures). For walls with greater spacing
between structural members, additional structure must be provided to
achieve the required fastener spacing.
• Lay out the location of the rail on the wall.
Ø5.5
50mm
120mm
H+43mm
Level
406mm 406mm 406mm 406mm
50mm
H+43mm
406mm 406mm 406mm 406mm
1830mm
H
10mm
1
MOUNT RAIL
NOTE: The rail must be level in order for the door to stay level.

Sliding Door Hardware
Flat Rail, Face Mount Installation Instructions
9457-72 Rev. 1
I-SD00378
Rev Date: 03/05/2018
Always visit www.hagerco.com for the latest Installation Instructions
COMPANIES 139 Victor Street, St. Louis, MO 63104 • (800) 325-9995
Page 2 of 4
HAGER
2
SECURE RAIL
• Place stop on rail near end of travel prior to
mounting rail.
• Mount rail to header using mounting plates and
provided bolts (H).
3
MOUNT CARRIERS
• Using a square, locate carrier location and mark
mounting holes using the carriers as a template.
NOTE: Carriers must be square to door to prevent
premature wear on carriers.
• Drill holes through door using a 25/64" (10mm)
drill bit. Drill Guide is recommended
• Mount carriers to door using provided screws.
90mm
150mm
40mm
Ø5.5
50mm

Sliding Door Hardware
Flat Rail, Face Mount Installation Instructions
9457-72 Rev. 1
I-SD00378
Rev Date: 03/05/2018
Always visit www.hagerco.com for the latest Installation Instructions
COMPANIES 139 Victor Street, St. Louis, MO 63104 • (800) 325-9995
Page 3 of 4
HAGER
4
MOUNT ANTI-JUMP BUMPERS
• Attach anti-jump bumper to the top of the door on the inside of each
carrier within 2" of carrier using provided screws.
10mm
5
PREPARE DOOR AND INSTALL
• Route bottom of door for floor guide using
1/4" (6.35mm) routing bit.
• Rotate anti-jump bumper away from backside of door.
• Hand door on rail by sliding on from the end. If space
does not allow, then with help from a partner, tip the
bottom edge of door away from track and place
carriers on the rail. Swing door down into position.
• Rotate anti-jump bumper back into position.
6
INSTALL FLOOR GUIDE
• Locate floor guide in the center of travel so that door is always contained by floor guide.
• Using floor guide as a template mark mounting hole locations.
• Drill pilot hole at least 1.18" (30mm) deep using a 5/16" (8mm) drill bit.
• Install 8mm anchors (K) and mount floor guide using provided screws (H).
7mm
20mm

Sliding Door Hardware
Flat Rail, Face Mount Installation Instructions
9457-72 Rev. 1
I-SD00378
Rev Date: 03/05/2018
Always visit www.hagerco.com for the latest Installation Instructions
COMPANIES 139 Victor Street, St. Louis, MO 63104 • (800) 325-9995
Page 4 of 4
HAGER
7
MOUNT DOOR STOPS
• Move door to end of travel making sure door is still contained by floor guide.
• Mount door stop using provided set screws.
• Repeat for other end.
/