Page is loading ...

Page 1 Page 2 Page 3 Page 4 Page 5
Levan Collection Double Glass
2 Light Vanity Wall Sconce
Home Depot SKU 723-389 (UPC 092903310317)
(Chrome Finish)
INSTRUCTION MANUAL

Page 1 Page 2 Page 3 Page 4 Page 5
FEATURES:
QUESTIONS, PROBLEMS, MISSING PARTS
CAUTION:
:
1. Durable easy to maintain finish; simply wipe with a clean soft cloth to keep looking new.
2. Type A15 medium base bulb lamp holder may be fitted with a CFL equivalent energy-
saving bulb (bulbs not included).
ASSEMBLY INSTRUCTIONS
1. Before starting to assemble your pendant fixture, spread all parts out on a clean flat
surface. Inspect each part for defects that may have occurred during shipping.
Important
: Inspect the wire insulation for any cuts, abrasions or exposed copper that may have
resulted during shipping. If there is a defect in the wire, DO NOT continue the assembly
operation. Please call our Customer Service Team at 1-877-385-2907.
2. CONSULT A QUALIFIED ELECTRICIAN IF YOU HAVE ANY ELECTRICAL
QUESTIONS.
3. Keep your receipt and these Instructions for Proof of Purchase.
Before returning to your Home Depot, please call our Customer Service Team at 1-877-385-2907
or visit www.homedepot.com. Please reference your SKU 723-389 when speaking to a Customer
Service agent.
Thank you for purchasing this Hampton Bay vanity fixture.This product has been manufactured
to the highest standards of safety and quality. The durable finish and glass shade provide for
care -free maintenance. Simply wipe with a clean towel to keep looking new.

Page 1 Page 2 Page 3 Page 4 Page 5
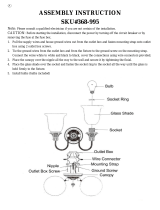
PARTS INCLUDED FOR ASSEMBLY (parts are not to scale):
TOOLS REQUIRED FOR ASSEMBLY:
ASSEMBLY INSTRUCTIONS
Light Bulb (not included)
(60-watt maximum Type A15 medium base bulb or CFL equivalent)
Phillips screwdriver
(not included)
Flathead screwdriver
(not included)
Wire stripper
(not included)
1. TURN OFF ELECTRICITY at main fuse box (or circuit breaker box) before begin-
ning installation by switching circuit breaker off or removing fuse. MIN 90º C
SUPPLY CONDUCTORS. CONSULT A QUALIFIED ELECTRICIAN TO ENSURE
CORRECT BRANCH CIRCUIT CONDUCTOR.
1 ea – fixture (F)
2 ea – Outlet
Box Screw (B)
3 ea –Wire Nut (C)
1 ea – Mounting
Strap (A)
2 ea – 3/8 in.
Machine Screw
(10 mm) (D)
1 ea – Green
Screw (E)
2 ea – Clear
Glass Shade (G)
2 ea – Frosted
Glass Shade (H)
2 ea – Socket
Nut (I)
2 ea – Rubber
ring (J)

Page 1 Page 2 Page 3 Page 4 Page 5
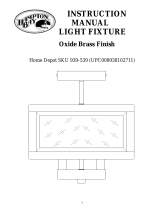
ASSEMBLY INSTRUCTIONS
2. Fasten mounting strap (A) onto the outlet box using
two outlet box screws (B). Ensure that all supply
circuit wires protrude out of the outlet box.
3. Strip 3/4 in. of insulation from wire ends of fixture
and of supply circuit wires. Attach ground supply
circuit wire (green or bare copper wire) to ground
fixture wire together with wire nut (C). (Alternatively,
if there is no ground supply circuit wire, only attach
the ground fixture wire to the mounting strap (A) with
the green screw (E)). Never connect ground wire to
black or white power supply wires.
4. Twist stripped wire ends of fixture and supply
circuit wires together black to black (hot) and white to
white (neutral). Twist on wire nuts (C), ensuring
conductors are no longer exposed. Carefully tuck
connected wires and wire nuts into the outlet box.
5. Secure the fixture (F) into place by screwing two
machine screws (D) through the two fixture side holes
and then into the mounting strap (A).
6. Place rubber ring (J) over the frosted glass shade
(H) then place the clear glass shade (G) over the
frosted glass shade (H). Holding these together, place
onto lampholder of fixture (F) and secure in place by
tightening the socket nut (I) onto lampholder of
fixture (F), until it is snug. Do not over tighten or the
glass shades may crack or break.
7. Install light bulbs (not included). Only use bulbs of
the specified type and maximum rated wattage or less.
B
E
D
H
C
Bulb
Outlet
box
Ground
fixture wire
F
G
J
I
A
Ground
supply wire
Black (Hot)
White
(Neutral)
Black (Hot)
White
(Neutral)

Page 1 Page 2 Page 3 Page 4 Page 5
TROUBLESHOOTING
:
Possible Cause
Corrective Action
Bulb will not light.
1. Bulb is burned out.
1. Replace light bulb.
2. Power is off.
2. Make sure power
supply is on.
3. Cord not plugged in.
3. Make sure cord is
plugged into the outlet.
4. Circuit breaker off.
4. Make sure circuit
breaker is to the ‘on’
position.
Fuse blows or circuit
breaker trips when
light is turned on.
1. Exposed wire
1. Discontinue use.
Unplug unit from the wall
and contact a qualified
electrician or call the
Home Depot Customer
Service Team at 1-877-
-
PRODUCT MAINTENANCE:
1. To clean simply wipe with a soft dry cloth.
2. Do not use any cleaners with chemicals, solvents or harsh abrasives.
LIMITED WARRANTY
The manufacturer warrants this pendant fixture to be free from defects in materials and workmanship for a
period of one (1) year from date of purchase. This warranty applies only to the original consumer purchaser and
only to products used in normal use and service. If this product is found to be defective, the manufacturer’s only
obligation, and your exclusive remedy, is the repair or replacement of the prod
uct at the manufacturer’s discretion,
provided that the product has not been damaged through misuse, abuse, accident, modifications, alterations, neglect
or mishandling. This warranty shall not apply to any product that is found to have been improperly installed, setup,
or used in any way not in accordance with the instruction supplied with the product. This warranty shall not apply
to a failure
of the product as a result of an accident, misuse, abuse, negligence, alteration, or faulty installation, or
any other failure not relating to faulty material or workmanship. This warranty shall not apply to the finish on any
portion of the product, such as surface and/or weathering, as this is considered normal wear and tear. The
manufacturer does not warrant and specially disclaims any warran
ty, whether express or implied, of fitness
for a particular purpose, other than the warranty contained herein. The manufacturer specifically disclaims
any liability and shall not be liable for any consequential or incidental loss or damage, including but not
limited to any labor / expense costs involved in the replacement or repair of said product.
385 2907.
/