Crestron AV2 User manual

Category
Processors
Type
User manual

This manual is also suitable for

Crestron AV2 & PRO2
2-Series Integrated Dual Bus Control System
Operations Guide
This document was prepared and written by the Technical Documentation department at:
Crestron Electronics, Inc.
15 Volvo Drive
Rockleigh, NJ 07647
1-888-CRESTRON
All brand names, product names and trademarks are the property of their respective owners.
©2006 Crestron Electronics, Inc.
Crestron AV2 & PRO2 2-Series Integrated Dual Bus Control System
Contents
2-Series Integrated Dual Bus Control System: AV2 & PRO2 1
Introduction ...............................................................................................................................1
Features and Functions................................................................................................ 1
Specifications ..............................................................................................................3
Physical Description....................................................................................................5
Industry Compliance ................................................................................................... 9
Setup ........................................................................................................................................10
Network Wiring.........................................................................................................10
Identity Code ............................................................................................................. 10
Hardware Hookup .....................................................................................................10
Programming Software............................................................................................................14
Earliest Version Software Requirements for the PC ................................................. 14
Programming with Crestron SystemBuilder.............................................................. 14
Programming with SIMPL Windows ........................................................................ 14
Example Program...................................................................................................... 15
Uploading and Upgrading........................................................................................................ 16
Establishing Communication.....................................................................................16
Programs and Firmware ............................................................................................17
Operation .................................................................................................................................18
Problem Solving ......................................................................................................................23
Possible Problems with the Control System..............................................................23
Serial Communication Difficulties with Other Devices Connected to the Control
System .......................................................................................................................24
Check Network Wiring..............................................................................................26
Reference Documents................................................................................................ 27
Further Inquiries ........................................................................................................27
Future Updates ..........................................................................................................27
Software License Agreement...................................................................................................28
Return and Warranty Policies .................................................................................................. 30
Merchandise Returns / Repair Service ...................................................................... 30
CRESTRON Limited Warranty.................................................................................30
Operations Guide – DOC. 5957B Contents i
Crestron AV2 & PRO2 2-Series Integrated Dual Bus Control System
2-Series Integrated Dual Bus
Control System: AV2 & PRO2
2-Series Integrated Dual Bus
Control System: AV2 & PRO2
Introduction Introduction
Features and Functions
2-Series engine with Dual-bus architecture
36 MB of Internal Memory
1
4 GB Compact Flash memory card slot
Cresnet
port – master/slave selectable
10/100 Ethernet capable with SSL encryption
Crestron e-Control
2 and Crestron RoomView
enabled
Built-in firewall, NAT and router
Six Com ports, eight IR/serial ports, eight Versiport I/O ports, eight
relay ports
Three Y-Bus
2
/ One Z-Bus control card expansion slots
Internal power supply
2-Space EIA rack-mountable
Front panel control with LCD display (PRO2 only)
1. For more information on internal memory, refer to “2-Series Memory & Directory Structure” in the
latest version of the Crestron 2-Series Control System Reference Guide (Doc. 6256), which is available
from the Crestron website (http://www.crestron.com/manuals
).
2. Optional on AV2.
2-Series Engine
At the heart of the AV2 & PRO2 is the powerful 32-bit Freescale ColdFire
®
processor. Crestron's exclusive enhanced real-time operating system makes the AV2
& PRO2 the fastest, most reliable control systems available.
Dual Bus Architecture
The AV2’s & PRO2's unique dual-bus architecture affords ultra fast
communications. The 40 Mbps Y-Bus provides a high-speed backplane for IR, serial
and other integrated control ports. Additional control ports and interfaces like MIDI
and digital audio processing may be added by installing up to three Y-Bus control
Operations Guide – DOC. 5957B 2-Series Integrated Dual Bus Control System: AV2 & PRO2 1
2-Series Integrated Dual Bus Control System Crestron AV2 & PRO2
cards (expansion cage option required for AV2). At a blazing 300 Mbps, the Z-Bus
supports Fast Ethernet with future support for other emerging technologies.
Cresnet
®
Cresnet is the communications backbone for many Crestron touchpanels, keypads,
lighting controls and other devices. The Cresnet bus is a simple, yet flexible 4-wire
network that provides rock-solid bidirectional communication and power for up to
252 Cresnet devices.
Cresnet Slave Mode
Selectable Cresnet Slave Mode enables the AV2 & PRO2 to be configured as
Cresnet slave devices, effectively transforming them into Cresnet expansion
modules. Such flexibility can offer a cost-effective solution for system expansion,
providing a host of additional control ports in a single module.
Ethernet
Crestron pioneered the IP-based control system to harness the vast possibilities of
Ethernet and the Internet for remote control, monitoring, programming and
diagnostics. The AV2 & PRO2 are designed to deliver the world's most advanced IP
control solutions. A choice of single or dual port Ethernet cards enables a full-duplex
10/100 Ethernet connection with built-in Web server and email client and support for
both static and dynamic IP addressing.
Crestron e-Control
®
2
Crestron's award-winning e-Control 2 XPanel solutions offer the most flexible range
of IP control possibilities available. Using a Windows
®
computer or CE/PocketPC™
PDA device, e-Control 2 provides an amazing control GUI that looks and behaves
just like a Crestron Isys
®
touchpanel.
Crestron RoomView
®
Every Ethernet-enabled 2-Series control system works directly with Crestron's
exclusive RoomView Help Desk software for the industry's most comprehensive
facility-wide asset management solution.
SSL
All Ethernet-enabled 2-Series control systems support SSL (Secure Sockets Layer),
the industry standard for protecting sensitive network communications.
NAT
The AV2’s & PRO2's onboard NAT (Network Address Translator) acts as a firewall
and router to facilitate the configuration of a private control LAN with a single-point
connection to the client's LAN (Dual-port Ethernet card required).
Memory Expansion
A memory card slot accessible on the rear panel allows for easy expansion of the
AV2’s & PRO2's internal memory using any Type II Compact Flash memory card
up to 4 GB. Note that compact flash memory supports FAT file structure.
2 2-Series Integrated Dual Bus Control System: AV2 & PRO2 Operations Guide – DOC. 5957B
Crestron AV2 & PRO2 2-Series Integrated Dual Bus Control System
Front Panel Control (PRO2 only)
The PRO2 includes a programmable front control panel with LCD display and
control port status indicators. The PRO2's front panel serves as a ready user interface
for system configuration and diagnostics and can also be custom programmed to
enable menu-driven control capability.
Specifications
Specifications for the AV2 & PRO2 are listed in the following table.
AV2 & PRO2 Specifications
SPECIFICATION DETAILS
Processor
CPU
32-bit Freescale Coldfire
Microprocessor
Processing Speed 257 MIPS (Dhrystone 2.1 benchmark)
Memory
SDRAM 32 MB
NVRAM 256 kB
Flash 4 MB
Compact Flash expandable up to 4 GB (not included)
Operating System
Real-time preemptive multi-
threaded/multitasking kernel; FAT32 file
system with long names; supports SIMPL
Windows and SIMPL+
Ethernet
With C2ENET-1
10/100BaseT, auto-negotiating, full/half
duplex, static IP or DHCP/DNS, SSL,
TCP/IP, UDP/IP, CIP, SMTP, built-in Web
server and e-mail client; supports Crestron
e-Control
2 Xpanel and RoomView
applications
With C2ENET-2
All above features plus: built-in firewall,
router and network address translator
(NAT)
Expansion Slots
Y-Bus
1
(3) (AV2 requires CAGE2 accessory, sold
separately); Accept all Y-Bus control cards
Z-Bus
2
(1) Accepts all Z-Bus control cards
Power Requirements
Internal Universal Power
Supply
2.3 Amps, 100-250 Volts AC, 50/60 Hz
Available Cresnet Power
50 Watts (shared with control card
expansion slots)
Network Power Fuse Rating
4A, 250V (1 ¼” x ¼” Slow Blow Fuse
Series)
50 watts (DC) available for Cresnet devices
Environmental
Temperature 41º to 113ºF (5º to 45ºC)
Humidity 10% to 90% RH (non-condensing)
(Continued on following page)
Operations Guide – DOC. 5957B 2-Series Integrated Dual Bus Control System: AV2 & PRO2 3
2-Series Integrated Dual Bus Control System Crestron AV2 & PRO2
AV2 & PRO2 Specifications (Continued)
SPECIFICATION DETAILS
Enclosure
Black metal, 2U 19” rack-mountable
(rack ears included)
Dimensions
Height 3.47 in (8.82 cm)
Width
19.00 in (48.26 cm) with ears;
17.03 in (43.25 cm) without ears
Depth 9.69 in (24.61 cm)
Weight
AV2 7.1 lbs (3.22 kg) – with line cord
PRO2 8.0 lbs (3.63 kg) – with line cord
Available Accessories
CAGE2 (AV2 only) 3-Card expansion cage
C2ENET-1 Single port Ethernet card
C2ENET-2 Dual port Ethernet card
C2COM-2 Dual COM port card
3
C2COM-3 Three COM port card
3
C2IR-8 8 IR/Serial output card
3
CNXIO-16 16 I/O Versiport card
3
CNXAO-8 8 Analog output card
3
CNXRY-8 8 Relay card
3
CNXRY-16 16 Relay card
3
CNXMIDI MIDI Interface card
3
C2VEQ-4
4-Channel Volume/EQ and 4x4 matrix
mixer card
3
CNXTA
Telephone interface and Voice/WAV sound
card
3
C2N-HBLOCK Cresnet Network Distribution Block
C2N-NPA8 Cresnet Network Poll Accelerator
C2N-SPWS300 300 Watt Cresnet Power Supply
CNSP-XX Custom Serial Interface Cable
IRP2 IR Probe
1. 40 Mb/s parallel communications; Internal backplane for integrated control ports and Y-Bus expansion
slots.
2. 300 Mb/s parallel communications; Backplane for Z-Bus expansion slots.
3. AV2 requires CAGE2 for card installation.
4 2-Series Integrated Dual Bus Control System: AV2 & PRO2 Operations Guide – DOC. 5957B
Crestron AV2 & PRO2 2-Series Integrated Dual Bus Control System
Physical Description
This section provides information on the connections, controls and indicators
available on your AV2 & PRO2.
AV2 Physical View (shown with accessory cards installed in CAGE2; optional)
PRO2 Physical View (shown with accessory cards installed)
Operations Guide – DOC. 5957B 2-Series Integrated Dual Bus Control System: AV2 & PRO2 5
2-Series Integrated Dual Bus Control System Crestron AV2 & PRO2
AV2 & PRO2 Overall Dimensions
111098
765431
12
2
9.69 in
(24.61 cm)
17.03 in
(43.25 cm)
3.47 in
(8.82 cm)
13
1
14
15
16
17
18
19
6 2-Series Integrated Dual Bus Control System: AV2 & PRO2 Operations Guide – DOC. 5957B
Crestron AV2 & PRO2 2-Series Integrated Dual Bus Control System
Connectors, Controls & Indicators
#
CONNECTORS
1
,
CONTROLS & INDICATORS
DESCRIPTION
1
COMPUTER
FRONT PANEL REAR PANEL
DB9F connectors (one on front panel and one on rear) are used
when programming with a PC. Each port is modem compatible.
(Modem and PC cables not included.)
2 PWR LED Indicates 24 Volts DC power supplied from Cresnet control network.
3 NET LED Indicates communication with Cresnet System.
4 MSG LED
2
Illuminates when a message is detected. To decipher content,
examine the message available from the menu function buttons or
through the Crestron Toolbox™.
5 COM (A – F) LEDS
3
RXD - Illuminate during reception of data from serial devices
attached to the respective COM ports.
TXD – Illuminate during transmission of data to serial devices
attached to the respective COM ports.
RTS – Illuminate to reflect state of the RTS pin on the respective
COM port. If no handshaking is specified, the RTS line will be high
and the associated LED is also high. When RTS flow control is
enabled, RTS indicates the unit is ready to receive data from serial
devices attached to the respective COM ports.
CTS – Illuminate to reflect state of the CTS pin on the respective
COM port. An illuminated LED means the CTS line is high. When
CTS flow control is enabled, CTS indicates the serial devices on the
respective COM ports are ready to accept data.
6 IR – SERIAL (A – H) LEDS
3
Indicate activity on the respective IR-SERIAL lines.
7 RELAY (1 – 8) LEDS
3
Indicate the respective relay is closed.
8 RESET BUTTONS
HW-R - Initiates system hardware reset.
SR-R - Pressing this in combination with HW-R button performs a
system restart without loading the program. Pressing it alone
momentarily while the system is running restarts the program.
9 LAN (A – B) LEDS
4
LNK – Indicate the Ethernet card has established a valid Ethernet
connection.
ACT – Indicate communication (activity) at the respective port on the
Ethernet card.
10
LCD SCREEN & MENU
BUTTONS
3
Permits local control; refer to “Operation” on page 18 for details.
11
INPUT – OUTPUT
(1 – 8) LEDS
3
Indicate when input voltage thresholds for the respective I/O ports
are exceeded or when the output is active.
12 SLOT (1 – 3) LEDS
3
Indicate an expansion card is inserted into the respective slot.
These LEDS turn off momentarily when data is sent to the card or
received from the card.
13
NET
Four-position terminal block connector for data and power.
Connects to Cresnet control network.
Pin 1 (24) Power
Pin 2 (Y) Data
Pin 3 (Z) Data
Pin 4 (G) Ground
(Continued on following page)
Operations Guide – DOC. 5957B 2-Series Integrated Dual Bus Control System: AV2 & PRO2 7
2-Series Integrated Dual Bus Control System Crestron AV2 & PRO2
Connectors, Controls & Indicators (Continued)
#
CONNECTORS
1
,
CONTROLS & INDICATORS
DESCRIPTION
14
COM (A – F)
5, 6, 7
COM F
COM A
(6) DB9 male, bidirectional RS-232/422/485 ports. Up to 115.2k
baud, hardware and software handshaking support. Ports C-F
support C2N-NPA8 Network Poll Accelerator
8
.
PIN DIRECTION DESCRIPTION
1*
To AV2 or PRO2
(RXD-) RS-422 Receive Data (Idles low)
2
To AV2 or PRO2
(RXD) RS-232 Received Data
3
From AV2 or PRO2
(TXD) RS-232 Transmitted Data
4
From AV2 or PRO2
(TXD+) RS-422 Transmit Data (Idles high)
5
RS-232 and RS-422 Signal Common
6
To AV2 or PRO2
(RXD+) RS-422 Receive Data (Idles high)
7
From AV2 or PRO2
(RTS) RS-232 Request to Send
8
To AV2 or PRO2
(CTS) RS-232 Clear to Send
9
From AV2 or PRO2
(TXD-) RS-422 Transmit Data (Idles low)
* RS-422 transmit and receive are balanced signals requiring two lines
plus a ground in each direction. RXD+ and TXD+ should idle high (going
low at start of data transmission). RXD- and TXD- should idle low (going
high at start of data transmission). If necessary, RXD+/RXD- and
TXD+/TXD- may be swapped to maintain correct signal levels.
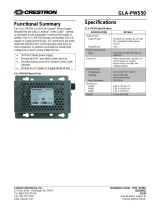
15
INFRARED - SERIAL
OUTPUT (A – H)
9
A B C D
E F G H
S G S G S G S G
INFRARED - SERIAL OUTPUT
S G S G S G S G
(8) 2-pin 3.5 mm detachable terminal blocks IR/Serial output ports.
IR output up to 1.2 MHz; 1-way serial TTL/RS-232 (0-5 Volts) up to
115.2k baud. Individual signal generator per port, allowing
simultaneous firing of all ports.
16
I/O (1 – 8)
10
S6 I/O
12345678G
(1) 9-pin 3.5 mm detachable terminal block comprising (8) digital
input/output or analog input ports (referenced to GND);
Digital Input: Rated for 0-24 Volts DC, input impedance 20k ohms,
logic threshold 1.24 Volts DC;
Digital Output; 250 mA sync from maximum 24 Volts DC, catch
diodes for use with “real world” loads;
Analog Input: Rated for 0-10 Volts DC, protected to 24 Volts DC
maximum, input impedance 20k ohms;
Programmable 5 Volts, 2k ohms pull-up resistor per pin.
17
RELAY OUTPUT
(1 – 8)
RELAYS7
1 234
OUTPUT
5
678
(2) 8-pin 3.5 mm detachable terminal blocks comprising (8) normally
open, isolated relays;
Rated 1 Amp, 30 Volts AC/DC, MOV arc suppression across
contacts.
18
100 – 240V ~2.4A 50/60 Hz
(POWER SUPPLY)
(1) IEC Socket, mates with removable power cord (included).
19
CHASSIS GROUND
(1) 6-32 screw, chassis ground lug.
1. Interface connectors for NET, Infrared-Serial, I/O and Relay Output ports are provided with the unit.
2. This LED was labeled “ERR” on units manufactured prior to 2005. It is functionally the same; only the labeling has changed.
3. PRO2 only.
4. LAN LEDs are active only if a single port or dual port Ethernet card (which is field installed) occupies the Z-Bus slot.
8 2-Series Integrated Dual Bus Control System: AV2 & PRO2 Operations Guide – DOC. 5957B
Crestron AV2 & PRO2 2-Series Integrated Dual Bus Control System
5. The pinout of each 9-pin port is non-standard; it contains RS-422 pins in addition to RS-232. This may result in a conflict with some equipment
and therefore all nine pins should not be used. Only the required pins for each communication type should be connected. For RS-232 and –422,
pins 2, 3, 5, 7 and 8 are wired straight through.
6. Data Set Ready (DSR) and Data Terminal Ready (DTR) are not supported.
7. To support RS-485, tie pin 1 (RXD-) to pin 9 (TXD-)
and pin 4 (TXD+) to pin 6 (RXD+) in the cable.
COM (DB9) CONNECTOR RS-485 BUS
(Refer to table at right.)
Tie Pins 1 & 9 -
Tie Pins 4 & 6 +
Pin 5 G
8. The Cresnet Poll Accelerator effectively increases the network speed, fan-out and device addresses by a factor of 8 for each Poll Accelerator added
to the system.
9. Transmission levels on the infrared – serial output connectors are in the 0 to +5 VDC range, which may not be compatible with all RS-232 devices.
10. Digital outputs are TTL values and may not work with devices requiring a “dry” contact closure (e.g. low voltage motor controllers).
Industry Compliance
These products are Listed to applicable UL Standards and requirements by
Underwriters Laboratories Inc.
(E174344)
As of the date of manufacture, the AV2 & PRO2 have been tested and found to
comply with specifications for CE marking and standards per EMC and
Radiocommunications Compliance Labelling.
NOTE: This device complies with part 15 of the FCC rules. Operation is subject to
the following two conditions: (1) this device may not cause harmful interference, and
(2) this device must accept any interference received, including interference that may
cause undesired operation.
This equipment has been tested and found to comply with the limits for a Class B
digital device, pursuant to part 15 of the FCC Rules. These limits are designed to
provide reasonable protection against harmful interference in a residential
installation. This equipment generates, uses and can radiate radio frequency energy
and if not installed and used in accordance with the instructions, may cause harmful
interference to radio communications. However, there is no guarantee that
interference will not occur in a particular installation. If this equipment does cause
harmful interference to radio or television reception, which can be determined by
turning the equipment off and on, the user is encouraged to try to correct the
interference by one or more of the following measures:
Reorient or relocate the receiving antenna.
Increase the separation between the equipment and receiver.
Connect the equipment into an outlet on a circuit different from that to
which the receiver is connected.
Consult the dealer or an experienced radio/TV technician for help.
Operations Guide – DOC. 5957B 2-Series Integrated Dual Bus Control System: AV2 & PRO2 9
2-Series Integrated Dual Bus Control System Crestron AV2 & PRO2
Setup
Network Wiring
When wiring the network, consider the following:
Use Crestron Certified Wire.
Use Crestron power supplies for Crestron equipment.
Provide sufficient power to the system.
CAUTION: Insufficient power can lead to unpredictable results or damage
to the equipment. Please use the Crestron Power Calculator to help calculate
how much power is needed for the system
(http://www.crestron.com/calculators
).
For larger networks, use a Cresnet Hub/Repeater (CNXHUB) to maintain
signal quality
For more details, refer to “Check Network Wiring” on page 26.
Identity Code
Net ID
The Net IDs of the AV2 & PRO2 have been factory set to 02. This Net ID is defined
as the “Master” control system. The Net IDs of multiple AV2 & PRO2 devices in the
same system must be unique; this means there will be a master/slave relationship
between units (only the Net ID of the master will be left at 02). Net IDs are changed
from a personal computer (PC) via the Crestron Toolbox™. When setting the Net
ID, consider the following:
The Net ID of each unit must match an ID code specified in the SIMPL
Windows program.
Each network device must have a unique Net ID.
For more details, refer to the Crestron Toolbox help file.
IP ID
The IP ID is set within the AV2’s or PRO2’s table using Crestron Toolbox. For
information on setting an IP table, refer to the Crestron Toolbox help file.
The IP IDs of multiple AV2 & PRO2 devices in the same system must be unique.
When setting the IP ID, consider the following:
The IP ID of each unit must match an IP ID specified in the SIMPL
Windows program.
Each device using IP to communicate with a control system must have a
unique IP ID.
Hardware Hookup
Ventilation
The AV2 & PRO2 should be used in a well-ventilated area. The venting holes should
not be obstructed under any circumstances. If the AV2 or PRO2 is hot to the touch,
consider using forced air ventilation and/or incrementing the spacing between units.
To prevent overheating, do not operate this product in an area that exceeds the
environmental temperature range listed in the table of specifications. Consideration
must be given if installed in a closed or multi-unit rack assembly since the operating
10 2-Series Integrated Dual Bus Control System: AV2 & PRO2 Operations Guide – DOC. 5957B
Crestron AV2 & PRO2 2-Series Integrated Dual Bus Control System
ambient temperature of the rack environment may be greater than the room ambient
temperature. Contact with thermal insulating materials should be avoided on all sides
of the unit.
Rack Mounting
The AV2 & PRO2 can be mounted in a rack or stacked with other equipment. Two
“ears” are provided with the AV2 & PRO2 so that the units can be rack mounted.
These ears must be installed prior to mounting. Complete the following procedure to
attach the ears to the unit. The only tool required is a #2 Phillips screwdriver.
WARNING: To prevent bodily injury when mounting or servicing this unit in a
rack, take special precautions to ensure that the system remains stable. The following
guidelines are provided to ensure your safety:
When mounting this unit in a partially filled rack, load the rack from the
bottom to the top with the heaviest component at the bottom of the rack.
If the rack is provided with stabilizing devices, install the stabilizers before
mounting or servicing the unit in the rack.
NOTE: If rack mounting is not required, rubber feet are provided for tabletop
mounting or stacking. Apply the feet near the corner edges on the underside of the
unit.
NOTE: Reliable earthing of rack-mounted equipment should be maintained.
Particular attention should be given to supply connections other than direct
connections to the branch circuit. (e.g., use of power strips).
To install the ears:
1. There are screws that secure each side of the AV2 & PRO2 top cover.
Using a #2 Phillips screwdriver, remove the three screws closest to the front
panel from one side of the unit. Refer to the diagram following step 3 for a
detailed view.
2. Position a rack ear so that its mounting holes align with the holes vacated
by the screws in step 1.
3. Secure the ear to the unit with three screws from step 1, as shown in the
following diagram.
Ear Attachment for Rack Mounting (this image shows a 1RU device)
USE COVER SCREWS
4. Repeat procedure (steps 1 through 3) to attach the remaining ear to the
opposite side.
Bussing Strip Installation
The 2-Series integrated dual bus control system is supplied with two brass bussing
strips to facilitate commoning (linking) of multiple terminal block connections. The
Operations Guide – DOC. 5957B 2-Series Integrated Dual Bus Control System: AV2 & PRO2 11
2-Series Integrated Dual Bus Control System Crestron AV2 & PRO2
bussing strips are constructed with four terminal block positions and may be
trimmed to size for various applications or different devices. One strip is supplied for
each 8-position terminal block.
1. To utilize the bussing strip, determine the number of relays to be
commoned for the equipment being installed. If less than four, the strip can
be trimmed to size with a pair of scissors or wire snips.
2. Loosen the terminal block screws and insert the first leg of the bussing strip
into the first common position of the terminal block. The strip engages the
other common positions automatically.
3. Remove approximately 1/8” of the jacket from the common wire and insert
the conductor into one of the terminal block common positions. Tighten the
terminal block screws to lock the wire and bussing strip into place. Insulate
the strip by folding a piece of ¾” wide vinyl electrical tape (such as Scotch
33+) over the spine and as much of the individual legs as possible. Excess
tape at each end of the strip should be pressed closed, then trimmed to
within approximately 1/16” of the end of the strip.
4. When wiring the remaining conductors, remove approximately 1/8” of the
jacket and insert the wires into the proper terminal block positions. To
prevent the possibility of electrical shorts, it is essential that these
conductors do not touch any uninsulated portion of the bussing strip.
5. Securing a tie wrap around the bussing strip is a useful way to provide
strain relief for the wires connected to the terminal block.
Memory Card Installation
The onboard 36 MB memory of the 2-Series integrated dual bus control system is
enhanced with a 4 GB expansion slot that supports off-the-shelf Type II compact
flash memory and “microdrive” devices. The slot is accessible on the rear panel of
the unit. Complete the following procedures to install the memory card. Power does
not have to be disconnected to insert memory. Note that compact flash memory
supports FAT file structure.
1. Loosen the screw that secures the memory slot cover located to the left of
the COMPUTER port on the rear panel.
2. Pull on the screw to remove the screw and cover.
3. Observe handling precautions of the memory card manufacturer and insert
card into the open slot.
4. Align and reposition cover over slot and tighten the screw.
Memory Card Removal
Complete the following procedures to remove the memory card. Power does not
have to be disconnected to remove memory.
1. Loosen the screw that secures the memory slot cover located to the left of
the COMPUTER port on the rear panel.
2. Pull on the screw to remove the screw and cover.
3. Press the eject button located on the extreme right of the slot.
4. Observe handling precautions of the memory card manufacturer and
remove card from the slot.
5. Align and reposition cover over slot and tighten the screw.
12 2-Series Integrated Dual Bus Control System: AV2 & PRO2 Operations Guide – DOC. 5957B
Crestron AV2 & PRO2 2-Series Integrated Dual Bus Control System
Connect the Device
Make the necessary connections as called out in the illustration that follows this
paragraph. Refer to “Network Wiring” on page 10 before attaching the 4-position
terminal block connector. Apply power after all connections have been made.
When making connections to the AV2 & PRO2, consider the following:
Use Crestron power supplies for Crestron equipment.
The included cable cannot be extended.
Hardware Connections for the AV2 & PRO2
COM (A - F):
TO ANY RS-232,
-422 OR -485
DEVICE
COMPUTER:
TO SERIAL PORT
ON PC (ANOTHER
DB9 CONNECTOR
ON FRONT PANEL)
CRESNET:
TO ANY
CRESNET
NETWORK
DEVICE
GROUND
INFRARED-
SERIAL OUTPUT
(A - H):
TO IRP2 OR
SERIAL DEVICES
RELAY OUTPUT (1 - 8):
TO CONTROLLABLE
DEVICES
100 - 240V ~2.4A
50/60 Hz
(POWER SUPPLY):
TO OUTLET (POWER
CORD SUPPLIED)
FROM DEVICE OUTPUTS
- CONTACT CLOSURES
- RELAY CLOSURES
I/O (1 - 8):
TO CONTROLLABLE
DEVICES
Operations Guide – DOC. 5957B 2-Series Integrated Dual Bus Control System: AV2 & PRO2 13
2-Series Integrated Dual Bus Control System Crestron AV2 & PRO2
Programming Software
Have a question or comment about Crestron software?
Answers to frequently asked questions (FAQs) can be viewed in the Online Help
section of the Crestron website. To post a question or view questions you have
submitted to Crestron’s True Blue Support, log in at http://support.crestron.com.
First-time users will need to establish a user account.
Earliest Version Software Requirements for the PC
NOTE: Crestron recommends that you use the latest software to take advantage of
the most recently released features. The latest software is available from the Crestron
website.
Crestron has developed an assortment of Windows
-based software tools to develop
a Cresnet system. The following are the minimum recommended software versions
for the PC:
Software
TASK REQUIRED SOFTWARE VERSION
Program control system to
operate AV2 & PRO2.
SIMPL Windows version 2.02.08 or later
with SIMPL+ Cross Compiler version 1.1 or
later and Library update 145 or later; Also
requires Crestron Database version 15.6.2
or later.
Upload program and firmware. Crestron Toolbox 1.01.06 or later.
Program with simple wizards
(optional but recommended).
Crestron SystemBuilder™ version 2.0.6 or
later. Refer to software release notes or
Crestron website for other required
Crestron software packages.
Programming with Crestron SystemBuilder
Crestron SystemBuilder is the easiest method of programming, but does not offer as
much flexibility as SIMPL Windows. For additional details, download
SystemBuilder from the Crestron website and examine the extensive help file.
Programming with SIMPL Windows
NOTE: While SIMPL Windows can be used to program the AV2 & PRO2, it is
recommended to use SystemBuilder for configuring a system.
SIMPL Windows is Crestron’s premier software for programming Crestron control
systems. It is organized into two separate, but equally important “Managers”.
Configuration Manager
Configuration Manager is the view where programmers “build” a Crestron control
system by selecting hardware from the Device Library.
14 2-Series Integrated Dual Bus Control System: AV2 & PRO2 Operations Guide – DOC. 5957B
Crestron AV2 & PRO2 2-Series Integrated Dual Bus Control System
To incorporate the AV2 or PRO2 into the system, drag the AV2 or PRO2
from the Control Systems folder of the Device Library and drop it in the
System Views.
Locating the AV2 & PRO2 in the Device Library
Programming Manager
Programming Manager is the view where programmers “program” a Crestron control
system by assigning signals to symbols. The symbol can be viewed by double
clicking on the icon or dragging it into Detail View. A description for each signal in
the symbol is described in the SIMPL Windows help file (F1).
Example Program
An example program for the AV2 & PRO2 is available from the Crestron website
(http://www.crestron.com/exampleprograms
).
Operations Guide – DOC. 5957B 2-Series Integrated Dual Bus Control System: AV2 & PRO2 15
2-Series Integrated Dual Bus Control System Crestron AV2 & PRO2
Uploading and Upgrading
Crestron recommends using the latest programming software and that each device
contains the latest firmware to take advantage of the most recently released features.
However, before attempting to upload or upgrade, it is necessary to establish
communication.
While the next section provides an overview for communication, refer to
“Establishing Communications with the Control System” in the Crestron 2-Series
Control System Reference Guide (Doc. 6256) for serial and TCP/IP connection
details. If communications cannot be established, refer to “Troubleshooting
Communications” in the same guide.
Establishing Communication
Use Crestron Toolbox for communicating with the AV2 & PRO2; refer to the
Crestron Toolbox help file for details. There are two methods of communication.
Direct Serial Communication
NOTE: Required for initial setup of Ethernet parameters.
Direct Serial Communication
PC RUNNING
CRESTRON TOOLBOX
AV2 or PRO2
SERIAL VIA CRESTRON
CABLE STCP-502PC
OR EQUIVALENT
The COMPUTER port on the AV2 & PRO2 connects to the serial port on
the PC via a serial cable (Crestron STCP-502PC or equivalent).
Use the Address Book in Crestron Toolbox to create an entry using the
expected serial communication protocol (RS232, auto-detect baud rate, no
parity, 8 data bits, 1 stop bit, XON/XOFF disabled, RTS/CTS enabled).
Display the AV2’s or PRO2’s “System Info” window (click the
icon);
communications are confirmed when the device information is displayed.
TCP/IP Communication
Ethernet Communication
PC RUNNING
CRESTRON TOOLBOX
AV2 or PRO2
ETHERNET
Establish direct serial communication between AV2 or PRO2 and PC.
Enter the IP address, IP mask, and default router of the AV2 or PRO2 via
the Crestron Toolbox (Functions | Ethernet Addressing); otherwise enable
DHCP.
Confirm Ethernet connections between AV2 or PRO2 and PC. If connecting
through a hub or router, use CAT5 straight through cables with 8-pin RJ-45
connectors. Alternatively, use a CAT5 crossover cable to connect the two
LAN ports directly, without using a hub or router.
16 2-Series Integrated Dual Bus Control System: AV2 & PRO2 Operations Guide – DOC. 5957B
  • Page 1 1
  • Page 2 2
  • Page 3 3
  • Page 4 4
  • Page 5 5
  • Page 6 6
  • Page 7 7
  • Page 8 8
  • Page 9 9
  • Page 10 10
  • Page 11 11
  • Page 12 12
  • Page 13 13
  • Page 14 14
  • Page 15 15
  • Page 16 16
  • Page 17 17
  • Page 18 18
  • Page 19 19
  • Page 20 20
  • Page 21 21
  • Page 22 22
  • Page 23 23
  • Page 24 24
  • Page 25 25
  • Page 26 26
  • Page 27 27
  • Page 28 28
  • Page 29 29
  • Page 30 30
  • Page 31 31
  • Page 32 32
  • Page 33 33
  • Page 34 34
  • Page 35 35
  • Page 36 36

Crestron AV2 User manual

Category
Processors
Type
User manual
This manual is also suitable for

Ask a question and I''ll find the answer in the document

Finding information in a document is now easier with AI