Page is loading ...

PTZ Outdoor WiFi Security Camera
User Manual
Model: HX-2PT1

Warranty & Support
Thanks for buying HOSAFE security cameras, we offer 1-year warranty and lifetime
support, if you have a good impress with our product, please kindly leave a positive
review on Amazon, thanks in advance
. …………………………………………………………………………………………
If you have problems in using it , please do not hesitate to contact us via Email:
support@hosafe.com, HOSAFE support Team will help you timely; there are also
FAQs and tutorial videos on our website www.hosafe.com
. …………………………………………………………………………………………
Online Support: https://www.hosafe.com (click right down support icon)
(Working Time: Monday~Friday UTC+8 08am to 11pm)
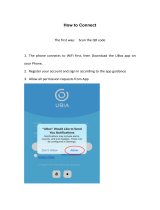
1. Install Phone App---Camhipro
Search "Camhipro" in Appstore / Google Play Store, or scan below QR code:
IOS Android
NOTE: Please allow below ALL permissions when you open Camhipro at the first
time.
1, Allow Camhipro to access mobile cellular data and wireless LAN, otherwise it can
not add camera
2, Allow Camhipro to receive pushed messages, otherwise the phone will not receive
alarm messages even the camera detectes a motion
3, Allow Camhipro to use the microphone when you want to use 2 way audio function
2. Reference Quick Guide or Tutorial
Video to add Camera to Camhipro

3. APP operation interface explanation

4. Insert Micro SD Card
Open the bottom SD Card slot cover with a small screw driver, and insert a micro SD
card (Support 8G to 128G), you can see the sd card memory size after installed
successfully, in Camhipro app, Setting--> SD card setting-->you can see the size
Remark: Please power off the camera when insert sd card, and based on default
setting, the camera will start loop recording once sd card is full, save a video per 10
minutes, the latest video will cover the oldest video.

5. Auto Tracking
Go to camera live view page, slide left 2 times at the bottom, you can see there is a
“Intelligent Tracking” icon at the bottom, tap to turn on, then it will track the motions
Remark: The motion detection switch must be ON status. (It is ON in default, if you
turned off motion detection, the auto tracking will not work)
6. IR LED Night Vision and Floodlight
This smart camera has 3 types night vision mode:
Ordinary: IR LED works at night (light is low) automatically, picture is black/white,
Floodlight does not work
Color: IR LED does not work at night, Floodlight works at night, picture is color
Intelligent: IR LED works at night, and when there is a motion detected, the IR LED
will be off, the Floodlight will be on for 30 seconds, then it will be off if there is no
motion in 30 seconds, if there are continue motions, the floodlight working time will
extend until no motion detected, after floodlight is off, the IR led will work again.
7. 2-Way Speak
If you want to talk with camera, need go to live video page
Step 1: Activate the Speaker icon, you can hear from camera
Step 2: Active the Microphone icon to speak
Remark: You can not hear from camera when you active microphone,
and can not speak when you hear from the camera, so you need switch
from the microphone and speaker.

8. Motion Detection and Push Alert
Message to Phone
8.1 To receive motion Alert on phone Camhipro app, please go to setting page-->
Alarm management and notification-->Turn on “Receive alarm push”, and if you want
the camera also detects a sound, please turn on “Audible alarm”, then you will receive
an alarm message when it detects a motion.
8.2 Schedule Alarm time, if you only want the camera detect motion at night or any
special time, you can go to “Advanced Setting” to set up the time range.
9. Actions when detect motion
9.1 Save Motion Videos to SD Card, if you have inserted a micro sd card to camera,
you will be able to turn on the switch “Alarm recording to SD card” (can not turn on
if no sd card). Even you do not turn on this switch, the sd card still records 24x7, but if
this switch is ON, the motion videos will be saved in advance, it is a original color 14
seconds video. (normal schedule recordings are blue color, you can see in recordings),
A 128G card could save videos for about 2 weeks. If your card memory size is small,
you can go to Recording Setting page to turn off the “Enable Recording” and turn on
this “alarm recording to sd card”.
9.2 Email Alert, If you want camera send an Email Alert with picture, you can turn on
“Alarm Capture sent to Email”, and configure Email, see below photos for your
reference. (The password is not your gmail login pasword, must be app password, if
you do not know how to get it, search “how to setup Gmail APP Password” in Google)
Remark: If you do not use Gmail, please search your own Email SMTP server, port
information on Google, the username, sender, receiver must be the same email.
If your gmail has not turned on 2-factor authentication, login gmail account and go to
Google apps-->Account-->Security page, scroll the page down to Less secure app
acess and click to turn it on (only personal gmail account has this option)

If you gmail has turned on 2-factor authentication, please login gmail account and go
to Google apps-->Account-->Security page, find 2-step verification and turn on, setup
an APP password, select windows mail type, and use this unique password instead
your original gmail password in email alert settinge page. Tap “Apply” before test.
9.3 Upload pictures and videos to FTP Server, if you want to upload pictures and
videos to FTP server, please turn on “Alarm recording to FTP” and “Alarm Capture
saved to FTP”, and configure FTP, see below photos for your reference.
You have your own FTP sever address, username and password.
Remark: Tap “Apply” before test.
10. Playback and Download Recordings
10.1 Playback. Please tap the icon to check videos saved in SD card, select and
tap a video to play, if you wan t to find older videos, tap the right down Search icon to
select the date (make sure your camera date and time were right when recorded, you
may can not playback if the camera has a wrong time zone and time, please reference
time setting chapter.)

10.2 Download Video. When you select the video, tap the video--> tap
Download--->after download complete, tap “To View”. And if you want to save this
video to phone or share with family/friend/police, you can tap download icon to
save to album, then you can find the videos in your phone photo album.
11. Install the camera
After the camera wifi setup successfully, please take it to the installation position,
connect it to the power adaptor, test if the camera works well, if cannot connect to
camera or the live video is freezing, maybe the wifi signal is too weak, then you
have to change a closer position to the router (this may happen when there are too
many walls/interference).
Remark: If there does be blocks/interference around the camera, it keeps
disconnecting, you can also connect it to router via Ethernet cable.
If you need to extend the power adaptor cord,
please do NOT extend at output lead, has to extend
AC input lead, otherwise the camera may be damaged
in 1 month when it is power shortage. It is easy to
find “AC power extension cord” on Amazon.
12. Share the camera with your family
Every camera can be managed by several Camhipro app, after you setup the camera
connected to your home WiFi, go to setting page, find top right share icon to get a QR
code, then ask your family/friend download Camhipro from appstore, tap + -->Add a
sharing device--> scan the QR code to add the camera, or just tell them camera UID,
username, and password to add in Camhipro. (tap +-->ip camera-->device in use-->
input UID and password).

14. ONVIF & RTSP
ONVIF:
If you want to add the camera to 3rd party onvif software/device, please find the
camera ip address from device information (settge page), usually we should use
information below:
Protocol: ONVIF, Ip address, Onvif port: 8080, user: admin, password: admin (for
some special software may need more information, please contact us for remote online
help, we use Teamviewer to help you to setup remotely)
RTSP:
The camera RTSP port is 554, and there are two live H.264 rtsp stream,
main stream: rtsp://username:password@ip address:554/11,
sub steam: rtsp://ip address:554/12
E.g. If camera ip address is 192.168.1.123, username and password are “admin”
main steam: rtsp://admin:admin@192.168.1.123:554/11
15. Reset the camera
Connect camera to power adapter, press and hold camera reset button for 20 seconds,
you can hear a Ding sound, and it will reset, restart and turn in 1 min. (the reset button
is on the cable with a cover)
13. Computer Software
We also offer free software for windows PC and MAC, please download from our
website >support-->software and manual-->HIP2P, after installedwww.hosafe.com--
the software, login without password, click + to add cameras in LAN, for adding
remote cameras, need go to Config page-->input uid and password-->Save-->Preview

16.Connect to Blue iris
Input ip address and onvif port: 8080, click Find/Inspect
17. Connect to Synology
18. Connect to QNAP

19. How to do if you can not make the
camera connect to home WiFi by phone
If you have done all steps to setup the wifi with phone app Camhipro, but failure,
please try to setup the wifi with PC Search Tool (download from >www.hosafe.com--
Support-->software & Manual-->Search Tool), connect the camera to the same router
as computer with an Ethernet cable, reset the camera, then follow below steps.
Unplug the Ethernet cable after finished WiFi Setting.
20. How to do if camera says
“Connecting”, and “Disconnect”
20.2 Please restart the camera (re-power), check you phone WLAN setting, if there
is a camera wifi signal with format IPCA-XXXXXX, that means you have not set up
camera to connect home wifi, you just connected to the camera directly via its wifi
hotspot, so you should follow the instruction (Chapter 2 add camera, or Chapter 20)
and finish the wifi setting.
20.3 If the camera is too far from your wifi router, or there are some blocks (walls,
metal doors), please take the camera indoor and check if these blocks make the wifi
signal weak, then you have to use a wifi repeater or use connect the camera to router
via Ethernet cable.
20.4 If you can access the camera at home (same WiFi LAN), but can not access
outside, please check the camera DNS in web browser-->settings-->Network-->
Network-->Find DNS on the right area, input manually (same as your computer DNS)
20.1 If it worked well before, please re-power the camera, and check again
This may be caused many reasons, please check and find the reason by below steps

No.
Description
Reason & Solution
1.
Can not see the
camera’s WiFi
Signal in
phone
WLAN setting
Please make sure the camera is NOT connecting
Ethernet cable, press and hold the reset button on
the cable for 20 seconds, wait for restart and stop
turning, check in your phone WLAN settinge,
there should be a WiFi signal named
IPCAM-xxxxx, if still can not find the wifi
signal, quick press the reset button and wait for
20 seconds, there should be a wifi signal now, the
format is IPCAM-XXXXX.
2.
Reset Camera
1) Press and hold the reset button for 20 seconds.
2) Hear “Dong” sound, and wait for reboot
3.
Connect
the camera to a
New WiFi
1) Reset camera
2) Delete the camera from Camhipro device list
3)Setup the camera as a new one
4.
Motion
detection
video does not
catch a person
Please try to adjust the camera position or
direction, make the camera further from the
monitor area
5.
Alarm too
Sensitive
This is a basic motion detection camera, it is
triggered by motion (the live picture changes,
like rain, moving leaves, etc.)
1, Please adjust the direction, avoid the moving
targets which is not important for you
2, Make the whole picture as motion detection
area
3, Turn down the motion sensitivity to be 5 or 10
6.
Camhipro app
cannot receive
alarm message
1, Please make sure the switch “Motion detection
alarm” and “receive alarm push” are both ON
2, If still can not receive message, please go to
app management to allow all permissions, or just
reinstall the app and allow all permissions when
you open it at the first time
Troubleshooting Table

Any questions please feel free to contact us via Email: support@hosafe.com
Or chat with us on our website www.hosafe.com
Facebook: @HOSAFE.OFFCIAL
Scan QR code to Active 2-year Warranty free
or via link: https://bit.ly/2MMpKig
HOME OFFICE SAFE CO., LTD
Scan QR code to watch Tutorial Video
or via link: https://youtu.be/RfHsagzp_Lw
/