Page is loading ...

Quick Start Guide
Version 1.14.0

Thank you for choosing the FlexRadio Systems® FLEX-5000A™
transceiver. The FLEX-5000A is a highly versatile transceiver,
designed to meet most if not all of your Amateur Radio needs. And
especially through PowerSDR™, the “brains” of your transceiver, it
continues to (rapidly) evolve.
Although setting up the FLEX-5000A is possibly a little different
than you may have experienced with a traditional transceiver, it is
not necessarily more difficult, as this Quick Start Guide will
hopefully demonstrate.
The Quick Start Guide is designed to get you on the air with the
least most fuss. To do this, we assume a basic HF installation and
do not delve into all the FLEX-5000A's and PowerSDR's many
possibilities. For that, we urge you to review the FLEX-5000 Owner's
Manual.
To get your FLEX-5000A on the air you will need:
●
The two cables and CD-ROM that came with your FLEX-5000A.
●
An HF-Antenna or dummy load.
●
A good RF ground.
●
Powered (computer type) speakers, or headphones.
●
A stabilized 13.8V DC power supply, capable of 25A
continuous duty.
●
A Windows® PC, with an IEEE 1394 (Firewire®) connection.
●
A microphone/PTT and/or CW paddles/keyer/straight key.
If you run into any trouble during the set-up process, please:
●
Recheck your steps.
●
Review the Owner's Manual.
●
Check our website http://www.flex-radio.com/ for our many
available support options.
FlexRadio Systems is a registered trademark. FLEX-3000, FLEX-5000 and PowerSDR
are trademarks of FlexRadio Systems. All other trademarks are the property of their
respective owners.
Introduction
The following 5 steps will run you through the process of getting on
the air.
This describes how to make all the physical connections to your
FLEX-5000A.
This step describes how to install the FLEX-5000 Device Driver,
which communicates with the transceiver through the IEEE 1394
port.
This walks you through the installation of PowerSDR, the actual
“brains” of your FLEX-5000A. PowerSDR determines your
transceiver's functionality. It also offers a versatile user interface.
This step describes how to configure the FLEX-5000 Device Driver.
The Device Driver has 3 parameters which you set to enable it to
communicate correctly with your FLEX-5000A.
Finally, this step describes how to configure PowerSDR. On the one
hand you will configure 2 parameters to be identical to those you
set in the Device Driver. On the other hand you will select the
correct audio input (microphone) and output (speakers and/or
headphones) ports.
Step 1: Hook Up the FLEX-5000A™
Step 2: Install the FLEX-5000 Device Driver
Step 3: Install PowerSDR
Step 4: Configure the FLEX-5000 Device Driver
Step 5: Configure PowerSDR..

In Step 1 you will make all the physical
connections required for basic HF operation
of the FLEX-5000A.
Back Panel
A: Antenna
Connect an HF antenna with a 50 Ohm
impedance or a dummy load to one of the 3
antenna ports marked ANT1, ANT2, or
ANT3. Remember the port you used as you
will need it in Step 5-C.
If you have the optional Antenna Tuner Installed, the
impedance may deviate from 50 Ohm (see the
Owner's Manual)
B: Ground
Connect the terminal marked GND to your
central station ground.
C: Speakers
Connect a powered speaker, e.g. a pair of
computer speakers, to the jack marked
PWR.SPKR/LINE OUT using a 1/8” stereo
plug.
Alternatively, connect headphones to the Front Panel
Phones jack.
Step 1: Hook Up the FLEX-5000A™
D: Power Supply
Use the power supply cable that came with
your transceiver to hook up a stabilized
13.8V DC power supply to the jack marked
–13.8V+.
The power supply must be rated for 25A
continuous duty.
The power cable is unterminated at one end
to allow you to attach your own
connector(s) if needed. Make sure the 1 or
2 red wires go to the positive and the 1 or 2
black wires to the negative terminal of your
power supply.
DO NOT POWER UP THE TRANSCEIVER
AT THIS TIME.
E: IEEE 1394
Locate the IEEE 1394 (FireWire®) cable
that came with your transceiver. Connect
the end with the ferrite core(s) to one of the
two jacks marked IEEE 1394. Connect the
other end to the IEEE 1394 jack on your
computer. The plugs should insert easily
with no extra force.
DO NOT INSERT THE PLUGS UPSIDE
DOWN.
F: Paddles/Keyer/Key
Connect your CW paddles, keyer or straight
key to the jack market KEY using a 1/4”
stereo (TRS) plug.
For paddles or a keyer, connect the Tip to
dot, Ring to dash and Sleeve to common.
For a straight key, connect Tip to key and
Sleeve to common. Do not connect the
Ring.
The PowerSDR Keyer is configured for iambic paddles
by default. To change this, please see the FLEX-5000
Owner's manual.
Front Panel
G: Microphone/PTT
Connect your microphone/PTT to the 8-pin
microphone jack.
The pin-out of the microphone jack is as
follows:
Proceed to Step 2: Install the FLEX-5000
Device Driver on the next page.
!"""
#
"
$%&&
'()*+
$%,-."/
&0
&
'12
$3
, &
45'(6$
4'(6,-
."/
$+7
387
9&8"1$::
(;1,
';1,
<*=,. > /
;1,
6
,8;=.8/
$::.</>
94,./?
94,.</

In Step 2 you will Install the FLEX-5000
Device Driver
A: Run the Device Driver Installation
Wizard
Insert the CD-ROM that came with your
FLEX-5000A. The Device Driver installer file
can be found in the Driver folder.
Alternatively, the Device Driver can be
downloaded from the home page of the
FlexRadio website:
http://www.flex-radio.com/
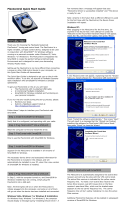
Double click the installer file to run the
Device Driver installation wizard. You will
see the following welcome screen:
Click Next on this and subsequent screens
to accept the default settings. Then click
Install. If a Software Installation warning
appears, click Continue Anyway to
proceed.
Step 2: Install the FLEX-5000 Device Driver
Finally, click Finish to restart your
computer.
B: Complete the Driver Installation
After your computer has restarted, power
up your FLEX-5000A: briefly press and then
release the Power button. After a brief
moment, you will hear the power relay click
and the Power button will illuminate.
If your operating system is Windows®
XP®, please skip to the column on the
right of this page.
Vista®: Your computer will automatically
load the drivers in the background. Please
allow this process to finish before installing
PowerSDR. This will take between 10-30
seconds to complete. To ensure driver
loading is indeed complete, open the
FlexRadio icon on your desktop and verify
that the Device Description is a FlexRadio
Systems FLEX-5000.
Proceed to Step 3: Install PowerSDR on the
next page.
Windows XP: Your computer will now
detect the FLEX-5000A and display the
Found New Hardware Wizard and a
welcome screen will show. Of the three
options, select the bottom one No, not at
this time and click Next.
The Wizard will recognize that you are
trying to install a FlexRadio FLEX-5000.
Select the option Install software
automatically (Recommended) and Click
Next.
The Wizard will then request you to please
wait while it installs the software. If a
Hardware Installation warning appears,
click Continue Anyway to proceed.
The Wizard will then finally display a screen
informing you it has finished installing the
software. Click Finish to continue.
Proceed to Step 3: Install PowerSDR on the
next page.

In Step 3 you will Install PowerSDR
A: Run the PowerSDR Installation
Wizard
Insert the CD-ROM that came with your
FLEX-5000A. The PowerSDR set-up.exe file
can be found in the PowerSDR folder.
Alternatively, PowerSDR can be downloaded
from the home page of the FlexRadio
website:
http://www.flex-radio.com/
Double click the setup.exe file to run the
PowerSDR set-up wizard. You will see the
PowerSDR Welcome screen.
If instead you see the following screen:
you will first need to install .Net 1.1 on your computer.
Information can on how to do this can be found on our
website at:
http://kc.flex-radio.com/KnowledgebaseArticle50072.aspx
You will also need the .Net 1.1 Service Pack 1. See:
http://kc.flex-radio.com/KnowledgebaseArticle50073.aspx
Click Next on this and subsequent screens,
accepting the License Agreement and all
defaults. PowerSDR will be installed on your
computer, after which an Installation
Complete screen will appear. Click Close to
complete the installation.
Step 3: Install PowerSDR
B: Run the PowerSDR Setup Wizard
Make sure your FLEX-5000A is powered up
and run PowerSDR, either by double-
clicking on the desktop icon you created
during installation, or clicking on Start,
then All Programs, PowerSDR and select
the PowerSDR version you just installed
(if this is not the first time you have
installed PowerSDR, you may have multiple
versions on your computer).
The first time PowerSDR starts up it will
first run an optimization routine. Click OK
and let the routine run.
Next the PowerSDR Setup Wizard will start
and a Welcome screen will open. Click
Next.
You will be asked to select your Radio
Model. Select FLEX-5000 and click Next.
You will then be informed that the Wizard is
finished. Click Finish to complete the
wizard.
PowerSDR next transfers your FLEX-5000A's
calibration data to the computer. This only
happens once, the first time you run a new
release of PowerSDR.
Click OK to start the transfer process.
If you have the second receiver (RX2) installed, this
transfer of data will be followed by a second transfer.
When the transfer process is complete,
PowerSDR will finish starting up and display
its front console.
Do not click the Start button just yet.
Proceed to Step 4: Configure the FLEX-5000
Device Driver on the next page.

In Step 4 you will configure the Device Driver's Sampling Rate, Buffer Size
and Operation Mode to work correctly with your FLEX-5000A.
Set the Sampling Rate and Buffer Size
Locate the Device Driver icon on your desktop and double-click on it to open
the Control Panel.
If you did not elect to create a desktop icon during installation, click on Start, then All Programs,
select the FlexRadio FLEX-5000 folder and double-click on the FlexRadio FLEX-5000
application.
In the top section, make sure the Bus tab on the left is selected. Set the
Sampling Rate to 96kHz and the Buffer Size to 1024. Remember these
settings as you will need them in Step 5-A.
Set the Operation Mode
Now select the Advanced tab on the right. Set the Operation Mode to Safe
Mode Level 1.
Proceed to Step 5: Configure PowerSDR on the next page.
Step 4: Configure the FLEX-5000 Device Driver

In Step 5 you will configure PowerSDR's
Audio Parameters as well as the Mixer and
Antenna Settings.
A: Configure the Audio Parameters
PowerSDR's Audio Parameters (Sampling
Rate and Buffer Size) must be configured to
match those of the Device Driver (see Step
4). To do so, click Setup in the menu bar of
PowerSDR to open the Setup Form. Select
the Audio tab and then select the Primary
tab.
Set the Buffer Size to 1024 and the
Sample Rate to 96000 (the same values
you set for the Device Driver in Step 4-A).
Click OK at the bottom right to complete
the settings.
Step 5: Configure PowerSDR
B: Configure the FLEX-5000 Audio
Mixer
Your FLEX-5000A has several input and
output ports and the Audio Mixer is used to
select the ones you are using and set their
audio levels (just like with a sound card).
Click Mixer in the menu bar of PowerSDR.
Check Mic as the Input to select the front
Microphone jack. Check Pow Spkr Line
Out as the Output, to select your powered
speakers. Check Head Phones if you
instead (or simultaneously) want to send
audio to the front Phones jack.
Click the red X at the top right to close.
C: Configure the Antenna Selector
Click Antenna in the menu bar of
PowerSDR to open the Antenna Selector
window. Set the Receiver 1 and Transmit
Antenna to the antenna port (ANT1, ANT2
or ANT3) you connected your HF antenna
or dummy load to in Step 1-A.
Click the red X at the top right to close.
D: Click Start
Congratulations! You've now completed all
the steps required to set up your FLEX-
5000A. In PowerSDR, click the Start button
at the top left to operate your FLEX-5000A.
This Quick Start Guide provides only the
basic steps to set up your FLEX-5000A. For
more information, you are referred to the
FLEX-5000 Owner's manual, which can be
found in the Docs folder on the CD-ROM
that came with your transceiver.
/