
User Guide
SUMMARY
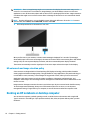
This guide provides technical specications and information about monitor features, setting up the monitor, and using
the monitor.

© Copyright 2020 HP Development Company,
L.P.
HDMI, the HDMI Logo and High-Denition
Multimedia Interface are trademarks or
registered trademarks of HDMI Licensing LLC.
NVIDIA, the NVIDIA logo,and G-SYNC are
trademarks and/or registered trademarks of
NVIDIA Corporation in the U.S. and other
countries. Windows is either a registered
trademark or trademark of Microsoft
Corporation in the United States and/or other
countries. USB Type-C®and USB-C® are
registered trademarks of USB Implementers
Forum. DisplayPort™, the DisplayPort™ logo,
and VESA® are trademarks or registered
trademarks owned by the Video Electronics
Standards Association (VESA) in the United
States and other countries.
The information contained herein is subject to
change without notice. The only warranties for
HP products and services are set forth in the
express warranty statements accompanying
such products and services. Nothing herein
should be construed as constituting an
additional warranty. HP shall not be liable for
technical or editorial errors or omissions
contained herein.
Product notice
This guide describes features that are common
to most models. Some features may not be
available on your product. To access the latest
user guide, go to http://www.hp.com/support,
and follow the instructions to nd your
product. Then select Manuals.
First Edition: December 2020
Document part number: M42640-xx1

About this guide
This guide provides technical specications and information about monitor features, setting up the monitor,
and using the software. Depending on the model, your monitor may not have all the features included in this
guide.
WARNING! Indicates a hazardous situation that, if not avoided, could result in serious injury or death.
CAUTION: Indicates a hazardous situation that, if not avoided, could result in minor or moderate injury.
IMPORTANT: Indicates information considered important but not hazard-related (for example, messages
related to property damage). Warns the user that failure to follow a procedure exactly as described could
result in loss of data or in damage to hardware or software. Also contains essential information to explain a
concept or to complete a task.
NOTE: Contains additional information to emphasize or supplement important points of the main text.
TIP: Provides helpful hints for completing a task.
This product incorporates HDMI technology.
iii

iv About this guide

Table of contents
1 Getting started ............................................................................................................................................. 1
Important safety information ............................................................................................................................... 1
More HP resources ................................................................................................................................................. 1
Preparing to call technical support ..................................................................................................... 2
Getting to know your monitor ............................................................................................................................... 2
Features ............................................................................................................................................... 2
Front components ............................................................................................................................... 3
Rear components ................................................................................................................................ 4
Locating the serial number and product number ............................................................................... 5
Setting up the monitor .......................................................................................................................................... 5
Attaching the monitor stand ............................................................................................................... 5
Mounting the monitor head ................................................................................................................ 7
Removing the monitor stand ............................................................................................ 7
Attaching the monitor head to a mounting device ........................................................... 8
Connecting the cables ......................................................................................................................... 9
Connecting USB devices .................................................................................................................... 12
Adjusting the monitor (select products only) ................................................................................... 13
Installing a security cable ................................................................................................................. 15
Turning on the monitor ..................................................................................................................... 15
HP watermark and image retention policy ....................................................................................... 16
Docking an HP notebook or desktop computer .................................................................................................. 16
2 Using the monitor ........................................................................................................................................ 18
Downloading software and utilities .................................................................................................................... 18
The Information le ............................................................................................................................................. 18
The Image Color Matching le ............................................................................................................................. 18
Using the OSD menu ............................................................................................................................................ 18
Using the OSD function buttons .......................................................................................................................... 19
Reassigning the function buttons ....................................................................................................................... 20
Changing the Power Mode setting (select products only) .................................................................................. 20
Using Auto-Sleep Mode (select products only) ................................................................................................... 20
Using low blue light mode (select products only) ............................................................................................... 21
Adjusting blue light output (select products only) .............................................................................................. 21
DisplayPort multistreaming over USB Type-C .................................................................................................... 21
v

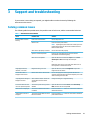
3 Support and troubleshooting ........................................................................................................................ 23
Solving common issues ....................................................................................................................................... 23
Button lockouts ................................................................................................................................................... 24
Optimizing image performance (analog input) ................................................................................................... 24
4 Maintaining the monitor .............................................................................................................................. 26
Maintenance guidelines ....................................................................................................................................... 26
Cleaning the monitor ......................................................................................................................... 26
Shipping the monitor ......................................................................................................................... 27
Appendix A Technical specications ................................................................................................................. 28
68.6 cm (27.0 in) QHD model specications ....................................................................................................... 28
60.5 cm (23.8 in) FHD model specications ........................................................................................................ 29
Preset display resolutions ................................................................................................................................... 29
High-denition video formats ............................................................................................................................. 30
Energy saver feature ........................................................................................................................................... 31
Appendix B Accessibility ................................................................................................................................. 32
HP and accessibility ............................................................................................................................................. 32
Finding the technology tools you need ............................................................................................ 32
The HP commitment ......................................................................................................................... 32
International Association of Accessibility Professionals (IAAP) ....................................................... 33
Finding the best assistive technology .............................................................................................. 33
Assessing your needs ..................................................................................................... 33
Accessibility for HP products .......................................................................................... 33
Standards and legislation .................................................................................................................................... 34
Standards .......................................................................................................................................... 34
Mandate 376 – EN 301 549 ............................................................................................ 34
Web Content Accessibility Guidelines (WCAG) ................................................................ 34
Legislation and regulations .............................................................................................................. 34
Useful accessibility resources and links .............................................................................................................. 35
Organizations .................................................................................................................................... 35
Educational institutions .................................................................................................................... 35
Other disability resources ................................................................................................................. 35
HP links .............................................................................................................................................. 36
Contacting support .............................................................................................................................................. 36
Index ............................................................................................................................................................. 37
vi

1 Getting started
Read this chapter to learn about safety information and where to nd additional HP resources.
Important safety information
An AC adapter and power cord might be included with the monitor. If you use another cord, use only a power
source and connection appropriate for this monitor. For information about the correct power cord set to use
with the monitor, see the Product Notices provided in your documentation kit.
WARNING! To reduce the risk of electric shock or damage to the equipment:
● Plug the power cord into an AC outlet that is easily accessible at all times.
● If the power cord has a three-pin attachment plug, plug the cord into a grounded (earthed) three-pin
outlet.
● Disconnect power from the computer by unplugging the power cord from the AC outlet. When
unplugging the power cord from the AC outlet, grasp the cord by the plug.
For your safety, do not place anything on power cords or cables. Take care to route all cords and cables
connected to the monitor so that they cannot be stepped on, pulled, grabbed, or tripped over.
To reduce the risk of serious injury, read the Safety & Comfort Guide provided with your user guides. It
describes proper workstation setup and proper posture, health, and work habits for computer users. The
Safety & Comfort Guide also provides important electrical and mechanical safety information. The Safety &
Comfort Guide is also available on the web at http://www.hp.com/ergo.
IMPORTANT: For the protection of the monitor and the computer, connect all power cords for the computer
and its peripheral devices (such as a monitor, printer, scanner) to a surge protection device such as a power
strip or uninterruptible power supply (UPS). Not all power strips provide surge protection; the power strip
must be specically labeled as having this capability. Use a power strip whose manufacturer oers a damage
replacement policy so that you can replace the equipment if surge protection fails.
Use the appropriate and correctly sized furniture designed to properly support your monitor.
WARNING! Monitors that are inappropriately situated on dressers, bookcases, shelves, desks, speakers,
chests, or carts could fall over and cause personal injury.
WARNING! Stability hazard: The device might fall, causing serious personal injury or death. To prevent
injury, securely attach the monitor to the oor or wall in accordance with the installation instructions.
WARNING! This equipment is not suitable for use in locations where children are likely to be present.
NOTE: This product is suitable for entertainment purposes. Consider placing the monitor in a controlled
luminous environment to avoid interference from surrounding light and bright surfaces that might cause
disturbing reections from the screen.
More HP resources
Use this table to locate resources that provide product details, how-to information, and more.
Important safety information 1

Table 1-1 Additional information
Resource Contents
Setup Instructions Overview of monitor setup and features
HP support For HP support or to resolve a hardware or software problem, go to
http://www.hp.com/support, and follow the instructions to nd your product.
– or –
Type support in the taskbar search box, and then select HP Support Assistant.
Then select Support.
– or –
Select the question mark icon in the taskbar search box.
Then select Support.
NOTE: Contact customer support to replace the power cord, the AC adapter (select products only), or any other cables that shipped
with your monitor.
Preparing to call technical support
Use this information if you have to troubleshoot an issue.
If you cannot solve a problem using Support and troubleshooting on page 23, a call to technical support can
provide additional help. Have the following information available when you call.
● Monitor model number
● Monitor serial number
● Purchase date on invoice
● Conditions under which the problem occurred
● Error messages received
● Hardware conguration
● Name and version of the hardware and software that you are using
Getting to know your monitor
Your monitor has top-rated features. This section provides details about your components, where they are
located, and how they work.
Features
Depending on the model, your monitor might include the following features:
Display features
The following models, which include full-screen support for lower resolutions; includes custom scaling for
maximum image size while preserving original aspect ratio:
● 68.6 cm (27.0 in) diagonal viewable screen area with 2560 × 1440 resolution
● 60.5 cm (23.8 in) diagonal viewable screen area with 1920 × 1080 resolution
2 Chapter 1 Getting started

● In-plane switching (IPS) panel
● Nonglare panel with an LED backlight
● Wide viewing angle to allow viewing from a sitting or standing position, or moving from side to side
● Tilt, swivel, and height adjustment capabilities
● Pivot capability to rotate the monitor head from landscape to portrait orientation
● Removable stand for exible monitor head mounting solutions
● HP Quick Release 2 device to quickly attach the monitor head to the stand with a simple click, and then
remove it with the convenient sliding tab release
● DisplayPort™ video input (cable included)
● High-Denition Multimedia Interface™ (HDMI) video input (cable included)
● USB hub with one USB Type-C® port (cable included) that connects to the computer (upstream) and four
USB ports that connect to USB devices (downstream)
● Four on-screen display (OSD) buttons, three that you can recongure to quickly allow selection of the
most commonly used operations
● Plug and Play capability if supported by your operating system
● VESA® mounting bracket for attaching the monitor head to a wall-mount device or swing arm
● Security cable slot on the rear of the monitor for an optional security cable
● Cable management feature for placement of cables and cords
● On-screen adjustments in several languages for easy setup and screen optimization
● Energy saver feature to meet requirements for reduced power consumption
NOTE: For safety and regulatory information, see the Product Notices provided in your documentation kit.
To access the latest user guide, go to http://www.hp.com/support, and follow the instructions to nd your
product. Then select Manuals.
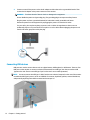
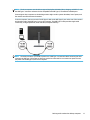
Front components
To identify the components on the front of the monitor, use this illustration and table.
Getting to know your monitor 3

Table 1-2 Front components and their descriptions
Component Description
(1) Menu button Press to open the OSD menu. When the OSD menu is open, the Menu light turns on.
(2-4) OSD buttons (assignable) When the OSD menu is open, press the buttons to navigate through the menu. The
function light icons indicate the default button functions. For a description of these
functions, see Using the OSD function buttons on page 19.
You can reassign the function buttons to quickly select the most commonly used
operations. See Reassigning the function buttons on page 20.
(5) Power button Turns the monitor on or o.
NOTE: Be sure that the master power switch on the monitor is in the On position to
turn on the monitor.
(6) Power light White: The monitor is on.
Amber: The monitor is in a reduced power state because of inactivity.
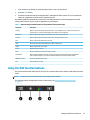
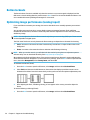
Rear components
To identify the components on the rear of the monitor, use this illustration and table.
Table 1-3 Rear components and their descriptions
Component Description
(1) Security cable slot Connects an optional security cable.
(2) Power connector Connects an AC adapter.
(3) VESA release button Releases the stand from the monitor.
(4) HDMI port Connects the HDMI cable to a source device such as a computer or game console.
(5) DisplayPort IN connector Connects the DisplayPort cable to a source device such as a computer or game console.
(6) USB Type-C port (upstream) Connects a USB Type-C cable to a source device such as a computer or game console. This
USB Type-C port can function as a DisplayPort audio/video input or as a USB 3.0
connection. It can also be used to deliver up to 65 W of power to a device. Power outputs
are 9 V/10 V/12 V/15 V/20 V to achieve a 65 W output.
4 Chapter 1 Getting started

Table 1-3 Rear components and their descriptions (continued)
Component Description
This port also enables the USB Type-A ports to perform their functions.
(7) DisplayPort OUT connector Connects the DisplayPort cable to a source device such as a computer or game console.
(8) USB ports (2) (downstream) Connect a USB cable to a peripheral device, such as a keyboard, mouse, or USB hard drive.
(9) USB ports (2) (downstream) Connect a USB cable to a peripheral device, such as a keyboard, mouse, or USB hard drive,
and charge peripheral devices.
Locating the serial number and product number
Depending on the product, the serial number and product number are located on a label on the rear of the
monitor or on a label under the front bezel of the monitor head. You might need these numbers when
contacting HP for support.
Setting up the monitor
This section describes attaching the monitor stand or wall mount and the options for connecting your monitor
to a PC, notebook, gaming console, or similar device.
WARNING! To reduce the risk of serious injury, read the Safety & Comfort Guide. It describes proper
workstation setup and proper posture, health, and work habits for computer users. The Safety & Comfort
Guide also provides important electrical and mechanical safety information. The Safety & Comfort Guide is
available on the web at http://www.hp.com/ergo.
IMPORTANT: To prevent damage to the monitor, do not touch the surface of the LCD panel. Pressure on the
panel can cause nonuniformity of color or disorientation of the liquid crystals. If this occurs, the screen will
not recover to its normal condition.
IMPORTANT: To prevent the screen from getting scratched, defaced, or broken and to prevent damage to
the control buttons, position the monitor facedown on a at surface covered with protective sheet foam or a
nonabrasive cloth.
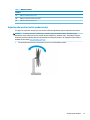
Attaching the monitor stand
Correctly attaching your monitor stand is critical for safe use. This section describes how to safely attach a
stand.
TIP: Consider the placement of the monitor, because surrounding light and bright surfaces might cause
interfering reections.
NOTE: The procedures for attaching a monitor stand might be dierent on other models.
1. With the monitor placed facedown inside the box, tear open the packaging bag along the tear line.
Setting up the monitor 5

2. With the monitor still placed facedown inside the box, lower the bottom of the stand's mounting plate
into the back of the monitor’s recess (1) until it snaps into place (2).
6 Chapter 1 Getting started

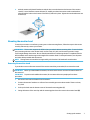
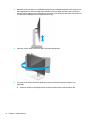
3. With the monitor still placed facedown inside the box, insert the base into the bottom of the monitor
stand (1). Swivel the base counterclockwise (2), making sure that the monitor stand screw heads are
aligned with the holes on the bottom of the base (3) and lock in place. Tighten the two thumbscrews into
the base (4).
Mounting the monitor head
To attach your monitor to a wall using a swing arm or other mounting xture, follow the steps in this section
to safely and securely connect your monitor.
IMPORTANT: This monitor supports the VESA industry-standard 100 mm mounting holes. To attach a third-
party mounting solution to the monitor head, use four 4 mm, 0.7 pitch, and 10 mm long screws. Longer
screws might damage the monitor. Be sure that the manufacturer’s mounting solution is compliant with the
VESA standard and is rated to support the weight of the monitor head. For best performance, use the power
and video cables provided with the monitor.
NOTE: This apparatus is intended to be supported by a UL-listed or CSA-listed wall-mount bracket.
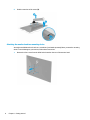
Removing the monitor stand
If you decide to use a wall mount instead of the monitor stand that you attached, rst remove the stand.
IMPORTANT: Before you disassemble the monitor, be sure that the monitor is turned o and all cables are
disconnected.
IMPORTANT: To position and stabilize the monitor, HP recommends that two people perform these
procedures.
1. Disconnect and remove all cables from the monitor.
2. Position the monitor facedown on a at surface covered by protective sheet made of foam or a clean,
dry cloth.
3. Push up the latch near the bottom center of the stand’s mounting plate (1).
4. Swing the bottom of the stand up until the mounting plate clears the recess in the monitor head (2).
Setting up the monitor 7

5. Slide the stand out of the recess (3).
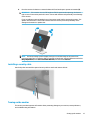
Attaching the monitor head to a mounting device
You might need additional tools such as a screwdriver (purchased separately) when you attach a mounting
device. To avoid damage to your monitor, follow these instructions.
1. Remove the four screws from the VESA holes located on the rear of the monitor head.
8 Chapter 1 Getting started

2. To attach the monitor head to a swing arm or other mounting device, insert four mounting screws
through the holes on the mounting device and into the VESA screw holes on the back of the monitor
head.
IMPORTANT: If these instructions do not apply to your device, then follow the mounting device
manufacturer’s instructions when mounting the monitor to a wall or swing arm.
Connecting the cables
In addition to details about how to connect a cable, this section contains information about how your monitor
functions when you connect certain cables.
NOTE: Depending on the model, the monitor might be capable of supporting VGA, USB Type-C, HDMI, or
DisplayPort inputs. The video mode is determined by the video cable used. The monitor automatically
determines which inputs have valid video signals. You can select the inputs through the OSD menu. The
monitor ships with select cables. Not all cables shown in this section are included with the monitor.
1. Place the monitor in a convenient, well-ventilated location near the computer.
Setting up the monitor 9

NOTE: Except for USB Type-C input, the monitor automatically determines which inputs have valid
video signals. You must manually select USB Type-C input. To select any input, including USB Type-C,
open the OSD menu and select Input.
2. Before connecting the cables, route the cables through the cable routing hole in the center of the stand.
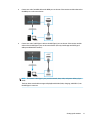
3. Connect a video cable.
● Connect one end of a DisplayPort cable to the DisplayPort connector on the rear of the monitor and
the other end to the DisplayPort connector on the source device.
●
NOTE: Depending on your DisplayPort cable connection, either the DisplayPort input video
connection is disabled between the monitor and connected host device after the system exits
Sleep or loses the input signal. When the system wakes from the Sleep state, the monitor
automatically scans to an active input video signal.
If your last video input connection was to DisplayPort, the monitor automatically scans and
switches to USB Type-C video, DisplayPort, or HDMI video input source.
You must reconnect to the correct DisplayPort (DisplayPort 1) input using the OSD menu. To
reconnect, press the OSD button on the monitor, select Menu, select Input, and then select a
DisplayPort setting.
10 Chapter 1 Getting started

● Connect one end of an HDMI cable to the HDMI port on the rear of the monitor and the other end to
the HDMI port on the source device.
● Connect one end of a USB Type-C cable to the USB Type-C port on the rear of the monitor and the
other end to the USB Type-C port on the source device. (Use only the HP-approved USB Type-C
cable provided with the monitor.)
NOTE: The monitor’s USB Type-C port provides network, data, video, and power delivery (up to
65 W).
The host device must be able to support DisplayPort Alt Mode (video, charging, and USB 3.1) over
the USB Type-C connector.
Setting up the monitor 11

4. Connect one end of the power cord to the AC adapter and the other end to a grounded AC outlet. Then
connect the AC adapter to the power connector on the monitor.
WARNING! To reduce the risk of electric shock or damage to the equipment:
Do not disable the power cord grounding plug. The grounding plug is an important safety feature.
Plug the power cord into a grounded (earthed) AC outlet that is easily accessible at all times.
Disconnect power from the equipment by unplugging the power cord from the AC outlet.
For your safety, do not place anything on power cords or cables. Arrange them so that no one can
accidentally step on or trip over them. Do not pull on a cord or cable. When unplugging the power cord
from the AC outlet, grasp the cord by the plug.
Connecting USB devices
USB ports are used to connect devices such as a digital camera, USB keyboard, or USB mouse. There are four
USB ports on the monitor to connect to a device (downstream): two USB Type-A on the rear and two USB
Type-A on the side. There is one USB Type-C port on the rear to act as a hub (upstream).
NOTE: You must connect the USB Type-C cable from the source device (computer) to the rear of the monitor
to enable the USB Type-A ports to serve as a USB hub for a mouse, keyboards, phones, external hard drives,
and practically anything that is USB-connected and can accept 5 V.
12 Chapter 1 Getting started

Table 1-4 USB port locations
USB Ports
(1) USB Type-A downstream ports (2)
(2) USB Type-C upstream port from computer
(3) USB Type-A downstream ports (2)
Adjusting the monitor (select products only)
To support an ergonomic work space, your monitor oers the adjustment options outlined in this section.
WARNING! To reduce the risk of serious injury, read the Safety & Comfort Guide. It describes proper
workstation setup and proper posture, health, and work habits for computer users. The Safety & Comfort
Guide also provides important electrical and mechanical safety information. The Safety & Comfort Guide is
available on the web at http://www.hp.com/ergo.
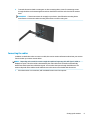
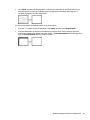
1. Tilt the monitor head forward or backward to set it to a comfortable eye level.
Setting up the monitor 13

2. Adjust the monitor’s height to a comfortable position for your individual workstation. The monitor’s top
bezel edge should not exceed a height that is parallel to your eye height. A monitor that is positioned
low and reclined might be more comfortable for users with corrective lenses. Reposition your monitor as
you adjust your working posture throughout the work day.
3. Swivel the monitor head to the left or right for the best viewing angle.
4. You can pivot the monitor head from landscape to portrait orientation viewing to adapt to your
application.
a. Adjust the monitor to full height position and tilt the monitor back to full tilt position (1).
14 Chapter 1 Getting started
Page is loading ...
Page is loading ...
Page is loading ...
Page is loading ...
Page is loading ...
Page is loading ...
Page is loading ...
Page is loading ...
Page is loading ...
Page is loading ...
Page is loading ...
Page is loading ...
Page is loading ...
Page is loading ...
Page is loading ...
Page is loading ...
Page is loading ...
Page is loading ...
Page is loading ...
Page is loading ...
Page is loading ...
Page is loading ...
Page is loading ...
-
 1
1
-
 2
2
-
 3
3
-
 4
4
-
 5
5
-
 6
6
-
 7
7
-
 8
8
-
 9
9
-
 10
10
-
 11
11
-
 12
12
-
 13
13
-
 14
14
-
 15
15
-
 16
16
-
 17
17
-
 18
18
-
 19
19
-
 20
20
-
 21
21
-
 22
22
-
 23
23
-
 24
24
-
 25
25
-
 26
26
-
 27
27
-
 28
28
-
 29
29
-
 30
30
-
 31
31
-
 32
32
-
 33
33
-
 34
34
-
 35
35
-
 36
36
-
 37
37
-
 38
38
-
 39
39
-
 40
40
-
 41
41
-
 42
42
-
 43
43


HP E27u G4 QHD USB-C Monitor User guide
- Type
- User guide
- This manual is also suitable for
Ask a question and I''ll find the answer in the document
Finding information in a document is now easier with AI
Related papers
-
HP E14 G4 Portable Monitor User guide
-
HP Z24f G3 FHD Display User guide
-
HP X24ih Gaming Monitor User guide
-
HP Value 27-inch Displays User guide
-
HP 5ZP65AA Ultra HD Monitor User guide
-
-
HP E24t G4 FHD Touch Monitor User guide
-
HP Value 34-inch Displays User guide
-
HP Z27 27-inch 4K UHD Display User guide
-
