O-Scale Sacramento Northern Traction Body Kits
We would like to thank you for purchasing this
LaBelle kit. We believe that these are the finest kits
of their type on the market today and we hope that
you enjoy building it.
These are considered to be “Craftsman” kits. Don’t
let that title scare you. This is a Craftsman kit
because if you shake the box, all you do is break
the parts, not assemble the model.
If you can read and follow directions then you, too,
can be a “Craftsman.”
X
Y
Z
3
2
3
O-261 Coach
O-262 Combine
X
Y
Z
4
2
3
TEMPLATE “X”
TEMPLATE ‘Y’
TEMPLATE ‘Z’
TEMPLATE ‘E’
SCALE= 1/8” = 1’ 0”
OR ½ “O” SCALE
01’ 2’ 3’ 4’
Templates are Full Size
LaBelle Woodworking Company
5101 Ridge Road
Cheyenne, Wyoming 82009
Phone :307-433-9909 Fax: 307-433-9949
Toll Free: 866-246-9967 (Voice Only)
e-mail: [email protected]

2
Stripwood that is colored on one end is used in several different places. Be sure that you cut from the uncolored end of the wood to make your
parts.
Stripwood colored on both ends can be cut from either end and is used for one particular part. It will be completely used in one assembly.
Please keep in mind while building this kit that it is YOUR kit and that you can make it as Spartan or as Detailed as you wish. It is up to you.
Remember, all this is is a wooden passenger conveyance on wheels.
3
Cut Mullion Casing (5) in place from (Stripwood one end colored
Brown). Cement Scribed Siding (6) in place. Trim the siding flush
with the ends of the sides.
NOTE: When making siding Joints, make cuts so Scribe Spacing is Equal
Cut out Door Rails (7) (Marked Black) as per Isometric Drawing
Notation. Sand flush with window opening. Cut Door Panels (8)(9)
from 1/32 x 5/8 in wide Stripwood and cement to Doors (7) (Marked
Black) keeping Flush at the bottoms of the doors (10) Keeping up
3/32 inch from bottom.
4Cement Doors (7) to the back of the letterboard as per Isometric and
plan drawings. Keep the edge of the Doors Exactly in Line with
End of side and up from Bottom of the side the thickness of
the Bumper (14). Sand flush with the top of the side.
NOTE: Use Bumper to obtain the correct distance
Cut Filler Pieces (11) to 3/4 inch length from (Stripwood
Combination Colors Brown and Red) and cement to back of doors,
keeping flush with the top and Outer Edge of Doors, and (For
Combine Only):Cut Filler piece (12) to Width of Baggage Doors
(10) from (Stripwood One End Colored Yellow)
and cement to the back of letterboards, keeping the
Inner End In Line with End of sides and flush with
the bottom. Cement Doors (10) to back of
Letterboard as per Isometric and Plan
Drawings, keeping edge of Doors
Exactly In Line with the end of
the side and up from the
bottom of the side
exactly the
thickness
of the
Bumper (14).
NOTE: Use Bumper to obtain the correct distance Up
1
These are the sub-sides (1)
Sand the Letterboards
at the end of the subsides
to remove the rough edges, if any
Separate and cement the window posts
in place (2).
Cut
2
Make a Left and a Right Window Post (3) from one large
offset scribed post, cutting slightly larger than required
and cementing to the Sub-Sides with the Raised
shoulder toward the Window and keeping it
back the correct margin (eyeball it) from
the window.
NOTES: The Term “Raised Shoulder” is the slight projection on Both edges of the post
When Making Joints, make cuts so Scribed Spacing is Equal.
Make One Right and Left Window
Post by trimming off Raised
Shoulder from the proper
edges of the other large
offset scribed post.
Cement in place keeping
the Raised Shoulder edge
toward the window opening and keep the Raised Shoulder back the
Correct distance from the window opening. Now cement in place the
remaining portion of Post (4) using Excess Portion For Post (3)

7
3
5 6
8
Cement Formers (13) to Bumpers (14) Centering in the width and
flush at the back edges.
NOTE: Combine has one (1) wide Bumper for Baggage End.
Place Bumpers on a flat surface and place them at their respective
ends. Cement the bottom edges of the doors to the formers making
sure that the notches are against the edge of the doors. Cement the
top formers (13) in place making Sure that the Notches are against
the edges of the doors.
Cut the door sill (15) to length to fit between the end of the side and
the notch in the bumper and cement in place.
Cut the Quarter-Round pieces (16), Both ends colored Black, to the
proper height and cement one to the face of the Baggage Doors and
against the end of the side keeping flush with the face of the side, and
to the other end of the Baggage Door, keeping flush with the edge of
the door.
On the Passenger door, cut the Quarter Round, (17) Colored One End
Black, flush with the bottom of the car side. Cement one to the Face
of the Passenger Door (9) and against the end of the side wall. Keep
this Flush with the face of the sides. Cement the other to the face of
the door, keeping it flush with the edge of the door.
Cut and cement the door panels (19) from the 1/32” x 5/8” wide
Stripwood to the End door Sections(18), keeping the panels 3/32”
up from the bottom of the doors.
Cement the end door sections (18) to the formers (13) keeping the
ends in line with the points marked “X” in the drawing.
Cement in place the Right and Left Angle Window Sections (20)
and sand them flush with the top
X
X
Cut the Door Section End Letterboard filler piece (21) to length from
the Stripwood with one End Colored Blue and cement the Narrow Edge
to the face of the End Door keeping it flush at the top.
Cut and fit the Window Section End Window Letterboard filler pieces
(22) from the same stripwood and cement the Wide Edge to the face of
the Window Sections, keeping it flush at the top.
Cut the Door Molding (23) to length from the Stripwood combination
Colored Brown and Black. Cement this molding to the face of the
door keeping it flush with the edges of the door.

4
910
11
Cut and fit Unscribed Dash Siding (24) which is Pre-Cut to height
and cement it to the Window Sections.
Cut and fit the Window Sills (25) from Stripwood with one end
colored Yellow. Cement on Top of the Dash. Sand the window
sills to leave a slight projection.
Cut and Cement the Bevel Casing (26) in place, from Stripwood
with one end colored Red. This casing goes next to the end door
Cut and Cement the Bevel Casing (27) in place, from Stripwood
with one end colored Green. This casing goes against the outside
of the end next to the Passenger Doors. Make sure that the “square
edge” and “wide face” are out.
.
Cut out or trace Template “E” and sand the end letterboards
to this radius, Flush with the center and corner moldings.
Red Ends
Green Ends
Sand here
Remove the Tension of the End Letterboard Overlay, (28) made
from Stripwood with the Combination colors Blue and Green,
by rolling a small round object back and forth on the Backside.
Center and cement to the End Radius, keeping it flush at the top.
12
Assemble the roof (29) by cementing the window inserts (30)
inside the roof.
Cut the casing (31) to length from the Stripwood colored one end
Brown.
Cut the casing (32) to length from the Stripwood colored both
ends Blue.
Cement in Place.
Brown End
Both ends Blue
Sand the Roof to the correct length, leaving an equal overhang
at the sides and ends.

13
15 16
5
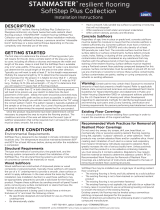
Now Make up Templates “X”, “Y” and “Z” from Card Stock
or use our optional roof rounding kit, which has these Templates
pre-made. Use these templates to check the roof contour at lines
X, Y and Z as per the roof end notations shown on page 1.
Cut and sand the Lower Roof sections using Template “X”
Next, use template “Y” to make four roof overhang pieces
from 1/8” x 3/4” wide stripwood.
Remember, this is a cut and fit procedure. First, cut off Small
Portions of the Roof Top overhang until Points “K” and Points
“L” of the roof overhang pieces fit and cement in place.
Now cut and sand the Roof Ends to match Template “Z”
What does all this mean? Easy, be patient and get a piece of emery
cloth and take a little off the ends at a time. Just pull with the Grain
of the wood, like polishing a pair of shoes.
KL
Roof Bead
Radius “Y”
Lower Roof
Radius “Z”
Roof Radius “X”
14
Shown Below is an alternative method for rounding the roof ends
which some people prefer to the method just outlined.
Make Roof Walk (34) from Stripwood with the combination
colors Red and Black and (35) Stripwood with both ends colored
Brown.
Tip: Place your sandpaper, sand side up on the roof and sand the
roofwalk to the roof curve by just rubbing across the Sandpaper.
Now paint the car and the roof. After the
car is painted, add the Clear Mylar Window material
Cut two Body Spacers from 3/23” x ½” wide stripwood and
fit them between the sides at the top of the car. Space
equally and cement in place.

6
Instructions © LaBelle Woodworking Co of Wyoming, 2003
If You’ve gotten this far in your kit building, you
can now call yourself a “Craftsman” modeler.
Congratulations!
24
23
18
23
19
26
26
REMOVE 25
27 21
22
22
28
FIT TO ROOF
CONTOUR
35
34
28 32
33
K
K
L
L
30
31
32
13
13
POINTS
X
POINTS
X
20 25 27
14
1
11
8
7
REMOVE 17
17
2
5
6
4
10
9
16
15
16
12
O-261, O-262 Isometric Drawing
LaBelle Woodworking Company
5101 Ridge Road
Cheyenne, Wyoming 82009
Phone :307-433-9909 Fax: 307-433-9949
Toll Free: 866-246-9967 (Voice Only)
e-mail: [email protected]
/