Excalibur electronic 383-2 User manual
- Category
- Game console accessories
- Type
- User manual
This manual is also suitable for

Excalibur
Electronics
Double Screen
Double Screen
T
T
alking Golf
alking Golf
Model No. 383-2
OPERATING MANUAL
www.ExcaliburElectronics.com

3
C
ongratulations on your purchase of Excalibur
Electronics’ Double Screen Talking Golf. It’s
the most realistic handheld golf game there is!
You and your friends will have hours of fun. You can
practice or play by yourself against the computer or
compete against a friend. You can even play with or
without the computer’s Hint Mode (see page 4).
Double Screen Talking Golf is easy to use, but be sure to use it
safely. Before starting, please read this manual thoroughly, espe-
cially noting safety, care and battery information. Keep this man-
ual for reference.
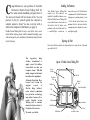
Installing the Batteries
Your Double Screen Talking Golf
requires two AAA batteries, not
included. To install the batteries, care-
fully turn Double Screen Talking Golf
over so that the unit is face-down on a
soft surface. Find the battery com-
partment on the back of the unit. Use
a small Phillips screwdriver to
remove the screw. Lift off the battery
compartment lid. Install the batteries,
making sure to match polarity (+ and
-). Place the tab of the battery com-
partment lid in its slot and close the
compartment door. Replace the screw
and tighten gently.
Layout of Double Screen Talking Golf
Start/Swing/Shot
Sound
Club
Direction
Reset
(on back of unit)
Hole/Player
The legendary King
Arthur brandished a
magic sword, Excalibur,
from which we take our
company name. With this
unique weapon in his hands,
he could not be vanquished.
Although Excalibur Elec-
tronics can’t claim the
magical secrets of
Merlin, King Arthur’s
court wizard, sometimes
our patented technology
may make it seem as if we
could. Double Screen
Talking Golf is another
unmatched innovation of
Excalibur Electronics.
We make you think.
Opening the Unit
Press the Lid Release button (see diagram below) to open the unit. Then pull
up on the Lid Lift.
Off
On/Mode
Check
Lid Release
Lid Lift
Golfer’s
View
Overhead
View
Course
Guide

5
4
Game Description
Your Double Screen Talking Golf con-
tains two LCD screens, one that shows
the entire hole layout from an overhead
view and the other that shows the hole
from the golfer’s point of view from the
ball location. The course contains the
standard 18 holes, ranging from short par
3s to long par 5s. The golfer can select
from 13 different clubs to play the course.
The layout will challenge the golfer as he
hits up and down hills, around trees and
over a river and other water hazards.
Special Note: You can make the game
easier or more difficult by choosing to
play with or without Hint Mode. (See
“HOLE/PLAYER” under “Functions of
the Buttons.”)
The goal of the game is to make par 72
while playing the course, or even go
under par to play like a pro! The game
consists of three different modes of play:
Practice—Start the game from any hole
of your choice.
Tournament—This is a one- or two-play-
er game. Start the game from the first
hole, and continue until you finish the
eighteenth hole. Whoever scores the low-
est on a hole gains the honors and tees off
first from the next hole.
Skins—This is a two-player game. Again,
start the match from the first hole. If one
of the players wins the hole by making
the least number of strokes, they bank
$1,000! If the players each make the same
score on a hole, then that $1,000 prize is
carried over to the next hole. Whoever
makes the most money after completing
the eighteenth hole is the winner!
Functions of the Buttons
ON/MODE: Press this button to turn on
the computer. The default is set to
Practice mode for one player. Press the
button again to select one-player
Tournament or two-player Skins mode.
When the computer is turned off or turns
itself off to conserve the batteries, press
this button again to restart the unit, and
you will return to the mode that you last
selected.
OFF: Press to turn the unit off.
SOUND: Press to turn sound on or off.
CHECK: Press to check the stroke, the
score (in Practice and Tournament
modes) and the amount of money won (in
Skins mode).
HOLE/PLAYER: In Practice mode, press
to select which hole you would like to
begin play at. In Tournament mode, press
to play a two-player game. Pressing this
button again will select the one-player
game.
Addtionally, before hitting any shot, the
player can turn on or off Hint Mode. The
game is easier in Hint Mode, when the
Suggested Stroke Power Indicator is on.
If the indicator is on, you should press the
Start/Swing/Shot button once to start your
shot. New bars will appear on the display,
from left to right. When the new bar
reaches the Suggested Stroke Power
Indicator, press the Start/Swing/Shot but-
ton again. The ball will be struck with the
correct amount of force for the shot.
If Stroke Power is off, press the
Start/Swing/Shot button once to start
your shot. Press this button again when
you think that you have hit the ball with
the right amount of force. Use the table
below to help determine your stroke.
In Hint Mode, club selection is automatic
(although you can override it by pressing
Club) and the Suggested Stroke Power
Indicator (shown as a bar on the right side
of the display) is on. When not in Hint
Mode, the 1W club will be automatically
selected unless you’re on the green, in
which case the PT will be selected. So
you must be careful to choose your prop-
er club!
START/SWING/SHOT: After the game
mode and number of players have been
selected, press this button to confirm the
mode and start the game. Pressing the
Hole/Player button at this point will turn
Hint Mode on or off.
CLUB: The player can choose one of 13
clubs provided by the computer. The
computer will automatically select the
club for you that it believes is the correct
club for the yardage. Press the Club but-
ton if you would like a different club
instead. The distance the club can hit the
ball is listed in the Distance display.
DIRECTION: The game defaults to
Straight as the ball direction. Pressing
this button allows you to Hook your shot.
Press again for a Slice, and one more
press will reset the direction to Straight.
RESET: This button is in a recessed area
in the back of the unit. Use a pointed
instrument to press the button to reset the
game in case it malfunctions.
Club Function
The game provides a club automatically
for you according to your distance to the
hole. The distance range of a club, the
usual distance the club will provide you,
and the distance shown by each stroke
power bar are as follows:
1W 0-270 230-270 27
3W 0-230 200-230 23
4W 0-210 190-210 21
3I 0-200 160-200 20
4I 0-170 150-170 17
5I 0-160 140-160 16
6I 0-150 130-150 15
7I 0-140 120-140 14
8I 0-130 110-130 13
9I 0-120 100-120 12
PW 0-110 50-110 11
SW 0-50 0-50 5
PT 0-10 ———- 1
Club
Range
in yards
Usual
distance
in yards
Power
bar unit
in yards
Notes:
“W” indicates a wood.
“I” indicates an iron.
PT (putter) is best for shots on the green.
SW (sand wedge) is best for hitting out of
sand traps and very short shots to the green.
PW (pitching wedge) is best for shots on a
slope and short shots to the green.
The usual distance refers to the distance unaf-
fected by the terrain and the wind direction.
Playing Double Screen Talking Golf
Pressing HOLE/PLAYER before your shot
turns Hint Mode on or off.

76
Course Terrain
1. The game consists of eight different
terrains: Tee, Fairway, Rough, Bunker,
Water, Up Slope, Down Slope and Green.
2. The shot distance is determined by the
club selection and the terrain.
3. There are five different kinds of wind
conditions in the game: North, South,
East, West, and Windless. The wind direc-
tion changes without changing the force
of the wind every 30 seconds, which
affects the shooting distance. The dis-
tance is also related to the shot direction
selected, either Hook, Straight or Slice.
Only if the shot is over 20 yards can it be
affected by the wind direction, and every
20 yards will be affected be a factor of
one. See the chart at the top of the next
column.
4. To sum up:
Actual shot distance = usual distance -
distance affected by terrain ± distance
affected by wind direction.
Game Rules
1. The player always faces the green. The
goal is to get the ball into the hole with
the least number of shots.
2. A South wind (that is from the south,
blowing in a northerly direction, toward
the green) is displayed when the up arrow
appears in the golfer’s point-of-view dis-
play screen. An East wind is shown by the
left arrow, a West wind by the right arrow
and the North wind by the down arrow.
3. The following describes Out of Bounds
(OOB) shots:
(A) When the hole you’re playing is over
300 yards in length and contains sand
traps, if you hit the ball 100 yards or more
over the hole you will be OOB.
(B) When the hole you’re playing is over
300 yards in length and does not contain
sand traps, if you hit the ball 50 yards or
more over the hole you will be OOB.
(C) When the hole you’re playing is under
301 yards in length and contains sand
traps, if you hit the ball 50 yards or more
over the hole you will be OOB.
(D) When the hole you’re playing is
under 301 yards in length and does not
contain sand traps, if you hit the ball 25
yards or more over the hole you will be
OOB.
(E) Using a Hook to hit the ball beyond
200 yards is OOB when an East wind is
blowing.
(F) Using a Slice to hit the ball beyond
200 yards is OOB when a West wind is
blowing.
4. If your shot goes OOB or you hit the
ball into the water, you will be penalized
2 strokes.
5. When you are in the 2-player game of
Skins or Tournament modes, after the ini-
tial shot, the player farther away from the
green will shoot next. The player who is
to shoot next will have his icon flash in
the bottom left-hand corner of the display.
6. When the ball is 10 yards or less from
the hole, the ball is considered to be on
the green. The only club available is the
PT (putter) and the only direction you can
hit the ball is Straight.
7. If playing in Hint Mode (see page 4),
you should press the Start/Swing/Shot
button once to start your shot. New bars
will be displayed from left to right. When
the new bar reaches the Suggested Stroke
Power Indicator, you should press the
Start/Swing/Shot button again. The ball
will be struck with the correct amount of
force for the shot.
If you’ve decided to play with Hint Mode
off, press the Start/Swing/Shot button
once to start your shot. Press this button
again when you think that you have hit
the ball with the right amount of force.
8. Before hitting your shot, you can press
the Hole/Player button to turn on the Hint
function. This will provide you with the
computer’s advice of what club should be
used for the shot and the force necessary
to shoot the correct distance. If the Sound
is on, when you press the Hole/Player
button then a double beep indicates that
the Hint function is on, while a single
beep indicates that the Hint function is
off.
9. When the game is idle for 60 seconds,
a bird sound will play. This will only hap-
pen once for each hole.
How to Play (See diagrams on top of
Overhead View (on left of unit)
Golfer’s View (on right of unit)
Windless-1 yard 0 yard -1 yard
South -2 yard +4 yard -2 yard
North -3 yard -4 yard -3 yard
East -4 yard -3 yard 0 yard
West 0 yard -3 yard -4 yard
Wind
Direction
Hook
Straight
Slice

8 9
Special Care & Handling
Battery Information
• Avoid moisture and extreme
temperatures.
• For best results, use between
the temperatures of 39ºF and
100ºF (4º C and 38º C).
• Clean using only a slightly
damp cloth.
• Do not use cleaners with
chemical agents.
CAUTION: Batteries should be
removed and replaced by adults
only.
• Do not mix old and new
batteries.
• Your unit requires 2 AAA bat-
teries, not included.
• Do not mix alkaline, standard
(carbon zinc) or rechargeable
(nickel-cadium) batteries.
• Do not use rechargeable
batteries.
• To avoid explosion or leakage,
do not dispose of batteries in a
fire or attempt to recharge stan
dard or alkaline batteries.
• Be sure to insert batteries with
the correct polarities and
always follow the toy and
battery manufacturer’s
instructions.
• Remove batteries and store
them in a cool, dry place when
not in use.
• Always remove old and dead
batteries from the product.
•
The supply terminals are not to
be short-circuited.
page 6.)
1. Press the key On/Mode to select either
the Practice, Tournament or Skins modes.
2. The word ‘Practice’ displays if you
chose that mode. Pressing the
Hole/Player button will allow you to
select any hole you would like to start on,
1 through 18. After selecting your starting
hole, press Start/Swing/Shot to confirm
your selections and start the game. After
finishing the hole, press Start/Swing/Shot
to play the next hole or press the
Hole/Player button to select a different
hole.
3. The word ‘Tournament’ displays if you
chose that mode. Pressing the
Hole/Player button will allow you to
select whether you want to play a one or
two player game. Press Start/Swing/Shot
to confirm your selections and start the
game. You will play the course in turn
from the first to the eighteenth hole.
4. The word ‘Skins’ displays if you chose
that mode. You will always be in the two
player game. Press Start/Swing/Shot to
confirm your selections and start the
game. You will play the course in turn
from the first to the eighteenth hole. The
game begins with player 1, then it’s play-
er 2’s turn. After the initial shots, the
player farthest from the green hits first.
Whoever hits the least number of shots
for a hole wins the hole and $1,000. If a
tie occurs, the $1,000 is carried over to
the next hole. The maximum amount a
player can win is $18,000.
5. If the ball is hit and does not go into the
hole, the following information will be
displayed: Stroke (the number of strokes
taken for this hole), XXXY (the distance
you drove the ball), and To Hole XXXY
(the distance to the hole). If the ball is hit
and does go into the hole, the following
information will be displayed: Stroke (the
number of strokes taken for this hole),
XXXY (the distance you drove the ball),
To Hole XXXY (the distance to the hole)
and Score XXX (the player’s score).
Auto Power Off
The game turns itself off after being idle
for about 3 minutes. Press On to restart
the game and return to where you left off.
Self-checking Mode
Press down the Start/Swing/Shot, Club
and Direction buttons at the same time
and then place a pointed instrument in the
Reset hole in the back of the computer
and press down. After releasing the

10 11
EXCALIBUR ELECTRONICS,
INC., warrants to the original con-
sumer that its products are free from
any electrical or mechanical defects
for a period of 90 DAYS from the
date of purchase. If any such defect
is discovered within the warranty
period, EXCALIBUR ELECTRON-
ICS, INC., will repair or replace the
unit free of charge upon receipt of
the unit, shipped postage prepaid
and insured to the factory address
shown at right.
The warranty covers normal con-
sumer use and does not cover dam-
age that occurs in shipment or failure
that results from alterations, acci-
dent, misuse, abuse, neglect, wear
and tear, inadequate maintenance,
commercial use, or unreasonable use
of the unit. Removal of the top
panel voids all warranties. This war-
ranty does not cover cost of repairs
made or attempted outside of the
factory.
Any applicable implied warranties,
including warranties of mer-
chantability and fitness, are hereby
limited to 90 DAYS from the date of
purchase. Consequential or inciden-
tal damages resulting from a breach
of any applicable express or implied
warranties are hereby excluded.
Some states do not allow limitations
on the duration of implied war-
ranties and do not allow exclusion of
incidental or consequential damages,
so the above limitations and exclu-
sions in these instances may not
apply.
The only authorized service center
in the United States is:
Excalibur Electronics, Inc.
13755 SW 119th Ave
Miami, Florida 33186 U.S.A.
Phone: 305.477.8080
Fax: 305.477.9516
www.ExcaliburElectronics.com
Ship the unit carefully packed,
preferably in the original carton, and
send it prepaid, and adequately
insured. Include a letter, detailing
the complaint and including your
daytime telephone number, inside
the shipping carton.
If your warranty has expired and you
want an estimated fee for service,
write to the above address, specify-
ing the model and the problem.
DO NOT SEND YOUR
UNIT WITHOUT
RECEIVING AN ESTIMATE FOR
SERVICING. WE CANNOT
STORE YOUR UNIT!
Limited 90-Day Warranty
Play games live at:
www.ExcaliburElectronics.com

Excalibur Electronics, Inc.
13755 SW 119th Ave
Miami, Florida 33186 U.S.A.
Phone: 305.477.8080
Fax: 305.477.9516
www.ExcaliburElectronics.com
We make you think.
-
 1
1
-
 2
2
-
 3
3
-
 4
4
-
 5
5
-
 6
6
-
 7
7


Excalibur electronic 383-2 User manual
- Category
- Game console accessories
- Type
- User manual
- This manual is also suitable for
Ask a question and I''ll find the answer in the document
Finding information in a document is now easier with AI
Related papers
-
 Excalibur electronic 9366 User manual
-
 Excalibur electronic 9345 User manual
-
 Excalibur electronic Games EI-PT1001 User manual
-
 Excalibur electronic iBlaster Express 185 User manual
-
 Excalibur electronic H639S-WC User manual
-
 Excalibur electronic EI-PT1013 User manual
-
 Excalibur electronic 904 User manual
-
 Excalibur electronic SF20-2 User manual
-
 Excalibur electronic FN10-BB User manual
-
 Excalibur electronic ABC Wide 333 User manual


Other documents
-
Titan Fitness 25 LB Steel Club User manual
-
Radica Games Connectv Real Swing Golf I9037 User manual
-
-
T-Mobile Dash (HTC Excalibur) Hard reset manual
-
Garmin Approach 010-01914-00 User manual
-
 EZ Drinker TOILET-GOLF Installation guide
-
Excalibur Porsche 1:12 User manual
-
TomTom Golfer User guide
-
-
