La Crosse Technology 308-2408FR Faqs

Category
Alarm clocks
Type
Faqs

La Crosse Technology 308-2408FR is a weather station that provides accurate indoor and outdoor temperature readings, helping you stay informed about your surroundings. It features a sleek design with a large, easy-to-read display, making it a valuable addition to any home or office. With its wireless outdoor sensor, you can monitor the outdoor temperature from the comfort of your indoor space.

La Crosse Technology 308-2408FR is a weather station that provides accurate indoor and outdoor temperature readings, helping you stay informed about your surroundings. It features a sleek design with a large, easy-to-read display, making it a valuable addition to any home or office. With its wireless outdoor sensor, you can monitor the outdoor temperature from the comfort of your indoor space.

La Crosse Technology, Ltd. www.lacrossetechnology.com/support Page 1
308-2408FR FAQS
The links below will work in most PDF viewers and link to the topic area by clicking
the link. We recommend Adobe Reader version 10 or greater available at:
http://get.adobe.com/reader
CONTENTS
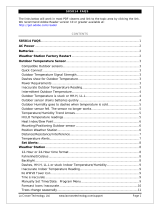
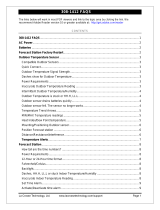
308-2408FR FAQS .............................................................................................................. 1
AC adapter ............................................................................................................................. 2
Batteries ................................................................................................................................ 2
Weather Station Factory Restart .................................................................................. 2
Outdoor Temperature Sensor ......................................................................................... 3
Compatible Outdoor sensors ............................................................................................. 3
Outdoor Temperature Signal Strength ............................................................................ 3
Dashes show for Outdoor Temperature .......................................................................... 3
Power Requirements .......................................................................................................... 3
Inaccurate Outdoor Temperature Reading ..................................................................... 3
Intermittent Outdoor Temperature .................................................................................. 4
Outdoor Temperature is stuck or HH.H, LL.L ................................................................. 4
Outdoor sensor drains batteries quickly ......................................................................... 4
Outdoor sensor fell. The sensor no longer works .......................................................... 5
Mounting/Positioning Outdoor sensor ............................................................................. 5
Position Weather station .................................................................................................... 6
Distance/Resistance/Interference .................................................................................... 6
Weather Station .................................................................................................................. 7
Power Requirements .......................................................................................................... 7
12-Hour time format .......................................................................................................... 7
Fahrenheit temperature display. ...................................................................................... 7
Backlight ............................................................................................................................... 7
Set Time Alarm.................................................................................................................... 7
Activate | Deactivate Alarm .............................................................................................. 7
Snooze .................................................................................................................................. 8
Dashes, HH.H, LL.L or stuck Indoor Temperature ........................................................ 8
Inaccurate Indoor Temperature Reading ........................................................................ 8
Manually Set Time/Date: Program Menu ...................................................................... 8
No WWVB Tower Icon ........................................................................................................ 9
Weather station is blank: No letters, numbers or dashed lines ................................. 9
Weather station is dim ......................................................................................................10
Weather station has missing segments .........................................................................10
La Crosse Technology, Ltd. www.lacrossetechnology.com/support Page 2
AC adapter
The design of this weather station is to use AC adapter (5-volt) as primary
power source.
When operating with the AC adapter cord, the backlight
can be on continually.
When operating on AC adapter, batteries are optional and are not required in
the weather station.
The backlight
will operate at high or low intensity at your discretion.
Batteries
Explanation: Many problems are resolved with fresh batteries of the appropriate
voltage. Many items sent in under warranty, work when tested with fresh batteries.
Batteries manufactured this year will have an expiration date 10 years (or more) in
the future. Battery technology has improved and batteries will maintain voltage
longer in storage. However, the environment the batteries reside in for the 10 years
can deplete the power.
Use Alkaline or Lithium batteries in the outdoor sensor.
A minimum voltage of 1.48V for each battery is necessary for proper
performance.
Use batteries dated at least six years in advance of the current year. Batteries
dated earlier than six years from now may still work, but may be unstable in
performance.
Good name brand batteries make less noise, which reduces the chance of RF
(radio frequency) interference from the battery compartment.
Weather Station Factory Restart
Explanation: The factory restart returns the weather station and outdoor sensor to
an “out-of-the-box” default state and often resolves an issue.
Factory Restart:
1. Remove all power (batteries and AC) from outdoor sensor and weather station.
2. Press one of the buttons on the weather station at least 20 times to clear all
memory.
3. Verify that the weather station is blank before proceeding (there may be lines
painted on the screen that will show when there is no power).
4. Leave both units without power for 15 minutes (very important).
5. Insert the AC adapter cord into the wall outlet then into the weather station.
6. Insert fresh batteries into the outdoor sensor.
7. Press the TX button on the outdoor sensor to transmit RF signal.
8. Keep the outdoor sensor 5-10 feet from the weather station.
9. When RF connection is established, the temperature will appear on the station.
Allow the outdoor sensor and weather station to sit together for 15 minutes to
establish a strong connection.
10.Do not press buttons for 15 minutes.
For optimum 433MHz transmission, place the outdoor sensor no more than 196
feet (60 meters, open air) from the weather station.
La Crosse Technology, Ltd. www.lacrossetechnology.com/support Page 3
See the section on mounting and distance/resistance/interference for details on
mounting the outdoor sensor.
Note: When your clock is powered on, it starts to receive WWVB signal for seven
minutes. The tower icon will flash.
Note: During reception of the WWVB time signal, the buttons will not function.
Outdoor Temperature Sensor
Compatible Outdoor sensors
The TW004 (433MHz) outdoor sensor comes packaged with this weather station.
This is the only compatible sensor.
Outdoor Temperature Signal Strength
Explanation: The weather station will search for the outdoor temperature outdoor
sensor for 3 minutes once batteries are installed or when the button is held for 3
seconds.
The temperature display will be dashes “---“.
Dashes show for Outdoor Temperature
Explanation: Dashes mean the connection is lost between the weather station and
the outdoor sensor.
Batteries
often resolve the connection.
Distance/Resistance can cause loss of connection between the outdoor sensor
and the weather station.
Turn the weather station 90 degrees towards the outdoor sensor to provide
better reception. This allows more antenna surface to face the outdoor sensor
signal.
Try the factory restart
.
Power Requirements
2-AAA batteries
power the outdoor sensor.
We recommend Alkaline batteries for the outdoor sensor.
You may choose to use Lithium batteries for temperatures below -20°F/-28.8°C.
Inaccurate Outdoor Temperature Reading
Explanation: High outdoor temperature readings are generally a location issue.
Low outdoor temperature readings are power related or a sensor going bad.
The outdoor sensor reads the environment where it is mounted. When mounted
inside the home, it will read inside temperature.
When the outdoor sensor reads high during the day, but not at night, it is a
positioning
problem.
Look for heat sources such as sunlight, door or window frames or reflected heat.
La Crosse Technology, Ltd. www.lacrossetechnology.com/support Page 4
Side-by-side test: Place the outdoor sensor right next to the weather station for 2
hours.
Compare indoor and outdoor temperature. The temperatures should be within 4
degrees to be within tolerance.
If the outdoor sensor reads correctly when next to the weather station, try a
different location outside.
Intermittent Outdoor Temperature
Explanation: Intermittent problems are the hardest to resolve. RF (radio
frequency) communication may come and go occasionally. This can be normal in
some environments (e.g. moister climates). If outdoor sensor signal is lost, please
wait 2-4 hours for the signal to reconnect on its own.
Move the outdoor sensor to a closer location.
Distance/Resistance
can cause loss of outdoor sensor signal.
Check Batteries.
Freezer test: Confirm the weather station is reading the correct outdoor sensor
(not a neighbor’s sensor). Place the outdoor sensor in the freezer for an hour and
watch the temperature drop on the weather station.
Indoor distance test: Please complete the Restart
with outdoor sensor and
weather station 5-10 feet apart and inside to establish a strong connection.
After 15 minutes, if there is a reading in the outdoor temperature area, move
the outdoor sensor to another room with one wall between the outdoor sensor
and the weather station.
Observe to see if the temperature remains on consistently for 1 hour.
If the temperature remains on while in the house, then it is likely a
distance/resistance
issue.
Move the outdoor sensor to different locations outside to find a location where
the temperature reading will hold.
Outdoor Temperature is stuck or HH.H, LL.L
Explanation: These symbols are error messages indicating the outdoor sensor is
outside of its readable range.
Check Batteries.
Overpowered or underpowered batteries can cause this
reading.
Replace outdoor sensor.
Note: The last outdoor reading may remain (not change) for several hours when
connection is lost. The outdoor temperature reading will flash when the connection
is first lost or intermittent.
Outdoor sensor drains batteries quickly
Test a new set of alkaline batteries. Write down the date of installation and the
voltage of the batteries.
When the batteries fail, please note the date and voltage again.
La Crosse Technology, Ltd. www.lacrossetechnology.com/support Page 5
Check the distance and resistance between the outdoor sensor and weather
station. Outdoor sensors at the end of the range may work while batteries are
fresh but not after they drain a bit.
Check for leaking batteries, which may damage the outdoor sensor.
Battery life is over 24 months when using reputable battery brands for both
Alkaline and Lithium batteries.
Outdoor sensor fell. The sensor no longer works
Explanation: If there is no physical damage to the outdoor sensor, the fall may
not have caused internal damage. A fall can shock the outdoor sensor or the
batteries in the outdoor sensor. Batteries that have fallen on a hard surface may be
damaged and unable to function properly.
Complete a Restart
with fresh batteries.
Use Batteries dated at least six years in advance of the current year. Batteries
dated earlier than six years from now may still work, but may be unstable in
performance.
Note: An outdoor sensor that has fallen into puddle, snow, or other standing water,
will likely have water damage and need to be replaced. Outdoor sensors are water
resistant, not waterproof.
Replacement Outdoor sensors
Visit your local Retailer or La Crosse Technology® Store
http://store.lacrossetechnology.com/
Note: Be sure to order the correct model and frequency to avoid receiving the
incorrect item.
Call La Crosse Technology® Store at 608-785-7939 or e-mail from the store
website if you are unsure about the correct item to order. Each item carries the
original new product warranty and includes access to La Crosse Technology®
technical support.
Mounting/Positioning Outdoor sensor
First: Place the outdoor sensor in the desired shaded location and the weather
station in the home. Wait approximately 1 hour before permanently mounting the
outdoor sensor to ensure that there is proper reception.
POSITION
Outdoor:
Protect the outdoor sensor from standing rain or snow and from the overhead
sun, which can cause it to read incorrectly.
Mounting under an eave or deck rail works well.
If you choose, you can construct a small roof or box for the outdoor sensor. Be
sure a box has vents.
Mount the outdoor sensor on the North side where to prevent sun from causing
incorrect readings.
Mount at least 6 feet in the air for a strong RF (radio frequency) signal.
Do not mount the outdoor sensor on a metal fence. This significantly reduces
the effective range
.
Outdoor sensors are water resistant, not waterproof.
La Crosse Technology, Ltd. www.lacrossetechnology.com/support Page 6
Indoor or Outdoor:
Mount outdoor temperature sensor vertically.
Avoid more than one wall between the outdoor sensor and the weather station.
The maximum transmitting range in open air is over 196 ft. (60 meters).
Obstacles such as walls, windows, stucco, concrete and large metal objects can
reduce the range.
Do not mount near electrical wires, transmitting antennas or other items that
will interfere
with the signal.
RF (radio frequency) signals do not travel well through moisture or dirt.
Position Weather station
The weather station has a stand to sit on a desk or table or can be wall
mounted.
Place within range
of the outdoor sensor.
The maximum transmitting range in open air is 196 ft. (60 meters).
Obstacles such as walls, windows, stucco, concrete and large metal objects can
reduce the range.
Choose a location 6 feet or more from electronics such as cordless phones,
wireless gaming systems, televisions, microwaves, routers, baby monitors, etc.,
which can prevent signal reception.
Be aware of electrical wires and plumbing within a wall. This will interfere with
RF (radio frequency) signal reception.
For best WWVB reception, orientate the forecast station with the front of the
back facing Ft. Collins Colorado.
Distance/Resistance/Interference
Distance:
The maximum transmitting range in open air is over 196 ft. (60 meters)
between the outdoor sensor and the weather station. This range is in open air
with ideal conditions.
Consider what is in the signal path between the weather station and the outdoor
sensor.
Avoid placing electronics in the signal path between the weather station and the
outdoor sensor.
Resistance:
Obstacles such as walls, floors, windows, stucco, concrete and large metal
objects can reduce the range.
When considering the distance between the outdoor sensor and the weather
station 196 ft. (60 meters) open air, cut that distance in half for each wall,
window, tree, bush or other obstruction in the signal path.
Closer is better.
Windows reflect the RF (radio frequency) signal.
Metal absorbs the signal and reduces the range.
Stucco has a metal mesh that absorbs the signal.
Do not mount the outdoor sensor on a metal fence. This significantly reduces
the effective range.
La Crosse Technology, Ltd. www.lacrossetechnology.com/support Page 7
Interference:
Consider items in the signal path between the outdoor sensor and the weather
station.
Sometimes a simple relocation of the outdoor sensor or the weather station will
correct the interference.
Windows can reflect the radio signal.
Metal will absorb the RF (radio frequency) signal.
Stucco has a metal mesh that absorbs signal.
Avoid transmitting antennas: (ham radios, emergency dispatch centers, airports,
military bases, etc.)
Electrical wires (utilities, cable, etc.)
Vegetation is full of moisture and reduces signal.
It is difficult for RF (radio frequency) signal to travel through a hill.
Weather Station
Power Requirements
This weather station is powered by a 5-volt AC adapter.
Optional CR2032 backup battery may be used.
12-Hour time format
Time can display in 12-hour (am, pm) time only.
Fahrenheit temperature display.
This station reads in Fahrenheit only.
Backlight
AC adapter: The backlight is on continuously when operating the weather station
with the 5-volt AC adapter.
Press the button to dim the display or to brighten the display.
Set Time Alarm
1. Hold the AL button to enter alarm set mode.
2. The alarm hour will flash.
3. Press the or buttons to set the alarm hour.
4. Press the AL button to confirm adjustments and move to the minutes.
5. The alarm minutes will flash.
6. Press the or buttons to set the alarm minutes.
7. Press the AL button to confirm adjustments exit.
Note: The alarm will sound for two minutes, then shut off completely.
Activate | Deactivate Alarm
•Press the AL button once to activate the alarm.
•The letters “AL” will appear above the time when the alarm is active.
•Press the AL button once again to deactivate the alarm.
La Crosse Technology, Ltd. www.lacrossetechnology.com/support Page 8
Snooze
•When the alarm sounds, press ZZ once to stop the alarm temporarily. The letters
“AL” will flash. The alarm will beep again in 5 minutes or after your previously set
snooze duration.
•To stop the daily alarm, press any button EXCEPT the ZZ when alarm is beeping.
The alarm will stop and “AL” icon becomes solid; alarm will beep again same time
next day.
Dashes, HH.H, LL.L or stuck Indoor Temperature
Explanation: These symbols are error messages indication the indoor sensor is
outside of its readable range. For indoor readings, this is generally a power related
issue.
Check that the AC adapter cord is inserted into a working outlet.
Batteries
may be overpowered or underpowered. Remove batteries from the
weather station.
Press any button 20 times. Leave the weather station unpowered for 1-2 hours.
If the indoor temperature is still shows dashes, HH.H or LL.L, the weather
station may need replacement.
Inaccurate Indoor Temperature Reading
Side-by-side test: Bring the outdoor sensor in the house and place it next to the
weather station for 2 hours.
Compare indoor and outdoor temperature. The temperature should be within 4
degrees to be within tolerance.
Look for heat sources such as sunlight, door or window frames or reflected heat
or cold near the weather station.
Check batteries
and AC adapter cord.
Manually Set Time/Date: Program Menu
Hold the SET button for 5 seconds to enter setting mode.
Use the or buttons to adjust a value.
Press the SET button to confirm and advance.
Setting Order:
Time Zone
Daylight Saving Time Indicator
Hours
Minutes
Snooze duration
PROGRAM MENU
1. Hold the SET button for five seconds.
2. The Time Zone 04 (Pacific) will flash.
3. Press the or buttons to select your time zone.
04 = Pacific
La Crosse Technology, Ltd. www.lacrossetechnology.com/support Page 9
03 = Mountain
02 = Central
01 = Eastern
4. Press the SET button to confirm and select day light saving time indicator
setting.
5. ON will flash.
6. Press the or buttons to select DST OFF.
7. Press the SET button to confirm and select the hours.
8. The hours will flash.
9. Press the or buttons to set the hours.
10. Press the SET button to confirm and select minutes.
11. The minutes will flash.
12. Press the or buttons to set the minutes.
13. Press the SET button to confirm and select snooze duration.
14. The snooze duration will flash (05-60 minutes).
15. Press the or buttons to set the snooze duration.
16. Press the SET button to confirm and exit.
No WWVB Tower Icon
The digital clock has not received a WWVB time signal in the past 24 hours.
Position
the digital clock for better reception.
Hold the - button to send the Digital clock on a WWVB signal search at night.
Allow up to 5 nights to receive the time signal.
1. When your clock is powered on, it starts to receive WWVB signal for seven
minutes. The tower icon will flash.
Note: During reception of the WWVB time signal, the buttons will not function.
The LED will change to low brightness and will return to high brightness after
WWVB search.
•Receiving WWVB signal (tower icon flashing)
•Successful Reception (tower icon is solid)
•Failed Reception (no tower icon)
2. During reception, press and hold the / WAVE button, your clock will give a
short beep and stop the WWVB signal reception.
3. During reception, press / WAVE button once to show reception mode and
signal strength indication:
•When strong WWVB signal is detected, the display shows with three bars
•During reception, the signal strength may move from one bar to two bars to
three bars.
4. This is normal since the clock is detecting WWVB signal and other signals in the
air at the same time.
5. Press SET will return to the time display with tower icon flashing.
Weather station is blank: No letters, numbers or dashed lines
Check that the AC adapter. Is it correctly installed and connects to an active
outlet.
Press any button 20 times. Leave the alarm clock unpowered for 1-2 hours.
Power clock with AC adapter only to determine if batteries were an issue.
La Crosse Technology, Ltd. www.lacrossetechnology.com/support Page 10
Weather station is dim
Press the button to dim the display or to brighten the display.
Clock must operate on AC power for backlight to stay on.
Weather station has missing segments
Explanation: When parts of numbers, letters, or pictures are missing on the
display, it is often power related.
Check that the AC adapter. Is it correctly installed and connects to an active
outlet.
Press any button 20 times. Leave the alarm clock unpowered for 1-2 hours.
Power clock with AC adapter only to determine if batteries were an issue.
  • Page 1 1
  • Page 2 2
  • Page 3 3
  • Page 4 4
  • Page 5 5
  • Page 6 6
  • Page 7 7
  • Page 8 8
  • Page 9 9
  • Page 10 10

La Crosse Technology 308-2408FR Faqs

Category
Alarm clocks
Type
Faqs

La Crosse Technology 308-2408FR is a weather station that provides accurate indoor and outdoor temperature readings, helping you stay informed about your surroundings. It features a sleek design with a large, easy-to-read display, making it a valuable addition to any home or office. With its wireless outdoor sensor, you can monitor the outdoor temperature from the comfort of your indoor space.

Ask a question and I''ll find the answer in the document

Finding information in a document is now easier with AI