
hp photosmart
7150
basics guide
tw_basics.book Page 1 Monday, July 1, 2002 8:47 AM

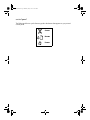
control panel
The following table is a quick reference guide to the buttons that appear on your printer’s
control panel.
C
ANCEL
RESUME
POWER
tw_basics.book Page 2 Monday, July 1, 2002 8:47 AM

contents
contents
i
1 get started . . . . . . . . . . . . . . . . . . . . . . . . . . . . . . . . . . . . . . . . . 1
welcome. . . . . . . . . . . . . . . . . . . . . . . . . . . . . . . . . . . . . . . . . . . . . . . . . .1
printer parts . . . . . . . . . . . . . . . . . . . . . . . . . . . . . . . . . . . . . . . . . . . . . . .3
front . . . . . . . . . . . . . . . . . . . . . . . . . . . . . . . . . . . . . . . . . . . . . . . . . .3
back . . . . . . . . . . . . . . . . . . . . . . . . . . . . . . . . . . . . . . . . . . . . . . . . . .4
control panel and indicator lights . . . . . . . . . . . . . . . . . . . . . . . . . . . . . .5
paper information . . . . . . . . . . . . . . . . . . . . . . . . . . . . . . . . . . . . . . . . . . .6
load paper in the IN tray . . . . . . . . . . . . . . . . . . . . . . . . . . . . . . . . . . . .6
load photo paper in the photo tray . . . . . . . . . . . . . . . . . . . . . . . . . . . . .7
print cartridge information . . . . . . . . . . . . . . . . . . . . . . . . . . . . . . . . . . . . .9
use the print cartridge protector . . . . . . . . . . . . . . . . . . . . . . . . . . . . . .10
use reserve print mode. . . . . . . . . . . . . . . . . . . . . . . . . . . . . . . . . . . . .10
install or replace the print cartridges . . . . . . . . . . . . . . . . . . . . . . . . . . .11
use the control panel . . . . . . . . . . . . . . . . . . . . . . . . . . . . . . . . . . . . . . . .14
use the buttons . . . . . . . . . . . . . . . . . . . . . . . . . . . . . . . . . . . . . . . . . .14
use the indicator lights. . . . . . . . . . . . . . . . . . . . . . . . . . . . . . . . . . . . .14
2 use your printer with an hp direct-printing digital camera . . . . . 15
print camera-selected photos. . . . . . . . . . . . . . . . . . . . . . . . . . . . . . . . . . .15
select and print photos. . . . . . . . . . . . . . . . . . . . . . . . . . . . . . . . . . . . .15
3 use your printer with a computer. . . . . . . . . . . . . . . . . . . . . . . . 17
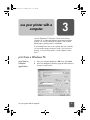
print from a Windows PC . . . . . . . . . . . . . . . . . . . . . . . . . . . . . . . . . . . . .17
print from a software application . . . . . . . . . . . . . . . . . . . . . . . . . . . . .17
use the Windows PC taskbar icon. . . . . . . . . . . . . . . . . . . . . . . . . . . . .19
print from a Macintosh . . . . . . . . . . . . . . . . . . . . . . . . . . . . . . . . . . . . . . .20
print from a software application (OS X or OS 9.x). . . . . . . . . . . . . . . . .20
tw_basics.book Page i Monday, July 1, 2002 8:47 AM

basics guide
ii
4 troubleshooting . . . . . . . . . . . . . . . . . . . . . . . . . . . . . . . . . . . . 21
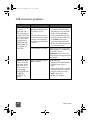
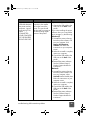
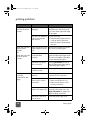
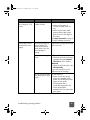
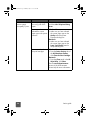
USB connection problems . . . . . . . . . . . . . . . . . . . . . . . . . . . . . . . . . . . . . 22
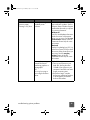
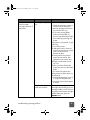
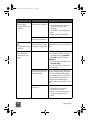
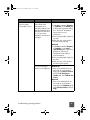
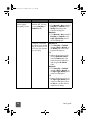
printer problems . . . . . . . . . . . . . . . . . . . . . . . . . . . . . . . . . . . . . . . . . . . 24
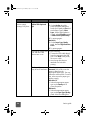
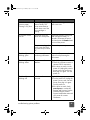
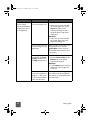
printing problems . . . . . . . . . . . . . . . . . . . . . . . . . . . . . . . . . . . . . . . . . . 28
index . . . . . . . . . . . . . . . . . . . . . . . . . . . . . . . . . . . . . . . . . . . . . . 41
tw_basics.book Page ii Monday, July 1, 2002 8:47 AM

1
1
get started
1
get started
welcome
Thank you for purchasing an HP Photosmart printer! Your new
printer comes with the following documentation to help you get
started and get the most out of your printer:
• Setup Guide — The HP Photosmart Setup Guide is the
poster that comes with your printer. It contains quick and
easy instructions to help you set up your printer and install
the printer software.
• Basics Guide —The HP Photosmart Basics Guide is the
booklet you are reading. It includes a quick reference
guide to help you get acquainted with your new printer. It
describes how to use the basic features of your printer, and
it contains hardware troubleshooting information.
• Software Setup & Product Support — The HP Photosmart
Software Setup & Product Support booklet explains how to
install and set up the software that comes with your printer.
It contains software troubleshooting information, and it
also describes how to get support from www.hp.com and
how to contact HP Support and Services.
• HP Photosmart Printer Help — The HP Photosmart Printer
Help is an online guide that describes how to use the more
advanced features of your new printer. It also includes
information on printer care and maintenance as well as a
section on advanced troubleshooting and error messages.
After you have installed the HP Photosmart software on
your computer, you can view and print the HP Photosmart
Printer Help.
tw_basics.book Page 1 Monday, July 1, 2002 8:47 AM

basics guide
2
view the hp photosmart printer help
• Windows PC: From the Start menu, choose Programs,
Hewlett-Packard, Photosmart 130, 230, 7150, 7345,
7350, 7550, and HP Photo & Imaging Director. From
the HP Photo & Imaging Director, click Help.
• Macintosh: Insert the HP Photosmart CD. In the User
Docs folder, select your language, then click the
photosmart 7150.html file.
print the hp photosmart printer help
• Windows PC: Click Print in the top navigation bar of
the HP Photosmart Printer Help window.
• Macintosh: From the File menu, select Print, or click
Print in the top navigation bar of the browser.
tw_basics.book Page 2 Monday, July 1, 2002 8:47 AM

get started: printer parts
3
printer parts
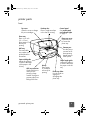
front
Envelope slot
Place a single envelope
in this slot for printing
OUT tray
This removable
tray catches your
printed photos or
documents
OUT tray extension
Gently pull this out
when you are
printing a large
number of pages to
prevent paper from
falling to the floor
Paper length guide
Adjust this guide to
fit close to the end of
the paper in the IN
tray
IN tray
Place paper
or envelopes
in this tray for
printing
Top cover
Open this cover to change
the print cartridges
Photo tray
Place 4 x 6 inch
(10 x 15 cm)
photo paper in
this tray for
printing
Camera port
Use this port to
connect an HP
direct-printing
digital camera
to the printer
Paper width guide
Adjust this guide to
fit close to the edge
of the paper in the
IN tray
Photo tray cover
Open this cover
to access the
photo tray
Photo tray slider
Use this slider to
engage or
disengage the
photo tray
Control panel
See control panel
and indicator lights
on page 5
tw_basics.book Page 3 Monday, July 1, 2002 8:47 AM

basics guide
4
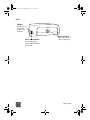
back
Power cord connection
Connect the power
cord included with the
printer here
USB port
Use this port to
connect the
printer to the
computer
Rear access door
Remove this door to
clear a paper jam
tw_basics.book Page 4 Monday, July 1, 2002 8:47 AM

get started: printer parts
5
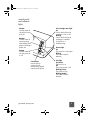
control panel
and indicator
lights
CANCEL
Use this button to
cancel the current
print job
P
OWER
Use this button to
turn the printer on
or off
RESUME
Use this button to
resume printing
after loading more
paper or clearing a
paper jam
Print light
On (Green)
The power is on
Off
The printer power is off
Blinking (Green)
The printer is busy
Blinking (Amber)
The printer requires
attention
Print cartridge status light
On
One or both of the print
cartridges is low on ink
Blinking
One or both of the print
cartridges is installed
incorrectly or is
malfunctioning
Resume light
On
The printer is out of paper
Blinking
The printer requires
attention
Camera port
Use this port to
connect an HP
direct-printing digital
camera to the printer
tw_basics.book Page 5 Monday, July 1, 2002 8:47 AM

basics guide
6
paper information
You can load and print on a wide variety of paper types and
sizes, from index cards and photo paper to envelopes and
transparencies. We recommend using HP-designed inkjet
paper for the best results.
• Use the IN tray for all supported paper types and sizes
• Use the photo tray when printing on 4 x 6 inch
(10 x 15 cm) photo paper
• Use the envelope slot on the OUT tray when you need to
print a single envelope
For more information on supported paper types and sizes, see
the HP Photosmart Printer Help.
load paper in
the IN tray
1 Lift the OUT tray.
2 Pull out the paper length guide on the IN tray and slide the
paper width guide as far to the left as it will go.
If you are using HP-designed inkjet paper,
remember to set the paper type in the printer
Properties dialog box (Windows PC) or the
Print dialog box (Macintosh).
Paper length
guide
IN tray
Paper width
guide
OUT tray
Photo tray
slider
tw_basics.book Page 6 Monday, July 1, 2002 8:47 AM

get started: paper information
7
3 Place a stack of paper into the IN tray.
• Load the paper with the side to be printed facing down.
The printer pulls the paper in, flips it over, and then
prints on the paper; the finished document faces up in
the OUT tray.
• Always load paper in the portrait direction, with the
shortest edge toward you.
• Be careful not to use too much or too little paper. It may
be difficult for the printer to pick up a sheet of paper
when there are only one or two sheets in the IN tray.
Check that the stack of paper contains several sheets
but is no higher than the top of the paper length guide.
See the specifications section of the HP Photosmart
Printer Help for more information.
• Use one type and size of paper at a time. Do not mix
paper types or sizes in the IN tray.
4 Move the photo tray slider toward you until it stops. This
disengages the photo tray.
5 Adjust the paper width guide and paper length guide to fit
close to the edges of the paper without bending the paper.
This helps the paper feed straight into the printer.
6 Lower the OUT tray.
load photo
paper in the
photo tray
When you use the photo tray you can leave paper in the IN
tray.
1 Move the photo tray slider toward you until it stops. This
disengages the photo tray.
2 Lift the photo tray cover.
If you run out of photo paper in the photo tray, the
printer continues to print using paper from the IN
tray.
tw_basics.book Page 7 Monday, July 1, 2002 8:47 AM

basics guide
8
3 Load paper in the photo tray with the side to be printed
facing down. If you are using tabbed paper, insert the
paper so the tab feeds in last. The printer pulls the paper
in, flips it over, then prints on the paper; the finished
document faces up in the OUT tray.
• You can load up to 20 sheets of paper in the photo
tray.
4 Lower the photo tray cover.
5 Move the photo tray slider away from you (toward the
inside of the printer) until it stops against the edge of the
paper. This engages the photo tray.
See the HP Photosmart Printer Help for more information on:
• loading a single envelope
• loading a stack of envelopes
• loading index cards and other small media
• loading transparencies
When you are finished using the photo tray, move
the photo tray slider toward you until it stops. This
disengages the photo tray so the printer uses the
paper in the IN tray.
OUT tray
Photo tray
slider
Photo tray
cover
tw_basics.book Page 8 Monday, July 1, 2002 8:47 AM

get started: print cartridge information
9
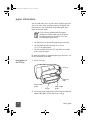
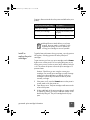
print cartridge information
There are three print cartridges available for your printer.
The two print cartridges that came with your printer are exactly
what you need to print beautiful photos:
• HP #57 (C6657A) — Tri-color print cartridge
• HP #58 (C6658A) — Photo print cartridge
To print regular documents economically, you can purchase a
black print cartridge to use in place of the photo print cartirdge:
• HP #56 (C6656A) — Black print cartridge
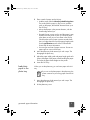
The print cartridge cradle inside the printer has two stalls that
hold your print cartridges. The print cartridges you use depend
on what you are printing.
To print... Use these print cartridges
Documents Left stall: Tri-color print cartridge (HP #57)
Right stall: Black print cartridge (HP #56)
Photos on
photo paper
Left stall: Tri-color print cartridge (HP #57)
Right stall: Photo print cartridge (HP #58)
You can leave the black print cartridge in the
right stall when printing photos. For the best
photo quality, install the photo print cartridge.
tw_basics.book Page 9 Monday, July 1, 2002 8:47 AM

basics guide
10
use the print
cartridge
protector
The print cartridge protector is designed to keep your print
cartridge fresh when it is not being used. Whenever you
remove a print cartridge from the printer, store it in the print
cartridge protector that came with your printer.
• To insert a print cartridge into the print cartridge protector,
slide the print cartridge into the print cartridge protector at
a slight angle and snap it securely into place.
• To remove the print cartridge from the print cartridge
protector, press down and back on the top of the print
cartridge protector to release the print cartridge, then slide
the print cartridge out of the print cartridge protector.
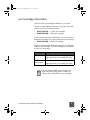
use reserve
print mode
Reserve Mode allows you to keep printing even if one of your
print cartridges fails, runs out of ink, or is incompatible with
your printer. If you receive a print cartridge error message on
your computer monitor or camera LCD, or if the print cartridge
status light is on or blinking, remove the print cartridge and
close the top cover to enter Reserve Mode. You will see a
message reminding you that you are in Reserve Mode.
tw_basics.book Page 10 Monday, July 1, 2002 8:47 AM

get started: print cartridge information
11
Printing in Reserve Mode slows the printer and affects the print
quality.
install or
replace the print
cartridges
To get the best performance from your printer, use only genuine
HP supplies, including genuine HP factory-filled print
cartridges.
To get maximum use from your print cartridges,use the P
OWER
button to turn off the printer. Do not unplug the printer or turn
off the power source (such as a power strip) until the Print light
is off. This allows the printer to store the print cartridges in a
protected state.
Caution! Check that you are using the correct print
cartridges. Do not refill print cartridges yourself. Damage
resulting from the modification or refilling of HP print
cartridges is specifically excluded from the HP printer
warranty coverage.
1 If the printer is off, press the P
OWER button on the printer’s
control panel to turn the printer on.
2 Open the top cover. The print cartridge cradle moves to the
center of the printer.
3 Lift the cradle latch of the print cartridge you want to install
or replace by placing your finger under the number on the
latch and pulling out. The print cartridge latch will pop
open.
If you are printing with only... The result is...
Black print cartridge Colors print as grayscale
Tri-color print cartridge Colors print but black prints
as gray
Photo print cartridge Colors print as grayscale
Although Reserve Mode allows you to keep
printing, the print quality is reduced. For the
highest print quality, be sure to replace the
missing print cartridge as soon as possible.
tw_basics.book Page 11 Monday, July 1, 2002 8:47 AM

basics guide
12
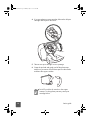
4 If you are replacing a print cartridge, slide out the old print
cartridge and recycle or discard it.
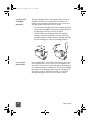
5 Take the new print cartridge out of its package.
6 Grasp the pink tab and gently peel off the plastic tape.
Make sure you remove only the clear tape from the nozzles
and leave the copper contacts.
Do NOT touch the ink nozzles or the copper
contacts. Touching these parts may cause print
cartridge failure.
tw_basics.book Page 12 Monday, July 1, 2002 8:47 AM

get started: print cartridge information
13
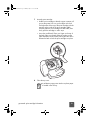
7 Insert the print cartridge:
• Hold the print cartridge so that the copper contacts will
go into the printer first. Line up the ridges on the left
and right sides of the top of the print cartridge with the
grooves on the inside of the print cartridge cradle.
Carefully slide the print cartridge into the cradle, then
firmly push the cartridge in until it stops.
• Lower the cradle latch. Place your finger on the top of
the latch. Place your thumb under the number on the
latch and hold it forward while pushing the latch down.
Release the latch to lock the print cartridge into place.
8 Close the top cover.
A calibration page prints. Make sure plain paper
is loaded in the IN tray.
tw_basics.book Page 13 Monday, July 1, 2002 8:47 AM

basics guide
14
use the control panel
use the buttons Your printer’s control panel has three buttons:
• C
ANCEL — Use this button to cancel the current print job.
• R
ESUME — Use this button to resume printing after loading
more paper or after clearing a paper jam.
• P
OWER — Use this button to turn the printer on or off.
use the
indicator lights
Your printer’s control panel has three indicator lights:
• Print cartridge status light — When this light is on, one or
both of the print cartridges is low on ink. When this light is
blinking, one or both of the print cartridges is installed
incorrectly or is malfunctioning.
• Resume light — When this light is on, the printer is out of
paper. When this light is blinking, the printer requires
attention.
• Print light — When this light is on, the power is on. When
this light is blinking green, the printer is busy. When this
light is blinking amber, the printer requires attention.
Always use the P
OWER button to turn off the
printer.
When the Print cartridge status light and the
Resume light are both blinking, there is a
paper jam. When all three lights are blinking,
the cradle is stuck. See printing problems on
page 28 for more information.
tw_basics.book Page 14 Monday, July 1, 2002 8:47 AM

2
2
use your printer with an hp direct-printing digital camera
15
use your printer with an
hp direct-printing digital
camera
Your HP Photosmart 7150 printer lets you print beautiful photos
from your digital camera without using your computer.
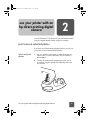
print camera-selected photos
If you have an HP direct-printing digital camera, you can use
your printer to print camera-selected photos.
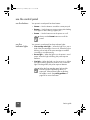
select and print
photos
1 Use your camera’s Share menu to select the photos you
want to print. For more information, see your camera’s
documentation.
2 Connect the camera to the camera port on the front of
your printer using the special USB cable that came with
your camera.
tw_basics.book Page 15 Monday, July 1, 2002 8:47 AM

basics guide
16
3 When you connect the camera to the printer, the camera’s
Print Setup menu appears. Use this menu to:
• Change the photos you have selected for printing.
• Select the paper type.
• Select the paper size.
4 When you are ready to print, follow the instructions on
your camera’s LCD.
To learn more about using camera-selected
photos, see the documentation that came with
your camera.
tw_basics.book Page 16 Monday, July 1, 2002 8:47 AM
Page is loading ...
Page is loading ...
Page is loading ...
Page is loading ...
Page is loading ...
Page is loading ...
Page is loading ...
Page is loading ...
Page is loading ...
Page is loading ...
Page is loading ...
Page is loading ...
Page is loading ...
Page is loading ...
Page is loading ...
Page is loading ...
Page is loading ...
Page is loading ...
Page is loading ...
Page is loading ...
Page is loading ...
Page is loading ...
Page is loading ...
Page is loading ...
Page is loading ...
Page is loading ...
Page is loading ...
Page is loading ...
-
 1
1
-
 2
2
-
 3
3
-
 4
4
-
 5
5
-
 6
6
-
 7
7
-
 8
8
-
 9
9
-
 10
10
-
 11
11
-
 12
12
-
 13
13
-
 14
14
-
 15
15
-
 16
16
-
 17
17
-
 18
18
-
 19
19
-
 20
20
-
 21
21
-
 22
22
-
 23
23
-
 24
24
-
 25
25
-
 26
26
-
 27
27
-
 28
28
-
 29
29
-
 30
30
-
 31
31
-
 32
32
-
 33
33
-
 34
34
-
 35
35
-
 36
36
-
 37
37
-
 38
38
-
 39
39
-
 40
40
-
 41
41
-
 42
42
-
 43
43
-
 44
44
-
 45
45
-
 46
46
-
 47
47
-
 48
48


Ask a question and I''ll find the answer in the document
Finding information in a document is now easier with AI
Related papers
-
Compaq 7550 User manual
-
-
Compaq Photosmart 230 User manual
-
Compaq Photosmart 1315 User manual
-
Compaq Photosmart 140 User manual
-
Compaq PHOTOSMART 1000 User manual
-
-
Compaq CC001A#B1H User manual
-
Radio Shack Q3046A#ABA User manual
-
Other documents
-
Epson CPD-18557R1 User manual
-
HP Photosmart 7150 Printer series Installation guide
-
HP D5300 User manual
-
-
HP 7350 User manual
-
HP Photosmart 7600 Printer series User guide
-
HP (Hewlett-Packard) 7900 User manual
-
-
-