
TOUCHSCREEN INSTALLATION GUIDE
Congratulations on the purchase of your new ASTRALVISION LED touchscreen. It has the
latest touchscreen technology, and is easy to use with ‘plug-n-play” operation with
Windows 7 & 8. This guide covers the physical installation of the Touchscreen; the
operation of the Touchscreen is covered in the Quick Start Guide that is also included on the
product CD.
Most users install the Touchscreen directly onto a wall, but ABI does offer an optional Mobile
Stand for all Touchscreens, and an optional smaller Primary Classroom model to suit the 55”
Touchscreen. This guide covers wall installation; there are separate guides for the mobile
stands.
All Touchscreens are susceptible to interference by direct sunlight so it is recommended that
the Touchscreen be located where direct sunlight does not strike the screen or where the
screen surface can be protected by window blinds. Avoid excessive temperature extremes
such as direct sunlight, radiators, and air ducts. Ensure full ventilation as allowed by the
bracket supplied.
ASTRALVISION products are manufactured and distributed in Australia by ABI Pty Ltd. If you
have any technical issues relating to the installation, contact ABI on 02.9938 6866 or email

The Mounting Plate System:
Your Touchscreen is supplied with a mounting plate. The 2 arms are already attached to
the Touchscreen & the plate is wrapped & packed in with the Touchscreen.
Your Touchscreen is supplied with mounting bracket, and a full range of accessories is
included with the Touchscreen and are detailed in the Quick Start Guide. Installation is a
relatively simple process but a qualified Installer is recommended to ensure the mounting
bracket is properly attached to the wall.
The Touchscreen is quite heavy so it is recommended that the Touchscreen only be
attached to a masonary wall using the bolts provided in the Touchscreen accessory box. If
attaching to a plasterboard or timber wall, the wall mounting plate should be attached
directly to wall framing studs. If this is not possible, adequate horizontal timber beams
should be attached to the studs & the mounting plate attached to the timber beams. Your
installer will be able to determine the appropriate size of timber beam based on the size/
weight of your Touchscreen, and span between supporting studs.
The Touchscreen is normally installed so that the bottom edge of the Touchscreen is
approximately 80cm from the floor. This can be varied to suit your needs, particularly if
you have young or disabled users. The mount plate should be positioned in the centre of
the Touchscreen; it is recommended you use removeable tape to mark out the position of
the Touchscreen on your wall so your can accurately locate the mounting plate, ensuring
it is level, & mark the wall for the bolt locations.
Ensure that you have considered the position of cabling & power for use with the Touchscreen
before you drill the wall to mount the plate. Remember that a few cms of space are
required above the plate to enable the lifting and positioning of the Touchscreen.
Once the mount plate is installed, the Touchscreen is simply lifted onto the bracket. Ensure
you have an extra person to check that the arms are properly engaged on the mount plate
while it is being lifted into position.
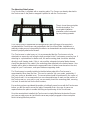
The pic shows the mount plate
& brackets together. The
mount plate installation
orientation so the horizontal
lips are pointing upwards.

Cable Connections:
The Quick Start Guide covers the various connectors on the Touchscreen. Main cables
required are:
# Power Cable (supplied)
# USB from Touchscreen to PC for touch data (supplied)
# HDMI for video or data (supplied)
# VGA + 3.5mm for data/audio (supplied)
# Coax TV aerial cable (for TV channels)
Connectors for other cable input types (Component video, Composite video, Audio) are
avaible. There is also a 3.5mm Audio (Line Out) Out Connector that can be used for
supplementary Soundbar or other Speaker connection. There is also a USB input socket for
slideshow images.
NOTE: Any USB cable should only be run a maximum distance of 5m unless an amplifier is
used. There is almost 2m of USB cabling inside the Touchscreen, so the 3m USB cable we
supply is the maximum recommended unless you use an amplifier. A simple “Active USB
Extender”, available from Computer Accessory suppliers such as Jaycar, Dick Smith, etc
should be used is an external USB length of more than 3m is required.
Similarly, we only recommend a maximum length of 10m for HDMI and VGA cables (VGA can
be run longer under good conditions). An amplified HDMI or VGA extender system, usually
using Cat 5/6 cabling, is recommended for lengths greater than 10m for optimum results.
HDMI will give a better image quality than VGA, hence why multiple HDMI inputs are included
on the input board. HDMI can be used for either data (PC) or Video (DVD, etc) inputs, and
carries both the image & audio signals.
Touchscreen Operation:
The Quick Start Guide covers the operation of the Touchscreen.
If you have any technical issues relating to the installation, contact ABI on 02.9938 6866 or
email [email protected]..
Prepared June 2014.
-
 1
1
-
 2
2
-
 3
3


ASTRALVISION 84” Installation guide
- Category
- Network extenders
- Type
- Installation guide
Ask a question and I''ll find the answer in the document
Finding information in a document is now easier with AI
Related papers

Other documents
-
NCR 5916 User manual
-
CyberResearch CYRAQ 21A User manual
-
Elo Touch Solution ET4201L User manual
-
-
 Aspen Touch Solutions ATM-123R Series User manual
-
 Aspen Touch Solutions ATM-173R User manual
-
-
Elo TouchSystems Entuitive ET1545L-XXWC-X Series User manual
-
-
 Rockwell Automation Allen-Bradley 6181 User manual


