Page is loading ...

Henny Penny
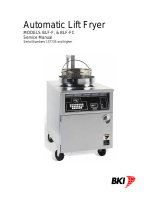
Open Fryer Electric
Model OE-100
OPERATOR MANUAL

Henny Penny Model OE-100
LIMITED WARRANTY FOR HENNY PENNY APPLIANCES
Subject to the following conditions, Henny Penny Corporation makes the following limited warranties to the original
purchaser only for Henny Penny appliances and replacement parts:
NEW EQUIPMENT: Any part of a new appliance, except lamps and fuses, which proves to be
defective in material or workmanship within two (2) years from date of original installation, will be
repaired or replaced without charge F.O.B. factory, Eaton, Ohio, or F.O.B. authorized distributor.
To validate this warranty, the registration card for the appliance must be mailed to Henny Penny
within ten (10) days after installation.
REPLACEMENT PARTS: Any appliance replacement part, except lamps and fuses, which
proves to be defective in material or workmanship within ninety (90) days from date of original
installation will be repaired or replaced without charge F.O.B. factory, Eaton, Ohio, or F.O.B.
authorized distributor.
The warranty for new equipment and replacement parts covers only the repair or replacement of the defective part
and does not include any labor charges for the removal and installation of any parts, travel or other expenses
incidental to the repair or replacement of a part.
EXTENDED FRYPOT WARRANTY: Henny Penny will replace any frypot that fails due to manufacturing or
workmanship issues for a period of up to seven (7) years from date of manufacture. This warranty shall not cover
any frypot that fails due to any misuse or abuse, such as heating of the frypot without shortening.
0 TO 3 YEARS: During this time, any frypot that fails due to manufacturing or workmanship
issues will be replaced at no charge for parts, labor, or freight. Henny Penny will either install a
new frypot at no cost or provide a new or reconditioned replacement fryer at no cost.
3 TO 7 YEARS: During this time, any frypot that fails due to manufacturing or workmanship
issues will be replaced at no charge for the frypot only. Any freight charges and labor costs to
install the new frypot as well as the cost of any other parts replaced, such as insulation, thermal
sensors, high limits, fittings, and hardware, will be the responsibility of the owner.
Any claim must be represented to either Henny Penny or the distributor from whom the appliance was purchased.
No allowance will be granted for repairs made by anyone else without Henny Penny's written consent. If damage
occurs during shipping, notify the sender at once so that a claim may be filed.
THE ABOVE LIMITED WARRANTY SETS FORTH THE SOLE REMEDY AGAINST HENNY PENNY
FOR ANY BREACH OF WARRANTY OR OTHER TERM. BUYER AGREES THAT NO OTHER REMEDY
(INCLUDING CLAIMS FOR ANY INCIDENTAL OR CONSQUENTIAL DAMAGES) SHALL BE AVAIL-
ABLE.
The above limited warranty does not apply (a) to damage resulting from accident, alteration, misuse, or abuse; (b)
if the equipment's serial number is removed or defaced; or (c) for lamps and fuses. THE ABOVE LIMITED
WARRANTY IS EXPRESSLY IN LIEU OF ALL OTHER WARRANTIES, EXPRESS OR IMPLIED, IN-
CLUDING MERCHANTABILITY AND FITNESS, AND ALL OTHER WARRANTIES ARE EXCLUDED.
HENNY PENNY NEITHER ASSUMES NOR AUTHORIZES ANY PERSON TO ASSUME FOR IT ANY
OTHER OBLIGATION OR LIABILITY.
Revised 3-04 FM05-001

1201 i
Model OE-100
Table of Contents
SECTION 1. INTRODUCTION .................................................................................................... 1-1
1-1. OPEN FRYER WITH DUAL TIMER .............................................................. 1-1
1-2. FEATURES ..................................................................................................... 1-1
1-3. PROPER CARE .............................................................................................. 1-1
1-4. ASSISTANCE ................................................................................................. 1-2
1-5. SAFETY .......................................................................................................... 1-2
SECTION 2. INSTALLATION ....................................................................................................... 2-1
2-1. INTRODUCTION .......................................................................................... 2-1
2-2. UNPACKING ................................................................................................. 2-1
2-3. FRYER LOCATION ....................................................................................... 2-2
2-4. LEVELING OF FRYER .................................................................................. 2-2
2-5. VENTILATION ............................................................................................... 2-2
2-6. ELECTRICAL REQUIREMENTS .................................................................. 2-3
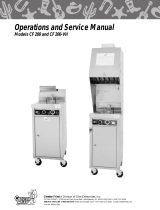
2-7. FRYER DIMENSIONS ................................................................................... 2-4
SECTION 3. OPERATION ............................................................................................................ 3-1
3-1. INTRODUCTION .......................................................................................... 3-1
3-2. OPERATING CONTROLS ............................................................................. 3-1
3-3. FILLING OR ADDING SHORTENING ......................................................... 3-9
3-4. OPERATING CONTROLS AND PROCEDURES ......................................... 3-9
3-5. USAGE REVIEW OPERATION ..................................................................... 3-11
3-6. USAGE REVIEW RESET ............................................................................... 3-11
3-7. FILTERING OF SHORTENING ..................................................................... 3-11
3-8. FILTER PUMP PROBLEM ............................................................................. 3-14
3-9. CHANGING THE FILTER ENVELOPE ........................................................ 3-15
3-10. CLEANING THE FRYPOT ............................................................................ 3-16
3-11. PREVENTIVE MAINTENANCE ................................................................... 3-19
3-12. ERROR CODES ............................................................................................. 3-19
SECTION 4. PROGRAMMING .................................................................................................... 4-1
4-1. LOW LEVEL PROGRAM MODE .................................................................. 4-1
4-2. HIGH LEVEL PROGRAM MODE ................................................................. 4-2
4-3. IDLE PROGRAMMING ................................................................................. 4-3
4-4. SPECIAL PROGRAM MODE ........................................................................ 4-4
GLOSSARY ........................................................................................................................................ G-1
Henny Penny Distributor List (Domestic and International)

1-1
Model OE-100
SECTION 1. INTRODUCTION
1-1. OPEN FRYER WITH
DUAL TIMER
1-2. FEATURES • Easily cleaned.
• 65 lb. shortening capacity.
• 15 lb. product capacity.
• Microcomputer controls.
• Stainless steel construction.
• Manual reset high limit control.
• Self-diagnostic system built into controls.
• Built-in melt cycle.
• Digital display - continuous countdown of time during cook cycle or
display of fry pot temperature.
• Dual timers for independently controlled cook cycles.
• Built-in filtering system.
1-3. PROPER CARE As in any food service equipment, the Henny Penny OE-100 does
require care and maintenance. Suggestions for the proper day-to-day
care and maintenance are contained in this manual. For your conve-
nience, this manual consists of the following sections:
Table of Contents Programming
Introduction Distributor List
Installation Glossary
Operation
The conscientious use of the recommended procedures, coupled with
regular maintenance, results in fewer repairs to the equipment. When
such repairs become necessary, they may be accomplished by follow-
ing the repair steps contained in the Technical Manual. The Technical
Manual is available for downloading from our Website and contains
sections covering Troubleshooting, Maintenance, Wiring Diagram, and
Parts List.
1201
The Henny Penny Open Fryer with Dual Timer is a basic unit of
food equipment designed to cook foods better and easier. Micro-
computer based design helps make this possible.

1-2
Model OE-100
1-5. SAFETY The only way to ensure safe operation of the Henny Penny OE-100 is
to fully understand the proper installation and operation procedures.
The instructions in this manual have been prepared to aid you in
learning the proper procedures. Where information is of particular
importance or is safety related, the words NOTICE, CAUTION,
WARNING or DANGER are used. Their usage is described below.
The word NOTICE is used to highlight especially important
information.
The word CAUTION is used to alert you to a procedure
that, if not performed properly, may damage the unit.
The word WARNING is used to alert you to a procedure
that, if not performed properly, may cause personal injury.
THE WORD DANGER INDICATES AN IMMINENT
HAZARD WHICH WILL RESULT IN HIGHLY SERIOUS
INJURY SUCH AS SECOND OR THIRD DEGREE
BURNS.
1-4. ASSISTANCE Should you require assistance, just call your local independent
Henny Penny distributor (refer to distributor list in rear of this
manual).
In addition, feel free to contact our corporate headquarters in
Eaton, Ohio. Dial 1-800-417-8405 toll free, or 1-937-456-8405 or
visit our Website at: www.hennypenny.com.
1201

2-1
Model OE-100
SECTION 2. INSTALLATION
2-1. INTRODUCTION This section provides the installation instructions for the Henny
Penny OE-100.
Installation of this unit should be performed only by a quali-
fied service technician.
Do not puncture the open fryer with any objects such as
drills or screws as component damage or electrical shock
could result.
2-2. UNPACKING
The unit is bolted to a wooden skid and then packed inside a heavy
cardboard carton with sufficient padding to withstand normal shipping
treatment.
Any shipping damage should be noted in the presence of the
delivey agent and signed prior to his or her departure.
1. Carefully cut bands from cardboard.
2. Lift carton from fryer.
3. Titling unit, remove leg bolts holding skid to unit.
Care should be taken when tilting unit to prevent personal
injury.
4. Remove packing and casters from frypot and thread into leg
inserts.
1091
SHOCK HAZARD
HEAVY OBJECT

2-2
Model OE-100
2-2. UNPACKING
(Continued)
2-3. FRYER LOCATION The proper location of the fryer is very important for operation, speed,
and convenience. Choose a location which provides easy loading and
unloading of product without interfering with the final assembly of food
orders. Operators have found that frying from raw to finish, and
holding the product in warmers, provides fast continuous service.
Keep in mind the best efficiency will be obtained by a straight line
operation, i.e. raw in one side and finished out the other side. Order
assembly can be moved away with only a slight loss of efficiency.
2-4. LEVELING OF FRYER For proper operation, the fryer should be level from side to side
and front to back. Using a level placed on the flat areas around the
frypot collar, adjust the casters until the unit is level.
2-5. VENTILATION The fryer should be located with provision for venting into an
adequate exhaust hood or ventilation system. This is essential to
permit efficient removal of the frying odors. We recommend you
consult a local ventilation or heating company to help in design-
ing an adequate system.
Ventilation must conform to local, state, and national codes.
Consult your local fire department or other authorities.
593
5. Remove filter drain pan and filter screen assembly from box and
slide underneath fryer. Connect filter union to the standpipe
assembly.
6. Remove baskets (if present) and brush set from box and install
baskets into the fryer pot.
7. Unit is now ready for location and set-up.

2-3
Model OE-100
2-6. ELECTRICAL
REQUIREMENTS
The OE-100 is available from the factory wired for 208 or 480 volts,
three phase, 50 or 60 hertz service. Refer to the table below for
supply wiring and fusing.
Volts Phase KW Amps Fuse
480 3 13.5 18 30A
415 3 13.5 20 30A
380 3 13.5 15 30A
240 3 13.5 15 30A
208 3 13.5 39 50A
480 3 22 28 40A
415 3 22 33 40A
380 3 22 35 50A
240 3 22 58 70A
208 3 22 61 90A
This fryer must be adequately and safely grounded. Refer
to local electrical codes for correct grounding procedures. If
fryer is not adequately grounded, electrical shock could
result.
A separate disconnect switch with proper capacity fuses or break-
ers must be installed at a convenient location between the fryer
and the power source.
593
SHOCK HAZARD

2-4
Model OE-100
2-7. FRYER DIMENSIONS
593

3-1
Model OE-100
SECTION 3. OPERATION
3-1. INTRODUCTION This section provides operating procedures for the Henny Penny OE-
100. Read sections 1, 2, and 3 and all instructions before operating
the fryer.
3-2. OPERATING
CONTROLS
Figures 3-1 through 3-8 identify and describe the function of all
operating controls and components.
Page Fig. Item Description Function
No. No. No.
3-6 3-1 1 Cook/Off/Pump This three position rocker type switch controls the power
Switch to the fryer when in the cook position. When in the pump
position, power is then applied to the filter pump motor.
3-6 3-1 2 Filter Heaters This machine is equipped with an optional strip heater
that the operator must manually turn on and off. The
indicator will illuminate when power is applied and will
melt any solidified shortening that may have accumulated in
the filter pump lines.
Use filter heater only long enough to melt the
solidified shortening in lines. The heater must not be
left unattended or fire could result.
3-6 3-1 3 Digital Display The digital display shows the shortening temperature,
as well as the timer countdown in the cook cycle. The
temperature of the shortening can be determined by
depressing the temperature button. If the temperature is
below 250°F, the digital display will read "LO". If the
temperature exceeds 390°F, the display will read "HI".
Any temperature between these two settings will be
displayed.
3-6 3-1 4 Timer Button The right timer can be activated or reset by gently pressing
the timer button. The same holds true for the left timer
button. The left display shows the left timer information and
the right display shows the information for the right timer.
593
FLAMMABLE

Model OE-100
3-2
3-2. OPERATING
CONTROLS
(Continued)
Page Fig. Item Description Function
No. No. No.
3-6 3-1 5 Set Button The set button is used to set the cook cycles and to
enter the special program modes.
3-6 3-1 6 Exit Melt Button The exit melt button is used to bypass the melt cycle. By
pressing and holding the exit melt button for 5 seconds, the
heat comes on continuously.
3-6 3-1 7 Temperature By pressing the temperature button (indicated by ther-
Button mometer), the actual shortening temperature will show
on the left display and the setpoint temperature on the
right display.
3-6 3-1 8 Melt LED When the melt LED is flashing, the fryer is in the melt
cycle. When the temperature of the shortening reaches
approximately 250° F, the melt LED will go off and
automatically switch to the cook cycle.
When using new shortening, it is recommended to melt
the shortening on an outside source before placing
shortening in the frypot. Unless elements are
completely covered in shortening, fire or damage to
the frypot could result.
3-6 3-1 9 Ready LED The ready LED illuminates when the temperature of the
shortening is near the setpoint temperature. (It flashes if the
temperature is 5° F more than the setpoint temperature.)
3-6 3-1 10 Heat LED The heat LED illuminates when the heat comes on.
3-6 3-1 11 Usage LED The usage LED flashes slowly when the set button is
pressed and held for 2 seconds. The number of loads
cooked of a selected product can be obtained at this time.
If the set button is pressed and held for 10 seconds the
usage LED flashes at a fast rate and the usage can be
reset to 0 by pressing the timer button for the desired
side.
3-6 3-1 12 Product LED The product LED flashes while in the program modes,
and a new product can be selected at this time.
593
FLAMMABLE

3-3
Model OE-100
3-2. OPERATING
CONTROLS
(Continued)
Page Fig. Item Description Function
No. No. No.
3-6 3-1 13 Time LED The time LED flashes while in the program mode and a
new fry time can be programmed.
3-6 3-1 14 Temperature LED The temperature LED flashes while in the program mode
and the setpoint temperature can be programmed.
3-6 3-1 15 Alarm LED The alarm LED flashes while in the program mode. Up to
four alarms can be programmed in a cook cycle.
3-6 3-1 16 Other LED The other LED flashes while in the high level program
mode and special program modes only. Several parameters
can be programmed at this time.
3-6 3-1 17 Idle LED The idle LED illuminates when the right timer up and
down button is pressed for 2 seconds. The indicator
passes through the other product LEDs to the idle LED.
The control will then regulate the shortening temperature
at a lower programmed temperature.
3-6 3-1 18 Up and Down 2 sets of up and down buttons (denoted as triangles)
Buttons are on the control. These buttons are used in programming
and product selection. A product is selected by pressing and
holding either the up or down button for 2 seconds. To
select both the right and left products at the same time the
programmed setpoint temperatures must be the same.
3-7 3-2 19 Fuses The fuses, located on the panel behind door, are protective
devices that break the circuit when the current exceeds the
rated value. The fuses provide overload protection for the
control panel.
3-7 3-2 20 High Limit Reset This manual reset lever, located on the panel behind door,
Lever must be pushed down in the event the high limit trips.
This lever will manually reset the high limit.
3-7 3-3 21 Contactors The contactors are the relays that route power to the
heating elements. One relay coil is in series with the high
limit temperature control, and the other relay coil is in
series with the heat control circuit.
3-7 3-3 22 Fan The fan's function is to eliminate any heat build-up
behind the control panel.
593

Model OE-100
3-4
3-2. OPERATING
CONTROLS
(Continued)
Page Fig. Item Description Function
No. No. No.
3-7 3-3 23 Temperature probe The temperature probe, located behind the control panel,
determines the shortening temperature.
3-7-73-7
3-4 24 Drain Interlock The drain interlock switch is a microswitch that provides
Switch protection for the heating elements in case an operator drains
shortening from the frypot while the power switch is on. The
drain switch is designed to automatically shut off the control
system when the drain valve is opened.
Is is recommended to turn all power off before opening
drain valve, or fire could result.
3-8 3-5 25 Drain Valve The drain valve is a 2-way ball valve and is normally
in the closed position. Turn the handle to the open position to
drain the shortening from the frypot.
Open the drain valve slowly to eliminate splashing of
hot shortening. Severe burns could result.
3-8 3-5 26 Filter Valve The filter valve is a 2-way ball valve which operates in
conjunction with the filtering system. With the handle in
the open position and the main power switch in the pump
position, this valve directs the filtered shortening from
the filter drain pan back into the frypot.
3-8 3-6 27 Filter Union The filter union connects the filter assembly to the filter
pump. It is easily disconnected to allow removal of the
filter and filter drain pan.
593
FLAMMABLE

3-5
Model OE-100
3-2. OPERATING
CONTROLS
(Continued)
Page Fig. Item Description Function
No. No. No.
3-8 3-7 28 Filter Drain Pan The removable filter drain pan houses the filter and
catches the shortening when it is drained from the frypot.
It is used to remove and discard the shortening when the
shortening needs to be replaced.
Use protective gloves or cloth to prevent burns. The
drain pan will be hot.
3-8 3-8 29 Filter Rinse Hose The filter rinse hose is used to rinse food particles from
and Quick- the frypot into the filter drain pan. This hand-held hose is
Disconnect attached to a quick-disconnect.
Use extreme caution when operating the filter rinse
hose. Refer to "Filtering Procedures" in this manual
for proper operation, or burns could result.
593
HOT SURFACE

Model OE-100
3-6
593

3-7
Model OE-100
Figure 3-2
Figure 3-3
593
Figure 3-4

Model OE-100
3-8
593
Figure 3-5
Figure 3-6
Figure 3-7
Figure 3-8

3-9
Model OE-100
3-3. FILLING OR
ADDING
SHORTENING
It is recommended that a high quality frying shortening be used in the
OE-100. Some low grade shortenings have a high moisture content
and will cause foaming and boiling over.
The Henny Penny OE-100 requires 65 pounds of shortening. It has a
level indicator line marked on the rear of the pot wall, which shows
the heated shortening at the proper level. Cold shortening should be
below the bottom of the level indicator. The shortening will expand
when heated.
Maintain hot shortening at level indicator line or fire could
result.
Shortening and all metal parts that are in contact with the
shortening are extremely hot. We recommend using
protective gloves when in contact with metal parts.
3-4. OPERATING
CONTROLS AND
PROCEDURES
The Henny Penny Open Fryer with dual timers contains a solid state
control of both cooking temperature and time. The following is a brief
description of the operating procedure.
1. Be sure the drain valve and filter valve are in the closed position.
2. Fill frypot with shortening.
When using new shortening, it is recommended to melt
the shortening on an outside source before placing
shortening in the frypot. Unless elements are completely
covered in shortening, fire or damage to the frypot could
result.
3. Move power switch to the POWER position. Unit will automati-
cally go into the melt cycle. When shortening temperature has
reached approximately 250°F, melt light will extinguish and unit
will go into cook cycle.
At the end of each day, the cover must be on frypot when
not in operation to avoid shortening contamination.
593
FLAMMABLE

Model OE-100
3-10
3-4. OPERATING
CONTROLS AND
PROCEDURES
The melt cycle may be bypassed, if desired, by pressing and
holding the Exit Melt button for 5 seconds. The control will
go directly to the cook cycle.
Do not bypass the melt cycle unless enough shortening has
melted to completely cover all of the heating elements. If
melt cycle is bypassed before all heating elements are
covered, excessive smoking of the shortening or a fire will
result.
The temperatures and times are preset from the factory and
the two timers operate independently. They may be set,
started, or stopped without affecting each other.
4. Completely stir shortening to stabilize the temperature throughout
the frypot.
5. When shortening temperature has reached set point, ready light
will illuminate, indicating to the operator they may drop product.
6. Lower basket with product into frypot and lightly depress timer
button. Countdown will begin.
7. When cook cycle is complete, an alarm will sound and the display
will flash "done". Press timer button to stop alarm.
8. Lift basket to allow product to drain.
9. If a hold time is programmed, and the timer button is pushed, the
timers will automatically start counting down in a hold cycle.
10. At the end of the hold cycle an alarm sounds. Press the timer
button to stop the alarm.
593
FLAMMABLE

3-11
Model OE-100
3-5. USAGE REVIEW
OPERATION
Usage review enables the operator to review the number of loads of
the products cooked, either daily or accumulated count.
1. Push the Set button for 2 seconds until the Usage LED flashes.
2. The LED beside the selected product shows the operator which
product to be reviewed. To select a product, press the up and
down buttons. When all LEDs are lit, all product usages are
shown.
3. The left display shows either "daily" or "accu". The right display
shows the usage. Push the Set button to change between daily or
accumulated.
4. Push and hold Set button to exit usage review.
3-6. USAGE REVIEW
RESET
1. Press and hold the Set button for ten seconds. The control will
beep 3 times and the Usage LED will flash at a fast rate.
2. Select product and daily, or accumulated type, as described
above. Push right timer button to clear displayed usage count.
Daily usage is automatically cleared when power is turned off.
3. Push and hold Set button to exit usage review.
3-7. FILTERING OF
SHORTENING
Frying breaded food requires frequent filtering. Taste the cold shorten-
ing every day for flavor. Watch the shortening for foaming during cook
cycles. Discard the shortening as soon as it shows signs of foaming.
Clean the frypot as follows each time the shortening is changed or
filtered:
1. Turn the main power switch to the OFF position. Remove and
clean the fry basket in soap and water. Rinse thoroughly.
The best results are obtained when the shortening is
filtered at the normal frying temperature.
593
/