Page is loading ...

Instruction
Manual
002-858e-04.22
Piezoresistive
pressure sensors
Types 4007...
4011...
4017... *
4043…
4045...
4073…
4075...
4049...
4065...
4067...
*
*
* Standard version
(non-Ex-version) and
explosion-proof version
(Ex-ec)

Instruction
Manual
002-858e-04.22
Piezoresistive
pressure sensors
Types 4007...
4011...
4017... *
4043…
4045...
4073…
4075...
4049...
4065...
4067...
*
*
* Standard version
(non-Ex-version) and
explosion-proof version
(Ex-ec)


Page 1
002-858e-04.22
We thank you for choosing a Kistler quality product distin-
guished by technical innovation, precision and long life.
Information in this document is subject to change without
notice. Kistler reserves the right to change or improve its
products and make changes in the content without obliga-
tion to notify any person or organization of such changes or
improvements.
© 2018 ... 2022 Kistler Group. Kistler Group products are
protected by various intellectual property rights. For more
details visit www.kistler.com. The Kistler Group includes
Kistler Holding AG and all its subsidiaries in Europe,
Asia, the Americas and Australia.
Kistler Group
Eulachstraße 22
8408 Winterthur
Switzerland
Tel. +41 52 224 11 11
info@kistler.com
www.kistler.com
Foreword
Foreword

Piezoresistive pressure sensors
002-858e-04.22
Page 2
Content
1. Introduction ...................................................................................................................................3
2. Important information ...................................................................................................................4
2.1 Protection and standards ....................................................................................................4
2.2 Disposal instructions for electronic equipment ...................................................................4
2.3 Software upgrades and updates .........................................................................................4
3. Preface ..........................................................................................................................................5
3.1 Technical data and documentation .....................................................................................5
3.2 Principle of operation ..........................................................................................................6
3.3 Media compatibility .............................................................................................................6
3.4 Requirements to cooling .....................................................................................................7
3.5 Precautions for water cooling .............................................................................................7
4. Operation ......................................................................................................................................9
4.1 Operation in non-hazardous areas .....................................................................................9
4.2 Operation in hazardous areas ............................................................................................9
4.2.1 Instructions for operation in hazardous areas ......................................................9
4.2.2 Sensor execution...................................................................................................9
4.2.3 Product Marking ....................................................................................................9
4.2.4 Installation of the Sensor (Ex-ec) for operation in zone 2 ...................................10
5. Installation of the piezoresistive sensor ......................................................................................11
5.1 General information ..........................................................................................................11
5.2 Direct installation ..............................................................................................................11
5.3 Installation with sleeve ......................................................................................................11
5.4 Installation examples ........................................................................................................12
5.5 Machining the mounting bore ...........................................................................................12
5.6 Mounting the water hose on the cooling pipe ...................................................................14
5.7 Protector heat screen for water cooled sensor .................................................................14
5.8 Check points before installation ........................................................................................15
5.9 Installing the sensor into the bore .....................................................................................15
6. Piezoresistive sensor cable routing ............................................................................................17
7. Setting up the measuring chain ..................................................................................................18
8. Zero-point correction ...................................................................................................................19
9. Dismounting and maintenance ...................................................................................................21
9.1 Dismounting ......................................................................................................................21
9.2 Maintenance .....................................................................................................................21
10. Kistler technical center services ..................................................................................................24
11. Declaration of conformity ............................................................................................................25
Total pages 25

Introduction
Page 3
002-858e-04.22
1. Introduction
Please take the time to thoroughly read this instruction
manual. It will help you with the installation, maintenance,
and use of this product.
To the extent permitted by law Kistler does not accept any
liability if this instruction manual is not followed or products
other than those listed under Accessories are used.
Kistler offers a wide range of products for use in measuring
technology:
Piezoelectric sensors for measuring force, torque, strain,
pressure, acceleration, shock, vibration and acoustic-
emission
Strain gage sensor systems for measuring force and mo-
ment
Piezoresistive pressure sensors and transmitters
Signal conditioners, indicators and calibrators
Electronic control and monitoring systems as well as
software for specific measurement applications
Data transmission modules (telemetry)
Kistler also develops and produces measuring solutions
for the application fields engines, vehicles, manufacturing,
plastics and biomechanics sectors.
Our product and application brochures will provide you
with an overview of our product range. Detailed data sheets
are available for almost all products.
If you need additional help beyond what can be found
either online or in this manual, please contact Kistler‘s
extensive support organization.

Piezoresistive pressure sensors
002-858e-04.22
Page 4
2. Important information
2.1 Protection and standards
The piezoresistive pressure sensor 4011AE..., 4017AE... and
4067EE… complies to CE and the following provisions of
directives:
ISO 9001
2011/65/EU (ROHS)
2014/34/EU (ATEX Directive)
The following harmonized Ex-standards were applied:
EN IEC 60079-0:2018 / IEC 60079-0:2017
EN 60079-7:2015 / IEC 60079-7:2017
2.2 Disposal instructions for electronic equipment
Do not discard old electronic devices in municipal trash. For
disposal at end of life, please return this product to an au-
thorized local electronic waste disposal service or contact
the nearest Kistler sales office for return instructions.
2.3 Software upgrades and updates
Kistler may from time to time supply upgrades or updates
for embedded software. Such upgrades or updates must al-
ways be installed.
Kistler declines any liability whatsoever for any direct or
consequential damage caused by products running on em-
bedded software which has not been upgraded or updated
with the latest software supplied.

Preface
Page 5
002-858e-04.22
3. Preface
Piezoresistive low pressure sensors are very reliable
solutions for gas exchange analysis. They are used for
precise absolute pressure measurements in low pressure
indication. The piezoresistive sensors can be applied direct
in the intake of the engine or in the exhaust using a water-
cooled adapter.
Piezoresistive high pressure sensors are essential where static
and dynamic pressure measurements are required. They are
ideal for accurate frequency analysis of pressure profiles
in injection systems or general pressure measurements in
hydraulic systems.
Fig. 1: Piezoresistive pressure sensors
3.1 Technical data and documentation
Data sheets are available on www.kistler.com
Type 4017 Type 4007 Type 4011 Type 4065 Type 4067 Type 4049

Piezoresistive pressure sensors
002-858e-04.22
Page 6
3.2 Principle of operation
The sensor measuring element is a Wheatstone bridge semi-
conductor. The applied pressure is changing the resistance
of the Wheatstone bridge and its voltage output, which is
proportional to the pressure.
In sensors of Type 4007 with Direct Chip Exposure (DCE)
the pressure acts on the measuring element directly. The
element is covered with a protective coating to protect it
from the measurement media and increase durability.
The sensor Types 4011, 4017 and 4049... use media sepa-
rated technology. The pressure acts via an oil-filling onto
the measuring element – this is separated from the media
by a steel diaphragm.
The sensor Types 4065 and 4067 are based on block sensor
technology. The pressure acts on a steel diaphragm, which
then applies a force onto a silicon block measuring element.
Fig. 2: Cross section of piezoresistive sensors (left: DCE;
middle: oil-filled; right: block technology)
3.3 Media compatibility
The DCE piezoresistive sensors have limited media
compatibility. The sensor Type 4007 has been successfully
tested with following medias: gasoline, diesel, E15 (race
fuel), engine oil (0W-40), brake fluid (DOT 4), PVE oil (air
condition), air, water and diesel exhaust fluid (AUS 32/
AdBlue).
Media-separated sensors can be used with fluids and gases
compatible with stainless steel.
For measuring pressure in combustion engine exhaust paths
it is recommended to use media separated sensors.

Preface
Page 7
002-858e-04.22
3.4 Requirements to cooling
The use of Kistler cooling system Type 2621G for cooled sen-
sors is recommended. It is capable of providing cooling for
several piezoresistive sensors as 4049 (depending on the heat
load created by the application) with an optimum quantity of
coolant, at the right pressure and constant temperature. This
facilitates measurements with absolute reproducibility and
best lifetime of the piezoresistive sensors.
Coolant temperature:
50 ±3°C
Coolant flow rate:
0.3 to 0.5 l/min
Coolant pressure:
1.5 ±0.2 bar
Coolant composition:
demineralized water according to VDE-Norm 0510;
cooling fluid additive BASF G30/G40/G48 or similar
product (do not mix with each other)
mixing ratio: 1 part additive with 4 parts demineralized
water suitable for applications down to –9°C
For more information refer to instruction manual of cooling
unit Type 2621G.
Never connect the piezoresistive sensor to an open cooling
system with water from the main supply. This water source
contains calcium and lime deposits, which will accumulate
inside the sensor, impacting the cooling and in the worst
case, blocking the cooling channels inside the sensor.
3.5 Precautions for water cooling
The cooling system flow must be active before the engine is
started. The reason for this is that exhaust gases will heat up
the sensor very rapidly above its maximum temperature limit.
Further, the sensor may be damaged when low temperature
coolant enters the hot sensor (thermal shock effect).
Keep the cooling system on until the temperature of the
installation position of the sensor in the engine cooled
down to less than 100°C.

Piezoresistive pressure sensors
002-858e-04.22
Page 8
If the cooling system fails and cannot work normally, the
combustion engine and the cooling system should be shut
down immediately to prevent the cooling system from
working intermittently, thus damaging the sensor. To
continue using the cooling system, stop the engine until
the temperature of the sensor drops to approximately the
same temperature as the coolant.
During the operation of the cooling system, it must be
ensured that the hoses and tubes are not constricted –
free flow of the coolant is essential. It is recommended to
use original accessories cooling hoses from Kistler (refer
to the data sheet of the sensor).
Before storing the sensor, empty the coolant from the
sensor, flush it with demineralized water and blow it out
very carefully with compressed air.

Operation
Page 9
002-858e-04.22
4. Operation
4.1 Operation in non-hazardous areas
In non-hazardous areas the sensor Types without Ex-certifi-
cation can be used.
4.2 Operation in hazardous areas
4.2.1 Instructions for operation in hazardous areas
The Ex-certified sensor can be used only in zone 2.
The sensor can be installed in the hazardous Ex-zone
The plug (connector) is not to be installed in the hazard-
ous Ex-zone
All electrical connections must be properly connected
No modifications are permitted on any equipment that is
certified for use in hazardous areas
Defective sensors must be returned to the manufacturer.
4.2.2 Sensor execution
For applications in hazardous areas the sensor versions
Type 4011AE…, Type 4017AE... or Type 4067EE… (certi-
fied “Ex ec”) must be used.
4.2.3 Product Marking
The Ex-certified sensors are labeled with the ATEX and
IECEx designation.
Kistler Intrumente AG, Switzerland
Type 40XX…
SN: / Date of Mfg: XXXXXXX / XX.XXXX
Rated 24 VDC, 50 mW -40 ≤ Ta ≤ +180°C
ATEX and IECEx: Increased safety “Ex ec”:

Piezoresistive pressure sensors
002-858e-04.22
Page 10
Specific conditions of use:
Pressure sensors are to be protected against impact dur-
ing the installation, operating and maintenance.
The plug is not to be installed in the hazardous Ex zone.
The device must be only installed in an area with a mini-
mum degree of pollution 2.
The sensor must be earthed over the installation.
The sensors can be used only in the rated ambient tem-
perature ranges (°C):
– for Types 4011AExxx; 4067EExxx:
-40< Tamb < +180°C
– for Types 4011AE250; 4011AE500:
Tamb -40°C … 140°C
Particular recommendation:
Do not disconnect cable if power is on! Separate only in
non-hazardous area.
4.2.4 Installation of the Sensor (Ex-ec) for operation in zone 2
Non-Ex-Area
Area (Zone 2)
amplifier
4665B / 4624A
Fig. 3: Installation of the measuring chain for Zone 2
(example: sensor Type 4011AE….)
The maximal electrical values of the sensors are:
Ui VDC 24
I mA 1...4
Pmax mW 50

Installation of the piezoresistive sensor
Page 11
002-858e-04.22
5. Installation of the piezoresistive sensor
5.1 General information
The accuracy of a measurement and quality of the data are
highly dependent on careful installation of the piezoresistive
pressure sensor.
The sensor bore must be machined to the specified tolerances.
The specified tightening torque of the piezoresistive sensor
must be observed.
Refer to the values and instructions in the data sheet of the
sensor.
5.2 Direct installation
Direct installation requires the least installation space. A di-
rect installation is only possible if it is not necessary to cross
any water or oil galleries in the cylinder head casting.
In case of repeated mounting and dismounting of a sensor,
there is the risk of damaging the sealing mechanism and
thread of the mounting bore. Typically, the cylinder head
material is softer than that of the sensor. Before mounting
the sensor in the bore, also to facilitate dismounting it at
the end of the test, it is recommended to coat thread of
the sensor with high temperature resistant grease (e.g.
MOLYKOTE HSC plus or Metaflus 70–81). Do not apply
any grease on the diaphragm.
5.3 Installation with sleeve
In the case where the point to be measured can only be
accessed via an oil or cooling water gallery, a mounting
sleeve is necessary to provide adequate sealing for the
installation. At the front, the sleeve is screwed and sealed
with a sealing ring. At the rear, sealing is achieved using
O-rings and/or Loctite compound (Loctite 648 for shaft-
hub, Loctite 290 for thread).

Piezoresistive pressure sensors
002-858e-04.22
Page 12
Benefits of using a mounting sleeve:
Precise sensor bore inside the sleeve
Machining of the bore for the mounting sleeve is simplified
The mounting sleeve has the required strength to ensure
that the sealing part can resist wear. This allows the sen-
sor to be mounted and dismounted repeatedly without
restrictions
When removing the sensor, the mounting sleeve prevents
cooling fluid from leaking into combustion chamber
Disadvantages of using a mounting sleeve:
Can influence on the cylinder head cooling performance
(depending on size and position of the sleeve with respect
to the water cooling channels)
5.4 Installation examples
Fig. 4: Left: sleeve mounting through a cooling water
gallery, sensor Type 4011A…DS...8; middle:
direct mounting with small cavity in front of the
diaphragm, sensor Type 4067E; right: mounting
on a pipe with a welded boss, sensor Type 4049B
5.5 Machining the mounting bore
When preparing the sensor bore, ensure that the thread is
concentric in relation to the relative bore diameters. The
sealing part must be completely flat. Refer to the specifica-
tions and tolerances stated on the datasheet of the sensor.

Installation of the piezoresistive sensor
Page 13
002-858e-04.22
All machining steps with the drill, milling cutter, reamer and
screw tap must be performed with the work held securely in
the same position.
High pressure piezoresistive sensors are particularly sensitive
to machining bore tolerances. It is essential to use the correct
machining tools and methods for creating the sensor bore
and installation. This will provide a good quality installation
with correct, concentric positioning of the sensor and a high
quality sealing surface for optimized sensor operation.
The copyright of this drawing, that is entrusted personally to the
recipient, remains with our Company. No copies or duplications of
this drawing may be made, nor is it allowed to transmit it or to
make it accessible to third parties without our written permission.
Modification
100022811
Date
29.06.2018
Generating system
Word 2010
European
projection
First project-no Date of copy
High pressure sensor M10x1
Specification control sheet
gez. 04.07.2014 Beo
k
ISTLER
Size
A4
Documentnumber Version
n
Page 1
gepr. 31.07.2014 Diw 4067E…-00e c
Kistler Instrumente AG, Winterthur
Switzerland of 5
ges. 31.07.2014 Mvi
Internal and supplier use
Description
The 4067E_DS_ is a piezoresistive absolute pressure sensor for high pressure and temperature
conditions. Using the unique design a high natural frequency of the sensor is achieved enabling
dynamical measurements.
Digital temperature compensation in combination with PiezoSmart is used to guarantee a high level of
accuracy. Being part of the DS-family, the sensor features a seamless integration with the PR-amplifiers
4624A and 4665B.
4067E...-00e - c - YS0 - Produkt Spezifikation - interne und externe Fertigung - Freigegeben --- siehe Tabelle --- 17-Dec-2018 16:37 (CET) - [email protected]
Fig. 5: Example sensor Type 4067 bore machining re-
quirements
40 55
100
9 e9
-
-
0,025
0,061
9 h8
-
0
0,022
Mitnehmer nach DIN 1809
Spezialbohrer D9h8x100 für 4067/6215
A4
a
1 / 1
1:1
measure. analyze. innovate.
Erstmals verwendet
Erste Proj.-Nr.
Werkstoff
Änderung
Datum
Massstab
Ersatz für
Kopie Datum
100024606 01.11.2018
gez.
gepr.
ges.
15.10.2018
Bgu
Hs
01.11.2018
Hs
01.11.2018
Bik
100.319.038
Zeichnungs-Nr.
Material-Nr.
KIWAG-SWX_A4h / Vers. 21-Sep-2017
Ver.
Bl.
D-00033-X2
18000328 1327
öffentlich
Das Urheberrecht an dieser Zeichnung, die dem Empfänger
persönlich anvertraut wird, verbleibt unserer Firma.
Ohne unsere schriftliche Genehmigung darf die Zeichnung
weder kopiert noch vervielfältigt, noch an Drittpersonen
mitgeteilt oder zugänglich gemacht werden.
01.11.2018
100.319.038 - a - skbvdg - SKB VDok Grafik - öffentlich - Freigegeben --- 18000328 1327 --- 17-Dec-2018 16:42 (CET) - [email protected]
Fig. 6: Example drill Type 1327
10
10
35
M10x1
90
SW8
10
Gewindebohrer M10x1
A4
a
1 / 1
1:1
measure. analyze. innovate.
Erstmals verwendet
Erste Proj.-Nr.
Werkstoff
Änderung
Datum
Massstab
Ersatz für
Kopie Datum
100007350-T1
18.02.2015
gez.
gepr.
ges.
18.02.2015
Hs
Hs
18.02.2015
Hs
18.02.2015
100.232.990
Zeichnungs-Nr.
Material-Nr.
KIWAG-SWX_A4h
Ver.
Bl.
18000338 1353
öffentlich
Das Urheberrecht an dieser Zeichnung, die dem Empfänger
persönlich anvertraut wird, verbleibt unserer Firma.
Ohne unsere schriftliche Genehmigung darf die Zeichnung
weder kopiert noch vervielfältigt, noch an Drittpersonen
mitgeteilt oder zugänglich gemacht werden.
15.11.2017
100.232.990 - a - skbvdg - SKB VDok Grafik - öffentlich - Freigegeben --- 18000338 1353 --- 17-Dec-2018 16:44 (CET) - [email protected]
Fig. 7: Example screw tap Type 1353

Piezoresistive pressure sensors
002-858e-04.22
Page 14
The sealing face and mounting bore should be considered
a service item during the lifetime of the sensor installation.
The sealing face in particular requires maintenance and in-
spection of the seal and determination of any leakage, or
imperfections in the installation itself.
Fig. 8: A handheld optical borescope suitable for inspecting
5.6 Mounting the water hose on the cooling pipe
Soak the end of the FPM (Fluorocarbon Rubber) hose in
boiling water for several seconds – this allows expansion via
heating to assist fitting, then fit the FPM hose on the cool-
ing pipe of the sensor. With this procedure it is not neces-
sary to rotate the FPM water hose back and forth whilst
fitting as this creates a risk of loosening the cooling pipe. If
a cooling pipe becomes loose, it must be unscrewed com-
pletely – then follow the mounting procedure as mentioned
in the chapter „maintenance“.
5.7 Protector heat screen for water cooled sensor
When using the sensor in exhaust gas application soot par-
ticles may build up on the protector screen of the sensor. For
the best sensor performance it may be necessary to clean or
replace the protector screen. For the detailed step-by-step de-
scription please refer to the manual “Replacement of Screen”.
Fig. 9: Sensor Type 4049 and heat screen 1189A

Installation of the piezoresistive sensor
Page 15
002-858e-04.22
5.8 Check points before installation
Water leakage – After connecting the FPM hoses to the
cooling pipes of sensor or cooling adapter, operate the
cooling system and check that there is no leakage.
Piezoresistive cable – Carefully check the piezoresistive
cable for damages over its full length and if necessary
replace it completely.
Sensor seal ring – The sensors seal ring must always be
applied to the sensor as shown in Figure 9. If the sealing
ring is damaged, it should be replaced.
Fig. 10: Left: seal ring Type 1145 of a shoulder sealing
sensor Type 4007, right: seal ring Type 1100 of a
front sealing sensor Type 4067
Mounting bore – Check the condition of the mounting
bore, it must be machined to the specified dimensions
and tolerances as described in the datasheet, and also
clean and dry prior to installation.
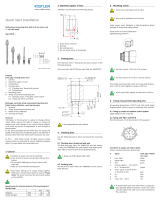
5.9 Installing the sensor into the bore
Feed the piezoresistive cable through the mounting key and
then fit the mounting key on the hex of the sensor. If us-
ing the slotted mounting wrench, pay attention to proper
positioning of the piezoresistive cable in the slot (danger of
squashing the cable, Fig. 11). For the applications with high
temperature (e.g. engine exhaust) the thread of the sensor
should be lubricated with high-temperature resistant grease
(e.g. MOLYKOTE HSC plus or Metaflux 70–81) before in-
stalling the sensor in the bore. This will facilitate dismount-
ing the sensor from the bore post-testing.

Piezoresistive pressure sensors
002-858e-04.22
Page 16
During installation and disassembly, the piezoresistive cable
should be rotated with the mounting wrench to avoid dam-
age of the cable. During use pay attention to protect the
sensor cable. Do not squash, twist or pull the cable.
Screw the sensor hand-tight and then use the torque
wrench for tightening to the required value as specified in
the datasheet of the sensor.
For cooled sensors: when the sensor installation is completed,
connect the hoses to feed and return manifolds of the cooling
system.
Fig. 11: Example sensor Type 4007, slotted mounting
wrench Type 1300B12

Piezoresistive sensor cable routing
Page 17
002-858e-04.22
6. Piezoresistive sensor cable routing
The piezoresistive cable of the sensor must be routed to
avoid other high frequency or power cables as much as
possible (e.g. ignition or fuel injection system cabling, dyna-
mometer or motor power cables). If this cannot be avoided,
the piezoresistive cables should be kept perpendicular to the
high-frequency signal lines to reduce signal interference.
There must be no mechanical tension on the cable. It is
absolutely essential to avoid deformation caused by sharp
bends. During use pay attention to protect the cable: do
not squash, twist or pull it. Ensure the cleanliness of the ca-
ble connector. Do not allow water, oil, dust, or other dirt in
the vicinity of the cable interfaces. If the piezoresistive con-
nector becomes contaminated during use, use an electronic
cleaning spray to clean it.
/